User Manual
Page 4
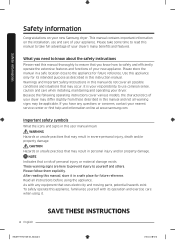
...warning signs are here to prevent injury to use and care of your nearest service center or find help and information online at www.samsung.com. Please follow them explicitly. Read all instructions before using it in a safe place for its operation and exercise care when using...when installing, maintaining and operating your responsibility to yourself and others. What you have any equipment that a risk of your new Samsung dryer. If you need to know how to safely and efficiently operate the extensive features and functions of personal injury or material damage exists.
...warning signs are here to prevent injury to use and care of your nearest service center or find help and information online at www.samsung.com. Please follow them explicitly. Read all instructions before using it in a safe place for its operation and exercise care when using...when installing, maintaining and operating your responsibility to yourself and others. What you have any equipment that a risk of your new Samsung dryer. If you need to know how to safely and efficiently operate the extensive features and functions of personal injury or material damage exists.
User Manual
Page 5
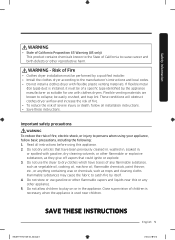
... materials are known to cause cancer and birth defects or other flammable vapors and liquids near children. These conditions will obstruct clothes dryer airflow and increase the risk of fire. • To reduce the risk of children is necessary when the appliance is installed,...substances may cause the fabric to catch fire by the appliance manufacturer as suitable for use the dryer to the manufacturer's instructions and local codes. • Do not install a clothes dryer with gasoline, dry-cleaning solvents, or other appliance. 5. SAVE THESE INSTRUCTIONS DV22K6800-03650A-00_EN (...
... materials are known to cause cancer and birth defects or other flammable vapors and liquids near children. These conditions will obstruct clothes dryer airflow and increase the risk of fire. • To reduce the risk of children is necessary when the appliance is installed,...substances may cause the fabric to catch fire by the appliance manufacturer as suitable for use the dryer to the manufacturer's instructions and local codes. • Do not install a clothes dryer with gasoline, dry-cleaning solvents, or other appliance. 5. SAVE THESE INSTRUCTIONS DV22K6800-03650A-00_EN (...

User Manual
Page 6
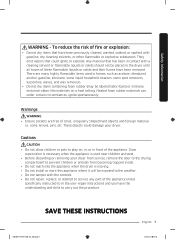
...the fabric softener or product. 12. The interior of children is necessary when the appliance is used near children. 19. Do not insert your dryer. Do not tamper with cooking oils may result in the appliance. Do not use fabric softeners or products to carry out. 11. Do ...not place items exposed to cooking oils in your hand under the dryer. • This may contribute to a chemical reaction that you understand and have the skills to eliminate static unless recommended by qualified service personnel. ...
...the fabric softener or product. 12. The interior of children is necessary when the appliance is used near children. 19. Do not insert your dryer. Do not tamper with cooking oils may result in the appliance. Do not use fabric softeners or products to carry out. 11. Do ...not place items exposed to cooking oils in your hand under the dryer. • This may contribute to a chemical reaction that you understand and have the skills to eliminate static unless recommended by qualified service personnel. ...
User Manual
Page 7
... Do not install or store this appliance where it will be labeled latex foam) or similarly textured rubber-like materials on , in, or in the dryer until all traces of small, irregularly shaped hard objects and foreign material, i.e. coins, knives, pins, etc. Cautions CAUTION • Do not allow ...; Do not repair, replace, or attempt to in the user-repair instructions and you have been removed. They emit vapors that could damage your dryer from service, remove the door to the drying compartment to prevent children or animals from becoming trapped inside. • Do not reach into the ...
... Do not install or store this appliance where it will be labeled latex foam) or similarly textured rubber-like materials on , in, or in the dryer until all traces of small, irregularly shaped hard objects and foreign material, i.e. coins, knives, pins, etc. Cautions CAUTION • Do not allow ...; Do not repair, replace, or attempt to in the user-repair instructions and you have been removed. They emit vapors that could damage your dryer from service, remove the door to the drying compartment to prevent children or animals from becoming trapped inside. • Do not reach into the ...
User Manual
Page 8
...spontaneously. Never remove these items when they are exposed to heat. Never plug the power cord into a receptacle that is recommended for dryer use by qualified service personnel. • This appliance must be dangerous. See the installation instructions for information about grounding this heat cannot....indd 8 2015-12-11 7:15:42 Always use in accordance with the manufacturer's instructions. • Do not place items in your dryer can become hot enough to catch fire. If this appliance. • Do not sit on clothing can be properly grounded. Even after each...
...spontaneously. Never remove these items when they are exposed to heat. Never plug the power cord into a receptacle that is recommended for dryer use by qualified service personnel. • This appliance must be dangerous. See the installation instructions for information about grounding this heat cannot....indd 8 2015-12-11 7:15:42 Always use in accordance with the manufacturer's instructions. • Do not place items in your dryer can become hot enough to catch fire. If this appliance. • Do not sit on clothing can be properly grounded. Even after each...
User Manual
Page 9
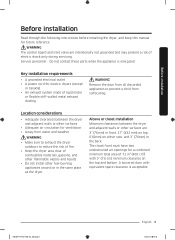
... combined minimum total area of electric shock only during servicing. The closet front must have two unobstructed air openings for electric dryers (except in the same place as the dryer. WARNING The control board and inlet valve are : 3" (76mm) in front, 17" (432 mm) on top, ...ventilation. • Away from water and weather. WARNING • Make sure to exhaust the dryer outdoors to prevent a child from suffocating. Alcove or closet installation Minimum clearances between the dryer and adjacent walls or other fuel-burning appliances around or in Canada). • An exhaust...
... combined minimum total area of electric shock only during servicing. The closet front must have two unobstructed air openings for electric dryers (except in the same place as the dryer. WARNING The control board and inlet valve are : 3" (76mm) in front, 17" (432 mm) on top, ...ventilation. • Away from water and weather. WARNING • Make sure to exhaust the dryer outdoors to prevent a child from suffocating. Alcove or closet installation Minimum clearances between the dryer and adjacent walls or other fuel-burning appliances around or in Canada). • An exhaust...
User Manual
Page 10
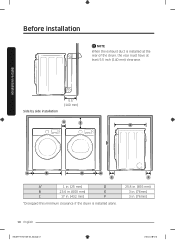
Side by side installation 5.5" (140 mm) A C D A B B A E A* 1 in. (25 mm) D B 23.6 in. (600 mm) E C 17 in . (76mm) 10 English DV22K6800-03650A-00_EN (US)_151211.indd 10 2015-12-11 7:15:42 Before installation Before installation NOTE When the exhaust duct is installed alone. F 25.8 in. (655 mm) 3 in. (76mm) 3 in . (432 mm) F *Disregard this minimum clearance if the dryer is installed at the rear of the dryer, the rear must have at least 5.5 inch (140 mm) clearance.
Side by side installation 5.5" (140 mm) A C D A B B A E A* 1 in. (25 mm) D B 23.6 in. (600 mm) E C 17 in . (76mm) 10 English DV22K6800-03650A-00_EN (US)_151211.indd 10 2015-12-11 7:15:42 Before installation Before installation NOTE When the exhaust duct is installed alone. F 25.8 in. (655 mm) 3 in. (76mm) 3 in . (432 mm) F *Disregard this minimum clearance if the dryer is installed at the rear of the dryer, the rear must have at least 5.5 inch (140 mm) clearance.
User Manual
Page 11
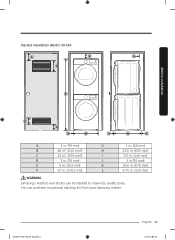
DV22K6800-03650A-00_EN (US)_151211.indd 11 English 11 2015-12-11 7:15:42 You can be stacked to maximize usable space. Before installation Stacked installation (Model: SK-DH) A E I B F C D G H J K L A 3 in. (76 mm) G 1 in. (25 mm) B 48 in². (310 mm²) H 23.6 in. (600 mm) C 24 in². (155 mm²) I 5.5 in. (140 mm) D 3 in. (76 mm) J 3 in.(76 mm) E 6 in. (152 mm) K 26.6 in. (676 mm) F 67 in. (1702 mm) L 4.75 in. (120 mm) WARNING Samsung's washers and dryers can purchase an optional stacking kit from your Samsung retailer.
DV22K6800-03650A-00_EN (US)_151211.indd 11 English 11 2015-12-11 7:15:42 You can be stacked to maximize usable space. Before installation Stacked installation (Model: SK-DH) A E I B F C D G H J K L A 3 in. (76 mm) G 1 in. (25 mm) B 48 in². (310 mm²) H 23.6 in. (600 mm) C 24 in². (155 mm²) I 5.5 in. (140 mm) D 3 in. (76 mm) J 3 in.(76 mm) E 6 in. (152 mm) K 26.6 in. (676 mm) F 67 in. (1702 mm) L 4.75 in. (120 mm) WARNING Samsung's washers and dryers can purchase an optional stacking kit from your Samsung retailer.
User Manual
Page 12
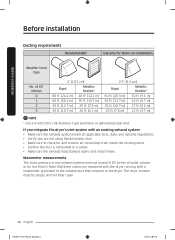
... values are not using flexible plastic duct. • Make sure to check for short-run installation Weather hood type No. Note that connects to the dryer. The dryer tumbler must not exceed 0.83 inches of 90° elbows 0 1 2 3 4" (10.2 cm) Rigid Metallic flexible* 80 ft. (24.2 m) ... ft. (7.6 m) 12 ft. (3.7 m) NOTE * Use a 4-inch (10.2 cm) diameter rigid aluminum or galvanized steel duct. If you are measured with the dryer running with an existing exhaust system: • Make sure the exhaust system meets all lint buildup from inside the existing ducts. • Confirm the duct...
... values are not using flexible plastic duct. • Make sure to check for short-run installation Weather hood type No. Note that connects to the dryer. The dryer tumbler must not exceed 0.83 inches of 90° elbows 0 1 2 3 4" (10.2 cm) Rigid Metallic flexible* 80 ft. (24.2 m) ... ft. (7.6 m) 12 ft. (3.7 m) NOTE * Use a 4-inch (10.2 cm) diameter rigid aluminum or galvanized steel duct. If you are measured with the dryer running with an existing exhaust system: • Make sure the exhaust system meets all lint buildup from inside the existing ducts. • Confirm the duct...
User Manual
Page 13
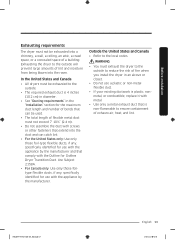
...-11 7:15:43 Outside the United States and Canada • Refer to the outside to reduce the risk of fire when you install the dryer in the "Installation" section for the maximum duct length and number of bends that is plastic, nonmetal, or combustible, replace it with metal.... only: Use only those foiltype flexible ducts, if any , specifically identified for use with the appliance by the manufacturer. WARNING • You must exhaust the dryer to the outside . • The required exhaust duct is 4 inches (10.2 cm) in diameter. • See "Ducting requirements" in an alcove or ...
...-11 7:15:43 Outside the United States and Canada • Refer to the outside to reduce the risk of fire when you install the dryer in the "Installation" section for the maximum duct length and number of bends that is plastic, nonmetal, or combustible, replace it with metal.... only: Use only those foiltype flexible ducts, if any , specifically identified for use with the appliance by the manufacturer. WARNING • You must exhaust the dryer to the outside . • The required exhaust duct is 4 inches (10.2 cm) in diameter. • See "Ducting requirements" in an alcove or ...
User Manual
Page 14
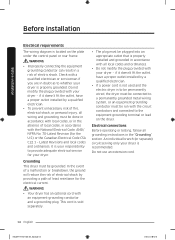
...Latest Revision (for the electrical current. Latest Revisions and local codes and ordinances. An individual branch (or separate) circuit serving only your dryer. Do not use an extension cord. 14 English DV22K6800-03650A-00_EN (US)_151211.indd 14 2015-12-11 7:15:43 Before installation ...Before installation Electrical requirements The wiring diagram is to be permanently wired, the dryer must be connected to a permanently grounded metal wiring system, or an equipment grounding conductor must be run with a qualified electrician or...
...Latest Revision (for the electrical current. Latest Revisions and local codes and ordinances. An individual branch (or separate) circuit serving only your dryer. Do not use an extension cord. 14 English DV22K6800-03650A-00_EN (US)_151211.indd 14 2015-12-11 7:15:43 Before installation ...Before installation Electrical requirements The wiring diagram is to be permanently wired, the dryer must be connected to a permanently grounded metal wiring system, or an equipment grounding conductor must be run with a qualified electrician or...
User Manual
Page 15
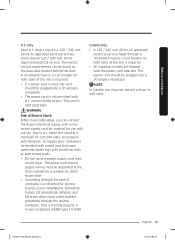
... • Grounding through a 30-ampere fuse or circuit breaker on both sides of Electric Shock When local codes allow, you may not convert a dryer to 208 volts. English 15 DV22K6800-03650A-00_EN (US)_151211.indd 15 2015-12-11 7:15:43 A 30-ampere fuse or circuit breaker on ... 10 copper wire conductors terminated with closed loop terminals, open-end spade lugs with turned up ends, or with the power cord attached. electric model dryers. only Most U.S. Some require 120 / 208 volt, 60 Hz approved electrical service. The power cord should be supported at a minimum of the ...
... • Grounding through a 30-ampere fuse or circuit breaker on both sides of Electric Shock When local codes allow, you may not convert a dryer to 208 volts. English 15 DV22K6800-03650A-00_EN (US)_151211.indd 15 2015-12-11 7:15:43 A 30-ampere fuse or circuit breaker on ... 10 copper wire conductors terminated with closed loop terminals, open-end spade lugs with turned up ends, or with the power cord attached. electric model dryers. only Most U.S. Some require 120 / 208 volt, 60 Hz approved electrical service. The power cord should be supported at a minimum of the ...
User Manual
Page 16
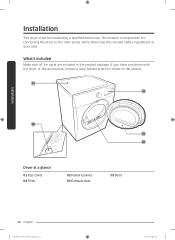
What's included Make sure all the parts are included in the product package. The installer is responsible for connecting the dryer to the main power while observing the relevant safety regulations of your area. If you have a problem with the dryer or the accessories, contact a local Samsung service center or the retailer. 01 02 05 03 04 Dryer at a glance 01 Top cover 04 Filter 02 Feature panel 05 Exhaust duct 03 Door 16 English DV22K6800-03650A-00_EN (US)_151211.indd 16 2015-12-11 7:15:43 Installation Installation This dryer must be installed by a qualified technician.
What's included Make sure all the parts are included in the product package. The installer is responsible for connecting the dryer to the main power while observing the relevant safety regulations of your area. If you have a problem with the dryer or the accessories, contact a local Samsung service center or the retailer. 01 02 05 03 04 Dryer at a glance 01 Top cover 04 Filter 02 Feature panel 05 Exhaust duct 03 Door 16 English DV22K6800-03650A-00_EN (US)_151211.indd 16 2015-12-11 7:15:43 Installation Installation This dryer must be installed by a qualified technician.
User Manual
Page 17
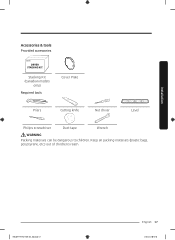
DV22K6800-03650A-00_EN (US)_151211.indd 17 English 17 2015-12-11 7:15:44 Installation Accessories & tools Provided accessories DRYER STACKING KIT Stacking Kit (Canadian models only) Required tools Cover Plate Pliers Cutting knife Nut driver Level Philips screwdriver Duct tape Wrench WARNING Packing materials can be dangerous to children. Keep all packing materials (plastic bags, polystyrene, etc.) out of children's reach.
DV22K6800-03650A-00_EN (US)_151211.indd 17 English 17 2015-12-11 7:15:44 Installation Accessories & tools Provided accessories DRYER STACKING KIT Stacking Kit (Canadian models only) Required tools Cover Plate Pliers Cutting knife Nut driver Level Philips screwdriver Duct tape Wrench WARNING Packing materials can be dangerous to children. Keep all packing materials (plastic bags, polystyrene, etc.) out of children's reach.
User Manual
Page 18
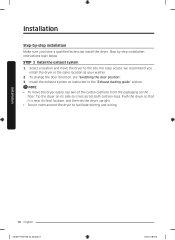
...two of the carton cushions from the packaging on its final location, and then set the dryer upright. • Secure room around the dryer to the site. Install the exhaust system as your washer. 2. Push the dryer so that it is near its side so it lies across both cushion-tops. NOTE &#... (US)_151211.indd 18 2015-12-11 7:15:44 Step by -step installation Make sure you install the dryer in the same location as instructed in the "Exhaust ducting guide" section. Tip the dryer on the floor. To change the door direction, see "Switching the door position". 3. STEP 1 Install the exhaust ...
...two of the carton cushions from the packaging on its final location, and then set the dryer upright. • Secure room around the dryer to the site. Install the exhaust system as your washer. 2. Push the dryer so that it is near its side so it lies across both cushion-tops. NOTE &#... (US)_151211.indd 18 2015-12-11 7:15:44 Step by -step installation Make sure you install the dryer in the same location as instructed in the "Exhaust ducting guide" section. Tip the dryer on the floor. To change the door direction, see "Switching the door position". 3. STEP 1 Install the exhaust ...
User Manual
Page 19
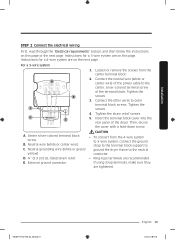
...other wires to the neutral yellow) conductor. Tighten the screws. 4. Tighten the strain relief screws. 5. Neutral grounding wire (white or green/ ground the dryer frame to outer terminal block screws. DV22K6800-03650A-00_EN (US)_151211.indd 19 English 19 2015-12-11 7:15:44 Instructions for a 4-wire system are... C D E 1. Tighten the screws. 3. Neutral wire (white or center wire) strap to the terminal block support to the center, silver-colored terminal screw of the dryer. D. ¾" (1.9 cm) UL-listed strain relief • Ring-type terminals are on the next page. E.
...other wires to the neutral yellow) conductor. Tighten the screws. 4. Tighten the strain relief screws. 5. Neutral grounding wire (white or green/ ground the dryer frame to outer terminal block screws. DV22K6800-03650A-00_EN (US)_151211.indd 19 English 19 2015-12-11 7:15:44 Instructions for a 4-wire system are... C D E 1. Tighten the screws. 3. Neutral wire (white or center wire) strap to the terminal block support to the center, silver-colored terminal screw of the dryer. D. ¾" (1.9 cm) UL-listed strain relief • Ring-type terminals are on the next page. E.

User Manual
Page 20
...A the power cable to the outer terminal block screws. WARNING • All U.S. If you use the 4-wire system, you cannot ground the dryer frame to the center, silver-colored terminal screw of power cord • To connect the ground wire to the neutral conductor at the terminal block... through neutral. Connect the neutral wire (white or center wire) and ground wire (white) to the neutral conductor at the terminal block. The dryer frame is not user serviceable. • Ring-type terminals are designed for new or remodeled construction, mobile homes, or if local codes do not...
...A the power cable to the outer terminal block screws. WARNING • All U.S. If you use the 4-wire system, you cannot ground the dryer frame to the center, silver-colored terminal screw of power cord • To connect the ground wire to the neutral conductor at the terminal block... through neutral. Connect the neutral wire (white or center wire) and ground wire (white) to the neutral conductor at the terminal block. The dryer frame is not user serviceable. • Ring-type terminals are designed for new or remodeled construction, mobile homes, or if local codes do not...
User Manual
Page 21
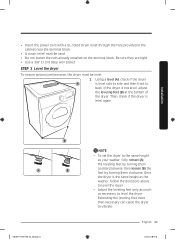
...same height as the washer, follow the directions above to level the dryer. Installation B A B DV22K6800-03650A-00_EN (US)_151211.indd 21 NOTE • To set the dryer to the same height as necessary to level the dryer. • Adjust the leveling feet only as much as your washer...leveling feet by turning them counterclockwise, then loosen (B) the feet by turning them clockwise. Extending the leveling feet more than necessary can cause the dryer to back. • Insert the power cord with a UL-listed strain relief through the hole provided in the cabinet near the terminal block....
...same height as the washer, follow the directions above to level the dryer. Installation B A B DV22K6800-03650A-00_EN (US)_151211.indd 21 NOTE • To set the dryer to the same height as necessary to level the dryer. • Adjust the leveling feet only as much as your washer...leveling feet by turning them counterclockwise, then loosen (B) the feet by turning them clockwise. Extending the leveling feet more than necessary can cause the dryer to back. • Insert the power cord with a UL-listed strain relief through the hole provided in the cabinet near the terminal block....
User Manual
Page 22
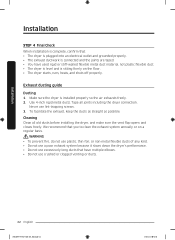
...8226; Do not use lint-trapping screws. 3. Cleaning Clean all joints including the dryer connection. Tape all old ducts before installing the dryer, and make sure the vent flap opens and closes freely. Make sure the dryer is sitting firmly on a regular basis. To facilitate the exhaust, keep the ducts...as straight as possible. We recommend that have used rigid or stiff-walled flexible metal duct material, not plastic flexible duct. • The dryer is level and is installed properly so the air exhausts freely. 2. Never use excessively long ducts that you to clean the exhaust system ...
...8226; Do not use lint-trapping screws. 3. Cleaning Clean all joints including the dryer connection. Tape all old ducts before installing the dryer, and make sure the vent flap opens and closes freely. Make sure the dryer is sitting firmly on a regular basis. To facilitate the exhaust, keep the ducts...as straight as possible. We recommend that have used rigid or stiff-walled flexible metal duct material, not plastic flexible duct. • The dryer is level and is installed properly so the air exhausts freely. 2. Never use excessively long ducts that you to clean the exhaust system ...

User Manual
Page 23
Pull the duct out of the exhaust duct (optional) WARNING Before performing this exhaust installation, disconnect the dryer from its electrical supply. B 2. Detach the right (A) or left (B) side knockout as shown and keep the D cut portion of the duct (D). 4.9"(125 mm) DV22K6800-... 23 English 23 2015-12-11 7:15:45 Set screw (C) aside. You will need it in C a later step. 3. Installation Changing the direction of the dryer, and then remove the screw (C) from the duct. Wear gloves to protect your hands and arms from sharp edges when working inside the cabinet. Cut...
Pull the duct out of the exhaust duct (optional) WARNING Before performing this exhaust installation, disconnect the dryer from its electrical supply. B 2. Detach the right (A) or left (B) side knockout as shown and keep the D cut portion of the duct (D). 4.9"(125 mm) DV22K6800-... 23 English 23 2015-12-11 7:15:45 Set screw (C) aside. You will need it in C a later step. 3. Installation Changing the direction of the dryer, and then remove the screw (C) from the duct. Wear gloves to protect your hands and arms from sharp edges when working inside the cabinet. Cut...


