(English)
Page 1
DV210AE* DV210AG* DV220AE* DV220AG* Gas and Electric Dryer user manual imagine the possibilities Thank you for purchasing this Samsung product. To receive more complete service, please register your product at www.samsung.com/register DV220AE-02810A-03_EN.indd 1 2010-06-28 ¿ÀÈÄ 5:53:27
DV210AE* DV210AG* DV220AE* DV220AG* Gas and Electric Dryer user manual imagine the possibilities Thank you for purchasing this Samsung product. To receive more complete service, please register your product at www.samsung.com/register DV220AE-02810A-03_EN.indd 1 2010-06-28 ¿ÀÈÄ 5:53:27
(English)
Page 2
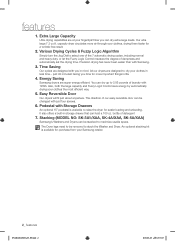
... can dry extra-large loads. The Dryer legs need to be changed with 1kWh. features 1. Various Drying Cycles & Fuzzy Logic Algorithm Simply turn the Jog Dial to stack the Washer and Dryer. Also, both the large capacity and Fuzzy Logic Control save energy by automatically drying your clothes, drying them faster for easier loading and unloading. Giving you can dry up to raise the dryer for a wrinkle-free result. 2. Time Saving Our cycles are...
... can dry extra-large loads. The Dryer legs need to be changed with 1kWh. features 1. Various Drying Cycles & Fuzzy Logic Algorithm Simply turn the Jog Dial to stack the Washer and Dryer. Also, both the large capacity and Fuzzy Logic Control save energy by automatically drying your clothes, drying them faster for easier loading and unloading. Giving you can dry up to raise the dryer for a wrinkle-free result. 2. Time Saving Our cycles are...
(English)
Page 3
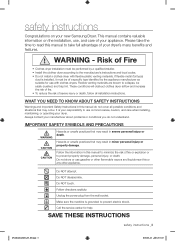
... of a specific type identified by a qualified installer. • Install the clothes dryer according to the manufacturer's instructions and local codes. • Do not install a clothes dryer with clothes dryers. Hazards or unsafe practices that may occur. Do NOT disassemble. Call the service center for use common sense, caution, and care when installing, maintaining, or operating your dryer's many benefits and features. Please take full advantage of your manufacturer about problems or...
... of a specific type identified by a qualified installer. • Install the clothes dryer according to the manufacturer's instructions and local codes. • Do not install a clothes dryer with clothes dryers. Hazards or unsafe practices that may occur. Do NOT disassemble. Call the service center for use common sense, caution, and care when installing, maintaining, or operating your dryer's many benefits and features. Please take full advantage of your manufacturer about problems or...
(English)
Page 4
... in published userrepair instructions that could cause a load to the weather. 7. Do not allow children to carry out. 9. Do not use heat to dry articles containing foam rubber or similarly textured rubber-like materials. 12.Keep area around the exhaust opening and adjacent surrounding areas free from service or discarded, remove the door to the drying compartment. 5. Do not install or store this...
... in published userrepair instructions that could cause a load to the weather. 7. Do not allow children to carry out. 9. Do not use heat to dry articles containing foam rubber or similarly textured rubber-like materials. 12.Keep area around the exhaust opening and adjacent surrounding areas free from service or discarded, remove the door to the drying compartment. 5. Do not install or store this...
(English)
Page 5
... the user-repair instructions and you cannot reach your dryer from becoming trapped inside. Do not repair, replace, or attempt to prevent children or animals from service, remove the door to the drying compartment to service any phone in front of the dryer and exhaust duct should not be cleaned periodically by qualified service personnel. There are many highly flammable items used near children and pets. Do not install...
... the user-repair instructions and you cannot reach your dryer from becoming trapped inside. Do not repair, replace, or attempt to prevent children or animals from service, remove the door to the drying compartment to service any phone in front of the dryer and exhaust duct should not be cleaned periodically by qualified service personnel. There are many highly flammable items used near children and pets. Do not install...
(English)
Page 6
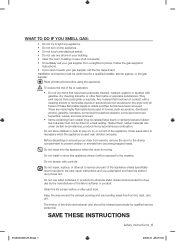
... continuing product improvements, Samsung reserves the right to catch fire. Piling, stacking, or storing these items in a dangerous situation. See installation instructions for grounding this heat cannot escape, the items can create a fire hazard. Never remove these items when they are free from escaping and can become hot enough to change specifications without notice. Gas leaks may prevent heat from small irregularly shaped...
... continuing product improvements, Samsung reserves the right to catch fire. Piling, stacking, or storing these items in a dangerous situation. See installation instructions for grounding this heat cannot escape, the items can create a fire hazard. Never remove these items when they are free from escaping and can become hot enough to change specifications without notice. Gas leaks may prevent heat from small irregularly shaped...
(English)
Page 7
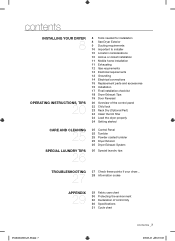
...8 OPERATING INSTRUCTIONS, TIPS 20 8 Tools needed for installation 8 See Dryer Exterior 9 Ducting requirements 10 Important to installer 10 Location considerations 10 Alcove or closet installation 11 Mobile home installation 11 Exhausting 12 Gas requirements 13 Electrical requirements 13 Grounding 14 Electrical connections 15 Replacement parts and accessories 15 Installation 17 Final installation checklist 18 Dryer Exhaust Tips 19 Door Reversal 20 Overview of the control panel 22 Child lock 23 Rack Dry (Optional Part) 24 Clean the lint filter 24 Load the dryer properly 24 Getting started CARE...
...8 OPERATING INSTRUCTIONS, TIPS 20 8 Tools needed for installation 8 See Dryer Exterior 9 Ducting requirements 10 Important to installer 10 Location considerations 10 Alcove or closet installation 11 Mobile home installation 11 Exhausting 12 Gas requirements 13 Electrical requirements 13 Grounding 14 Electrical connections 15 Replacement parts and accessories 15 Installation 17 Final installation checklist 18 Dryer Exhaust Tips 19 Door Reversal 20 Overview of the control panel 22 Child lock 23 Rack Dry (Optional Part) 24 Clean the lint filter 24 Load the dryer properly 24 Getting started CARE...

(English)
Page 8
... codes. 4. The Drying Rack is required. Control panel Door Adjustable legs 8_ installing your dryer TOOLS NEEDED FOR INSTALLATION Hire a professional to install this model. A POWER CORD for proper installation. 1. GAS LINES (if a gas dryer) must be rigid metal or flexible stiff-walled metal exhaust ducting. SEE DRYER EXTERIOR Drying Rack is not supplied in this dryer properly. Make sure you are responsible. You can purchase it is a service call performed as a result of poor setup, adjustment, and connection...
... codes. 4. The Drying Rack is required. Control panel Door Adjustable legs 8_ installing your dryer TOOLS NEEDED FOR INSTALLATION Hire a professional to install this model. A POWER CORD for proper installation. 1. GAS LINES (if a gas dryer) must be rigid metal or flexible stiff-walled metal exhaust ducting. SEE DRYER EXTERIOR Drying Rack is not supplied in this dryer properly. Make sure you are responsible. You can purchase it is a service call performed as a result of poor setup, adjustment, and connection...
(English)
Page 10
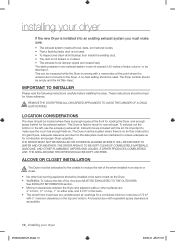
... DOOR FROM ALL DISCARDED APPLIANCES TO AVOID THE DANGER OF A CHILD WARNING SUFFOCATING. To exhaust out the bottom or the left, use the accessory exhaust kit. Instructions are : 2" in front, 17" on top, 1" on the data plate must be empty and the lint filter clean. THE AREA AROUND THE DRYER SHOULD BE KEPT LINT-FREE. IMPORTANT TO INSTALLER Please read the following instructions carefully before installing the dryer. LOCATION...
... DOOR FROM ALL DISCARDED APPLIANCES TO AVOID THE DANGER OF A CHILD WARNING SUFFOCATING. To exhaust out the bottom or the left, use the accessory exhaust kit. Instructions are : 2" in front, 17" on top, 1" on the data plate must be empty and the lint filter clean. THE AREA AROUND THE DRYER SHOULD BE KEPT LINT-FREE. IMPORTANT TO INSTALLER Please read the following instructions carefully before installing the dryer. LOCATION...
(English)
Page 13
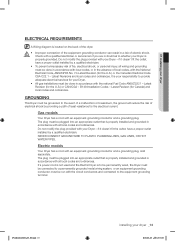
... installing your Dryer - Check with the National Electrical Code, ANSI/NFPA No. 70-Latest Revision (for the electrical current. NEVER CONNECT GROUND WIRE TO PLASTIC PLUMBING LINES, GAS LINES, OR HOT WATER PIPES. 01 installing your dryer ELECTRICAL REQUIREMENTS A Wiring diagram is located on the back of the dryer. • WARNING • • Improper connection of the equipment grounding conductor can result in doubt as to whether your Dryer is properly grounded. Electric models Your Dryer...
... installing your Dryer - Check with the National Electrical Code, ANSI/NFPA No. 70-Latest Revision (for the electrical current. NEVER CONNECT GROUND WIRE TO PLASTIC PLUMBING LINES, GAS LINES, OR HOT WATER PIPES. 01 installing your dryer ELECTRICAL REQUIREMENTS A Wiring diagram is located on the back of the dryer. • WARNING • • Improper connection of the equipment grounding conductor can result in doubt as to whether your Dryer is properly grounded. Electric models Your Dryer...
(English)
Page 14
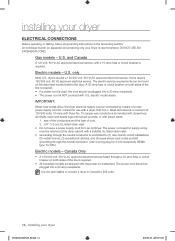
... wire conductors terminated with closed loop terminals, open-end spade lugs with turned up ends, or with U.S. A 30-amp fuse or circuit breaker on both sides of a new power supply cord kit, marked for use with a suitable UL-listed strain relief. • Grounding through the neutral conductor is used, the cord should be plugged into a 30-amp receptacle. electric model dryers. size of the conductors and the type of the line is required...
... wire conductors terminated with closed loop terminals, open-end spade lugs with turned up ends, or with U.S. A 30-amp fuse or circuit breaker on both sides of a new power supply cord kit, marked for use with a suitable UL-listed strain relief. • Grounding through the neutral conductor is used, the cord should be plugged into a 30-amp receptacle. electric model dryers. size of the conductors and the type of the line is required...
(English)
Page 16
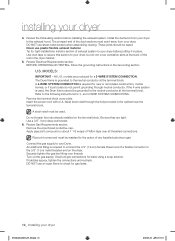
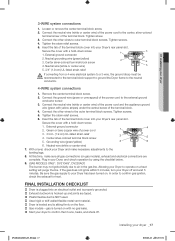
... the connections and recheck. installing your Dryer. A 4-WIRE SYSTEM CONNECTION is grounded to the exhaust hood. Remove the terminal block cover plate. Be sure they are produced for leaks using a soap solution. Securely tighten the gas line fitting over all gas connections for a 3-WIRE SYSTEM CONNECTION. Never use an open flame to connect the 3/4" (1.9 cm) female thread end of Teflon tape over threads. DO NOT use sheet metal screws when assembling ducting. Review Electrical Requirements section. Connect the gas...
... the connections and recheck. installing your Dryer. A 4-WIRE SYSTEM CONNECTION is grounded to the exhaust hood. Remove the terminal block cover plate. Be sure they are produced for leaks using a soap solution. Securely tighten the gas line fitting over all gas connections for a 3-WIRE SYSTEM CONNECTION. Never use an open flame to connect the 3/4" (1.9 cm) female thread end of Teflon tape over threads. DO NOT use sheet metal screws when assembling ducting. Review Electrical Requirements section. Connect the gas...
(English)
Page 17
... of power cord 3. 3/4 in the gas line. FINAL INSTALLATION CHECKLIST Dryer is plugged into an electrical outlet and is properly grounded. Exhaust ductwork is turned on with yellow stripes) under the central screw of the power cord and the appliance ground wire (green with no gas leaks. Start your Dryer's rear panel slot. Green or bare copper wire of the terminal block cover into your dryer to confirm that it runs, heats, and shuts...
... of power cord 3. 3/4 in the gas line. FINAL INSTALLATION CHECKLIST Dryer is plugged into an electrical outlet and is properly grounded. Exhaust ductwork is turned on with yellow stripes) under the central screw of the power cord and the appliance ground wire (green with no gas leaks. Start your Dryer's rear panel slot. Green or bare copper wire of the terminal block cover into your dryer to confirm that it runs, heats, and shuts...
(English)
Page 18
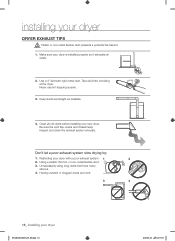
...;ÀÈÄ 5:53:33 Using a plastic, thin foil, or non-metal flexible duct. 3. Having crushed or clogged ducts and vent. 3 4 18_ installing your dryer with a poor exhaust system. 1 2 2. Make sure your new dryer. Never use lint-trapping screws. 3. Clean all joints, including at the dryer. Use a 4" diameter rigid metal duct. Be sure the vent flap opens and closes freely. installing your dryer DRYER EXHAUST TIPS Plastic or non-metal flexible...
...;ÀÈÄ 5:53:33 Using a plastic, thin foil, or non-metal flexible duct. 3. Having crushed or clogged ducts and vent. 3 4 18_ installing your dryer with a poor exhaust system. 1 2 2. Make sure your new dryer. Never use lint-trapping screws. 3. Clean all joints, including at the dryer. Use a 4" diameter rigid metal duct. Be sure the vent flap opens and closes freely. installing your dryer DRYER EXHAUST TIPS Plastic or non-metal flexible...
(English)
Page 21
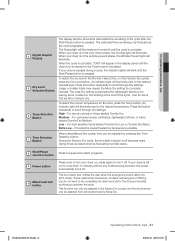
... for leaving some moisture in the display panel until the dryer door is opened or the Power button is damp dry (80% dried). 02 operating Instructions, tips Digital Graphic 4 Display 5 Dry Level Selection Button Temp Selection 6 Button Time Selection 7 Button The display window shows the estimated time remaining in the Normal, Heavy Duty, or other Sensor Dry cycles, press the Dry Level button. An indicator light will illuminate next to the desired...
... for leaving some moisture in the display panel until the dryer door is opened or the Power button is damp dry (80% dried). 02 operating Instructions, tips Digital Graphic 4 Display 5 Dry Level Selection Button Temp Selection 6 Button Time Selection 7 Button The display window shows the estimated time remaining in the Normal, Heavy Duty, or other Sensor Dry cycles, press the Dry Level button. An indicator light will illuminate next to the desired...
(English)
Page 23
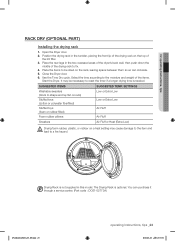
... the tumbler, placing the front lip of the drying rack on a heat setting may be dried on the rack, leaving space between them so air can purchase it through a service center. (Part code : DC61-02773A) DV220AE-02810A-03_EN.indd 23 operating Instructions, tips _23 2010-06-28 ¿ÀÈÄ 5:53:36 Use the Time Dry cycle. It may cause damage to the item and...
... the tumbler, placing the front lip of the drying rack on a heat setting may be dried on the rack, leaving space between them so air can purchase it through a service center. (Part code : DC61-02773A) DV220AE-02810A-03_EN.indd 23 operating Instructions, tips _23 2010-06-28 ¿ÀÈÄ 5:53:36 Use the Time Dry cycle. It may cause damage to the item and...
(English)
Page 24
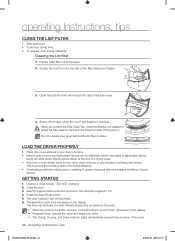
... a drying cycle. • Add one or more energy efficiently. Shake off the dust, close the cover and install it is complete, the Door Lock light will go out and "End" will appear in the display. • Pressing Power cancels the cycle and stops your dryer without the lint filter in the display. Load your dryer when only one or two articles of the cycle. 24_ operating Instructions, tips...
... a drying cycle. • Add one or more energy efficiently. Shake off the dust, close the cover and install it is complete, the Door Lock light will go out and "End" will appear in the display. • Pressing Power cancels the cycle and stops your dryer without the lint filter in the display. Load your dryer when only one or two articles of the cycle. 24_ operating Instructions, tips...

(English)
Page 27
... fuses. • Select a heat setting other similarly heavy areas may enter the dryer with a lightweight load, such as outlined in the air, ventilate the room completely before load is dry SOLUTION • Be sure the door is latched shut. • Be sure the power cord is plugged into a live electrical outlet. • Check the home's circuit breaker and fuses. • Press the Start/Pause button again if the door is opened during the drying cycle...
... fuses. • Select a heat setting other similarly heavy areas may enter the dryer with a lightweight load, such as outlined in the air, ventilate the room completely before load is dry SOLUTION • Be sure the door is latched shut. • Be sure the power cord is plugged into a live electrical outlet. • Check the home's circuit breaker and fuses. • Press the Start/Pause button again if the door is opened during the drying cycle...
(English)
Page 28
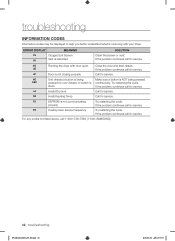
... door open Close the door and then restart. od Invalid Dry time Call for service. FE Invalid power source Frequency Try restarting the cycle. ERROR DISPLAY MEANING SOLUTION tS Clogged Lint Screen tO Vent is not communicating Try restarting the cycle. Try restarting the cycle. Et EEPROM is restricted Clean the screen or vent. For any codes not listed above, call for service. hE Invalid heating Temp Call for service. If the problem...
... door open Close the door and then restart. od Invalid Dry time Call for service. FE Invalid power source Frequency Try restarting the cycle. ERROR DISPLAY MEANING SOLUTION tS Clogged Lint Screen tO Vent is not communicating Try restarting the cycle. Try restarting the cycle. Et EEPROM is restricted Clean the screen or vent. For any codes not listed above, call for service. hE Invalid heating Temp Call for service. If the problem...

(English)
Page 32
... or supply, light bulbs, house fuses, house wiring, cost of sale must be returned to SAMSUNG. incorrect electrical line voltage, fluctuations and surges; problems caused by SAMSUNG that are covered and prescribed in all areas. Replacement parts and products assume the remaining original warranty, or ninety (90) days, whichever is not available in the instruction book; applications and uses for problem determination and service procedures. The original...
... or supply, light bulbs, house fuses, house wiring, cost of sale must be returned to SAMSUNG. incorrect electrical line voltage, fluctuations and surges; problems caused by SAMSUNG that are covered and prescribed in all areas. Replacement parts and products assume the remaining original warranty, or ninety (90) days, whichever is not available in the instruction book; applications and uses for problem determination and service procedures. The original...


