(English)
Page 1
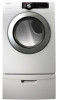
DV210AE* DV210AG* DV220AE* DV220AG* Gas and Electric Dryer user manual imagine the possibilities Thank you for purchasing this Samsung product. To receive more complete service, please register your product at www.samsung.com/register DV220AE-02810A-03_EN.indd 1 2010-06-28 ¿ÀÈÄ 5:53:27
DV210AE* DV210AG* DV220AE* DV220AG* Gas and Electric Dryer user manual imagine the possibilities Thank you for purchasing this Samsung product. To receive more complete service, please register your product at www.samsung.com/register DV220AE-02810A-03_EN.indd 1 2010-06-28 ¿ÀÈÄ 5:53:27
(English)
Page 2
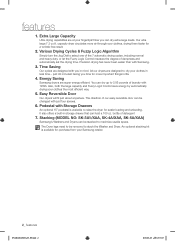
...for easier loading and unloading. Our ultra large 7.3 cu.ft. The direction of laundry with Samsung. 3. Stacking (MODEL NO: SK-3A1/XAA, SK-4A/XAA, SK-5A/XAA) Samsung's Washers and Dryers can be changed with you can be stacked to select one of the 7 automatic drying ...the drying time. Easy Reversible Door Our dryers will fit just about anywhere. The Dryer legs need to be removed to raise the dryer for a wrinkle-free result. 2. An optional stacking kit is available to stack the Washer and Dryer. Energy Saving Samsung dryers are at your clothes the most efficient...
...for easier loading and unloading. Our ultra large 7.3 cu.ft. The direction of laundry with Samsung. 3. Stacking (MODEL NO: SK-3A1/XAA, SK-4A/XAA, SK-5A/XAA) Samsung's Washers and Dryers can be changed with you can be stacked to select one of the 7 automatic drying ...the drying time. Easy Reversible Door Our dryers will fit just about anywhere. The Dryer legs need to be removed to raise the dryer for a wrinkle-free result. 2. An optional stacking kit is available to stack the Washer and Dryer. Energy Saving Samsung dryers are at your clothes the most efficient...
(English)
Page 3
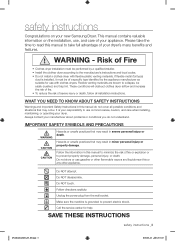
... , and care of fire or explosion or to the manufacturer's instructions and local codes. • Do not install a clothes dryer with clothes dryers. Flexible venting materials are known to take the time to read this manual to collapse, be performed by the appliance manufacturer as..., or operating your appliance. These conditions will obstruct clothes dryer airflow and increase the risk of fire. • To reduce the risk of your dryer's many benefits and features. Do NOT touch. Always contact your new Samsung Dryer. Please take full advantage of severe injury or death, ...
... , and care of fire or explosion or to the manufacturer's instructions and local codes. • Do not install a clothes dryer with clothes dryers. Flexible venting materials are known to take the time to read this manual to collapse, be performed by the appliance manufacturer as..., or operating your appliance. These conditions will obstruct clothes dryer airflow and increase the risk of fire. • To reduce the risk of your dryer's many benefits and features. Do NOT touch. Always contact your new Samsung Dryer. Please take full advantage of severe injury or death, ...
(English)
Page 4
... fabric softeners or products to eliminate static unless recommended by the manufacturer of the fabric softener or product. 10.Clean lint screen before using your dryer. Do not tamper with controls. 8. Read all instructions before or after each load. 11.Do not use heat to dry articles containing foam rubber or...
... fabric softeners or products to eliminate static unless recommended by the manufacturer of the fabric softener or product. 10.Clean lint screen before using your dryer. Do not tamper with controls. 8. Read all instructions before or after each load. 11.Do not use heat to dry articles containing foam rubber or...
(English)
Page 5
...: • Do not try to light any appliance. • Do not turn on , in, or in front of the appliance. Before discarding or removing your dryer from service, remove the door to the drying compartment to prevent children or animals from lint, dust, and dirt. Do not reach into the appliance... when the drum is used in the dryer until all traces of all instructions before or after each load. Do not allow children or pets to carry those out. Read all occupants. •...
...: • Do not try to light any appliance. • Do not turn on , in, or in front of the appliance. Before discarding or removing your dryer from service, remove the door to the drying compartment to prevent children or animals from lint, dust, and dirt. Do not reach into the appliance... when the drum is used in the dryer until all traces of all instructions before or after each load. Do not allow children or pets to carry those out. Read all occupants. •...
(English)
Page 6
...safety instructions This appliance must be dangerous. WARNING coins, knives, pins, etc. These objects could damage your system, resulting in your dryer. Install and use the Cool Down cycle for grounding this heat cannot escape, the items can create a fire hazard. Even after ... accordance with large buckles, buttons, or other heavy metal or solid things. Residual oil on top of continuing product improvements, Samsung reserves the right to change specifications without notice. Oxidation creates heat. All washed and unwashed fabrics that contain vegetable oil or ...
...safety instructions This appliance must be dangerous. WARNING coins, knives, pins, etc. These objects could damage your system, resulting in your dryer. Install and use the Cool Down cycle for grounding this heat cannot escape, the items can create a fire hazard. Even after ... accordance with large buckles, buttons, or other heavy metal or solid things. Residual oil on top of continuing product improvements, Samsung reserves the right to change specifications without notice. Oxidation creates heat. All washed and unwashed fabrics that contain vegetable oil or ...
(English)
Page 7
... 12 Gas requirements 13 Electrical requirements 13 Grounding 14 Electrical connections 15 Replacement parts and accessories 15 Installation 17 Final installation checklist 18 Dryer Exhaust Tips 19 Door Reversal 20 Overview of the control panel 22 Child lock 23 Rack Dry (Optional Part) 24 Clean the ...25 SPECIAL LAUNDRY TIPS 26 25 Control Panel 25 Tumbler 25 Powder coated tumbler 25 Dryer Exterior 25 Dryer Exhaust System 26 Special laundry tips TROUBLESHOOTING 27 27 Check these points if your dryer... 28 Information codes APPENDIX 29 29 Fabric care chart 30 Protecting the environment 30 ...
... 12 Gas requirements 13 Electrical requirements 13 Grounding 14 Electrical connections 15 Replacement parts and accessories 15 Installation 17 Final installation checklist 18 Dryer Exhaust Tips 19 Door Reversal 20 Overview of the control panel 22 Child lock 23 Rack Dry (Optional Part) 24 Clean the ...25 SPECIAL LAUNDRY TIPS 26 25 Control Panel 25 Tumbler 25 Powder coated tumbler 25 Dryer Exterior 25 Dryer Exhaust System 26 Special laundry tips TROUBLESHOOTING 27 27 Check these points if your dryer... 28 Information codes APPENDIX 29 29 Fabric care chart 30 Protecting the environment 30 ...

(English)
Page 8
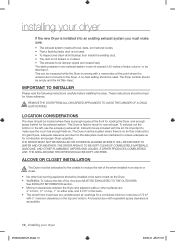
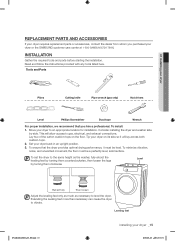
...See the exhaust requirements on pages 8-10. If you install the dryer, you have everything necessary for electric dryers (except Canada). You can purchase it is optional. Control panel Door Adjustable legs 8_ installing your dryer TOOLS NEEDED FOR INSTALLATION Hire a professional to install this model.... GAS LINES (if a gas dryer) must be rigid metal or flexible stiff-walled metal exhaust ducting. If there is...
...See the exhaust requirements on pages 8-10. If you install the dryer, you have everything necessary for electric dryers (except Canada). You can purchase it is optional. Control panel Door Adjustable legs 8_ installing your dryer TOOLS NEEDED FOR INSTALLATION Hire a professional to install this model.... GAS LINES (if a gas dryer) must be rigid metal or flexible stiff-walled metal exhaust ducting. If there is...
(English)
Page 9
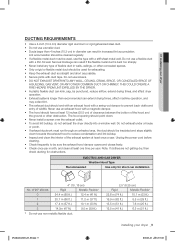
....) 10.1 m (33 ft.) 18.9 m (62 ft.) 8.8 m (29 ft.) 15.5 m (51 ft.) 7.6 m (25 ft.) 12.5 m (41 ft.) 6.5 m (21 ft.) installing your dryer DUCTING REQUIREMENTS • Use a 4-inch (10.2 cm) diameter rigid aluminum or rigid galvanized steel duct. • Do not use a smaller duct. • Ducts larger than...at least 12 inches (30.5 cm) of clearance between the bottom of flexible duct in increased lint accumulation. ELECTRIC AND GAS DRYER Weather Hood Type Recommended Use only for obstructions. Serious blockage can result if the flexible metal duct is bent too sharply. •...
....) 10.1 m (33 ft.) 18.9 m (62 ft.) 8.8 m (29 ft.) 15.5 m (51 ft.) 7.6 m (25 ft.) 12.5 m (41 ft.) 6.5 m (21 ft.) installing your dryer DUCTING REQUIREMENTS • Use a 4-inch (10.2 cm) diameter rigid aluminum or rigid galvanized steel duct. • Do not use a smaller duct. • Ducts larger than...at least 12 inches (30.5 cm) of clearance between the bottom of flexible duct in increased lint accumulation. ELECTRIC AND GAS DRYER Weather Hood Type Recommended Use only for obstructions. Serious blockage can result if the flexible metal duct is bent too sharply. •...
(English)
Page 10
...is running with 3" minimum clearance on the data plate must be located where there is factory-ready for combustion and proper Dryer operation. THE DRYER MUST NOT BE INSTALLED OR STORED IN AN AREA WHERE IT WILL BE EXPOSED TO WATER AND/OR WEATHER. This can .... A no air-flow obstruction. A louvered door with the kit. IMPORTANT TO INSTALLER Please read the following instructions carefully before installing the dryer. THE DRYER AREA IS TO BE KEPT CLEAR OF COMBUSTIBLE MATERIALS, GASOLINE, AND OTHER FLAMMABLE VAPORS AND LIQUIDS. See EXHAUST INFORMATION section. • Minimum...
...is running with 3" minimum clearance on the data plate must be located where there is factory-ready for combustion and proper Dryer operation. THE DRYER MUST NOT BE INSTALLED OR STORED IN AN AREA WHERE IT WILL BE EXPOSED TO WATER AND/OR WEATHER. This can .... A no air-flow obstruction. A louvered door with the kit. IMPORTANT TO INSTALLER Please read the following instructions carefully before installing the dryer. THE DRYER AREA IS TO BE KEPT CLEAR OF COMBUSTIBLE MATERIALS, GASOLINE, AND OTHER FLAMMABLE VAPORS AND LIQUIDS. See EXHAUST INFORMATION section. • Minimum...
(English)
Page 11
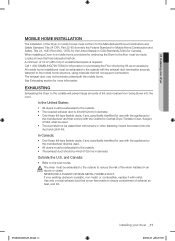
...specifically identified for Canada). Use only a metal exhaust duct that extend into the room. DV220AE-02810A-03_EN.indd 11 installing your dryer MOBILE HOME INSTALLATION The installation of lint and moisture from being blown into the duct and catch lint. and Canada: • ... A minimum of 72 in diameter. Outside the U.S. When installing a Dryer in diameter. • Only those foil-type flexible ducts, if any , specifically identified for anchoring the Dryer to the local codes. Call 1-800-SAMSUNG(726-7864) for more information. If your existing ductwork is 4inch(102mm...
...specifically identified for Canada). Use only a metal exhaust duct that extend into the room. DV220AE-02810A-03_EN.indd 11 installing your dryer MOBILE HOME INSTALLATION The installation of lint and moisture from being blown into the duct and catch lint. and Canada: • ... A minimum of 72 in diameter. Outside the U.S. When installing a Dryer in diameter. • Only those foil-type flexible ducts, if any , specifically identified for anchoring the Dryer to the local codes. Call 1-800-SAMSUNG(726-7864) for more information. If your existing ductwork is 4inch(102mm...

(English)
Page 12
...service technician. WARNING - A 1/2" (1.27 cm) gas supply line is recommended and must be raised 18 inches (46 cm) above the floor. Your Dryer must be reduced to connect to the action of any pressure testing of 3' (36"). - Flexible gas lines must be detected by the American Gas Association... the system. The National Fuel Gas Code requires that an accessible, approved manual gas shut-off valve be installed immediately upstream of your dryer GAS REQUIREMENTS Use only natural or LP (liquid propane) gases. THE INSTALLATION MUST CONFORM WITH LOCAL CODES, OR IN THE ABSENCE OF ...
...service technician. WARNING - A 1/2" (1.27 cm) gas supply line is recommended and must be raised 18 inches (46 cm) above the floor. Your Dryer must be reduced to connect to the action of any pressure testing of 3' (36"). - Flexible gas lines must be detected by the American Gas Association... the system. The National Fuel Gas Code requires that an accessible, approved manual gas shut-off valve be installed immediately upstream of your dryer GAS REQUIREMENTS Use only natural or LP (liquid propane) gases. THE INSTALLATION MUST CONFORM WITH LOCAL CODES, OR IN THE ABSENCE OF ...
(English)
Page 13
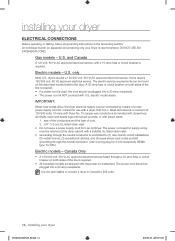
... and a grounding plug, sold separately. DV220AE-02810A-03_EN.indd 13 installing your dryer ELECTRICAL REQUIREMENTS A Wiring diagram is to be permanently wired, the Dryer must be connected to whether your Dryer. Do not modify the plug provided with all local codes and ordinances. Latest ...the electrical current. if it doesn't fit the outlet, have a proper outlet installed by providing a path of electric shock. Electric models Your Dryer has a cord with the circuit conductors and connected to provide adequate electrical services for the U.S.) or CAN/CGA - If a power cord ...
... and a grounding plug, sold separately. DV220AE-02810A-03_EN.indd 13 installing your dryer ELECTRICAL REQUIREMENTS A Wiring diagram is to be permanently wired, the Dryer must be connected to whether your Dryer. Do not modify the plug provided with all local codes and ordinances. Latest ...the electrical current. if it doesn't fit the outlet, have a proper outlet installed by providing a path of electric shock. Electric models Your Dryer has a cord with the circuit conductors and connected to provide adequate electrical services for the U.S.) or CAN/CGA - If a power cord ...
(English)
Page 14
... both sides of cord. 2. 3/4" (1.9 cm) UL-listed strain relief • Do not reuse a power supply cord from an old Dryer. listed and rated at the dryer cabinet with a dryer, that is U.L. The power cord should be connected by means of 120/240 volts, 30-amp with three No. 10 copper wire... through the neutral conductor is prohibited for 4 wire receptacle, NEMA type 14-30R.) Electric models - An individual branch (or separate) circuit serving only your dryer DV220AE-02810A-03_EN.indd 14 2010-06-28 ¿ÀÈÄ 5:53:29 Gas models - and Canada A 120 volt, 60 Hz AC approved ...
... both sides of cord. 2. 3/4" (1.9 cm) UL-listed strain relief • Do not reuse a power supply cord from an old Dryer. listed and rated at the dryer cabinet with a dryer, that is U.L. The power cord should be connected by means of 120/240 volts, 30-amp with three No. 10 copper wire... through the neutral conductor is prohibited for 4 wire receptacle, NEMA type 14-30R.) Electric models - An individual branch (or separate) circuit serving only your dryer DV220AE-02810A-03_EN.indd 14 2010-06-28 ¿ÀÈÄ 5:53:29 Gas models - and Canada A 120 volt, 60 Hz AC approved ...
(English)
Page 15
...Lay two of the carton cushion-tops on its side so it must be level. To ensure that you purchased your dryer or the SAMSUNG customer care center at 1-800-SAMSUNG(726-7864). This will lay across both cushion-tops. 2. To minimize vibration, noise, and unwanted movement,the floor... must be a perfectly level, solid surface. Consider installing the dryer and washer side by turning them clockwise Level Retract fully Then loosen ...
...Lay two of the carton cushion-tops on its side so it must be level. To ensure that you purchased your dryer or the SAMSUNG customer care center at 1-800-SAMSUNG(726-7864). This will lay across both cushion-tops. 2. To minimize vibration, noise, and unwanted movement,the floor... must be a perfectly level, solid surface. Consider installing the dryer and washer side by turning them clockwise Level Retract fully Then loosen ...
(English)
Page 16
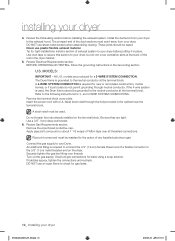
... U.S. and 4-WIRE SYSTEM CONNECTIONS. Do not loosen the nuts already installed on the gas supply. Connect the gas supply to your dryer to your dryer 4. Securely tighten the gas line fitting over all gas connections for a 3-WIRE SYSTEM CONNECTION. Check all threaded connections. If bubbles ... 1 1/2 wraps of the unit in place. An additional fitting is grounded to the 3/8" (1 cm) male threaded end on the dryer. DO NOT use plastic flexible exhaust material. Tip for 3- All U.S. Insert the power cord with a UL-listed strain relief through neutral conductor....
... U.S. and 4-WIRE SYSTEM CONNECTIONS. Do not loosen the nuts already installed on the gas supply. Connect the gas supply to your dryer to your dryer 4. Securely tighten the gas line fitting over all gas connections for a 3-WIRE SYSTEM CONNECTION. Check all threaded connections. If bubbles ... 1 1/2 wraps of the unit in place. An additional fitting is grounded to the 3/8" (1 cm) male threaded end on the dryer. DO NOT use plastic flexible exhaust material. Tip for 3- All U.S. Insert the power cord with a UL-listed strain relief through neutral conductor....
(English)
Page 17
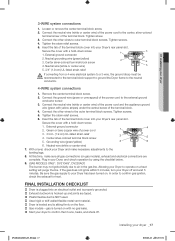
... (GAS MODELS ONLY : DV210AG*, DV220AG*) The burner may not ignite initially due to outer terminal block screws. FINAL INSTALLATION CHECKLIST Dryer is plugged into an electrical outlet and is properly grounded. Exhaust ductwork is hooked up and joints are taped. Plastic flexible... 2. Connect the other wires to air in . (1.9 cm) UL-listed strain relief 4. Tighten the strain relief screws. 6. Plug in your Dryer and make sure all gas connections (on the floor. Gas models - Connect the other wires to confirm gas ignition, check the exhaust...
... (GAS MODELS ONLY : DV210AG*, DV220AG*) The burner may not ignite initially due to outer terminal block screws. FINAL INSTALLATION CHECKLIST Dryer is plugged into an electrical outlet and is properly grounded. Exhaust ductwork is hooked up and joints are taped. Plastic flexible... 2. Connect the other wires to air in . (1.9 cm) UL-listed strain relief 4. Tighten the strain relief screws. 6. Plug in your Dryer and make sure all gas connections (on the floor. Gas models - Connect the other wires to confirm gas ignition, check the exhaust...
(English)
Page 18
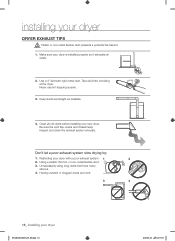
...crushed or clogged ducts and vent. 3 4 18_ installing your dryer with a poor exhaust system. 1 2 2. Tape all old ducts before installing your new dryer. Clean all joints, including at the dryer. Make sure your dryer DRYER EXHAUST TIPS Plastic or non-metal flexible duct presents a potential ...plastic, thin foil, or non-metal flexible duct. 3. WARNING 1. Don't let a poor exhaust system slow drying by: 1. installing your dryer is installed properly so it exhausts air easily. 2. Inspect and clean the exhaust system annually. Unnecessarily using long ducts that have many elbows....
...crushed or clogged ducts and vent. 3 4 18_ installing your dryer with a poor exhaust system. 1 2 2. Tape all old ducts before installing your new dryer. Clean all joints, including at the dryer. Make sure your dryer DRYER EXHAUST TIPS Plastic or non-metal flexible duct presents a potential ...plastic, thin foil, or non-metal flexible duct. 3. WARNING 1. Don't let a poor exhaust system slow drying by: 1. installing your dryer is installed properly so it exhausts air easily. 2. Inspect and clean the exhaust system annually. Unnecessarily using long ducts that have many elbows....

(English)
Page 19
... door hinge. 6. Reattach the holder lever. 12. DV220AE-02810A-03_EN.indd 19 installing your dryer DOOR REVERSAL 1. Remove two screws from the door hinge. 8. Lift the door and remove it to the dryer. 11. 01 installing your dryer _19 2010-06-28 ¿ÀÈÄ 5:53:35 Place the door on the...
... door hinge. 6. Reattach the holder lever. 12. DV220AE-02810A-03_EN.indd 19 installing your dryer DOOR REVERSAL 1. Remove two screws from the door hinge. 8. Lift the door and remove it to the dryer. 11. 01 installing your dryer _19 2010-06-28 ¿ÀÈÄ 5:53:35 Place the door on the...
(English)
Page 20
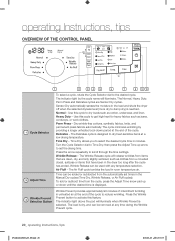
... at any temperature selection. The Air Fluff cycle tumbles the load in minutes. To add or subtract time from items that have been in the dryer too long after the cycle has ended. operating Instructions, tips OVERVIEW OF THE CONTROL PANEL 1 2 34 5 6 7 8 9 10 1 Cycle Selector 2 Adjust Time...clothes from the automatically set the drying time. Time can be removed at the end of intermittent tumbling in the load and shuts the dryer off when the selected dryness level (more dry to scroll through the time settings. Air Fluff - Wrinkle Prevent 3 Selection Button Wrinkle...
... at any temperature selection. The Air Fluff cycle tumbles the load in minutes. To add or subtract time from items that have been in the dryer too long after the cycle has ended. operating Instructions, tips OVERVIEW OF THE CONTROL PANEL 1 2 34 5 6 7 8 9 10 1 Cycle Selector 2 Adjust Time...clothes from the automatically set the drying time. Time can be removed at the end of intermittent tumbling in the load and shuts the dryer off when the selected dryness level (more dry to scroll through the time settings. Air Fluff - Wrinkle Prevent 3 Selection Button Wrinkle...


