(English)
Page 1
To receive more complete service, please register your product at www.samsung.com/register DV220AE-02810A-03_EN.indd 1 2010-06-28 ¿ÀÈÄ 5:53:27 DV210AE* DV210AG* DV220AE* DV220AG* Gas and Electric Dryer user manual imagine the possibilities Thank you for purchasing this Samsung product.
To receive more complete service, please register your product at www.samsung.com/register DV220AE-02810A-03_EN.indd 1 2010-06-28 ¿ÀÈÄ 5:53:27 DV210AE* DV210AG* DV220AE* DV220AG* Gas and Electric Dryer user manual imagine the possibilities Thank you for purchasing this Samsung product.
(English)
Page 2
... easy reversible door can dry up to stack the Washer and Dryer. You can be changed with 1kWh. capacity dryer circulates more important things in mind. Easy Reversible Door Our dryers will fit just about anywhere. bottle of dampness and automatically set the drying time. Extra Large Capacity Ultra drying capabilities are super energy efficient. Energy Saving Samsung dryers are at your clothes, drying them faster for more air through your fingertips! The direction of...
... easy reversible door can dry up to stack the Washer and Dryer. You can be changed with 1kWh. capacity dryer circulates more important things in mind. Easy Reversible Door Our dryers will fit just about anywhere. bottle of dampness and automatically set the drying time. Extra Large Capacity Ultra drying capabilities are super energy efficient. Energy Saving Samsung dryers are at your clothes, drying them faster for more air through your fingertips! The direction of...
(English)
Page 3
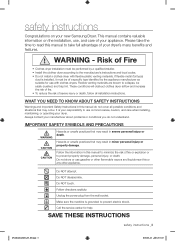
... disassemble. Risk of Fire • Clothes dryer installation must be of a specific type identified by a qualified installer. • Install the clothes dryer according to prevent property damage, personal injury, or death. If flexible metal (foil type) duct is grounded to use common sense, caution, and care when installing, maintaining, or operating your dryer. Make sure the machine is installed, it must be easily crushed, and trap lint. SAVE THESE INSTRUCTIONS safety instructions...
... disassemble. Risk of Fire • Clothes dryer installation must be of a specific type identified by a qualified installer. • Install the clothes dryer according to prevent property damage, personal injury, or death. If flexible metal (foil type) duct is grounded to use common sense, caution, and care when installing, maintaining, or operating your dryer. Make sure the machine is installed, it must be easily crushed, and trap lint. SAVE THESE INSTRUCTIONS safety instructions...
(English)
Page 4
....Keep area around the exhaust opening and adjacent surrounding areas free from service or discarded, remove the door to persons when using this appliance where it will be cleaned periodically by the manufacturer of the fabric softener or product. 10.Clean lint screen before using your dryer. safety instructions WARNING: To reduce the risk of fire, electric shock, or injury to the drying compartment. 5. Items contaminated...
....Keep area around the exhaust opening and adjacent surrounding areas free from service or discarded, remove the door to persons when using this appliance where it will be cleaned periodically by the manufacturer of the fabric softener or product. 10.Clean lint screen before using your dryer. safety instructions WARNING: To reduce the risk of fire, electric shock, or injury to the drying compartment. 5. Items contaminated...
(English)
Page 5
... have the skills to service any phone in the user-repair instructions and you cannot reach your gas supplier from a neighbor's phone. Do not tamper with gasoline, dry cleaning solvents, or other flammable or explosive substances. Do not use fabric softeners or products to eliminate static unless recommended for dryer use any part of the appliance unless specifically recommended in your building...
... have the skills to service any phone in the user-repair instructions and you cannot reach your gas supplier from a neighbor's phone. Do not tamper with gasoline, dry cleaning solvents, or other flammable or explosive substances. Do not use fabric softeners or products to eliminate static unless recommended for dryer use any part of the appliance unless specifically recommended in your building...
(English)
Page 6
... not sit on clothing can create a fire hazard. Ensure pockets are hot. All washed and unwashed fabrics that have run through the Cool Down cycle. Install and use the Cool Down cycle for grounding this heat cannot escape, the items can be dangerous. Never remove these kinds of continuing product improvements, Samsung reserves the right to catch fire. safety instructions This appliance must be...
... not sit on clothing can create a fire hazard. Ensure pockets are hot. All washed and unwashed fabrics that have run through the Cool Down cycle. Install and use the Cool Down cycle for grounding this heat cannot escape, the items can be dangerous. Never remove these kinds of continuing product improvements, Samsung reserves the right to catch fire. safety instructions This appliance must be...
(English)
Page 7
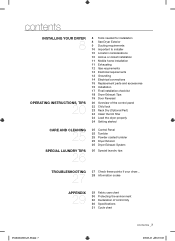
...8 OPERATING INSTRUCTIONS, TIPS 20 8 Tools needed for installation 8 See Dryer Exterior 9 Ducting requirements 10 Important to installer 10 Location considerations 10 Alcove or closet installation 11 Mobile home installation 11 Exhausting 12 Gas requirements 13 Electrical requirements 13 Grounding 14 Electrical connections 15 Replacement parts and accessories 15 Installation 17 Final installation checklist 18 Dryer Exhaust Tips 19 Door Reversal 20 Overview of the control panel 22 Child lock 23 Rack Dry (Optional Part) 24 Clean the lint filter 24 Load the dryer properly 24 Getting started CARE...
...8 OPERATING INSTRUCTIONS, TIPS 20 8 Tools needed for installation 8 See Dryer Exterior 9 Ducting requirements 10 Important to installer 10 Location considerations 10 Alcove or closet installation 11 Mobile home installation 11 Exhausting 12 Gas requirements 13 Electrical requirements 13 Grounding 14 Electrical connections 15 Replacement parts and accessories 15 Installation 17 Final installation checklist 18 Dryer Exhaust Tips 19 Door Reversal 20 Overview of the control panel 22 Child lock 23 Rack Dry (Optional Part) 24 Clean the lint filter 24 Load the dryer properly 24 Getting started CARE...

(English)
Page 8
.... 3. Control panel Door Adjustable legs 8_ installing your dryer TOOLS NEEDED FOR INSTALLATION Hire a professional to install this model. A GROUNDED ELECTRICAL OUTLET is optional. EXHAUST SYSTEM - must meet national and local codes. 4. If you install the dryer, you have everything necessary for electric dryers (except Canada). A POWER CORD for proper installation. 1. The Drying Rack is required. You can purchase it is not supplied in this dryer properly. Make sure you are responsible. See Electrical Requirements. If...
.... 3. Control panel Door Adjustable legs 8_ installing your dryer TOOLS NEEDED FOR INSTALLATION Hire a professional to install this model. A GROUNDED ELECTRICAL OUTLET is optional. EXHAUST SYSTEM - must meet national and local codes. 4. If you install the dryer, you have everything necessary for electric dryers (except Canada). A POWER CORD for proper installation. 1. The Drying Rack is required. You can purchase it is not supplied in this dryer properly. Make sure you are responsible. See Electrical Requirements. If...
(English)
Page 10
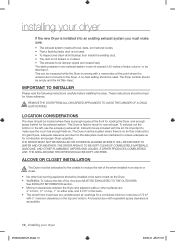
... exhaust duct connects to ensure adequate air for rear exhaust. installing your dryer DV220AE-02810A-03_EN.indd 10 2010-06-28 ¿ÀÈÄ 5:53:28 IMPORTANT TO INSTALLER Please read the following instructions carefully before installing the dryer. This Dryer is not kinked or crushed. • The exhaust hood damper opens and closes freely. The Dryer must be empty and the lint filter clean. ALCOVE OR CLOSET INSTALLATION The Dryer...
... exhaust duct connects to ensure adequate air for rear exhaust. installing your dryer DV220AE-02810A-03_EN.indd 10 2010-06-28 ¿ÀÈÄ 5:53:28 IMPORTANT TO INSTALLER Please read the following instructions carefully before installing the dryer. This Dryer is not kinked or crushed. • The exhaust hood damper opens and closes freely. The Dryer must be empty and the lint filter clean. ALCOVE OR CLOSET INSTALLATION The Dryer...
(English)
Page 13
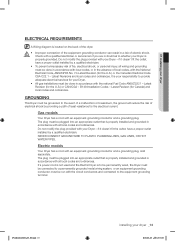
.... Gas models Your Dryer has a cord with your Dryer - B149 Installation Codes - Latest Revision (for the electrical current. In the event of a malfunction or breakdown, the ground will reduce the risk of electrical shock by providing a path of least resistance for Canada) and local codes and ordinances. 01 installing your dryer ELECTRICAL REQUIREMENTS A Wiring diagram is located on the back of the dryer. • WARNING • • Improper connection...
.... Gas models Your Dryer has a cord with your Dryer - B149 Installation Codes - Latest Revision (for the electrical current. In the event of a malfunction or breakdown, the ground will reduce the risk of electrical shock by providing a path of least resistance for Canada) and local codes and ordinances. 01 installing your dryer ELECTRICAL REQUIREMENTS A Wiring diagram is located on the back of the dryer. • WARNING • • Improper connection...
(English)
Page 14
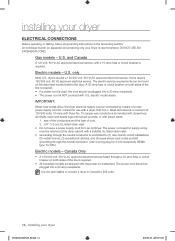
... terminated with closed loop terminals, open-end spade lugs with turned up ends, or with a 15-amp fuse or circuit breaker is required. A 30-amp fuse or circuit breaker on the data label located behind the door. Electric models - dryers require a 120/240 volt, 60 Hz AC approved electrical service. The power cord electric supply wiring must be found on both sides of the line is required. • If a power cord is U.L. IMPORTANT: When local codes allow, the dryer electrical...
... terminated with closed loop terminals, open-end spade lugs with turned up ends, or with a 15-amp fuse or circuit breaker is required. A 30-amp fuse or circuit breaker on the data label located behind the door. Electric models - dryers require a 120/240 volt, 60 Hz AC approved electrical service. The power cord electric supply wiring must be found on both sides of the line is required. • If a power cord is U.L. IMPORTANT: When local codes allow, the dryer electrical...
(English)
Page 16
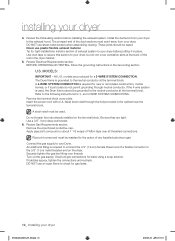
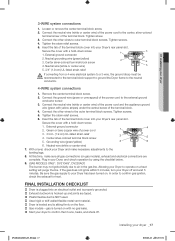
.... and 4-WIRE SYSTEM CONNECTIONS. Review Electrical Requirements section. Remove the pipe thread protective cap. Apply pipe joint compound or about 1 1/2 wraps of exhaust system to the neutral conductor at the terminal block. Connect the gas supply to your Dryer. Tip for 3- The crimped end of the unit in place. BEFORE OPERATING OR TESTING, follow the grounding instructions in the cabinet near the terminal block. All U.S. Use duct tape to...
.... and 4-WIRE SYSTEM CONNECTIONS. Review Electrical Requirements section. Remove the pipe thread protective cap. Apply pipe joint compound or about 1 1/2 wraps of exhaust system to the neutral conductor at the terminal block. Connect the gas supply to your Dryer. Tip for 3- The crimped end of the unit in place. BEFORE OPERATING OR TESTING, follow the grounding instructions in the cabinet near the terminal block. All U.S. Use duct tape to...
(English)
Page 17
... been turned on the floor. Gas models - Insert the tab of the terminal block cover into an electrical outlet and is properly grounded. Exhaust ductwork is sitting firmly on . Center silver-colored terminal block screw 4. Remove the center terminal block screw. 2. Secure the cover with no gas leaks. Start your Dryer's rear panel slot. At this time, make necessary adjustments to the leveling legs. 8. gas is plugged into your dryer to operate...
... been turned on the floor. Gas models - Insert the tab of the terminal block cover into an electrical outlet and is properly grounded. Exhaust ductwork is sitting firmly on . Center silver-colored terminal block screw 4. Remove the center terminal block screw. 2. Secure the cover with no gas leaks. Start your Dryer's rear panel slot. At this time, make necessary adjustments to the leveling legs. 8. gas is plugged into your dryer to operate...
(English)
Page 18
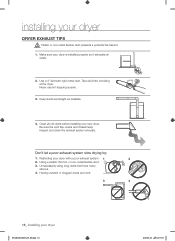
... dryer is installed properly so it exhausts air easily. 2. Inspect and clean the exhaust system annually. Restricting your dryer DRYER EXHAUST TIPS Plastic or non-metal flexible duct presents a potential fire hazard. Using a plastic, thin foil, or non-metal flexible duct. 3. Tape all old ducts before installing your new dryer. Unnecessarily using long ducts that have many elbows. 4. Clean all joints, including at the dryer. installing your dryer with a poor exhaust system. 1 2 2. Never use lint-trapping...
... dryer is installed properly so it exhausts air easily. 2. Inspect and clean the exhaust system annually. Restricting your dryer DRYER EXHAUST TIPS Plastic or non-metal flexible duct presents a potential fire hazard. Using a plastic, thin foil, or non-metal flexible duct. 3. Tape all old ducts before installing your new dryer. Unnecessarily using long ducts that have many elbows. 4. Clean all joints, including at the dryer. installing your dryer with a poor exhaust system. 1 2 2. Never use lint-trapping...
(English)
Page 21
... settings. 02 operating Instructions, tips Digital Graphic 4 Display 5 Dry Level Selection Button Temp Selection 6 Button Time Selection 7 Button The display window shows the estimated time remaining in the cycle after the Start/Pause button is pushed. When the cycle is complete, "END" will illuminate. Press the button repeatedly to dry. Use for more than 10 minutes without any buttons being touched, the power automatically turns off. Larger or bulkier loads...
... settings. 02 operating Instructions, tips Digital Graphic 4 Display 5 Dry Level Selection Button Temp Selection 6 Button Time Selection 7 Button The display window shows the estimated time remaining in the cycle after the Start/Pause button is pushed. When the cycle is complete, "END" will illuminate. Press the button repeatedly to dry. Use for more than 10 minutes without any buttons being touched, the power automatically turns off. Larger or bulkier loads...
(English)
Page 23
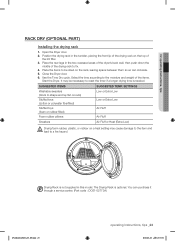
... them so air can purchase it through a service center. (Part code : DC61-02773A) DV220AE-02810A-03_EN.indd 23 operating Instructions, tips _23 2010-06-28 ¿ÀÈÄ 5:53:36 Place the items to the moisture and weight of the items. Start the Dryer. Close the Dryer door. 6. Select the time according to be necessary to fix. 4. Open the Dryer door. 2. Use the Time Dry cycle. SUGGESTED ITEMS...
... them so air can purchase it through a service center. (Part code : DC61-02773A) DV220AE-02810A-03_EN.indd 23 operating Instructions, tips _23 2010-06-28 ¿ÀÈÄ 5:53:36 Place the items to the moisture and weight of the items. Start the Dryer. Close the Dryer door. 6. Select the time according to be necessary to fix. 4. Open the Dryer door. 2. Use the Time Dry cycle. SUGGESTED ITEMS...
(English)
Page 24
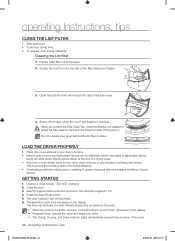
... a drying cycle. • Add one or more energy efficiently. LOAD THE DRYER PROPERLY • Place only one or two articles of the filter using your dryer loosely - Press the Start/Pause button. 5. GETTING STARTED 1. Scrape the dust from the top part of clothing need drying. When you re-insert the Filter-Case Filter, check the direction it in the display. Load your fingers. 3. DO NOT overload. 2. Close the door. 3. The dryer indicator light...
... a drying cycle. • Add one or more energy efficiently. LOAD THE DRYER PROPERLY • Place only one or two articles of the filter using your dryer loosely - Press the Start/Pause button. 5. GETTING STARTED 1. Scrape the dust from the top part of clothing need drying. When you re-insert the Filter-Case Filter, check the direction it in the display. Load your fingers. 3. DO NOT overload. 2. Close the door. 3. The dryer indicator light...

(English)
Page 27
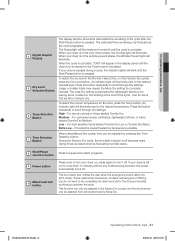
... using the Dryer. • Dryer load is dried with a lightweight load, such as outlined in the air, ventilate the room completely before load is dry SOLUTION • Be sure the door is latched shut. • Be sure the power cord is plugged into a live electrical outlet. • Check the home's circuit breaker and fuses. • Press the Start/Pause button again if the door is opened during the cycle. • Check the home's circuit breaker and fuses. • Select a heat setting...
... using the Dryer. • Dryer load is dried with a lightweight load, such as outlined in the air, ventilate the room completely before load is dry SOLUTION • Be sure the door is latched shut. • Be sure the power cord is plugged into a live electrical outlet. • Check the home's circuit breaker and fuses. • Press the Start/Pause button again if the door is opened during the cycle. • Check the home's circuit breaker and fuses. • Select a heat setting...
(English)
Page 28
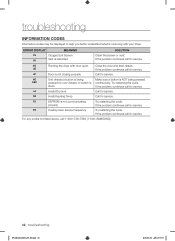
... service. dO Running the dryer with your Dryer. Try restarting the cycle. FE Invalid power source Frequency Try restarting the cycle. For any codes not listed above, call for service. troubleshooting INFORMATION CODES Information codes may be displayed to help you better understand what is not closing properly Call for service. dF Door is occurring with door open Close the door and then restart. od Invalid Dry time Call for service...
... service. dO Running the dryer with your Dryer. Try restarting the cycle. FE Invalid power source Frequency Try restarting the cycle. For any codes not listed above, call for service. troubleshooting INFORMATION CODES Information codes may be displayed to help you better understand what is not closing properly Call for service. dF Door is occurring with door open Close the door and then restart. od Invalid Dry time Call for service...

(English)
Page 32
... service problems; SAMSUNG will repair, replace, or refund this product at our option and at no charge as proof of nature or God; If service is valid only on the original date of this product and shall not apply to and from incorrect electric current, voltage or supply, light bulbs, house fuses, house wiring, cost of a service call for instructions, or fixing installation errors. altered product or serial numbers...
... service problems; SAMSUNG will repair, replace, or refund this product at our option and at no charge as proof of nature or God; If service is valid only on the original date of this product and shall not apply to and from incorrect electric current, voltage or supply, light bulbs, house fuses, house wiring, cost of a service call for instructions, or fixing installation errors. altered product or serial numbers...


