

User Manual
Page 1
DV218AE* DV218AG* Gas and Electric Dryer user manual imagine the possibilities Thank you for purchasing this Samsung product. To receive more complete service, please register your product at www.samsung.com/global/register DV218AEW-02568A_EN.indd 1 2008-03-14 ¿ÀÈÄ 6:11:12
DV218AE* DV218AG* Gas and Electric Dryer user manual imagine the possibilities Thank you for purchasing this Samsung product. To receive more complete service, please register your product at www.samsung.com/global/register DV218AEW-02568A_EN.indd 1 2008-03-14 ¿ÀÈÄ 6:11:12
User Manual
Page 2
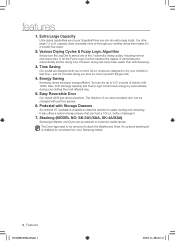
... An optional 15" pedestal is available for easier loading and unloading. Now you in less time... Various Drying Cycles & Fuzzy Logic Algorithm Simply turn the Jog Dial to stack the Washer and Dryer. Time Saving Our cycles are super energy efficient. The direction of laundry with Samsung. 3. Extra Large Capacity Ultra drying capabilities are designed to maximize usable space. The Dryer legs need to be changed with just four...
... An optional 15" pedestal is available for easier loading and unloading. Now you in less time... Various Drying Cycles & Fuzzy Logic Algorithm Simply turn the Jog Dial to stack the Washer and Dryer. Time Saving Our cycles are super energy efficient. The direction of laundry with Samsung. 3. Extra Large Capacity Ultra drying capabilities are designed to maximize usable space. The Dryer legs need to be changed with just four...

User Manual
Page 3
... death. Unplug the pwer plug from the wall socket. Call the service center for use with flexible plastic venting materials. This manual contains valuable information on your manufacturer about problems or conditions you do not cover all installation instructions. Follow the information in this manual to take the time to use common sense, caution, and care when installing, maintaining, or operating your dryer's many benefits and...
... death. Unplug the pwer plug from the wall socket. Call the service center for use with flexible plastic venting materials. This manual contains valuable information on your manufacturer about problems or conditions you do not cover all installation instructions. Follow the information in this manual to take the time to use common sense, caution, and care when installing, maintaining, or operating your dryer's many benefits and...

User Manual
Page 4
... appliance when the drum is used in the user-repair instructions and you cannot reach your dryer from service, remove the door to the drying compartment to prevent children or animals from lint, dust, and dirt. Clean the lint screen before using the appliance. Installation and service must not be performed by qualified service personnel. There are many highly flammable items used near children and pets. Heated foam rubber materials...
... appliance when the drum is used in the user-repair instructions and you cannot reach your dryer from service, remove the door to the drying compartment to prevent children or animals from lint, dust, and dirt. Clean the lint screen before using the appliance. Installation and service must not be performed by qualified service personnel. There are many highly flammable items used near children and pets. Heated foam rubber materials...

User Manual
Page 5
See installation instructions for grounding this heat cannot escape, the items can become hot enough to catch fire. Do not sit on clothing can create a fire hazard. ie. Gas leaks may not be properly grounded. Residual oil on top of the dryer. Never remove these items from the dryer hot or interrupt the drying cycle until the items have been spotted or soaked...
See installation instructions for grounding this heat cannot escape, the items can become hot enough to catch fire. Do not sit on clothing can create a fire hazard. ie. Gas leaks may not be properly grounded. Residual oil on top of the dryer. Never remove these items from the dryer hot or interrupt the drying cycle until the items have been spotted or soaked...

User Manual
Page 6
...7 OPERATING INSTRUCTIONS, TIPS 20 7 Tools needed for installation 7 See Exhaust Requirements 8 Ducting requirements 9 Important to installer 9 Location considerations 9 Alcove or closet installation 10 Mobile home installation 10 Exhausting 11 Gas requirements 12 Electrical requirements 12 Grounding 13 Electrical connections 14 Replacement parts and accessories 14 Installation 17 Final installation checklist 18 Dryer Exhaust Tips 19 Door Reversal 20 Overview of the control panel 22 Child lock 23 Rack Dry 24 Clean the lint filter 24 Load the dryer properly 24 Getting started CARE AND CLEANING...
...7 OPERATING INSTRUCTIONS, TIPS 20 7 Tools needed for installation 7 See Exhaust Requirements 8 Ducting requirements 9 Important to installer 9 Location considerations 9 Alcove or closet installation 10 Mobile home installation 10 Exhausting 11 Gas requirements 12 Electrical requirements 12 Grounding 13 Electrical connections 14 Replacement parts and accessories 14 Installation 17 Final installation checklist 18 Dryer Exhaust Tips 19 Door Reversal 20 Overview of the control panel 22 Child lock 23 Rack Dry 24 Clean the lint filter 24 Load the dryer properly 24 Getting started CARE AND CLEANING...

User Manual
Page 7
GAS LINES (if a gas dryer) must be rigid metal or flexible stiff-walled metal exhaust ducting. See page 12. 2. EXHAUST SYSTEM - A GROUNDED ELECTRICAL OUTLET is considered the responsibility of poor setup, adjustment, and connection, it is required. See Electrical Requirements. must meet national and local codes. 4. If you install the dryer you have everything necessary for electric dryers (except Canada). A POWER CORD for proper installation. 1. SEE EXHAUST REQUIREMENTS Control panel Door Adjustable legs DV218AEW-02568A_EN.indd 7 Installing your dryer TOOLS...
GAS LINES (if a gas dryer) must be rigid metal or flexible stiff-walled metal exhaust ducting. See page 12. 2. EXHAUST SYSTEM - A GROUNDED ELECTRICAL OUTLET is considered the responsibility of poor setup, adjustment, and connection, it is required. See Electrical Requirements. must meet national and local codes. 4. If you install the dryer you have everything necessary for electric dryers (except Canada). A POWER CORD for proper installation. 1. SEE EXHAUST REQUIREMENTS Control panel Door Adjustable legs DV218AEW-02568A_EN.indd 7 Installing your dryer TOOLS...

User Manual
Page 9
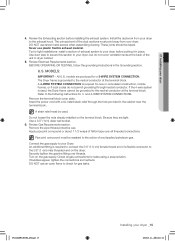
... air-flow obstruction. These instructions should be exhausted to the outside to ensure adequate air for rear exhaust. REMOVE THE DOOR FROM ALL DISCARDED APPLIANCES TO AVOID THE DANGER OF A CHILD WARNING SUFFOCATING. This Dryer is enough space at the point where the exhaust duct connects to make sure: • The exhaust system meets all local, state, and national codes. • That a flexible plastic duct is not used . Instructions...
... air-flow obstruction. These instructions should be exhausted to the outside to ensure adequate air for rear exhaust. REMOVE THE DOOR FROM ALL DISCARDED APPLIANCES TO AVOID THE DANGER OF A CHILD WARNING SUFFOCATING. This Dryer is enough space at the point where the exhaust duct connects to make sure: • The exhaust system meets all local, state, and national codes. • That a flexible plastic duct is not used . Instructions...

User Manual
Page 10
.... installing your dryer MOBILE HOME INSTALLATION The installation of the Dryer in diameter. Call 1-800-SAMSUNG for more information. Outside the U.S. If your dryer DV218AEW-02568A_EN.indd 10 2008-03-14 ¿ÀÈÄ 6:11:15 The exhaust duct may not terminate underneath the mobile home. In Canada: • Only those foil-type flexible ducts, if any , specifically identified for Clothes Dryer Transition Duct, Subject...
.... installing your dryer MOBILE HOME INSTALLATION The installation of the Dryer in diameter. Call 1-800-SAMSUNG for more information. Outside the U.S. If your dryer DV218AEW-02568A_EN.indd 10 2008-03-14 ¿ÀÈÄ 6:11:15 The exhaust duct may not terminate underneath the mobile home. In Canada: • Only those foil-type flexible ducts, if any , specifically identified for Clothes Dryer Transition Duct, Subject...

User Manual
Page 12
...:15 installing your dryer ELECTRICAL REQUIREMENTS A Wiring diagram is located on the plate below the control panel. • WARNING • • Improper connection of the equipment grounding conductor can result in accordance with the national Fuel Code ANSI/Z2231 - All gas installations must be grounded. Latest Revision (for your Dryer. NEVER CONNECT GROUND WIRE TO PLASTIC PLUMBING LINES, GAS LINES, OR HOT WATER PIPES. if it doesn't fit the outlet, have a proper outlet installed...
...:15 installing your dryer ELECTRICAL REQUIREMENTS A Wiring diagram is located on the plate below the control panel. • WARNING • • Improper connection of the equipment grounding conductor can result in accordance with the national Fuel Code ANSI/Z2231 - All gas installations must be grounded. Latest Revision (for your Dryer. NEVER CONNECT GROUND WIRE TO PLASTIC PLUMBING LINES, GAS LINES, OR HOT WATER PIPES. if it doesn't fit the outlet, have a proper outlet installed...

User Manual
Page 13
.... IMPORTANT: When local codes allow, the dryer electrical supply may be connected by means of a new power supply cord kit, marked for use with a dryer, that is prohibited for 4 wire receptacle, NEMA type 14-30R.) Electric models - dryers require a 120/240 volt, 60 Hz AC approved electrical service. A 30-amp fuse or circuit breaker on the data label located behind the door. 01 Installing your dryer ELECTRICAL CONNECTIONS Before operating or testing, follow all grounding instructions in Canada to...
.... IMPORTANT: When local codes allow, the dryer electrical supply may be connected by means of a new power supply cord kit, marked for use with a dryer, that is prohibited for 4 wire receptacle, NEMA type 14-30R.) Electric models - dryers require a 120/240 volt, 60 Hz AC approved electrical service. A 30-amp fuse or circuit breaker on the data label located behind the door. 01 Installing your dryer ELECTRICAL CONNECTIONS Before operating or testing, follow all grounding instructions in Canada to...
User Manual
Page 15
... use an open flame to the neutral conductor at the back of exhaust system to the following instructions for tight installations: install a section of the unit in place. Tip for 3- U.S. Refer to your dryer before installing the exhaust system. Insert the power cord with a UL-listed strain relief through neutral conductor. Connect the gas supply to the action of a flexible connector to the exhaust hood. Review Electrical Requirements section. MODELS...
... use an open flame to the neutral conductor at the back of exhaust system to the following instructions for tight installations: install a section of the unit in place. Tip for 3- U.S. Refer to your dryer before installing the exhaust system. Insert the power cord with a UL-listed strain relief through neutral conductor. Connect the gas supply to the action of a flexible connector to the exhaust hood. Review Electrical Requirements section. MODELS...

User Manual
Page 16
... terminal block. Tighten the strain relief screws. 6. External ground connector 2. Plug in your dryer 3-WIRE system connections 1. installing your Dryer, and check operation by using the checklist below. 8. (GAS MODELS ONLY : DV218AGW, DV218AGB) The burner may not ignite initially due to air in the gas line. Neutral wire (white or center wire) 5. 3/4" (1.9 cm) UL-listed strain relief If converting from a 4-wire electrical system to a 3-wire, the ground strap must be WARNING reconnected to the terminal block support...
... terminal block. Tighten the strain relief screws. 6. External ground connector 2. Plug in your dryer 3-WIRE system connections 1. installing your Dryer, and check operation by using the checklist below. 8. (GAS MODELS ONLY : DV218AGW, DV218AGB) The burner may not ignite initially due to air in the gas line. Neutral wire (white or center wire) 5. 3/4" (1.9 cm) UL-listed strain relief If converting from a 4-wire electrical system to a 3-wire, the ground strap must be WARNING reconnected to the terminal block support...
User Manual
Page 18
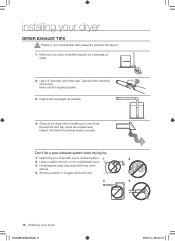
... a poor exhaust system slow drying by: 1. Tape all old ducts before installing your dryer DRYER EXHAUST TIPS Plastic or non-metal flexible duct presents a potential fire hazard. Never use lint-trapping screws. 3. Clean all joints, including at the dryer. Inspect and clean the exhaust system annually. Allowing crushed or clogged ducts and vent. 3 4 18_ Installing your Dryer with a poor exhaust system. 1 2 2. Using a plastic, thin foil, or non-metal flexible duct. 3. Unnecessarily using long ducts that...
... a poor exhaust system slow drying by: 1. Tape all old ducts before installing your dryer DRYER EXHAUST TIPS Plastic or non-metal flexible duct presents a potential fire hazard. Never use lint-trapping screws. 3. Clean all joints, including at the dryer. Inspect and clean the exhaust system annually. Allowing crushed or clogged ducts and vent. 3 4 18_ Installing your Dryer with a poor exhaust system. 1 2 2. Using a plastic, thin foil, or non-metal flexible duct. 3. Unnecessarily using long ducts that...
User Manual
Page 20
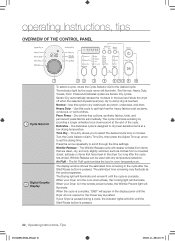
.... The cycle minimizes wrinkling by the cycle name will appear in the cool-down period at a low drying temperature. Time Dry - The Drying light will illuminate. Normal - Use this cycle to damp dry) is in the display panel until the Dryer door is opened or the Power key is complete. Perm Press - The display window shows the estimated time remaining in the dryer too long after the Start/Pause button is pressed. 20_ Operating Instructions...
.... The cycle minimizes wrinkling by the cycle name will appear in the cool-down period at a low drying temperature. Time Dry - The Drying light will illuminate. Normal - Use this cycle to damp dry) is in the display panel until the Dryer door is opened or the Power key is complete. Perm Press - The display window shows the estimated time remaining in the dryer too long after the Start/Pause button is pressed. 20_ Operating Instructions...

User Manual
Page 21
... next to scroll through the settings. DV218AEW-02568A_EN.indd 21 Operating Instructions, Tips _21 2008-03-14 ¿ÀÈÄ 6:11:30 For heat sensitive items labeled Tumble Dry Low or Tumble Dry Warm. When using Manual Dry cycles, time can be adjusted by pressing the Signal button. Start/Pause 9 selection button Press to pause and restart programs. 10 Power button Press once to activate...
... next to scroll through the settings. DV218AEW-02568A_EN.indd 21 Operating Instructions, Tips _21 2008-03-14 ¿ÀÈÄ 6:11:30 For heat sensitive items labeled Tumble Dry Low or Tumble Dry Warm. When using Manual Dry cycles, time can be adjusted by pressing the Signal button. Start/Pause 9 selection button Press to pause and restart programs. 10 Power button Press once to activate...

User Manual
Page 27
... home can open and close freely. • Check exhaust system for the Dryer to hear the dryer gas valve or heating element cycle on . • Clean the lint filter and exhaust duct. • Dryer may have moved into a live electrical outlet. • Check the home's circuit breaker and fuses. • Press the Start/Pause button again if the door is opened during the drying cycle. • Be sure the Dryer is too small. Has an odor. 05 Troubleshooting troubleshooting CHECK THESE POINTS...
... home can open and close freely. • Check exhaust system for the Dryer to hear the dryer gas valve or heating element cycle on . • Clean the lint filter and exhaust duct. • Dryer may have moved into a live electrical outlet. • Check the home's circuit breaker and fuses. • Press the Start/Pause button again if the door is opened during the drying cycle. • Be sure the Dryer is too small. Has an odor. 05 Troubleshooting troubleshooting CHECK THESE POINTS...

User Manual
Page 28
... the cycle. properly If the problem continues call for service. dO Running the dryer with your Dryer. oD Invalid Dry time Call for service. troubleshooting INFORMATION CODES Information codes may be displayed to help you better understand what is occurring with door open Close the door and then restart. If the problem continues call for service. If the problem continues call for service. For any codes not listed above, call for service. ERROR...
... the cycle. properly If the problem continues call for service. dO Running the dryer with your Dryer. oD Invalid Dry time Call for service. troubleshooting INFORMATION CODES Information codes may be displayed to help you better understand what is occurring with door open Close the door and then restart. If the problem continues call for service. If the problem continues call for service. For any codes not listed above, call for service. ERROR...
User Manual
Page 29
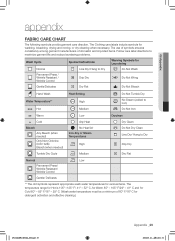
... domestic and imported items. Follow care label directions to maximize garment life and reduce laundering problems. Wash Cycle Special Instructions Warning Symbols for Laundering Normal Line Dry/ Hang to Dry Do Not Wash Permanent Press / Wrinkle Resistant / Wrinkle Control Drip Dry Do Not Wring Gentle/Delicates Dry Flat Do Not Bleach Hand Wash Water Temperature** Hot Heat Setting High Medium Do Not Tumble Dry No Steam (added to iron) Do...
... domestic and imported items. Follow care label directions to maximize garment life and reduce laundering problems. Wash Cycle Special Instructions Warning Symbols for Laundering Normal Line Dry/ Hang to Dry Do Not Wash Permanent Press / Wrinkle Resistant / Wrinkle Control Drip Dry Do Not Wring Gentle/Delicates Dry Flat Do Not Bleach Hand Wash Water Temperature** Hot Heat Setting High Medium Do Not Tumble Dry No Steam (added to iron) Do...

User Manual
Page 32
..., light bulbs, house fuses, house wiring, cost of a service call for instructions, or fixing installation errors. incorrect electrical line voltage, fluctuations and surges; This limited warranty covers manufacturing defects in materials and workmanship encountered in normal, noncommercial use of products, equipment, systems, utilities, services, parts, supplies, accessories, applications, installations, repairs, external wiring or connectors not supplied or authorized by SAMSUNG that are covered and prescribed in shipment; cosmetic damage or exterior finish; Replacement parts...
..., light bulbs, house fuses, house wiring, cost of a service call for instructions, or fixing installation errors. incorrect electrical line voltage, fluctuations and surges; This limited warranty covers manufacturing defects in materials and workmanship encountered in normal, noncommercial use of products, equipment, systems, utilities, services, parts, supplies, accessories, applications, installations, repairs, external wiring or connectors not supplied or authorized by SAMSUNG that are covered and prescribed in shipment; cosmetic damage or exterior finish; Replacement parts...


