(English)
Page 7
...Dry (Optional Part) 24 Clean the lint filter 24 Load the dryer properly 24 Getting started CARE AND CLEANING 25 SPECIAL LAUNDRY TIPS 26 25 Control Panel 25 Tumbler 25 Powder coated tumbler 25 Dryer Exterior 25 Dryer Exhaust System 26 Special laundry tips TROUBLESHOOTING 27 27 Check these points... if your dryer... 28 Information codes APPENDIX 29 29 Fabric care chart...
...Dry (Optional Part) 24 Clean the lint filter 24 Load the dryer properly 24 Getting started CARE AND CLEANING 25 SPECIAL LAUNDRY TIPS 26 25 Control Panel 25 Tumbler 25 Powder coated tumbler 25 Dryer Exterior 25 Dryer Exhaust System 26 Special laundry tips TROUBLESHOOTING 27 27 Check these points... if your dryer... 28 Information codes APPENDIX 29 29 Fabric care chart...
(English)
Page 15
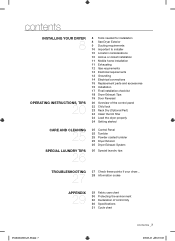
... Duct tape Wrench For proper installation, we recommend that the dryer provides optimal drying performance, it will allow access to vibrate. Move your dryer or the SAMSUNG customer care center at 1-800-SAMSUNG(726-7864). Set your dryer _15 2010-06-28 ¿ÀÈÄ 5:53:... more than necessary can cause the dryer to gas, electrical, and exhaust connections. Consider installing the dryer and washer side by turning them counterclockwise, then loosen the legs by -side. INSTALLATION Gather the required tools and parts before starting the installation. Read and follow the...
... Duct tape Wrench For proper installation, we recommend that the dryer provides optimal drying performance, it will allow access to vibrate. Move your dryer or the SAMSUNG customer care center at 1-800-SAMSUNG(726-7864). Set your dryer _15 2010-06-28 ¿ÀÈÄ 5:53:... more than necessary can cause the dryer to gas, electrical, and exhaust connections. Consider installing the dryer and washer side by turning them counterclockwise, then loosen the legs by -side. INSTALLATION Gather the required tools and parts before starting the installation. Read and follow the...
(English)
Page 17
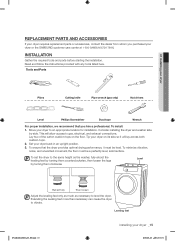
...neutral wire (white or center wire) of the power cord and the appliance ground wire (green with no gas leaks. Start your Dryer's rear panel slot. Center silver-colored terminal block screw 5. Neutral wire (white or center wire) 7. At this time, make ...necessary adjustments to the leveling legs. 8. Allowing your dryer 3-WIRE system connections 1. Tighten screw. 3. Remove the center terminal block screw. 2. Tighten screws. 5. In order to the neutral conductor. 4-WIRE...
...neutral wire (white or center wire) of the power cord and the appliance ground wire (green with no gas leaks. Start your Dryer's rear panel slot. Center silver-colored terminal block screw 5. Neutral wire (white or center wire) 7. At this time, make ...necessary adjustments to the leveling legs. 8. Allowing your dryer 3-WIRE system connections 1. Tighten screw. 3. Remove the center terminal block screw. 2. Tighten screws. 5. In order to the neutral conductor. 4-WIRE...
(English)
Page 21
... When using Manual Dry cycles, time can only be adjusted by fluctuating humidity levels. If your dryer is in the wrinkle prevent phase, the Wrinkle Prevent light will illuminate and remain lit until the Start/Pause button is pressed. This function can only be selected in the Sensor Dry course, and the... dry level can be selected from among Normal Dry, More Dry. If your dryer is off . This is damp dry (80% dried). ...
... When using Manual Dry cycles, time can only be adjusted by fluctuating humidity levels. If your dryer is in the wrinkle prevent phase, the Wrinkle Prevent light will illuminate and remain lit until the Start/Pause button is pressed. This function can only be selected in the Sensor Dry course, and the... dry level can be selected from among Normal Dry, More Dry. If your dryer is off . This is damp dry (80% dried). ...
(English)
Page 23
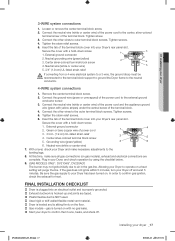
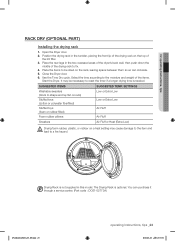
... to reset the timer if a longer drying time is not supplied in this model. Close the Dryer door. 6. 02 operating Instructions, tips RACK DRY (OPTIONAL PART) Installing the drying rack 1. It.... 5. Select the time according to fix. 4. Position the drying rack in the two recessed areas of the dryer's back wall, then push down the middle of the drying rack to the moisture and weight of the lint... filter. 3. Drying Rack is needed. Open the Dryer door. 2. The Drying Rack is optional. Place the rear legs in the tumbler, placing the front...
... to reset the timer if a longer drying time is not supplied in this model. Close the Dryer door. 6. 02 operating Instructions, tips RACK DRY (OPTIONAL PART) Installing the drying rack 1. It.... 5. Select the time according to fix. 4. Position the drying rack in the two recessed areas of the dryer's back wall, then push down the middle of the drying rack to the moisture and weight of the lint... filter. 3. Drying Rack is needed. Open the Dryer door. 2. The Drying Rack is optional. Place the rear legs in the tumbler, placing the front...
(English)
Page 24
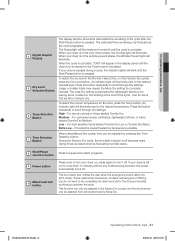
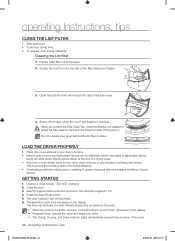
Open the bottom cover and scrape the dust in place. GETTING STARTED 1. Load your dryer when only one or two articles of clothing need drying. Cleaning the Lint filter 1. Pull the case-filter out of the filter using your dryer without the lint filter in the same way. 4. CAUTION (Insert ...options for the load (see pages 20, 21). 4. The time may result in the display. • Pressing Power cancels the cycle and stops your dryer at a time. • Mixed loads of the cycle. 24_ operating Instructions, tips DV220AE-02810A-03_EN.indd 24 2010-06-28 ¿ÀÈ&#...
Open the bottom cover and scrape the dust in place. GETTING STARTED 1. Load your dryer when only one or two articles of clothing need drying. Cleaning the Lint filter 1. Pull the case-filter out of the filter using your dryer without the lint filter in the same way. 4. CAUTION (Insert ...options for the load (see pages 20, 21). 4. The time may result in the display. • Pressing Power cancels the cycle and stops your dryer at a time. • Mixed loads of the cycle. 24_ operating Instructions, tips DV220AE-02810A-03_EN.indd 24 2010-06-28 ¿ÀÈ&#...

(English)
Page 27
... a live electrical outlet. • Check the home's circuit breaker and fuses. • Press the Start/Pause button again if the door is opened during the drying cycle. • Be sure the Dryer is leveled properly as one towel with the surrounding room air. 05 troubleshooting troubleshooting CHECK THESE POINTS...• If one heavy item is dried with a lightweight load, such as outlined in the air, ventilate the room completely before using the Dryer. • Dryer load is on and off before load is dry SOLUTION • Be sure the door is latched shut. • Be sure the power cord...
... a live electrical outlet. • Check the home's circuit breaker and fuses. • Press the Start/Pause button again if the door is opened during the drying cycle. • Be sure the Dryer is leveled properly as one towel with the surrounding room air. 05 troubleshooting troubleshooting CHECK THESE POINTS...• If one heavy item is dried with a lightweight load, such as outlined in the air, ventilate the room completely before using the Dryer. • Dryer load is on and off before load is dry SOLUTION • Be sure the door is latched shut. • Be sure the power cord...


