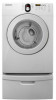
Samsung DV209AEW Research
Related Manual Pages


Similar Questions

Trying To Download A Service Repair Manual Pdf
I am trying to find a pdf download service manual for electric dryer model DV42H5000EW/AC
I am trying to find a pdf download service manual for electric dryer model DV42H5000EW/AC
(Posted by Anonymous-167104 3 years ago)

How To Replacing A Heating Element In A Samsung Dv209aew/xaa
(Posted by mterLdvans 9 years ago)

How To Replace A Belt On A Samsung Front Load Dryer Model Dv209aew
(Posted by baldoSh 9 years ago)

My Dryer Is Running But Not Getting Hot
the dryer is running but the kool icon is on and will not go off did tempeture will not get hot
the dryer is running but the kool icon is on and will not go off did tempeture will not get hot
(Posted by joanncurtin184 10 years ago)

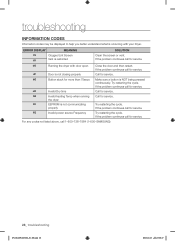
What Does My Samsung Dv209aew/xaa Clothes Dryer Error Code 'e5' Mean? Note:, Th
What does my Samsung DV209AEW/XAA clothes dryer error code "E5" mean? Note:, the top horizontal bar ...
What does my Samsung DV209AEW/XAA clothes dryer error code "E5" mean? Note:, the top horizontal bar ...
(Posted by stew1124 12 years ago)
Related Terms
The following terms were also used when searching for Samsung DV209AEW Research:- samsung dv209aew
- samsung dryer dv209aew
- dv209aew samsung
- dv209aew dryer
- dv209aew review
- samsung dv209aew dryer
- dv209aew xaa
- dv209aew/xaa
- dv209aew dryer review
- dv209aew reviews
- samsung dv209aew review
- samsung dv209aew xaa
- dv209aew heating element
- dv209aew manual
- dv209aew price
- dv209aew prices
- dv209aew
- dv209aew belt
- dv209aew belt repair
- dv209aew belt replacement
- dv209aew best price
- dv209aew diagram
- dv209aew dimensions
- dv209aew dryer 4-wire installation
- dv209aew dryer belt
- dv209aew dryer belt installation
- dv209aew dryer heater replacement
- dv209aew dryer how to install
- dv209aew dryer manual
- dv209aew dryer reviews
- dv209aew electric dryer
- dv209aew element
- dv209aew error codes
- dv209aew has power won't start
- dv209aew heating element repair
- dv209aew how to change heating element
- dv209aew lowes
- dv209aew no heat
- dv209aew no heating
- dv209aew not heating
- dv209aew not spinning
- dv209aew parts
- dv209aew rating
- dv209aew repair manual
- dv209aew replace heat element
- dv209aew replacement parts
- dv209aew samsung dryer
- dv209aew samsung review
- dv209aew service manual
- dv209aew specifications
- dv209aew thermostat
- dv209aew troubleshooting
- dv209aew user manual
- dv209aew washing machine
- dv209aew won't heat
- dv209aew wont heat
- dv209aew xaa belt
- dv209aew xaa belt replacement
- dv209aew xaa dryer manual
- dv209aew xaa dryer parts
- dv209aew xaa heating element
- dv209aew xaa manual
- dv209aew xaa motor dryer
- dv209aew xaa no heating
- dv209aew xaa parts
- dv209aew xaa service manual
- dv209aew/xaa belt
- dv209aew/xaa belt replacement
- dv209aew/xaa clicking but not running
- dv209aew/xaa diagram
- dv209aew/xaa dryer
- dv209aew/xaa dryer belt
- dv209aew/xaa dryer not heating
- dv209aew/xaa error codes
- dv209aew/xaa heating element
- dv209aew/xaa heating element for dryer
- dv209aew/xaa heating element replacement
- dv209aew/xaa how to fix belt
- dv209aew/xaa lint
- dv209aew/xaa manual
- dv209aew/xaa no heat
- dv209aew/xaa no heating
- dv209aew/xaa not heating
- dv209aew/xaa parts
- dv209aew/xaa power cord
- dv209aew/xaa samsung dryer belt replacement
- dv209aew/xaa samsung dryer heating element
- dv209aew/xaa service manual
- dv209aew/xaa thermal fuse
- dv209aew/xaa thermistor
- dv209aew/xaa thermostat part
- dv209aew/xaa troubleshooting
- dv209aew/xaa wiring diagram
- dv209aew/xaa won't heat
- dv209aew/xaa won't start
- dv209aew/xaa wont heat
- dv209aew/xaa wont start
- dv219aew xaa
- dv219aew/xaa
- dv219aew/xaa belt
- dv219aew/xaa belt replacement
- dv219aew/xaa not heating
- heating element for dv209aew
- samsung dryer dv209aew reviews
- samsung dryer dv209aew xaa
- samsung dv209aew belt
- samsung dv209aew belt repair
- samsung dv209aew belt replacement
- samsung dv209aew best price
- samsung dv209aew diagram
- samsung dv209aew dimensions
- samsung dv209aew dryer belt
- samsung dv209aew dryer belt installation
- samsung dv209aew dryer heater replacement
- samsung dv209aew dryer how to install
- samsung dv209aew dryer manual
- samsung dv209aew dryer review
- samsung dv209aew dryer reviews
- samsung dv209aew electric dryer
- samsung dv209aew error codes
- samsung dv209aew heating element
- samsung dv209aew heating element repair
- samsung dv209aew manual
- samsung dv209aew no heat
- samsung dv209aew no heating
- samsung dv209aew not spinning
- samsung dv209aew parts
- samsung dv209aew prices
- samsung dv209aew replacement parts
- samsung dv209aew reviews
- samsung dv209aew service manual
- samsung dv209aew specifications
- samsung dv209aew troubleshooting
- samsung dv209aew won't heat
- samsung dv209aew wont heat
- samsung dv209aew xaa belt
- samsung dv209aew xaa belt replacement
- samsung dv209aew xaa dryer parts
- samsung dv209aew xaa heating element
- samsung dv209aew xaa manual
- samsung dv209aew xaa motor dryer
- samsung dv209aew xaa no heating
- samsung dv209aew xaa parts
- samsung dv209aew xaa service manual
- samsung dv209aew/xaa
- samsung dv209aew/xaa belt
- samsung dv209aew/xaa belt replacement
- samsung dv209aew/xaa dryer
- samsung dv209aew/xaa dryer belt
- samsung dv209aew/xaa dryer not heating
- samsung dv209aew/xaa error codes
- samsung dv209aew/xaa heating element
- samsung dv209aew/xaa how to fix belt
- samsung dv209aew/xaa lint
- samsung dv209aew/xaa manual
- samsung dv209aew/xaa no heat
- samsung dv209aew/xaa no heating
- samsung dv209aew/xaa not heating
- samsung dv209aew/xaa parts
- samsung dv209aew/xaa power cord
- samsung dv209aew/xaa thermal fuse
- samsung dv209aew/xaa thermistor
- samsung dv209aew/xaa troubleshooting
- samsung dv209aew/xaa wiring diagram
- samsung dv209aew/xaa won't heat
- samsung dv209aew/xaa won't start
- samsung dv209aew/xaa wont heat
- samsung dv209aew/xaa wont start
- samsung dv219aew
- samsung dv219aew xaa
- samsung dv219aew/xaa
- samsung dv219aew/xaa belt
- samsung dv219aew/xaa belt replacement
- samsung dv219aew/xaa not heating
- samsung front load dv209aew
- samsung model dv209aew