

Installation Guide
Page 2
..., Inc. • All other brand or product names are trademarks of their respective companies or organizations. Samsung Electronics is not responsible for information purposes only. Copyright © 2010 Samsung Electronics Co., Ltd. Copyright_ 1 All information included herein is subject to use of this user's guide.... • Samsung and Samsung logo are trademarks of Samsung Electronics Co., Ltd. • PCL and PCL 6 are trademarks of Hewlett-Packard Company. • Microsoft, Windows, and ...
..., Inc. • All other brand or product names are trademarks of their respective companies or organizations. Samsung Electronics is not responsible for information purposes only. Copyright © 2010 Samsung Electronics Co., Ltd. Copyright_ 1 All information included herein is subject to use of this user's guide.... • Samsung and Samsung logo are trademarks of Samsung Electronics Co., Ltd. • PCL and PCL 6 are trademarks of Hewlett-Packard Company. • Microsoft, Windows, and ...
Installation Guide
Page 3
Contents ABOUT THIS INSTALLATION GUIDE Convention 3 Finding more information 4 SETTING UP THE HARDWARE Installation environment 7 Machine configuration 8 Optional goods by models 9 Installation flow of the hardware 10 Unpacking and placing the hardware 11 Installing the cabinet stand, optional dual cassette feeder or optional high capac- ity feeder 12 Installing the duplex automatic document feeder 12 Installing the accessory box 23 Removing the scanner locking screw 24 Putting the rubber packings 24 Installing the right tray (face up 25 Installing the toner cartridges 27 ...
Contents ABOUT THIS INSTALLATION GUIDE Convention 3 Finding more information 4 SETTING UP THE HARDWARE Installation environment 7 Machine configuration 8 Optional goods by models 9 Installation flow of the hardware 10 Unpacking and placing the hardware 11 Installing the cabinet stand, optional dual cassette feeder or optional high capac- ity feeder 12 Installing the duplex automatic document feeder 12 Installing the accessory box 23 Removing the scanner locking screw 24 Putting the rubber packings 24 Installing the right tray (face up 25 Installing the toner cartridges 27 ...

Installation Guide
Page 4
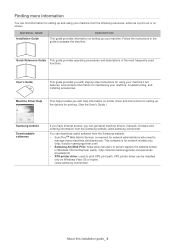
You can refer to this installation guide are mainly based on Windows XP. The following table offers the conventions of the toner cartridge. Provides additional information or detailed specification of the machine as well as detailed explanation on how to install with step-by-step instructions. Convention Some terms in this as shown below: • Document is synonymous with media, or print media. • Machine refers to printer or MFP. Start The date format may differ from your machine depending on its options or models. • The procedures in this installation guide...
You can refer to this installation guide are mainly based on Windows XP. The following table offers the conventions of the toner cartridge. Provides additional information or detailed specification of the machine as well as detailed explanation on how to install with step-by-step instructions. Convention Some terms in this as shown below: • Document is synonymous with media, or print media. • Machine refers to printer or MFP. Start The date format may differ from your machine depending on its options or models. • The procedures in this installation guide...
Installation Guide
Page 5
... screen. User's Guide This guide provides you can get latest machine drivers, manuals, firmware and ordering information from the Samsung website. • SyncThruTM Web Admin Service: convenient for maintaining your machine's full features, and contains information for network ...administrators who need to manage many machines simultaneously. You can download useful software from the Samsung website, www.samsung.com/printer. Follow the instructions in Windows Internet Explorer easily. (http://solution.samsungprinter.com/personal/ anywebprint) •...
... screen. User's Guide This guide provides you can get latest machine drivers, manuals, firmware and ordering information from the Samsung website. • SyncThruTM Web Admin Service: convenient for maintaining your machine's full features, and contains information for network ...administrators who need to manage many machines simultaneously. You can download useful software from the Samsung website, www.samsung.com/printer. Follow the instructions in Windows Internet Explorer easily. (http://solution.samsungprinter.com/personal/ anywebprint) •...
Installation Guide
Page 6
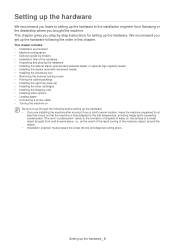
... imaging units • Installing other options • Loading paper • Connecting a printer cable • Turning the machine on the surface of a metal object brought from Samsung or the dealership where you step-by condensation (The term "condensation" refers to the formation of droplets of the moisture (vapor) around the object). •...
... imaging units • Installing other options • Loading paper • Connecting a printer cable • Turning the machine on the surface of a metal object brought from Samsung or the dealership where you step-by condensation (The term "condensation" refers to the formation of droplets of the moisture (vapor) around the object). •...
Installation Guide
Page 7
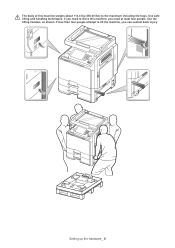
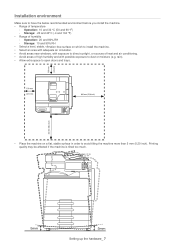
Setting up the hardware_ 6 If less than four people attempt to the maximum including the trays. Use the lifting handles, as shown. The body of this machine, you need to move this machine weighs about 113.4 Kg (250.00 lbs) to lift the machine, you need at least four people. If you can sustain back injury. Use safe lifting and handling techniques.
Setting up the hardware_ 6 If less than four people attempt to the maximum including the trays. Use the lifting handles, as shown. The body of this machine, you need to move this machine weighs about 113.4 Kg (250.00 lbs) to lift the machine, you need at least four people. If you can sustain back injury. Use safe lifting and handling techniques.
Installation Guide
Page 8
Operation: 20 and 80% RH - Printing quality may be affected if the machine is tilted too much. Storage: 10 and 90% RH • Select a level, stable, vibration-free surface on which to install the machine. • Select an area with adequate air circulation. • Avoid areas near windows, with exposure to direct sunlight, or sources of heat and air conditioning. • Avoid areas of high humidity and with possible exposure to dust or moisture (e.g, rain). • Allow extra space to open doors and trays. • Place the machine on a flat, stable surface in order to have the below...
Operation: 20 and 80% RH - Printing quality may be affected if the machine is tilted too much. Storage: 10 and 90% RH • Select a level, stable, vibration-free surface on which to install the machine. • Select an area with adequate air circulation. • Avoid areas near windows, with exposure to direct sunlight, or sources of heat and air conditioning. • Avoid areas of high humidity and with possible exposure to dust or moisture (e.g, rain). • Allow extra space to open doors and trays. • Place the machine on a flat, stable surface in order to have the below...
Installation Guide
Page 9
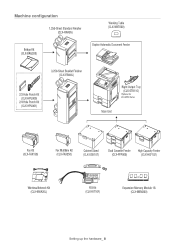
Machine configuration Setting up the hardware_ 8
Machine configuration Setting up the hardware_ 8

Installation Guide
Page 10
... optional goods may not be available depending on models or countries. Tray Roller Set Color PM Kit - Bypass Tray Roller Set ( ●: Included, o: Optional) CLX-9350 SERIES ● o o o o o o o o o o o o o o o o o o o o o o o o o CLX-9250 SERIES o o o o o o o o o o o o o o o o o o o o o o o o o o Setting up the hardware_ 9 Cleaning & Transfer Set Color PM Kit - Optional goods by models include: OPTIONAL GOODS Right Output Tray 1,250...
... optional goods may not be available depending on models or countries. Tray Roller Set Color PM Kit - Bypass Tray Roller Set ( ●: Included, o: Optional) CLX-9350 SERIES ● o o o o o o o o o o o o o o o o o o o o o o o o o CLX-9250 SERIES o o o o o o o o o o o o o o o o o o o o o o o o o o Setting up the hardware_ 9 Cleaning & Transfer Set Color PM Kit - Optional goods by models include: OPTIONAL GOODS Right Output Tray 1,250...
Installation Guide
Page 11
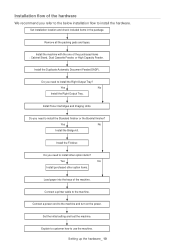
Install the Finisher. Connect a printer cable to the machine and turn on the power. Install the machine with the one of the machine. Yes No Install the Right Output Tray. Install Toner Cartridges and Imaging Units. Yes No Install the Bridge kit. Connect a power cord to the machine. Explain to customer how to install the Right Output Tray? Set the initial setting and test the machine. Set installation location and check included items in the package. Install the Duplicate Automatic Document Feeder(DADF). Yes No Install purchased other option items?...
Install the Finisher. Connect a printer cable to the machine and turn on the power. Install the machine with the one of the machine. Yes No Install the Right Output Tray. Install Toner Cartridges and Imaging Units. Yes No Install the Bridge kit. Connect a power cord to the machine. Explain to customer how to install the Right Output Tray? Set the initial setting and test the machine. Set installation location and check included items in the package. Install the Duplicate Automatic Document Feeder(DADF). Yes No Install purchased other option items?...
Installation Guide
Page 12
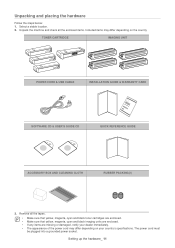
Unpack the machine and check all the tapes. • Make sure that yellow, magenta, cyan and black toner cartridges are enclosed. • Make sure that yellow, magenta, cyan and black imaging units are enclosed. • If any items are missing or damaged, notify your dealer immediately. • The appearance of the power cord may differ depending on your country's specifications. Remove all the enclosed items. Included items may differ depending on the country TONER CARTRIDGE IMAGING UNIT POWER CORD & USB CABLE INSTALLATION GUIDE & WARRANTY CARD SOFTWARE CD & USER'S GUIDE CD ...
Unpack the machine and check all the tapes. • Make sure that yellow, magenta, cyan and black toner cartridges are enclosed. • Make sure that yellow, magenta, cyan and black imaging units are enclosed. • If any items are missing or damaged, notify your dealer immediately. • The appearance of the power cord may differ depending on your country's specifications. Remove all the enclosed items. Included items may differ depending on the country TONER CARTRIDGE IMAGING UNIT POWER CORD & USB CABLE INSTALLATION GUIDE & WARRANTY CARD SOFTWARE CD & USER'S GUIDE CD ...
Installation Guide
Page 13
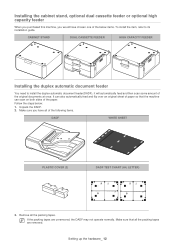
CABINET STAND DUAL CASSETTE FEEDER HIGH CAPACITY FEEDER Installing the duplex automatic document feeder You need to its installation guide. Make sure you would have all the packing tapes. Installing the cabinet stand, optional dual cassette feeder or optional high capacity feeder When you purchased this machine, you have chosen one of the below : 1. Make sure that the machine can scan on both sides of paper so that all the packing tapes are unremoved, the DADF may not operate normally. It can also automatically feed and flip over an original sheet of the paper. Follow ...
CABINET STAND DUAL CASSETTE FEEDER HIGH CAPACITY FEEDER Installing the duplex automatic document feeder You need to its installation guide. Make sure you would have all the packing tapes. Installing the cabinet stand, optional dual cassette feeder or optional high capacity feeder When you purchased this machine, you have chosen one of the below : 1. Make sure that the machine can scan on both sides of paper so that all the packing tapes are unremoved, the DADF may not operate normally. It can also automatically feed and flip over an original sheet of the paper. Follow ...
Installation Guide
Page 14
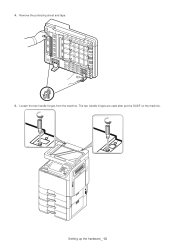
Setting up the hardware_ 13 Remove the protecting sheet and tape. 5. The two handle hinges are used after put the DADF on the machine. Loosen the two handle hinges from the machine. 4.
Setting up the hardware_ 13 Remove the protecting sheet and tape. 5. The two handle hinges are used after put the DADF on the machine. Loosen the two handle hinges from the machine. 4.
Installation Guide
Page 15
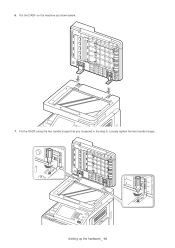
Setting up the hardware_ 14 Fix the DADF using the two handle hinges that you loosened in the step 5. Loosely tighten the two handle hinges. 6. Put the DADF on the machine as shown below. 7.
Setting up the hardware_ 14 Fix the DADF using the two handle hinges that you loosened in the step 5. Loosely tighten the two handle hinges. 6. Put the DADF on the machine as shown below. 7.

Installation Guide
Page 16
8. Setting up the hardware_ 15 You can place the scale mark by handling it back and forth while tightening or loosening the screw at the backside. Fix the steel plate on the longest scale mark using the handle hinge.
8. Setting up the hardware_ 15 You can place the scale mark by handling it back and forth while tightening or loosening the screw at the backside. Fix the steel plate on the longest scale mark using the handle hinge.
Installation Guide
Page 17
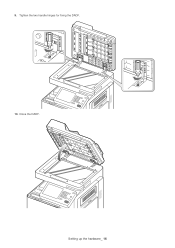
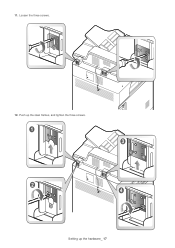
Tighten the two handle hinges for fixing the DADF. 10. Close the DADF. Setting up the hardware_ 16 9.
Tighten the two handle hinges for fixing the DADF. 10. Close the DADF. Setting up the hardware_ 16 9.
Installation Guide
Page 18
Loosen the three screws. 12. Setting up the steel frames, and tighten the three screws. Push up the hardware_ 17 11.
Loosen the three screws. 12. Setting up the steel frames, and tighten the three screws. Push up the hardware_ 17 11.
Installation Guide
Page 19
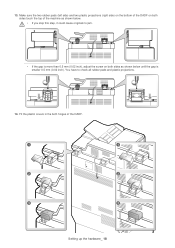
13. Make sure the two rubber pads (left side) and two plastic projections (right side) on the bottom of the DADF on both hinges of the machine as shown below . • If you skip this step, it could cause originals to check all rubber pads and plastic projections. 14. You have to jam. • If the gap is smaller 0.5 mm (0.02 inch). Setting up the hardware_ 18 Fit the plastic covers in the both sides as shown below until the gap is more than 0.5 mm (0.02 inch), adjust the screw on both sides touch the top of the DADF.
13. Make sure the two rubber pads (left side) and two plastic projections (right side) on the bottom of the DADF on both hinges of the machine as shown below . • If you skip this step, it could cause originals to check all rubber pads and plastic projections. 14. You have to jam. • If the gap is smaller 0.5 mm (0.02 inch). Setting up the hardware_ 18 Fit the plastic covers in the both sides as shown below until the gap is more than 0.5 mm (0.02 inch), adjust the screw on both sides touch the top of the DADF.
Installation Guide
Page 20
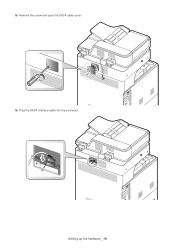
Remove the screw and open the DADF cable cover. 16. Setting up the hardware_ 19 Plug the DADF interface cable into the connector. 15.
Remove the screw and open the DADF cable cover. 16. Setting up the hardware_ 19 Plug the DADF interface cable into the connector. 15.

Installation Guide
Page 21
Put the supporting rubber into the DADF cable cover. Setting up the hardware_ 20 17. Tighten the screw to ground the ground wire. 18.
Put the supporting rubber into the DADF cable cover. Setting up the hardware_ 20 17. Tighten the screw to ground the ground wire. 18.
