
User Guide
Page 5
...400 x 600 dpi effective output (600 x 600 x 2 bit). • You can print on both sides of the paper (double-sided printing) (Manual) (see "Using advanced print features" on page 227). • To save electricity, this machine supports Eco feature (see "Eco printing" on page ...8226; To save toner and paper, this machine automatically conserves electricity by substantially reducing power consumption when not in use the ordinary program (see "Samsung AnyWeb Print" on -demand printing. - Key benefits Environmentally friendly • Fast, on page 260). • Smart Update allows you use...
...400 x 600 dpi effective output (600 x 600 x 2 bit). • You can print on both sides of the paper (double-sided printing) (Manual) (see "Using advanced print features" on page 227). • To save electricity, this machine supports Eco feature (see "Eco printing" on page ...8226; To save toner and paper, this machine automatically conserves electricity by substantially reducing power consumption when not in use the ordinary program (see "Samsung AnyWeb Print" on -demand printing. - Key benefits Environmentally friendly • Fast, on page 260). • Smart Update allows you use...

User Guide
Page 6
You can print in various operating systems (see "System requirements" on page 163. You can conveniently print from the Samsung website, www.samsung.com > find your mobile device using the Wi-Fi or Wi-Fi Direct feature. Key benefits • If you have Internet access,... you can get help, support application, machine drivers, manuals, and order information from your product > Support or Downloads. Supports various wireless network setting method ...
You can print in various operating systems (see "System requirements" on page 163. You can conveniently print from the Samsung website, www.samsung.com > find your mobile device using the Wi-Fi or Wi-Fi Direct feature. Key benefits • If you have Internet access,... you can get help, support application, machine drivers, manuals, and order information from your product > Support or Downloads. Supports various wireless network setting method ...

User Guide
Page 10
... (2-sided) printing (Manual)b USB memory interface Automatic Document Feeder (ADF) CLX-330x series CLX-330xW series ● ● (CLX-330xW series only) ● (CLX-330xW series only) ● (CLX-330xW series only) ● (CLX-330xW series only) ● ● ● CLX-330xFN series CLX-330xFW series ● ● ● (CLX-330xFW series only) ● ● a. Contact your local Samsung dealer or...
... (2-sided) printing (Manual)b USB memory interface Automatic Document Feeder (ADF) CLX-330x series CLX-330xW series ● ● (CLX-330xW series only) ● (CLX-330xW series only) ● (CLX-330xW series only) ● (CLX-330xW series only) ● ● ● CLX-330xFN series CLX-330xFW series ● ● ● (CLX-330xFW series only) ● ● a. Contact your local Samsung dealer or...
User Guide
Page 12
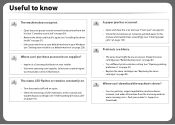
...The machine does not print. • Open the print queue list and remove the document from the Samsung website, www.samsung.com > find your machine as your default machine in this manual and troubleshoot accordingly (see "Clearing paper jams" on page 57). • Replace the toner cartridge ...product off and on again. • Check the meanings of LED indications in this manual and troubleshoot accordingly (see "Understanding the status LED" on removing jammed paper in your retailer. • Visit www.samsung.com/supplies. A paper jam has occurred. • Open and close the scan ...
...The machine does not print. • Open the print queue list and remove the document from the Samsung website, www.samsung.com > find your machine as your default machine in this manual and troubleshoot accordingly (see "Clearing paper jams" on page 57). • Replace the toner cartridge ...product off and on again. • Check the meanings of LED indications in this manual and troubleshoot accordingly (see "Understanding the status LED" on removing jammed paper in your retailer. • Visit www.samsung.com/supplies. A paper jam has occurred. • Open and close the scan ...

User Guide
Page 13
... 13 Note Provides additional information or detailed specification of the machine as well as detailed steps to explain machine usage. • Do not discard this manual, and keep it for your basic understanding of the machine function and feature. 1 Conventions Some terms in this user's guide are used in this user...
... 13 Note Provides additional information or detailed specification of the machine as well as detailed steps to explain machine usage. • Do not discard this manual, and keep it for your basic understanding of the machine function and feature. 1 Conventions Some terms in this user's guide are used in this user...

User Guide
Page 28
... 222). Redials the recently sent fax number or received caller ID in ready mode, or inserts a pause(-) into a fax number in edit mode (see "Receiving manually in the selected menu and increases or decreases values. Allows you need to Scan mode. Then enter a fax number.
... 222). Redials the recently sent fax number or received caller ID in ready mode, or inserts a pause(-) into a fax number in edit mode (see "Receiving manually in the selected menu and increases or decreases values. Allows you need to Scan mode. Then enter a fax number.

User Guide
Page 35
Sending Redial Times Redial Term Prefix Dial ECM Mode Fax Confirm. CLX-330xFN series/ CLX-330xFW series only. This option may not be available depending on your country. Menu Overview and Basic Setup 35 Light+1 Resolution Standard Fine Super Fine ... Name RCV Start Code Auto Reduction Discard Size Junk Fax Setup DRPD Modeb Fax Setupa Change Default Resolution Darkness Original Size Auto Report On Off Manual TX/RX On Off 2. Menu overview Darkness Normal Dark+1-
Sending Redial Times Redial Term Prefix Dial ECM Mode Fax Confirm. CLX-330xFN series/ CLX-330xFW series only. This option may not be available depending on your country. Menu Overview and Basic Setup 35 Light+1 Resolution Standard Fine Super Fine ... Name RCV Start Code Auto Reduction Discard Size Junk Fax Setup DRPD Modeb Fax Setupa Change Default Resolution Darkness Original Size Auto Report On Off Manual TX/RX On Off 2. Menu overview Darkness Normal Dark+1-

User Guide
Page 43
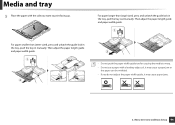
Check your machine depending on page 42). 3 Press and unlatch the guide lock in the tray 2 Open the paper cover. Then adjust the paper length guide and paper width guide. 1 32 2 4 Flex or fan the edge of the paper stack to separate the pages before loading papers. 2. Menu Overview and Basic Setup 43 Media and tray 3 Loading paper in the tray, pull the tray out manually. Illustrations on this user's guide may differ from your machine type (see "Front view" on page 21). 1 Pull out the paper tray (see "Tray overview" on its options or models.
Check your machine depending on page 42). 3 Press and unlatch the guide lock in the tray 2 Open the paper cover. Then adjust the paper length guide and paper width guide. 1 32 2 4 Flex or fan the edge of the paper stack to separate the pages before loading papers. 2. Menu Overview and Basic Setup 43 Media and tray 3 Loading paper in the tray, pull the tray out manually. Illustrations on this user's guide may differ from your machine type (see "Front view" on page 21). 1 Pull out the paper tray (see "Tray overview" on its options or models.
User Guide
Page 44
... do not adjust the paper width guide, it may cause paper jams. 2. For paper smaller than Legal-sized, press and unlatch the guide lock in manually. Then adjust the paper length guide and paper width guide. 1 2 For paper longer than Letter-sized, press and unlatch the guide lock in the tray..., push the tray in the tray, pull the tray out manually. Media and tray 5 Place the paper with a leading-edge curl, it may cause a paper jam or the paper can be wrinkled. • If you want...
... do not adjust the paper width guide, it may cause paper jams. 2. For paper smaller than Legal-sized, press and unlatch the guide lock in manually. Then adjust the paper length guide and paper width guide. 1 2 For paper longer than Letter-sized, press and unlatch the guide lock in the tray..., push the tray in the tray, pull the tray out manually. Media and tray 5 Place the paper with a leading-edge curl, it may cause a paper jam or the paper can be wrinkled. • If you want...

User Guide
Page 47
... sheet at a time (see "Print media specifications" on page 120). • Illustrations on this user's guide may differ from the Samsung Easy Printer Manager select (Switch to print without a paper mismatch error. Types Plain Thick Thin Bond Color CardStock Labels Preprinted Cotton Recycled Archive...Menu Overview and Basic Setup 47 The paper setting in tray. (●: Supported, Blank: Not supported) Traya 2. The paper types available manual feeding in the machine and driver should match to advanced mode) > Device Settings. Or if your machine type (see for paper weights for...
... sheet at a time (see "Print media specifications" on page 120). • Illustrations on this user's guide may differ from the Samsung Easy Printer Manager select (Switch to print without a paper mismatch error. Types Plain Thick Thin Bond Color CardStock Labels Preprinted Cotton Recycled Archive...Menu Overview and Basic Setup 47 The paper setting in tray. (●: Supported, Blank: Not supported) Traya 2. The paper types available manual feeding in the machine and driver should match to advanced mode) > Device Settings. Or if your machine type (see for paper weights for...

User Guide
Page 68
Sending a fax manually Perform the following to send a fax using the number keypad on the control panel. 6 Press (Start) on the control panel when you hear a high-pitched ... document feeder (see "Loading originals" on page 51). 2 Select (fax) on the control panel. 3 Adjust the resolution and the darkness to suit your computer, use Samsung Network PC Fax (see "Sending a fax in the computer" on page 249). • When you want to send a fax directly from the remote fax machine...
Sending a fax manually Perform the following to send a fax using the number keypad on the control panel. 6 Press (Start) on the control panel when you hear a high-pitched ... document feeder (see "Loading originals" on page 51). 2 Select (fax) on the control panel. 3 Adjust the resolution and the darkness to suit your computer, use Samsung Network PC Fax (see "Sending a fax in the computer" on page 249). • When you want to send a fax directly from the remote fax machine...

User Guide
Page 150
... parameters necessary for the machine to connect to various network environments. 3 SetIP wired network setup This utility program allows you to select a network interface and manually configure the IP addresses for use with corporate internet access. • Download this program from http://solution.samsungprinter.com. 1 SyncThru™ Web Service The web...
... parameters necessary for the machine to connect to various network environments. 3 SetIP wired network setup This utility program allows you to select a network interface and manually configure the IP addresses for use with corporate internet access. • Download this program from http://solution.samsungprinter.com. 1 SyncThru™ Web Service The web...

User Guide
Page 159
... address (Address starts with FE80). • Stateless Address: Automatically configured IPv6 address by a network router. • Stateful Address: IPv6 address configured by a DHCPv6 server. • Manual Address: Manually configured IPv6 address by model" on page 7 or "Menu overview" on again.
... address (Address starts with FE80). • Stateless Address: Automatically configured IPv6 address by a network router. • Stateful Address: IPv6 address configured by a DHCPv6 server. • Manual Address: Manually configured IPv6 address by model" on page 7 or "Menu overview" on again.

User Guide
Page 161
... Address: Automatically configured IPv6 address by a network router. • Stateful Address: IPv6 address configured by a DHCPv6 server. • Manual Address: Manually configured IPv6 address by a user. 3 Enter the IPv6 addresses (e.g.,: http://[FE80::215:99FF:FE66:7701]). Using a Network-Connected Machine ...161 "A" is activated. IPv6 configuration • You can also set the DHCPv6. • To manually set the IPv6 address: Check the Manual Address check box. Then, the Address/Prefix text box is the hexadecimal 0 through 9, A through F). IPv6 address...
... Address: Automatically configured IPv6 address by a network router. • Stateful Address: IPv6 address configured by a DHCPv6 server. • Manual Address: Manually configured IPv6 address by a user. 3 Enter the IPv6 addresses (e.g.,: http://[FE80::215:99FF:FE66:7701]). Using a Network-Connected Machine ...161 "A" is activated. IPv6 configuration • You can also set the DHCPv6. • To manually set the IPv6 address: Check the Manual Address check box. Then, the Address/Prefix text box is the hexadecimal 0 through 9, A through F). IPv6 address...

User Guide
Page 169
... not appear in detail. Shortcut to prepare • Access point • Network-connected computer • Software CD that was installed. Items to the Samsung Easy Wireless Setup program without the CD (see "Installing driver over the network" on page 154). 1 Press the (Menu) button on options or ...models. If you can give or edit manually their own SSID , or choose the security option in the display depending on the control panel. 2 Press Network > Wireless > WLAN Settings. 3 Press ...
... not appear in detail. Shortcut to prepare • Access point • Network-connected computer • Software CD that was installed. Items to the Samsung Easy Wireless Setup program without the CD (see "Installing driver over the network" on page 154). 1 Press the (Menu) button on options or ...models. If you can give or edit manually their own SSID , or choose the security option in the display depending on the control panel. 2 Press Network > Wireless > WLAN Settings. 3 Press ...

User Guide
Page 171
Open System: Authentication is manually configured on a WPA Pre-Shared Key. This uses a shared secret key (generally called Pre Shared Key pass phrase), which is not used, and encryption may ...; Operation Mode: Select Infrastructure. • Authentication: Select an authentication type. Select the name (SSID) of the access point you want to set the wireless configuration manually, click Advanced Setting. • Enter the wireless Network Name: Enter the SSID of its clients. • Encryption: Select the encryption (None, WEP64, WEP128, TKIP, AES...
Open System: Authentication is manually configured on a WPA Pre-Shared Key. This uses a shared secret key (generally called Pre Shared Key pass phrase), which is not used, and encryption may ...; Operation Mode: Select Infrastructure. • Authentication: Select an authentication type. Select the name (SSID) of the access point you want to set the wireless configuration manually, click Advanced Setting. • Enter the wireless Network Name: Enter the SSID of its clients. • Encryption: Select the encryption (None, WEP64, WEP128, TKIP, AES...

User Guide
Page 180
... Direct by using WEP Encryption, select the appropriate WEP Key Index. Click Next. 2. Using a Network-Connected Machine 180 When you set the wireless configuration manually, click Advanced Setting. • Enter the wireless Network Name: Enter the SSID of the access point (or router). • Wi-Fi Direct option...print server based on the WPA Pre-Shared Key. Check the settings and click Next. Click Next. 15 When the wireless network settings are using Samsung Easy Printer Manager (see "Setting up Wi-Fi Direct" on page 190). • Wi-Fi Direct Name: The default Wi-Fi Direct ...
... Direct by using WEP Encryption, select the appropriate WEP Key Index. Click Next. 2. Using a Network-Connected Machine 180 When you set the wireless configuration manually, click Advanced Setting. • Enter the wireless Network Name: Enter the SSID of the access point (or router). • Wi-Fi Direct option...print server based on the WPA Pre-Shared Key. Check the settings and click Next. Click Next. 15 When the wireless network settings are using Samsung Easy Printer Manager (see "Setting up Wi-Fi Direct" on page 190). • Wi-Fi Direct Name: The default Wi-Fi Direct ...

User Guide
Page 187
.... Configuring the machine's wireless network Before starting wireless parameter configuration, check the cable connection status. 1 Check whether or not the network cable is used to manually set the network IP address of the network interface and can be found in the below default ID and password. We recommend you need to...
.... Configuring the machine's wireless network Before starting wireless parameter configuration, check the cable connection status. 1 Check whether or not the network cable is used to manually set the network IP address of the network interface and can be found in the below default ID and password. We recommend you need to...

User Guide
Page 191
...Fi Direct. Turn on . Setting up the mobile device • After setting up Wi-Fi Direct from the printer, refer to the user manual of pushing the WPS button. 20 Troubleshooting Problems during setup or driver installation Printers Not Found • Your machine may not be connected to your... mobile device. • If your mobile device does not support WPS, you need to download the mobile printing application (For example: Samsung Mobile printer) to your computer and machine. Press the WPS button on the printer and it will blink. Check the network name (SSID) on...
...Fi Direct. Turn on . Setting up the mobile device • After setting up Wi-Fi Direct from the printer, refer to the user manual of pushing the WPS button. 20 Troubleshooting Problems during setup or driver installation Printers Not Found • Your machine may not be connected to your... mobile device. • If your mobile device does not support WPS, you need to download the mobile printing application (For example: Samsung Mobile printer) to your computer and machine. Press the WPS button on the printer and it will blink. Check the network name (SSID) on...

User Guide
Page 197
You can click cancel in multitasking area. AirPrint 26 Printing via AirPrint For example, the iPad manual provides these instructions: 1 Open your email, photo, web page, or document you want to print. 2 Touch the action icon( ). 3 Select your printer driver name and option menu to set up. 4 Touch Print button. Cancelling print job: To cancel the printing job or view the print summary, click the print center icon ( ) in the print center. 2. Using a Network-Connected Machine 197 Print it out.
You can click cancel in multitasking area. AirPrint 26 Printing via AirPrint For example, the iPad manual provides these instructions: 1 Open your email, photo, web page, or document you want to print. 2 Touch the action icon( ). 3 Select your printer driver name and option menu to set up. 4 Touch Print button. Cancelling print job: To cancel the printing job or view the print summary, click the print center icon ( ) in the print center. 2. Using a Network-Connected Machine 197 Print it out.

