User Manual (ENGLISH)
Page 59
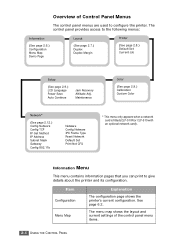
... menus are used to configure the printer. See page 6.2. The control panel provides access to give details about the printer and its configuration. Maintenance Color (See page 2.9.) Calibration Custom Color Network* (See page 2.12.) ...Config Network Config TCP IP Get Method IP Address Subnet Mask Gateway Config 802.11b Netware Config Netware IPX Frame Type Reset Network Default Set Print Net CFG * This menu only appears when a network card is fitted (CLP-510N or CLP...
... menus are used to configure the printer. See page 6.2. The control panel provides access to give details about the printer and its configuration. Maintenance Color (See page 2.9.) Calibration Custom Color Network* (See page 2.12.) ...Config Network Config TCP IP Get Method IP Address Subnet Mask Gateway Config 802.11b Netware Config Netware IPX Frame Type Reset Network Default Set Print Net CFG * This menu only appears when a network card is fitted (CLP-510N or CLP...

User Manual (ENGLISH)
Page 61
... the page for double-sided printing. Item Explanation Default Set This menu item allows you to restore the printer's factory default settings. Printer Menu This menu allows you to reset the printer settings or cancel the current job. Current Job You can increase or decrease the value in 0.1mm increments...position: In portrait orientation, appears in the upper line of the page. You can cancel the current print job and remove it from the printer buffer. 2.8 USING THE CONTROL PANEL Item Duplex Margin Explanation In this menu, you can set the margins for short binding, from 0.0mm...
... the page for double-sided printing. Item Explanation Default Set This menu item allows you to restore the printer's factory default settings. Printer Menu This menu allows you to reset the printer settings or cancel the current job. Current Job You can increase or decrease the value in 0.1mm increments...position: In portrait orientation, appears in the upper line of the page. You can cancel the current print job and remove it from the printer buffer. 2.8 USING THE CONTROL PANEL Item Duplex Margin Explanation In this menu, you can set the margins for short binding, from 0.0mm...

User Manual (ENGLISH)
Page 67
... item lets you select whether or not you set. Select Yes to On. This item reboots the network interface card. This item performs a simple reset and restores the factory default for the network configuration. Options: Yes, No* You can select this item only when you set Config Netware to Yes...frame type. • EN_SNAP: Select this item only when you set Netware to select the frame type. Item Netware Config Netware IPX Frame Type Reset Network Default Set Print Net CFG 2.14 USING THE CONTROL PANEL Explanation Options: On*, Off You can specify the frame type parameter used on the...
... item lets you select whether or not you set. Select Yes to On. This item reboots the network interface card. This item performs a simple reset and restores the factory default for the network configuration. Options: Yes, No* You can select this item only when you set Config Netware to Yes...frame type. • EN_SNAP: Select this item only when you set Netware to select the frame type. Item Netware Config Netware IPX Frame Type Reset Network Default Set Print Net CFG 2.14 USING THE CONTROL PANEL Explanation Options: On*, Off You can specify the frame type parameter used on the...
User Manual (ENGLISH)
Page 146
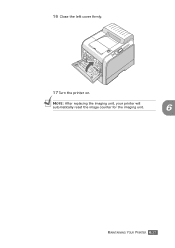
NOTE: After replacing the imaging unit, your printer will automatically reset the image counter for the imaging unit. 6 MAINTAINING YOUR PRINTER 6.21 16 Close the left cover firmly. 17 Turn the printer on.
NOTE: After replacing the imaging unit, your printer will automatically reset the image counter for the imaging unit. 6 MAINTAINING YOUR PRINTER 6.21 16 Close the left cover firmly. 17 Turn the printer on.
User Manual (ENGLISH)
Page 153
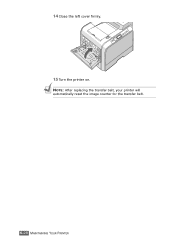
14 Close the left cover firmly. 15 Turn the printer on. NOTE: After replacing the transfer belt, your printer will automatically reset the image counter for the transfer belt. 6.28 MAINTAINING YOUR PRINTER
14 Close the left cover firmly. 15 Turn the printer on. NOTE: After replacing the transfer belt, your printer will automatically reset the image counter for the transfer belt. 6.28 MAINTAINING YOUR PRINTER

User Manual (ENGLISH)
Page 235
...button ( ) to access the menu. 3 Press scroll button ( or ) until "Reset Network" displays on the bottom line. Press the Enter button ( ). 4 Press the Enter button ( ). C.12 USING YOUR PRINTER ON A NETWORK You can reset the network interface card when a network problems occurs. 1 In ready mode, press ...interface card you see "Network" on the bottom line of the display. 2 Press the Enter button ( ) to confirm the selection. The printer resets the network interface card. To configure the wireless settings: 1 In ready mode, press the Menu button ( ) until you see "Network" ...
...button ( ) to access the menu. 3 Press scroll button ( or ) until "Reset Network" displays on the bottom line. Press the Enter button ( ). 4 Press the Enter button ( ). C.12 USING YOUR PRINTER ON A NETWORK You can reset the network interface card when a network problems occurs. 1 In ready mode, press ...interface card you see "Network" on the bottom line of the display. 2 Press the Enter button ( ) to confirm the selection. The printer resets the network interface card. To configure the wireless settings: 1 In ready mode, press the Menu button ( ) until you see "Network" ...


