
User Manual (user Manual) (ver.f3) (English)
Page 3
... Liability Licensed by Qualcomm Incorporated under one or more of Liability EXCEPT AS SET FORTH IN THE EXPRESS WARRANTY CONTAINED ON THE WARRANTY PAGE ENCLOSED WITH THE PRODUCT, THE PURCHASER TAKES THE PRODUCT "AS IS", AND SAMSUNG MAKES NO EXPRESS OR IMPLIED WARRANTY OF ANY KIND WHATSOEVER WITH RESPECT TO ... EXPRESS OR IMPLIED WARRANTY OF ANY KIND WHATSOEVER WITH RESPECT TO THE PRODUCT. THE PERFORMANCE OF THE PRODUCT; Disclaimer of Warranties; IN ADDITION, SAMSUNG SHALL NOT BE LIABLE FOR ANY DAMAGES OF ANY KIND RESULTING FROM THE PURCHASE OR USE OF THE PRODUCT OR ARISING FROM THE BREACH OF...
... Liability Licensed by Qualcomm Incorporated under one or more of Liability EXCEPT AS SET FORTH IN THE EXPRESS WARRANTY CONTAINED ON THE WARRANTY PAGE ENCLOSED WITH THE PRODUCT, THE PURCHASER TAKES THE PRODUCT "AS IS", AND SAMSUNG MAKES NO EXPRESS OR IMPLIED WARRANTY OF ANY KIND WHATSOEVER WITH RESPECT TO ... EXPRESS OR IMPLIED WARRANTY OF ANY KIND WHATSOEVER WITH RESPECT TO THE PRODUCT. THE PERFORMANCE OF THE PRODUCT; Disclaimer of Warranties; IN ADDITION, SAMSUNG SHALL NOT BE LIABLE FOR ANY DAMAGES OF ANY KIND RESULTING FROM THE PURCHASE OR USE OF THE PRODUCT OR ARISING FROM THE BREACH OF...

User Manual (user Manual) (ver.f3) (English)
Page 5
Exclusion of Liability 3 Section 1: Getting Started 9 Activating Your Phone 10 Setting Up Your Voicemail 11 Understanding this User Manual 12 Section 2: Understanding Your Phone 13 Features of Your Phone 14 Front Views of Your Phone 15 Command Keys 16 Understanding the Display Screen 19 Battery 22 Section 3: Call Functions 25 Making a Call 26 International ...Entry Mode 54 Using T9 Mode 54 Entering Upper and Lower Case 55 Table of Warranties; Table of Contents Table of Contents Intellectual Property 2 Samsung Telecommunications America (STA), L.P 2 Disclaimer of Contents 5
Exclusion of Liability 3 Section 1: Getting Started 9 Activating Your Phone 10 Setting Up Your Voicemail 11 Understanding this User Manual 12 Section 2: Understanding Your Phone 13 Features of Your Phone 14 Front Views of Your Phone 15 Command Keys 16 Understanding the Display Screen 19 Battery 22 Section 3: Call Functions 25 Making a Call 26 International ...Entry Mode 54 Using T9 Mode 54 Entering Upper and Lower Case 55 Table of Warranties; Table of Contents Table of Contents Intellectual Property 2 Samsung Telecommunications America (STA), L.P 2 Disclaimer of Contents 5

User Manual (user Manual) (ver.f3) (English)
Page 7
... 9: Changing Your Settings 109 Time and Date Settings 110 Sound Settings 110 Display Settings 114 Voice Kit Settings 119 Setup Settings 120 Section 10: Health and Safety Information . . . 133 Health and Safety Information 134 Consumer Information on Wireless Phones 136 Road Safety 146 Operating Environment 148 Using Your Phone Near Other Electronic ... Precautions 156 Care and Maintenance 157 Section 11: Warranty Information 159 Standard Limited Warranty 160 Intellectual Property Statement 166 Samsung Telecommunications America (STA), L.P. . . . . 167 Index 169 Table of Contents 7
... 9: Changing Your Settings 109 Time and Date Settings 110 Sound Settings 110 Display Settings 114 Voice Kit Settings 119 Setup Settings 120 Section 10: Health and Safety Information . . . 133 Health and Safety Information 134 Consumer Information on Wireless Phones 136 Road Safety 146 Operating Environment 148 Using Your Phone Near Other Electronic ... Precautions 156 Care and Maintenance 157 Section 11: Warranty Information 159 Standard Limited Warranty 160 Intellectual Property Statement 166 Samsung Telecommunications America (STA), L.P. . . . . 167 Index 169 Table of Contents 7

User Manual (user Manual) (ver.f3) (English)
Page 9
Section 1: Getting Started 9 Section 1 Section 1: Getting Started Topics Covered • Activating Your Phone • Setting Up Your Voicemail • Understanding this User Manual This section allows you to start using your phone by activating your service, setting up your Voicemail, or getting an understanding of how this manual is put together.
Section 1: Getting Started 9 Section 1 Section 1: Getting Started Topics Covered • Activating Your Phone • Setting Up Your Voicemail • Understanding this User Manual This section allows you to start using your phone by activating your service, setting up your Voicemail, or getting an understanding of how this manual is put together.

User Manual (user Manual) (ver.f3) (English)
Page 11
... hold the key, enter , or dial your own mobile number to enter your password. 2. Voicemail Setup-New Customer 1. Section 1 Setting Up Your Voicemail Setting Up Your Voicemail Voicemail allows callers to access Voicemail. Follow the prompts in the voice tutorial to view details of voice messages in your... Voicemail account has been set up, you can be retrieved any time. Note: Once your voice mailbox. In standby mode, press and hold the key, enter ,...
... hold the key, enter , or dial your own mobile number to enter your password. 2. Voicemail Setup-New Customer 1. Section 1 Setting Up Your Voicemail Setting Up Your Voicemail Voicemail allows callers to access Voicemail. Follow the prompts in the voice tutorial to view details of voice messages in your... Voicemail account has been set up, you can be retrieved any time. Note: Once your voice mailbox. In standby mode, press and hold the key, enter ,...

User Manual (user Manual) (ver.f3) (English)
Page 12
... 169. Fast facts provides definitions in context and proximity to define terms, and more. Notes and tips Throughout this guide are set apart from the glossary. The definitions for these methods are intended to point out important information, quick methods for activating features, to...sub menus in question. • Important: Points out important information about the current feature that could affect performance, or even damage your phone. Section 1 Understanding this User Manual The chapters of this manual generally follow the same order as follows: • Notes: Explain ...
... 169. Fast facts provides definitions in context and proximity to define terms, and more. Notes and tips Throughout this guide are set apart from the glossary. The definitions for these methods are intended to point out important information, quick methods for activating features, to...sub menus in question. • Important: Points out important information about the current feature that could affect performance, or even damage your phone. Section 1 Understanding this User Manual The chapters of this manual generally follow the same order as follows: • Notes: Explain ...

User Manual (user Manual) (ver.f3) (English)
Page 16
... are defined by what appears above each in the display is Edit, press the Edit (left ) soft key ( ) to edit a Contacts list entry or Profile setting. 16 Left soft key Some functions of the left soft key ( ) and the right soft key ( ).
... are defined by what appears above each in the display is Edit, press the Edit (left ) soft key ( ) to edit a Contacts list entry or Profile setting. 16 Left soft key Some functions of the left soft key ( ) and the right soft key ( ).

User Manual (user Manual) (ver.f3) (English)
Page 20
... is available only in the Verizon Wireless network. 2G Protocol: Indicates your phone is using the IS95-2G (Digital) protocol. GPS (United States Only): Global Positioning Service is set. Alarm clock: The alarm clock is set to On for emergency calls only. The 1X protocol is not capable of... high-speed data (3G). The phone alerts you to these by vibration and a flashing service LED. 20 ...
... is available only in the Verizon Wireless network. 2G Protocol: Indicates your phone is using the IS95-2G (Digital) protocol. GPS (United States Only): Global Positioning Service is set. Alarm clock: The alarm clock is set to On for emergency calls only. The 1X protocol is not capable of... high-speed data (3G). The phone alerts you to these by vibration and a flashing service LED. 20 ...

User Manual (user Manual) (ver.f3) (English)
Page 36
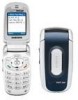
Your phone is acquired. If no preferred systems are available: • Home only -- The roaming icon appears in the designated ... is used to acquire service. The preferred roaming list is active, and extra charges may be unavailable while roaming. Note: Contact your phone to other digital networks. Note: Some features may apply when making or receiving a call. If no preferred systems are found , any...normal operation only in the display when roaming is used to acquire service. Roaming Options Roam Option sets roaming preferences if you move out of your home network.
Your phone is acquired. If no preferred systems are available: • Home only -- The roaming icon appears in the designated ... is used to acquire service. The preferred roaming list is active, and extra charges may be unavailable while roaming. Note: Contact your phone to other digital networks. Note: Some features may apply when making or receiving a call. If no preferred systems are found , any...normal operation only in the display when roaming is used to acquire service. Roaming Options Roam Option sets roaming preferences if you move out of your home network.
User Manual (user Manual) (ver.f3) (English)
Page 37
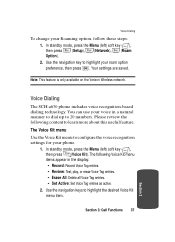
Your settings are saved. Note: This feature is only available on the Verizon Wireless network. Voice Dialing The SCH-a630 phone includes voice recognition-based dialing technology. In standby mode, press the Menu (left ) soft key ( ), then press (Setup), (Network), (Roam... Option). 2. Section 3: Call Functions 37 Section 3 The Voice Kit menu Use the Voice Kit menu to configure the voice recognition settings for ...
Your settings are saved. Note: This feature is only available on the Verizon Wireless network. Voice Dialing The SCH-a630 phone includes voice recognition-based dialing technology. In standby mode, press the Menu (left ) soft key ( ), then press (Setup), (Network), (Roam... Option). 2. Section 3: Call Functions 37 Section 3 The Voice Kit menu Use the Voice Kit menu to configure the voice recognition settings for ...

User Manual (user Manual) (ver.f3) (English)
Page 39
... Quick Dial, you can use your Voice Dial list 1. You're prompted to highlight a name. 4. Use Voice Dial Once you set up menu with your keypad and press OK." 5. The phone prompts, "Connecting," and the number is highlighted. 2. Record is dialed. Press the Option (left ) soft key ( ), then ... (left ) soft key ( ) to dial Contacts. 1. The entry is saved. Enter the name or phrase, then press . Enter the phone number, then press . The phone plays back the name or phrase, the Voice Dial screen appears in the display. 3. Press (Review). Use the navigation key to enter the...
... Quick Dial, you can use your Voice Dial list 1. You're prompted to highlight a name. 4. Use Voice Dial Once you set up menu with your keypad and press OK." 5. The phone prompts, "Connecting," and the number is highlighted. 2. Record is dialed. Press the Option (left ) soft key ( ), then ... (left ) soft key ( ) to dial Contacts. 1. The entry is saved. Enter the name or phrase, then press . Enter the phone number, then press . The phone plays back the name or phrase, the Voice Dial screen appears in the display. 3. Press (Review). Use the navigation key to enter the...

User Manual (user Manual) (ver.f3) (English)
Page 41
...and press . to activate Voice Kit for repeated calls. Use the Navigation keys to select Yes (to delete all Voice Tag names were deleted. Press (Set Active). The following activation options appear in the display. • [0] Only: Press and hold to select the method for the highlighted option. Now,...the headset. 3. In standby mode, press the Menu (left) soft key ( ), then press (Voice Kit). Voice Dialing 2. Press and hold to your phone. Press to release Voice Kit. • [0]/EarMic: Attach a headset to activate Voice Kit. Section 3 Section 3: Call Functions 41
...and press . to activate Voice Kit for repeated calls. Use the Navigation keys to select Yes (to delete all Voice Tag names were deleted. Press (Set Active). The following activation options appear in the display. • [0] Only: Press and hold to select the method for the highlighted option. Now,...the headset. 3. In standby mode, press the Menu (left) soft key ( ), then press (Voice Kit). Voice Dialing 2. Press and hold to your phone. Press to release Voice Kit. • [0]/EarMic: Attach a headset to activate Voice Kit. Section 3 Section 3: Call Functions 41

User Manual (user Manual) (ver.f3) (English)
Page 45
... voice encryption. • Location: Turn the GPS setting to launch its corresponding application. Note: If the call , press the Menu (left) soft key ( ). While in a call is disconnected while accessing the In-Use Option, the InUse Option disappears from the display and the phone eventually returns to standby mode. 1. The following In..., outgoing, and missed calls. • Contacts: Open the Contacts list and view contacts. • Silent/Quit: Silences/restores keypad tones. • Send Tel #: Sends your cell phone number as DTMF tones.
... voice encryption. • Location: Turn the GPS setting to launch its corresponding application. Note: If the call , press the Menu (left) soft key ( ). While in a call is disconnected while accessing the In-Use Option, the InUse Option disappears from the display and the phone eventually returns to standby mode. 1. The following In..., outgoing, and missed calls. • Contacts: Open the Contacts list and view contacts. • Silent/Quit: Silences/restores keypad tones. • Send Tel #: Sends your cell phone number as DTMF tones.

User Manual (user Manual) (ver.f3) (English)
Page 46
Section 4 • Version: View the software and hardware version information for your phone. 2. Use the navigation key to activate the feature. 46 If you press the Msg (right) soft key ( ) in while in a call, the following Messages menu items appear in the display: • Send New Msg • Voice Mail • Inbox • Outbox • Draft • Msg Setting • Erase Msg 3. Press to open the highlighted menu or to highlight a menu.
Section 4 • Version: View the software and hardware version information for your phone. 2. Use the navigation key to activate the feature. 46 If you press the Msg (right) soft key ( ) in while in a call, the following Messages menu items appear in the display: • Send New Msg • Voice Mail • Inbox • Outbox • Draft • Msg Setting • Erase Msg 3. Press to open the highlighted menu or to highlight a menu.

User Manual (user Manual) (ver.f3) (English)
Page 48
Alert 3.6.2.1 Volume/Vibrate 3.6.2.2 Type 3.6.2.3 Reminder 3.6.2.4 Alert On Call 3.6.3 Auto Play 3.6.4 Auto View 3.6.5 Auto Erase 3.6.6 Block/Unblock 3.6.7 Quick Text 3.6.8 Signature 3.6.9 Voice Mail # 48 Section 4 2.3 Rename Group 2.4 My Phone# 2.5 Memory 3 Messages 3.1 Send New Msg 3.2 Voice Mail 3.3 Inbox 3.4 Outbox 3.5 Draft 3.6 Msg Setting 3.6.1 Send Setting 3.6.1.1 SaveInOutbox 3.6.1.2 Callback # 3.6.1.3 Entry Mode 3.6.1.4 Insert Sign. 3.6.1.5 Delivery Ack 3.6.2 Msg.
Alert 3.6.2.1 Volume/Vibrate 3.6.2.2 Type 3.6.2.3 Reminder 3.6.2.4 Alert On Call 3.6.3 Auto Play 3.6.4 Auto View 3.6.5 Auto Erase 3.6.6 Block/Unblock 3.6.7 Quick Text 3.6.8 Signature 3.6.9 Voice Mail # 48 Section 4 2.3 Rename Group 2.4 My Phone# 2.5 Memory 3 Messages 3.1 Send New Msg 3.2 Voice Mail 3.3 Inbox 3.4 Outbox 3.5 Draft 3.6 Msg Setting 3.6.1 Send Setting 3.6.1.1 SaveInOutbox 3.6.1.2 Callback # 3.6.1.3 Entry Mode 3.6.1.4 Insert Sign. 3.6.1.5 Delivery Ack 3.6.2 Msg.

User Manual (user Manual) (ver.f3) (English)
Page 51
Section 4 7 Voice Kit 7.1 Record 7.2 Review 7.3 Erase All 7.4 Set Active 8 Setup 8.1 Location 8.2 Network 8.2.1 Set NAM 8.2.2 Roam Option 8.3 Security 8.4 Others 8.4.1 Shortcut 8.4.2 Call Answer 8.4.3 Auto Retry 8.4.4 Language 8.4.5 Clock Set 8.4.6 TTY/TDD Mode 8.5 Version Menu Outline Section 4: Menu Navigation 51
Section 4 7 Voice Kit 7.1 Record 7.2 Review 7.3 Erase All 7.4 Set Active 8 Setup 8.1 Location 8.2 Network 8.2.1 Set NAM 8.2.2 Roam Option 8.3 Security 8.4 Others 8.4.1 Shortcut 8.4.2 Call Answer 8.4.3 Auto Retry 8.4.4 Language 8.4.5 Clock Set 8.4.6 TTY/TDD Mode 8.5 Version Menu Outline Section 4: Menu Navigation 51

User Manual (user Manual) (ver.f3) (English)
Page 85
...Validity, Privacy, whether you want to have a Delivery Acknowledgement, Insert a Signature or Call Back #, and whether you send a message. 1. After the set priority, validity, privacy, and other options before you want to Defer Delivery of privacy for your message. • Delivery Ack--Off/On--Request confirmation ...for more information on these settings. • Save In Draft: Save the message to the recipient. Quick Text messages are pre-composed messages that you want the ...
...Validity, Privacy, whether you want to have a Delivery Acknowledgement, Insert a Signature or Call Back #, and whether you send a message. 1. After the set priority, validity, privacy, and other options before you want to Defer Delivery of privacy for your message. • Delivery Ack--Off/On--Request confirmation ...for more information on these settings. • Save In Draft: Save the message to the recipient. Quick Text messages are pre-composed messages that you want the ...

User Manual (user Manual) (ver.f3) (English)
Page 86
Delivery--Immediate/Set Time--Choose when you can view it later. • Press the View (right) soft key ( ) to open ... Sender. 86 Section 7 • Callback #--Yes/No/Edit--Insert a number into your message for each menu item. 4. Receive TXT Messages When your phone receives a message in standby mode, a ringer sounds (unless turned off), and New Message appears in the display. • Press the Ignore (left ... navigation keys to display the various Send Options for the recipient to call you want your phone to enter the option's sub menu. When the send option you back. • Def.
Delivery--Immediate/Set Time--Choose when you can view it later. • Press the View (right) soft key ( ) to open ... Sender. 86 Section 7 • Callback #--Yes/No/Edit--Insert a number into your message for each menu item. 4. Receive TXT Messages When your phone receives a message in standby mode, a ringer sounds (unless turned off), and New Message appears in the display. • Press the Ignore (left ... navigation keys to display the various Send Options for the recipient to call you want your phone to enter the option's sub menu. When the send option you back. • Def.
User Manual (user Manual) (ver.f3) (English)
Page 92
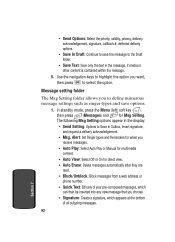
...• Block/Unblock: Block messages from a web address or phone number. • Quick Text: Edit any new message that you want, then press to select the option. The following Msg Setting options appear in the display: • Send Setting: Options to Save in the message, if media or other content...: Select Auto Play or Manual for multimedia content. • Auto View: Select Off or On for Msg Setting. Message setting folder The Msg Setting folder allows you to define numerous message settings such as ringer types and save the message to the Draft folder. • Save Text: Save only the...
...• Block/Unblock: Block messages from a web address or phone number. • Quick Text: Edit any new message that you want, then press to select the option. The following Msg Setting options appear in the display: • Send Setting: Options to Save in the message, if media or other content...: Select Auto Play or Manual for multimedia content. • Auto View: Select Off or On for Msg Setting. Message setting folder The Msg Setting folder allows you to define numerous message settings such as ringer types and save the message to the Draft folder. • Save Text: Save only the...

User Manual (user Manual) (ver.f3) (English)
Page 93
Erase message folder Use Erase Msg to erase all your Voicemail number. 2. Press , then select and change the available settings. Note: Erase Msg erases all messages in a particular folder, or use the Option menu (left ) soft key ( ), then press (Messages) and for...the folder. 4. Use the navigation key to select the highlighted folder. To delete a single message, use the All Messages options to highlight the message setting menu you want . 3. Use the navigation keys to highlight the folder containing messages that you want to confirm the erasure of all of a message...
Erase message folder Use Erase Msg to erase all your Voicemail number. 2. Press , then select and change the available settings. Note: Erase Msg erases all messages in a particular folder, or use the Option menu (left ) soft key ( ), then press (Messages) and for...the folder. 4. Use the navigation key to select the highlighted folder. To delete a single message, use the All Messages options to highlight the message setting menu you want . 3. Use the navigation keys to highlight the folder containing messages that you want to confirm the erasure of all of a message...


