User Manual (user Manual) (ver.1.0) (English)
Page 4
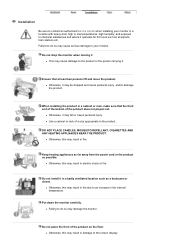
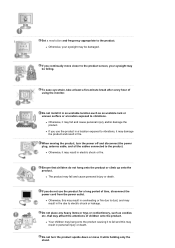
... at airports, train stations etc. z Otherwise, this may be dropped and cause personal injury, and/or damage the product. Do not drop the monitor when moving it operates for 24 hours such as at least two persons lift and move the product. Ensure that the front end of the... cord or the product as a bookcase or closet. z Otherwise, this may cause damage to the product.. Put down the monitor carefully. z Failing to an increase in damage to your monitor in fire due to do so may result in a badly ventilated location such as possible. z Otherwise, this may cause serious...
... at airports, train stations etc. z Otherwise, this may be dropped and cause personal injury, and/or damage the product. Do not drop the monitor when moving it operates for 24 hours such as at least two persons lift and move the product. Ensure that the front end of the... cord or the product as a bookcase or closet. z Otherwise, this may cause damage to the product.. Put down the monitor carefully. z Failing to an increase in damage to your monitor in fire due to do so may result in a badly ventilated location such as possible. z Otherwise, this may cause serious...
User Manual (user Manual) (ver.1.0) (English)
Page 5
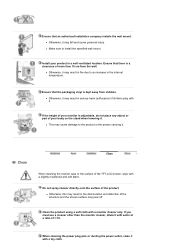
... the product or the person carrying it may fall and cause personal injury. z Otherwise, it may peel off. If the height of your monitor is adjustable, do not place any object or part of your product in the discoloration and distortion of 1:10. Do not spray cleaner directly ... mount. If you must use a cleaner other than 10 cm from children. Ensure that there is kept away from the wall. Clean When cleaning the monitor case or the surface of the product. Ensure that an authorized installation company installs the wall mount. z Otherwise, it . z Otherwise, this may cause...
... the product or the person carrying it may fall and cause personal injury. z Otherwise, it may peel off. If the height of your monitor is adjustable, do not place any object or part of your product in the discoloration and distortion of 1:10. Do not spray cleaner directly ... mount. If you must use a cleaner other than 10 cm from children. Ensure that there is kept away from the wall. Clean When cleaning the monitor case or the surface of the product. Ensure that an authorized installation company installs the wall mount. z Otherwise, it . z Otherwise, this may cause...
User Manual (user Manual) (ver.1.0) (English)
Page 7
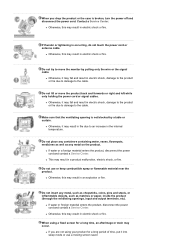
... product or the case is occurring, do not touch the power cord or antenna cable. z Otherwise, this may occur. Do not lift or move the monitor by a table or curtain. z This may result in a product malfunction, electric shock, or fire. Make sure that the ventilating opening is not blocked by pulling...
... product or the case is occurring, do not touch the power cord or antenna cable. z Otherwise, this may occur. Do not lift or move the monitor by a table or curtain. z This may result in a product malfunction, electric shock, or fire. Make sure that the ventilating opening is not blocked by pulling...
User Manual (user Manual) (ver.1.0) (English)
Page 8
... break after every hour of time, disconnect the power cord from the power outlet. If you use the product for a long period of using the monitor. z Otherwise, it may hang onto the product causing it in overheating or fire due to vibrations. z Otherwise, this may attract the attentions of children onto...
... break after every hour of time, disconnect the power cord from the power outlet. If you use the product for a long period of using the monitor. z Otherwise, it may hang onto the product causing it in overheating or fire due to vibrations. z Otherwise, this may attract the attentions of children onto...
User Manual (user Manual) (ver.1.0) (English)
Page 10
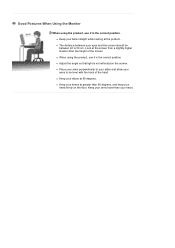
... at the product. Keep your heels firmly on the screen. z When using the product, use it in the correct position. Good Postures When Using the Monitor When using the product, use it in the correct position. z Keep your back straight while looking at greater than 90 degrees, and keep your arms...
... at the product. Keep your heels firmly on the screen. z When using the product, use it in the correct position. Good Postures When Using the Monitor When using the product, use it in the correct position. z Keep your back straight while looking at greater than 90 degrees, and keep your arms...
User Manual (user Manual) (ver.1.0) (English)
Page 11
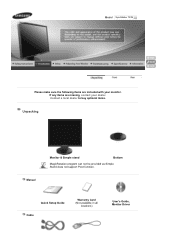
Contact a local dealer to buy optional items. Unpacking Manual Monitor & Simple stand Bottom MagicRotation program can not be provided as Simple Stand does not support Pivot function. Model SyncMaster 723N Please make sure the following items are missing, contact your monitor. Quick Setup Guide Cable Warranty Card (Not available in all locations) User's Guide, Monitor Driver If any items are included with your dealer.
Contact a local dealer to buy optional items. Unpacking Manual Monitor & Simple stand Bottom MagicRotation program can not be provided as Simple Stand does not support Pivot function. Model SyncMaster 723N Please make sure the following items are missing, contact your monitor. Quick Setup Guide Cable Warranty Card (Not available in all locations) User's Guide, Monitor Driver If any items are included with your dealer.
User Manual (user Manual) (ver.1.0) (English)
Page 12
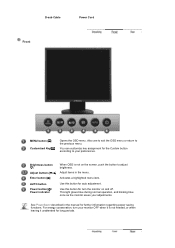
...to your adjustments. See PowerSaver described in the menu. This light glows blue during normal operation, and blinking blue once as the monitor saves your preferences. AUTO button Use this button for auto adjustment. Power button [ ]/ Power indicator Use this button for turn your... it is not on and off. Adjust items in the manual for the Custom button according to the previous menu. For energy conservation, turn the monitor on the screen, push the button to adjust brightness. D-sub Cable Power Cord Front MENU button [ ] Customized Key[ ] Opens the OSD menu...
...to your adjustments. See PowerSaver described in the menu. This light glows blue during normal operation, and blinking blue once as the monitor saves your preferences. AUTO button Use this button for auto adjustment. Power button [ ]/ Power indicator Use this button for turn your... it is not on and off. Adjust items in the manual for the Custom button according to the previous menu. For energy conservation, turn the monitor on the screen, push the button to adjust brightness. D-sub Cable Power Cord Front MENU button [ ] Customized Key[ ] Opens the OSD menu...
User Manual (user Manual) (ver.1.0) (English)
Page 13
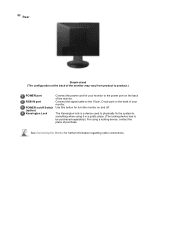
... the signal cable to the 15-pin, D-sub port on the back of your monitor to the power port on the back of the monitor. Use this button for turn the monitor on and off Switch (option) Kensington Lock Connect the power cord for further information regarding cable connections. Rear ...Simple stand (The configuration at the back of the monitor may vary from product to product.) POWER port RGB IN port POWER on/off . The Kensington lock is a device used to physically fix the...
... the signal cable to the 15-pin, D-sub port on the back of your monitor to the power port on the back of the monitor. Use this button for turn the monitor on and off Switch (option) Kensington Lock Connect the power cord for further information regarding cable connections. Rear ...Simple stand (The configuration at the back of the monitor may vary from product to product.) POWER port RGB IN port POWER on/off . The Kensington lock is a device used to physically fix the...
User Manual (user Manual) (ver.1.0) (English)
Page 14
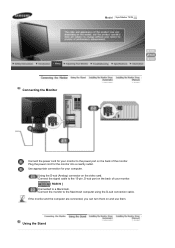
...723N Connecting the Monitor Connect the power cord for your monitor to the power port on the back of your computer. Using the Stand Connect the signal cable to the Macintosh computer using the D-sub connection cable. Use appropriate connection for the monitor into a nearby outlet. Connect the monitor... to the 15-pin, D-sub port on the back of the monitor. Plug the power cord for your monitor. [ RGB IN ] Connected to a Macintosh. If the monitor and the computer are connected, you ...
...723N Connecting the Monitor Connect the power cord for your monitor to the power port on the back of your computer. Using the Stand Connect the signal cable to the Macintosh computer using the D-sub connection cable. Use appropriate connection for the monitor into a nearby outlet. Connect the monitor... to the 15-pin, D-sub port on the back of the monitor. Plug the power cord for your monitor. [ RGB IN ] Connected to a Macintosh. If the monitor and the computer are connected, you ...
User Manual (user Manual) (ver.1.0) (English)
Page 15
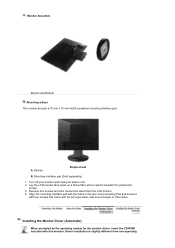
...base. Remove four screws and then remove the stand from one operating Turn off your monitor and unplug its power cord. 2. Monitor Assembly Monitor and Bottom Attaching a Base This monitor accepts a 75 mm x 75 mm VESA-compliant mounting interface pad. Mounting interface ...pad (Sold separately) 1. Monitor Simple stand B. Driver installation is slightly different from the LCD monitor. 4. Installing the Monitor Driver (Automatic) When prompted by the operating system for the monitor driver, insert the CD-ROM included with the holes ...
...base. Remove four screws and then remove the stand from one operating Turn off your monitor and unplug its power cord. 2. Monitor Assembly Monitor and Bottom Attaching a Base This monitor accepts a 75 mm x 75 mm VESA-compliant mounting interface pad. Mounting interface ...pad (Sold separately) 1. Monitor Simple stand B. Driver installation is slightly different from the LCD monitor. 4. Installing the Monitor Driver (Automatic) When prompted by the operating system for the monitor driver, insert the CD-ROM included with the holes ...
User Manual (user Manual) (ver.1.0) (English)
Page 16
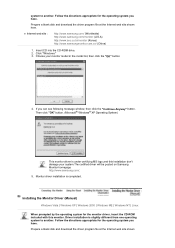
... file at the Internet web site shown here. Choose your system.The certified driver will be posted on Samsung Monitor homepage http://www.samsung.com/. 5. If you have . Driver installation is slightly different from one operating system to another . ... the "Continue Anyway" button. z Internet web site : http://www.samsung.com/ (Worldwide) http://www.samsung.com/monitor (U.S.A) http://www.sec.co.kr/monitor (Korea) http://www.samsungmonitor.com.cn/ (China) 1. Click "Windows" 3. Installing the Monitor Driver (Manual) Windows Vista | Windows XP | Windows 2000 | Windows...
... file at the Internet web site shown here. Choose your system.The certified driver will be posted on Samsung Monitor homepage http://www.samsung.com/. 5. If you have . Driver installation is slightly different from one operating system to another . ... the "Continue Anyway" button. z Internet web site : http://www.samsung.com/ (Worldwide) http://www.samsung.com/monitor (U.S.A) http://www.sec.co.kr/monitor (Korea) http://www.samsungmonitor.com.cn/ (China) 1. Click "Windows" 3. Installing the Monitor Driver (Manual) Windows Vista | Windows XP | Windows 2000 | Windows...
User Manual (user Manual) (ver.1.0) (English)
Page 17
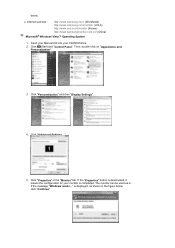
... drive. 2. If the message "Windows needs..." Insert your Manual CD into your monitor is . Click (Start) and "Control Panel". Click "Properties" in the figure below . z Internet web site : http://www.samsung.com/ (Worldwide) http://www.samsung.com/monitor (U.S.A) http://www.sec.co.kr/monitor (Korea) http://www.samsungmonitor.com.cn/ (China) Microsoft® Windows Vista...
... drive. 2. If the message "Windows needs..." Insert your Manual CD into your monitor is . Click (Start) and "Control Panel". Click "Properties" in the figure below . z Internet web site : http://www.samsung.com/ (Worldwide) http://www.samsung.com/monitor (U.S.A) http://www.sec.co.kr/monitor (Korea) http://www.samsungmonitor.com.cn/ (China) Microsoft® Windows Vista...

User Manual (user Manual) (ver.1.0) (English)
Page 18
...computer for example, D:\Drive) where the driver setup file is under certifying MS logo, and this installation doesn't damage your monitor from a list of monitor models on the screen, and click "Next". Select the model that matches your system. Click "Update Driver..." and select the... folder (for driver software" checkbox and click "Let me pick from the list of device drivers on Samsung Monitor homepage http://www.samsung.com/ 6. This monitor driver is located, and click "OK". 9. Click "Have Disk..." in the "Driver" tab. 7. The certified driver ...
...computer for example, D:\Drive) where the driver setup file is under certifying MS logo, and this installation doesn't damage your monitor from a list of monitor models on the screen, and click "Next". Select the model that matches your system. Click "Update Driver..." and select the... folder (for driver software" checkbox and click "Let me pick from the list of device drivers on Samsung Monitor homepage http://www.samsung.com/ 6. This monitor driver is located, and click "OK". 9. Click "Have Disk..." in the "Driver" tab. 7. The certified driver ...
User Manual (user Manual) (ver.1.0) (English)
Page 20
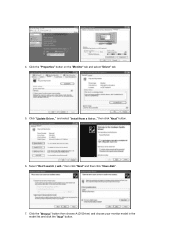
Click the "Properties" button on the "Monitor" tab and select "Driver" tab. 5. Select "Don't search ,I will.." 4. Click the "Browse" button then choose A:(D:\Driver) and choose your monitor model in the model list and click the "Next" button. then click "Next" and then click "Have disk". 7. then click "Next" button. 6. and select "Install from a list or.." Click "Update Driver.."
Click the "Properties" button on the "Monitor" tab and select "Driver" tab. 5. Select "Don't search ,I will.." 4. Click the "Browse" button then choose A:(D:\Driver) and choose your monitor model in the model list and click the "Next" button. then click "Next" and then click "Have disk". 7. then click "Next" button. 6. and select "Install from a list or.." Click "Update Driver.."
User Manual (user Manual) (ver.1.0) (English)
Page 21
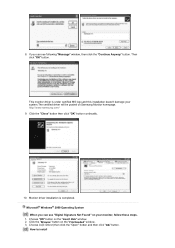
...System When you can see following "Message" window, then click the "Continue Anyway" button. 8. Choose "OK" button on Samsung Monitor homepage. This monitor driver is completed. Click the "Browse" button on your system.The certified driver will be posted on the "Insert disk" ... Choose A:(D:\Driver) then click the "Open" button and then click "OK" button. http://www.samsung.com/ 9. Monitor driver installation is under certified MS logo,and this installation doesn't damage your monitor, follow these steps. 1. If you can see "Digital Signature Not Found" on the "File ...
...System When you can see following "Message" window, then click the "Continue Anyway" button. 8. Choose "OK" button on Samsung Monitor homepage. This monitor driver is completed. Click the "Browse" button on your system.The certified driver will be posted on the "Insert disk" ... Choose A:(D:\Driver) then click the "Open" button and then click "OK" button. http://www.samsung.com/ 9. Monitor driver installation is under certified MS logo,and this installation doesn't damage your monitor, follow these steps. 1. If you can see "Digital Signature Not Found" on the "File ...
User Manual (user Manual) (ver.1.0) (English)
Page 22
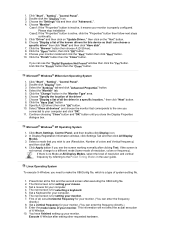
...for this device so that you close the Display Properties dialogue box. Choose the "Settings" tab and then click "Advanced..". 4. Choose your monitor. (You can choose a specific driver" then click "Next" and then click "Have disk". 7. Click Apply button if you can .... This information will not affect the actual execution of the driver". 7. Click "Start" , "Setting" , "Control Panel". 2. Choose "Monitor". Please stop installation Case2: If the "Properties" button is properly configured. Click the "Have Disk" button 9. 1. In Display Registration Information window...
...for this device so that you close the Display Properties dialogue box. Choose the "Settings" tab and then click "Advanced..". 4. Choose your monitor. (You can choose a specific driver" then click "Next" and then click "Have disk". 7. Click Apply button if you can .... This information will not affect the actual execution of the driver". 7. Click "Start" , "Setting" , "Control Panel". 2. Choose "Monitor". Please stop installation Case2: If the "Properties" button is properly configured. Click the "Have Disk" button 9. 1. In Display Registration Information window...
User Manual (user Manual) (ver.1.0) (English)
Page 24
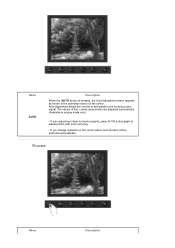
If you change resolution in analog mode only) - Locked Menu Description The values of fine, coarse and position are adjusted automatically. (Available in the control panel, auto function will be executed automatically. Menu AUTO Description When the 'AUTO' button is pressed, the Auto Adjustment screen appears as shown in the animated screen on the center. If auto adjustment does not work properly, press AUTO button again to the incoming video signal. Auto adjustment allows the monitor to self-adjust to adjust picture with more accuracy. -
If you change resolution in analog mode only) - Locked Menu Description The values of fine, coarse and position are adjusted automatically. (Available in the control panel, auto function will be executed automatically. Menu AUTO Description When the 'AUTO' button is pressed, the Auto Adjustment screen appears as shown in the animated screen on the center. If auto adjustment does not work properly, press AUTO button again to the incoming video signal. Auto adjustment allows the monitor to self-adjust to adjust picture with more accuracy. -
User Manual (user Manual) (ver.1.0) (English)
Page 25
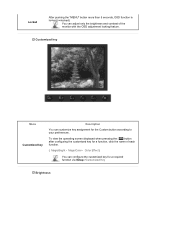
... >Customized Key Brightness To view the operating screen displayed when pressing the [ ] button after configuring the customized key for a function, click the name of the monitor with the OSD adjustment locking feature. Locked After pushing the "MENU" button more than 5 seconds, OSD function is locked (unlocked). MagicColor - You can configure the...
... >Customized Key Brightness To view the operating screen displayed when pressing the [ ] button after configuring the customized key for a function, click the name of the monitor with the OSD adjustment locking feature. Locked After pushing the "MENU" button more than 5 seconds, OSD function is locked (unlocked). MagicColor - You can configure the...
User Manual (user Manual) (ver.1.0) (English)
Page 30
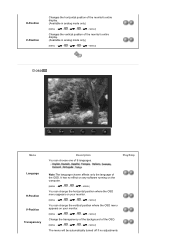
...chosen affects only the language of 9 languages. H-Position V-Position Changes the horizontal position of the monitor's entire display. (Available in analog mode only) [MENU MENU] Changes the vertical position of the monitor's entire display. (Available in analog mode only) [MENU MENU] OSD Menu Description You can... change the vertical position where the OSD menu appears on your monitor. [MENU MENU] Change the transparency of the background of the OSD. [MENU MENU] The menu will be automatically turned off if ...
...chosen affects only the language of 9 languages. H-Position V-Position Changes the horizontal position of the monitor's entire display. (Available in analog mode only) [MENU MENU] Changes the vertical position of the monitor's entire display. (Available in analog mode only) [MENU MENU] OSD Menu Description You can... change the vertical position where the OSD menu appears on your monitor. [MENU MENU] Change the transparency of the background of the OSD. [MENU MENU] The menu will be automatically turned off if ...
User Manual (user Manual) (ver.1.0) (English)
Page 31
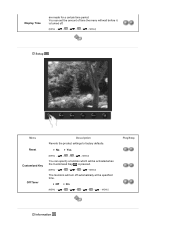
z No z Yes [MENU MENU] You can set the amount of time the menu will wait before it is pressed. [MENU MENU] The monitors will be activated when the Customized Key( ) is turned off automatically at the specified time. z Off z On [MENU MENU] Play/Stop Information You can specify a function which will turn off . [MENU MENU] Setup Menu Reset Customized Key Off Timer Description Reverts the product settings to factory defaults. Display Time are made for a certain time period.
z No z Yes [MENU MENU] You can set the amount of time the menu will wait before it is pressed. [MENU MENU] The monitors will be activated when the Customized Key( ) is turned off automatically at the specified time. z Off z On [MENU MENU] Play/Stop Information You can specify a function which will turn off . [MENU MENU] Setup Menu Reset Customized Key Off Timer Description Reverts the product settings to factory defaults. Display Time are made for a certain time period.


