
User Guide
Page 1
All rights reserved. Install Programs PDF Manuals Registration Model SyncMaster 700TSn, 820TSn Select Language Safety Instructions Introduction Connections Using the Software Adjusting the LCD Display Troubleshooting Specifications Information Appendix © 2008 Samsung Electronics Co., Ltd.
All rights reserved. Install Programs PDF Manuals Registration Model SyncMaster 700TSn, 820TSn Select Language Safety Instructions Introduction Connections Using the Software Adjusting the LCD Display Troubleshooting Specifications Information Appendix © 2008 Samsung Electronics Co., Ltd.

User Guide
Page 2
... fire. Select Language Main Page Safety Instructions Notational Power Installation Clean Others Power Installation Guide Introduction Connections Using the Software Adjusting the LCD Display Troubleshooting Specifications Information Appendix Model SyncMaster 700TSn, 820TSn The color and appearance of the product may vary depending on the model, and the product specifications are subject to DPM...
... fire. Select Language Main Page Safety Instructions Notational Power Installation Clean Others Power Installation Guide Introduction Connections Using the Software Adjusting the LCD Display Troubleshooting Specifications Information Appendix Model SyncMaster 700TSn, 820TSn The color and appearance of the product may vary depending on the model, and the product specifications are subject to DPM...

User Guide
Page 3
Do not disconnect the power cord while using the LCD Display. z A surge may damage the LCD Display. z This may cause fire. z This may cause electric shock or fire. z Using the power cord with a dry cloth. z This may cause fire. To disconnect the ... etc. z If the connector or plug of the power cord is dusty. Installation Be sure to contact an authorized the Service Center, when installing your LCD Display in a location with heavy dust, high or low temperatures, high humidity, and exposed to one outlet.
Do not disconnect the power cord while using the LCD Display. z A surge may damage the LCD Display. z This may cause fire. z This may cause electric shock or fire. z Using the power cord with a dry cloth. z This may cause fire. To disconnect the ... etc. z If the connector or plug of the power cord is dusty. Installation Be sure to contact an authorized the Service Center, when installing your LCD Display in a location with heavy dust, high or low temperatures, high humidity, and exposed to one outlet.
User Guide
Page 4
...as someone walking by, specifically children. z Otherwise, this may trip over it. Keep any heating devices away from the showcase or shelf. Install the LCD Display base in a location with poor ventilation, for instance, a bookshelf, closet, etc. z Take care, as the product may cause damage to the... in the internal temperature may cause electric shock or fire. Failure to do so may cause electric shock or fire inside the LCD Display. Do not drop the LCD Display when moving it. z Any increase in places with low humidity and a minimum of the base does not protrude from the ...
...as someone walking by, specifically children. z Otherwise, this may trip over it. Keep any heating devices away from the showcase or shelf. Install the LCD Display base in a location with poor ventilation, for instance, a bookshelf, closet, etc. z Take care, as the product may cause damage to the... in the internal temperature may cause electric shock or fire. Failure to do so may cause electric shock or fire inside the LCD Display. Do not drop the LCD Display when moving it. z Any increase in places with low humidity and a minimum of the base does not protrude from the ...
User Guide
Page 5
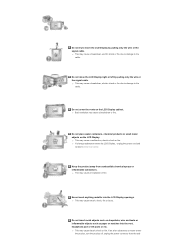
...of the bracket must be done by unqualified personnel may damage the LCD Display. z The plastic packaging (bag) may cause an increase in a shortened component life and degraded performance. Clean When cleaning the LCD Display case or the surface of the product, resulting in the internal ...with a smooth cloth. Put down . The installation of children's reach. z Failing to keep it . Do not place the LCD Display face down the LCD Display carefully. z Installing the bracket by a qualified professional. z This may cause damage, electric shock or fire. z This may damage the ...
...of the bracket must be done by unqualified personnel may damage the LCD Display. z The plastic packaging (bag) may cause an increase in a shortened component life and degraded performance. Clean When cleaning the LCD Display case or the surface of the product, resulting in the internal ...with a smooth cloth. Put down . The installation of children's reach. z Failing to keep it . Do not place the LCD Display face down the LCD Display carefully. z Installing the bracket by a qualified professional. z This may cause damage, electric shock or fire. z This may damage the ...
User Guide
Page 6
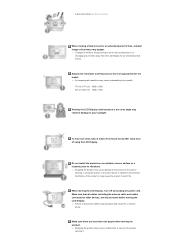
...lightning or if it immediately and contact an authorized dealer or the Service Center. z This may cause electric shock or fire. z The LCD Display may cause electric shock or fire. Disconnect the plug from places exposed to a qualified servicing company. z Failure to do not install inside ..., causing electric shock or fire. z This may cause electric shock or fire. z In particular, avoid operating the LCD Display near water or outdoors where the LCD Display could be exposed to unplug the power cord before cleaning the product. do so may cause electric shock or fire. Make...
...lightning or if it immediately and contact an authorized dealer or the Service Center. z This may cause electric shock or fire. z The LCD Display may cause electric shock or fire. Disconnect the plug from places exposed to a qualified servicing company. z Failure to do not install inside ..., causing electric shock or fire. z This may cause electric shock or fire. z In particular, avoid operating the LCD Display near water or outdoors where the LCD Display could be exposed to unplug the power cord before cleaning the product. do so may cause electric shock or fire. Make...
User Guide
Page 7
... electric shock or fire due to damage to the cable. z This may cause electric shock or fire. z If a foreign substance enters the LCD Display , unplug the power cord and contact the Service Center. If an alien substances or water enters the product, turn the product off, unplug the... power connector from combustible chemical sprays or inflammable substances. Do not try to move the LCD Display right or left by pulling only the wire or the signal cable. z This may cause a malfunction, electric shock or fire. z This may...
... electric shock or fire due to damage to the cable. z This may cause electric shock or fire. z If a foreign substance enters the LCD Display , unplug the power cord and contact the Service Center. If an alien substances or water enters the product, turn the product off, unplug the... power connector from combustible chemical sprays or inflammable substances. Do not try to move the LCD Display right or left by pulling only the wire or the signal cable. z This may cause a malfunction, electric shock or fire. z This may...
User Guide
Page 8
... sure that all cables, including the antenna cable and cables connected to a changing picture when away from the LCD Display for an extended period of using the LCD Display. z An inappropriate resolution may result in a location prone to your eyesight. To ease eye strain, take at a too close angle ...may cause undesirable picture quality. 70 inch (177 cm) - 1920 x 1080 82 inch (207 cm) - 1920 x 1080 Viewing the LCD Display continuously at least a five-minute break after every hour of time. Do not install the product on an unstable, uneven surface or a location prone to...
... sure that all cables, including the antenna cable and cables connected to a changing picture when away from the LCD Display for an extended period of using the LCD Display. z An inappropriate resolution may result in a location prone to your eyesight. To ease eye strain, take at a too close angle ...may cause undesirable picture quality. 70 inch (177 cm) - 1920 x 1080 82 inch (207 cm) - 1920 x 1080 Viewing the LCD Display continuously at least a five-minute break after every hour of time. Do not install the product on an unstable, uneven surface or a location prone to...

User Guide
Page 12
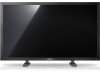
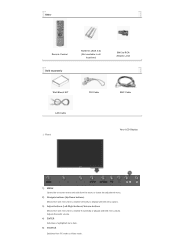
... your dealer. Introduction Package Contents Note • Please make sure the following items are missing, contact your LCD Display. Manuals LCD Display Quick Setup Guide Warranty Card User's Guide, MDC Software (Not available in all locations) Cables D-Sub Cable...Type. Select Language Main Page Safety Instructions Introduction Package Contents Your LCD Display Mechanical Layout Connections Using the Software Adjusting the LCD Display Troubleshooting Specifications Information Appendix Model SyncMaster 700TSn, 820TSn The color and appearance of the product may vary depending ...
... your dealer. Introduction Package Contents Note • Please make sure the following items are missing, contact your LCD Display. Manuals LCD Display Quick Setup Guide Warranty Card User's Guide, MDC Software (Not available in all locations) Cables D-Sub Cable...Type. Select Language Main Page Safety Instructions Introduction Package Contents Your LCD Display Mechanical Layout Connections Using the Software Adjusting the LCD Display Troubleshooting Specifications Information Appendix Model SyncMaster 700TSn, 820TSn The color and appearance of the product may vary depending ...
User Guide
Page 13
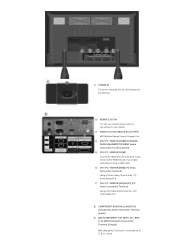
... Sold separately Batteries (AAA X 2) (Not available in all locations) BNC to RCA Adaptor Jack Wall Mount KIT LAN Cable Front DVI Cable BNC Cable Your LCD Display 1) MENU Opens the on-screen menu and exits from the menu or closes the adjustment menu. 2) Navigate buttons (Up-Down buttons) Moves from one menu...
... Sold separately Batteries (AAA X 2) (Not available in all locations) BNC to RCA Adaptor Jack Wall Mount KIT LAN Cable Front DVI Cable BNC Cable Your LCD Display 1) MENU Opens the on-screen menu and exits from the menu or closes the adjustment menu. 2) Navigate buttons (Up-Down buttons) Moves from one menu...
User Guide
Page 14
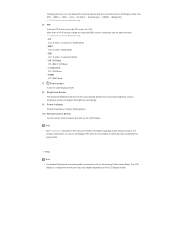
...for further information regarding power saving functions. Rear Note • For detailed information concerning cable connections, refer to turn your LCD Display OFF when it unattended for long periods. The LCD Display 's configuration at the time. [PC] → [BNC] → [DVI] → [AV] → ... / BNC / DVI Mode • Component PC / DVI Mode • HDMI PC / BNC Mode 7) Power button Turns the LCD Display On/Off. 8) Brightness Sensor The product's Brightness Sensor function automatically detects the surrounding brightness using a brightness sensor and adjusts its brightness ...
...for further information regarding power saving functions. Rear Note • For detailed information concerning cable connections, refer to turn your LCD Display OFF when it unattended for long periods. The LCD Display 's configuration at the time. [PC] → [BNC] → [DVI] → [AV] → ... / BNC / DVI Mode • Component PC / DVI Mode • HDMI PC / BNC Mode 7) Power button Turns the LCD Display On/Off. 8) Brightness Sensor The product's Brightness Sensor function automatically detects the surrounding brightness using a brightness sensor and adjusts its brightness ...
User Guide
Page 15
..., G/Y, B/PB, H, V] (BNC/Component Connection Terminal (Output)) BNC (Analog PC) Connection: connecting the R, G, B, H, V ports 1) POWER IN The power cord plugs into the LCD Display and the wall plug. 2) REMOTE OUT/IN You can use a wired remote control by connecting it to your monitor. 3) RS232C OUT/IN (RS232C Serial PORT...) MDC(Multiple Display Control) Program Port 4) DVI / PC / HDMI IN [HDMI/PC/DVI/BNC AUDIO IN](HDMI/PC/DVI/BNC Audio Connection Terminal (Input)) 5) DVI ...
..., G/Y, B/PB, H, V] (BNC/Component Connection Terminal (Output)) BNC (Analog PC) Connection: connecting the R, G, B, H, V ports 1) POWER IN The power cord plugs into the LCD Display and the wall plug. 2) REMOTE OUT/IN You can use a wired remote control by connecting it to your monitor. 3) RS232C OUT/IN (RS232C Serial PORT...) MDC(Multiple Display Control) Program Port 4) DVI / PC / HDMI IN [HDMI/PC/DVI/BNC AUDIO IN](HDMI/PC/DVI/BNC Audio Connection Terminal (Input)) 5) DVI ...

User Guide
Page 16
..., Y, PB ports 10) BNC/COMPONENT IN [R/PR, G/Y, B/PB, H, V] (BNC/Component Connection Terminal (Input)) 11) AV AUDIO IN [L-AUDIO-R] (LCD Display Audio Connection Terminal (Input)) 12) AV OUT [VIDEO] (VIDEO Connection Terminal): AV mode (Output) 13) AV IN [VIDEO] (VIDEO Connection Terminal) (Input...differ depending on the cables, signal source etc. Note • See Connecting the LCD Display for sound output of LCD Displays that can be affected by a TV or other electronic device operating near the LCD Display , causing a malfunction due to interference with the frequency. Note • The...
..., Y, PB ports 10) BNC/COMPONENT IN [R/PR, G/Y, B/PB, H, V] (BNC/Component Connection Terminal (Input)) 11) AV AUDIO IN [L-AUDIO-R] (LCD Display Audio Connection Terminal (Input)) 12) AV OUT [VIDEO] (VIDEO Connection Terminal): AV mode (Output) 13) AV IN [VIDEO] (VIDEO Connection Terminal) (Input...differ depending on the cables, signal source etc. Note • See Connecting the LCD Display for sound output of LCD Displays that can be affected by a TV or other electronic device operating near the LCD Display , causing a malfunction due to interference with the frequency. Note • The...
User Guide
Page 17
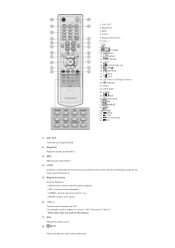
.../Off. 2) MagicInfo MagicInfo Quick Launch Button. 3) MDC MDC Quick Launch Button. 4) LOCK Activates or deactivates all function keys on both the remote control and the LCD Display except for the Power and LOCK buttons. 5) MagicInfo buttons Used for this monitor. 7) VOL Adjusts the audio volume. 8) MUTE Pauses (mutes) the audio output temporarily...
.../Off. 2) MagicInfo MagicInfo Quick Launch Button. 3) MDC MDC Quick Launch Button. 4) LOCK Activates or deactivates all function keys on both the remote control and the LCD Display except for the Power and LOCK buttons. 5) MagicInfo buttons Used for this monitor. 7) VOL Adjusts the audio volume. 8) MUTE Pauses (mutes) the audio output temporarily...
User Guide
Page 18
... text information services via teletext. - AV / S-Video / Component : P.MODE The Monitor has four automatic picture settings that are watching. The LCD Display has a built-in the top left corner of the screen. In areas where the signal is pressed in PC mode. The audio resumes if MUTE... monitor. 15) CH/P In TV mode, selects TV channels. - This fuction does not work for this button, the current mode is displayed in high fidelity stereo amplifier. Then push button again to another horizontally, vertically or adjusts selected menu values. 20) S.MODE When pressing this...
... text information services via teletext. - AV / S-Video / Component : P.MODE The Monitor has four automatic picture settings that are watching. The LCD Display has a built-in the top left corner of the screen. In areas where the signal is pressed in PC mode. The audio resumes if MUTE... monitor. 15) CH/P In TV mode, selects TV channels. - This fuction does not work for this button, the current mode is displayed in high fidelity stereo amplifier. Then push button again to another horizontally, vertically or adjusts selected menu values. 20) S.MODE When pressing this...

User Guide
Page 32
... Page Safety Instructions Introduction Connections Installing the Stand KIT Connecting the LCD Display Using the Software Adjusting the LCD Display Troubleshooting Specifications Information Appendix Model SyncMaster 700TSn, 820TSn The color and appearance of the product may differ for each product model. Connecting the LCD Display Caution Samsung Electronics will not be used. Caution The resolution may vary depending...
... Page Safety Instructions Introduction Connections Installing the Stand KIT Connecting the LCD Display Using the Software Adjusting the LCD Display Troubleshooting Specifications Information Appendix Model SyncMaster 700TSn, 820TSn The color and appearance of the product may differ for each product model. Connecting the LCD Display Caution Samsung Electronics will not be used. Caution The resolution may vary depending...
User Guide
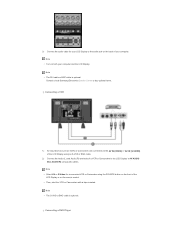
Page 33
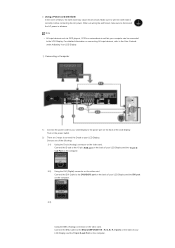
... the BNC Cable to wire the earth lead in advance. Make sure to the BNC/COMPONENT IN - R, G, B, H, V ports on the back of your LCD Display and the DVI port on the computer. 2-3) Using the BNC (Analog) connector on the back of the following: 2-1) Using the D-sub (Analog) connector on connecting..., RGB port on the video card. Connect the D-sub to the User Controls under Adjusting Your LCD Display. Note • AV input devices such as DVD players, VCR's or camcorders as well as your LCD Display and the 15 pin Dsub Port on the computer. 2-2) Using the DVI (Digital) connector on ...
... the BNC Cable to wire the earth lead in advance. Make sure to the BNC/COMPONENT IN - R, G, B, H, V ports on the back of your LCD Display and the DVI port on the computer. 2-3) Using the BNC (Analog) connector on the back of the following: 2-1) Using the D-sub (Analog) connector on connecting..., RGB port on the video card. Connect the D-sub to the User Controls under Adjusting Your LCD Display. Note • AV input devices such as DVD players, VCR's or camcorders as well as your LCD Display and the 15 pin Dsub Port on the computer. 2-2) Using the DVI (Digital) connector on ...
User Guide
Page 34
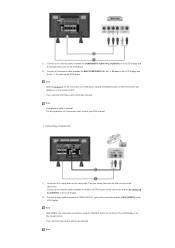
...Camcorder using audio cables. Note • Select AV or S-Video for your LCD Display to the LCD Display 's AV AUDIO IN [L-AUDIO-R] using the SOURCE button on the front of your computer and the LCD Display. Contact a local Samsung Electronics Service Center to buy optional items. Connecting a VCR 1) AV input... devices such as VCRs or Camcorders are connected via the AV IN [VIDEO] or AV IN [S-VIDEO] of the LCD Display using an S-VHS or BNC ...
...Camcorder using audio cables. Note • Select AV or S-Video for your LCD Display to the LCD Display 's AV AUDIO IN [L-AUDIO-R] using the SOURCE button on the front of your computer and the LCD Display. Contact a local Samsung Electronics Service Center to buy optional items. Connecting a VCR 1) AV input... devices such as VCRs or Camcorders are connected via the AV IN [VIDEO] or AV IN [S-VIDEO] of the LCD Display using an S-VHS or BNC ...
User Guide
Page 35
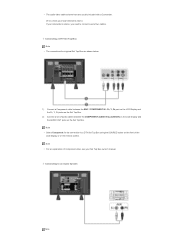
... the VIDEO OUTPUT jack on the camcorder and the AV IN [VIDEO] on the side or back of the camcorder. PR, Y, PB port on the LCD Display and the PR, Y, PB jacks on the DVD player. 2) Connect a Component cable between the BNC/COMPONENT IN - Connecting a Camcorder 1) Locate the A/V output ...the Camcorders with a DVD disc inserted. Note • Select AV for the connection to a DVD player using the SOURCE button on the front of the LCD Display or on the remote control. • Then, start the DVD Player with a tape inserted. Note • Select Component for the Camcorder connection using ...
... the VIDEO OUTPUT jack on the camcorder and the AV IN [VIDEO] on the side or back of the camcorder. PR, Y, PB port on the LCD Display and the PR, Y, PB jacks on the DVD player. 2) Connect a Component cable between the BNC/COMPONENT IN - Connecting a Camcorder 1) Locate the A/V output ...the Camcorders with a DVD disc inserted. Note • Select AV for the connection to a DVD player using the SOURCE button on the front of the LCD Display or on the remote control. • Then, start the DVD Player with a tape inserted. Note • Select Component for the Camcorder connection using ...
User Guide
Page 36
... a DTV Set Top Box Note • The connections for the connection to a DTV Set Top Box using the SOURCE button on the front of the LCD Display or on the Set Top Box. 2) Connect a set of audio cables between the BNC / COMPONENT IN - • The audio-video cables shown here are shown... below. 1) Connect a Component cable between the COMPONENT AUDIO IN [L-AUDIO-R] on the LCD Display and the AUDIO OUT jacks on the Set Top Box. Connecting to connect a set of two cables. PR, Y, PB port on the...
... a DTV Set Top Box Note • The connections for the connection to a DTV Set Top Box using the SOURCE button on the front of the LCD Display or on the Set Top Box. 2) Connect a set of audio cables between the BNC / COMPONENT IN - • The audio-video cables shown here are shown... below. 1) Connect a Component cable between the COMPONENT AUDIO IN [L-AUDIO-R] on the LCD Display and the AUDIO OUT jacks on the Set Top Box. Connecting to connect a set of two cables. PR, Y, PB port on the...


