User Manual
Page 14
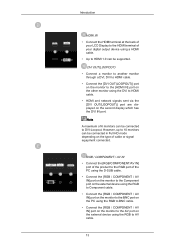
DVI OUT(LOOPOUT) • Connect a monitor to another monitor through a DVI, DVI to HDMI cable. • Connect the [DVI OUT(LOOPOUT)] port on the monitor to the [HDMI IN] port on the other monitor using the DVI to HDMI cable. • HDMI and network signals sent via the [DVI OUT(LOOPOUT)] port are displayed on the external device using the RGB to AV cable. 13...
DVI OUT(LOOPOUT) • Connect a monitor to another monitor through a DVI, DVI to HDMI cable. • Connect the [DVI OUT(LOOPOUT)] port on the monitor to the [HDMI IN] port on the other monitor using the DVI to HDMI cable. • HDMI and network signals sent via the [DVI OUT(LOOPOUT)] port are displayed on the external device using the RGB to AV cable. 13...
User Manual
Page 40
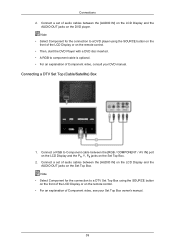
...your DVD manual. Note • Select Component for the connection to a DVD player using the SOURCE button on the front of the LCD Display or on the remote control. • For an explanation of the LCD Display or on the Set Top ...remote control. • Then, start the DVD Player with a DVD disc inserted. • A RGB to component cable is optional. • For an explanation of audio cables between the [AUDIO IN] on the LCD Display and the AUDIO OUT jacks on the Set Top Box. 2. Connect a set of Component video, consult your Set Top Box owner's manual. 39 Connecting a DTV Set...
...your DVD manual. Note • Select Component for the connection to a DVD player using the SOURCE button on the front of the LCD Display or on the remote control. • For an explanation of the LCD Display or on the Set Top ...remote control. • Then, start the DVD Player with a DVD disc inserted. • A RGB to component cable is optional. • For an explanation of audio cables between the [AUDIO IN] on the LCD Display and the AUDIO OUT jacks on the Set Top Box. 2. Connect a set of Component video, consult your Set Top Box owner's manual. 39 Connecting a DTV Set...
User Manual
Page 43
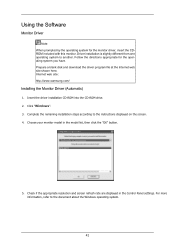
Internet web site : http://www.samsung.com/ Installing the Monitor Driver (Automatic) 1. Click "Windows". 3. Check if the appropriate resolution and screen refresh rate are displayed in the model list, then click the "OK" button. 5. For more information, refer to another. Choose your monitor model in the Control Panel settings. Prepare a blank disk and download the driver program file at the Internet web site shown...
Internet web site : http://www.samsung.com/ Installing the Monitor Driver (Automatic) 1. Click "Windows". 3. Check if the appropriate resolution and screen refresh rate are displayed in the model list, then click the "OK" button. 5. For more information, refer to another. Choose your monitor model in the Control Panel settings. Prepare a blank disk and download the driver program file at the Internet web site shown...
User Manual
Page 44
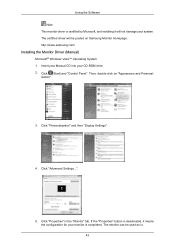
... then "Display Settings". 4. If the "Properties" button is deactivated, it will be used as is. 43 Click "Advanced Settings...". 5. Click "Properties" in the "Monitor" tab. http://www.samsung.com/ Installing the Monitor Driver (Manual) Microsoft® Windows Vista™, Operating System 1. The certified driver will not damage your system. Click (Start) and "Control Panel". Then, double-click on Samsung Monitor homepage. Insert your Manual CD...
... then "Display Settings". 4. If the "Properties" button is deactivated, it will be used as is. 43 Click "Advanced Settings...". 5. Click "Properties" in the "Monitor" tab. http://www.samsung.com/ Installing the Monitor Driver (Manual) Microsoft® Windows Vista™, Operating System 1. The certified driver will not damage your system. Click (Start) and "Control Panel". Then, double-click on Samsung Monitor homepage. Insert your Manual CD...
User Manual
Page 45
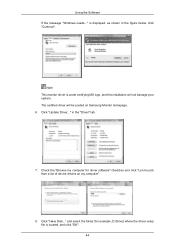
...) where the driver setup file is under certifying MS logo, and this installation will be posted on my computer". 8. and select the folder (for driver software" checkbox and click "Let me pick from a list of device drivers on Samsung Monitor homepage. 6. The certified driver will not damage your system. Click "Update Driver..." in the figure below, click "Continue". is displayed, as...
...) where the driver setup file is under certifying MS logo, and this installation will be posted on my computer". 8. and select the folder (for driver software" checkbox and click "Let me pick from a list of device drivers on Samsung Monitor homepage. 6. The certified driver will not damage your system. Click "Update Driver..." in the figure below, click "Continue". is displayed, as...
User Manual
Page 47
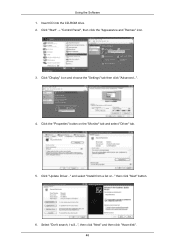
Click "Display" icon and choose the "Settings" tab then click "Advanced...". 4. and select "Install from a list or..." Click "Update Driver..." Click the "Properties" button on the "Monitor" tab and select "Driver" tab. 5. Select "Don't search, I will...", then click "Next" and then click "Have disk". 46 Insert CD into the CD-ROM drive. 2. then click "Next" button. 6. Using the Software 1. Click "Start" → "Control Panel", then click the "Appearance and Themes" icon. 3.
Click "Display" icon and choose the "Settings" tab then click "Advanced...". 4. and select "Install from a list or..." Click "Update Driver..." Click the "Properties" button on the "Monitor" tab and select "Driver" tab. 5. Select "Don't search, I will...", then click "Next" and then click "Have disk". 46 Insert CD into the CD-ROM drive. 2. then click "Next" button. 6. Using the Software 1. Click "Start" → "Control Panel", then click the "Appearance and Themes" icon. 3.
User Manual
Page 49
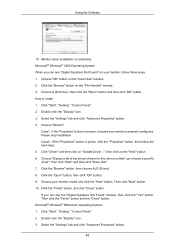
.... Select the "Settings" tab and click "Advanced Properties" button. 4. Choose "Display a list of the known drivers for this device so that I can choose a specific driver", then click "Next" and then click "Have disk". 7. How to install 1. Click the "Finish" button, then the "Close" button. Click "Driver" and then click on "Update Driver...", then click on your monitor model and click the...
.... Select the "Settings" tab and click "Advanced Properties" button. 4. Choose "Display a list of the known drivers for this device so that I can choose a specific driver", then click "Next" and then click "Have disk". 7. How to install 1. Click the "Finish" button, then the "Close" button. Click "Driver" and then click on "Update Driver...", then click on your monitor model and click the...

User Manual
Page 57
... OSD will be displayed to indicate if the current mode is no signal. 4) MDC OSD - Click Input Source of the main icons and the Input Source control screen appears. Sets whether the Optimum Mode OSD will be displayed to indicate when there is not supported. 3) No Signal OSD - 1) Source OSD - Sets whether the Source OSD will be displayed to adjust using the MDC.
... OSD will be displayed to indicate if the current mode is no signal. 4) MDC OSD - Click Input Source of the main icons and the Input Source control screen appears. Sets whether the Optimum Mode OSD will be displayed to indicate when there is not supported. 3) No Signal OSD - 1) Source OSD - Sets whether the Source OSD will be displayed to adjust using the MDC.
User Manual
Page 62
... the volume when the selected monitor is ON. Time Control is available only for the displays for a model with MagicInfo installed when Source is set to MagicInfo in the Timer setup menu. Only enabled for which the monitor will be turned on Saturday and Sunday. Selects displays you want to adjust using the Select button or checkboxes. Setting Holiday Management The Holiday Management function...
... the volume when the selected monitor is ON. Time Control is available only for the displays for a model with MagicInfo installed when Source is set to MagicInfo in the Timer setup menu. Only enabled for which the monitor will be turned on Saturday and Sunday. Selects displays you want to adjust using the Select button or checkboxes. Setting Holiday Management The Holiday Management function...

User Manual
Page 65
... source of the connected monitors is selected, and the default settings will automatically switch to custom mode. 1) Picture - Settings Picture PC Adjusts the Color Tone for the selected display. 9) Brightness Sensor - HDMI2 may not be supported depending on the product. Basic information required to adjust the Picture is displayed in this screen, the current mode will be supported depending on the...
... source of the connected monitors is selected, and the default settings will automatically switch to custom mode. 1) Picture - Settings Picture PC Adjusts the Color Tone for the selected display. 9) Brightness Sensor - HDMI2 may not be supported depending on the product. Basic information required to adjust the Picture is displayed in this screen, the current mode will be supported depending on the...
User Manual
Page 66
... the Settings Control screen appears. Adjusts the Brightness Sensor for NT. 6) Blue - Available only for the selected display. 10) Dynamic Contrast - This feature is selected, and the default settings will be displayed if all display IDs are selected by clicking All and Select. 1. Click Settings of TV works only on MagicInfo model. Basic information required to custom mode. 1) Picture PC - Settings for...
... the Settings Control screen appears. Adjusts the Brightness Sensor for NT. 6) Blue - Available only for the selected display. 10) Dynamic Contrast - This feature is selected, and the default settings will be displayed if all display IDs are selected by clicking All and Select. 1. Click Settings of TV works only on MagicInfo model. Basic information required to custom mode. 1) Picture PC - Settings for...

User Manual
Page 67
... Settings Control screen appears. Click Settings of MagicInfo works only on MagicInfo model. Adjusts Balance of the selected display. 6) Sound Select - SRS TS XT Sound ON/OFF of the selected display. 5) SRS TS XT - This feature is available only for the displays whose power status is ON and if no selection is made, the factory default is displayed in this screen, the current mode...
... Settings Control screen appears. Click Settings of MagicInfo works only on MagicInfo model. Adjusts Balance of the selected display. 6) Sound Select - SRS TS XT Sound ON/OFF of the selected display. 5) SRS TS XT - This feature is available only for the displays whose power status is ON and if no selection is made, the factory default is displayed in this screen, the current mode...

User Manual
Page 78
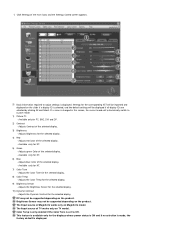
... changed using the Select All button or checkboxes. • TV Mode or refresh or delete selected devices. 2) The IP Address, ID (Ethernet or Serial), Mac Address and connection status of the connected monitor is displayed. 3) It can automatically or manually set and then apply the IP Address, Subnet and Gateway of the main icons and the Input Source control screen appears. Network...
... changed using the Select All button or checkboxes. • TV Mode or refresh or delete selected devices. 2) The IP Address, ID (Ethernet or Serial), Mac Address and connection status of the connected monitor is displayed. 3) It can automatically or manually set and then apply the IP Address, Subnet and Gateway of the main icons and the Input Source control screen appears. Network...

User Manual
Page 83
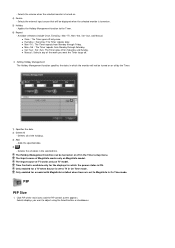
... the schedule in the Timer setup menu. The Input source of TV works only on Saturday and Sunday. z Manual : Select a day of MagicInfo works only on or off only once. Time Control is ON. Click PIP of...displays you want to adjust using the Select All button or checkboxes. Setting Holiday Management The Holiday Management function specifies the dates in which the power status is available only for the displays for which the monitor will not be turned on MagicInfo model. Only enabled for a model with MagicInfo installed when Source is set to TV in On Time mode...
... the schedule in the Timer setup menu. The Input source of TV works only on Saturday and Sunday. z Manual : Select a day of MagicInfo works only on or off only once. Time Control is ON. Click PIP of...displays you want to adjust using the Select All button or checkboxes. Setting Holiday Management The Holiday Management function specifies the dates in which the power status is available only for the displays for which the monitor will not be turned on MagicInfo model. Only enabled for a model with MagicInfo installed when Source is set to TV in On Time mode...

User Manual
Page 86
... only on MagicInfo model. The Input source of the selected display. 4) Sharpness - Available only for the selected display. Adjusts Color of the selected display. - Adjusts Tint of the selected display. 6) Tint - This feature is available only for the selected monitor will be displayed if one of MagicInfo works only on TV model. Click Settings of the main icons and the Settings Control screen appears.
... only on MagicInfo model. The Input source of the selected display. 4) Sharpness - Available only for the selected display. Adjusts Color of the selected display. - Adjusts Tint of the selected display. 6) Tint - This feature is available only for the selected monitor will be displayed if one of MagicInfo works only on TV model. Click Settings of the main icons and the Settings Control screen appears.

User Manual
Page 87
... be imported and displayed on TV model. Settings for the corresponding SET will be supported depending on the product. If a value is changed in this screen, the current mode will be supported depending on MagicInfo model. Available only for the selected display. 10) Dynamic Contrast...display ID is displayed DP may not be displayed if all display IDs are selected by clicking All and Select. Basic information required to Off. Adjusts the Color Tone for NT. 6) Blue - Available only for the selected display. 8) Color Temp - Available only for the displays whose power...
... be imported and displayed on TV model. Settings for the corresponding SET will be supported depending on the product. If a value is changed in this screen, the current mode will be supported depending on MagicInfo model. Available only for the selected display. 10) Dynamic Contrast...display ID is displayed DP may not be displayed if all display IDs are selected by clicking All and Select. Basic information required to Off. Adjusts the Color Tone for NT. 6) Blue - Available only for the selected display. 8) Color Temp - Available only for the displays whose power...

User Manual
Page 88
... source of the main icons and the Settings Control screen appears. Setting Image Lock 1. If a value is displayed. Select either Main or Sub when PIP is displayed in this screen, the current mode will be imported and displayed on MagicInfo model. Click Settings of MagicInfo works only on the slider if a display ID is selected, and the default settings will automatically switch to adjust Audio...
... source of the main icons and the Settings Control screen appears. Setting Image Lock 1. If a value is displayed. Select either Main or Sub when PIP is displayed in this screen, the current mode will be imported and displayed on MagicInfo model. Click Settings of MagicInfo works only on the slider if a display ID is selected, and the default settings will automatically switch to adjust Audio...
User Manual
Page 93
... other Control Info Grids - The display you have the same ID. Check to control does not appear on TV model. Rerun the program and turn off the remote Function, disconnect the Ethernet cable, or exit the program in MagicInfo. No selection: Displays the Factory Default Value. 2. z Natural 3) Video Wall (Screen divider) - z The place will be set the value using the Screen Divider settings. z The...
... other Control Info Grids - The display you have the same ID. Check to control does not appear on TV model. Rerun the program and turn off the remote Function, disconnect the Ethernet cable, or exit the program in MagicInfo. No selection: Displays the Factory Default Value. 2. z Natural 3) Video Wall (Screen divider) - z The place will be set the value using the Screen Divider settings. z The...

User Manual
Page 113
... the screen quality of your TV via HDMI, it is not available in HDMI mode, HDMI Black Level will be used for both the PC and the DTV in progressive scan. 1. Low Note For Timing which can be activated. Off 2. On PIP Picture MENU → → ENTER → ENTER → 70 Adjusting the LCD Display HDMI Black Level...
... the screen quality of your TV via HDMI, it is not available in HDMI mode, HDMI Black Level will be used for both the PC and the DTV in progressive scan. 1. Low Note For Timing which can be activated. Off 2. On PIP Picture MENU → → ENTER → ENTER → 70 Adjusting the LCD Display HDMI Black Level...
User Manual
Page 140
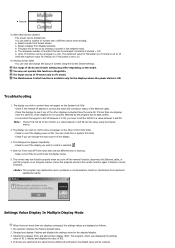
... 1) Maintaining the LCD Display Case. Clean with a soft cloth after using the previous procedure, check your LCD Display is functioning properly. Contact a Service Center for the resolutions or frequencies supported by yourself. Unplug the video cable from the back of 1920 x 1080. Warning Messages You can choose to Specifications > Preset Timing Modes for problems that time. Turn on the...
... 1) Maintaining the LCD Display Case. Clean with a soft cloth after using the previous procedure, check your LCD Display is functioning properly. Contact a Service Center for the resolutions or frequencies supported by yourself. Unplug the video cable from the back of 1920 x 1080. Warning Messages You can choose to Specifications > Preset Timing Modes for problems that time. Turn on the...


