
User Manual
Page 32
... 0x11 DATA Length 1 Power : Power code to be 0xFF. - At the time, each product will follow commands but ID 0 should be set ID part to "0xFE" and send commands. ID should show hexadecimal value of assigned ID, but it is the sum of its ID, set on /off control 0x3C 0~1 7 Auto adjustment control 0x3D 0 8 Video wall Mode control 0x5C 0~1 9 Safety Lock...
... 0x11 DATA Length 1 Power : Power code to be 0xFF. - At the time, each product will follow commands but ID 0 should be set ID part to "0xFE" and send commands. ID should show hexadecimal value of assigned ID, but it is the sum of its ID, set on /off control 0x3C 0~1 7 Auto adjustment control 0x3D 0 8 Video wall Mode control 0x5C 0~1 9 Safety Lock...

User Manual
Page 35
Caution Only works with models include TV. • Get Screen Mode Status Header 0xAA command 0x18 DATA Length ID CheckSum 0 • Set Picture Size Header command ID 0xAA 0x18 DATA Length 1 DATA Screen Mode Screen Mode : Screen Mode code to be controlled when Video Wall is Val1 ERR Check Sum • Screen Mode Control • Function Personal Computer changes "Screen Mode" of TV/Monitor. Introduction 0xAA 0xFF 3 Input Source : Same...
Caution Only works with models include TV. • Get Screen Mode Status Header 0xAA command 0x18 DATA Length ID CheckSum 0 • Set Picture Size Header command ID 0xAA 0x18 DATA Length 1 DATA Screen Mode Screen Mode : Screen Mode code to be controlled when Video Wall is Val1 ERR Check Sum • Screen Mode Control • Function Personal Computer changes "Screen Mode" of TV/Monitor. Introduction 0xAA 0xFF 3 Input Source : Same...

User Manual
Page 38
... CheckSum Video Wall Mode Video Wall Mode : Video Wall Mode code to be set on . Introduction 0xAA 0xFF 3 'A' 0x3D Auto Adjustment • Nak Header 0xAA command 0xFF ID DATA Length Ack/Nak r-CMD 3 'N' 0x3D ERR : Error code that shows what occurred error is Val1 ERR Check Sum • Video Wall Mode Control • Function Personal Computer converts Video Wall Mode of TV / Monitor when Video Wall is on...
... CheckSum Video Wall Mode Video Wall Mode : Video Wall Mode code to be set on . Introduction 0xAA 0xFF 3 'A' 0x3D Auto Adjustment • Nak Header 0xAA command 0xFF ID DATA Length Ack/Nak r-CMD 3 'N' 0x3D ERR : Error code that shows what occurred error is Val1 ERR Check Sum • Video Wall Mode Control • Function Personal Computer converts Video Wall Mode of TV / Monitor when Video Wall is on...
User Manual
Page 45
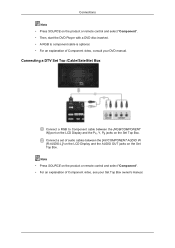
... your Set Top Box owner's manual. Connections Note • Press SOURCE on the product or remote control and select "Component". • Then, start the DVD Player with a DVD disc inserted. • A RGB to Component cable between the [AV/COMPONENT AUDIO IN [R-AUDIO-L]] on the LCD Display and the AUDIO OUT jacks on the Set Top Box. Connecting a DTV Set Top...
... your Set Top Box owner's manual. Connections Note • Press SOURCE on the product or remote control and select "Component". • Then, start the DVD Player with a DVD disc inserted. • A RGB to Component cable between the [AV/COMPONENT AUDIO IN [R-AUDIO-L]] on the LCD Display and the AUDIO OUT jacks on the Set Top Box. Connecting a DTV Set Top...
User Manual
Page 49
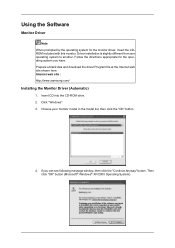
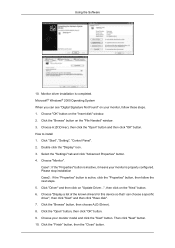
Internet web site : http://www.samsung.com/ Installing the Monitor Driver (Automatic) 1. Then click "OK" button (Microsoft® Windows® XP/2000 Operating System). Driver installation is slightly different from one operating system to another. Follow the directions appropriate for the monitor driver, insert the CDROM included with this monitor. Choose your monitor model in the model list, then click the "OK" button...
Internet web site : http://www.samsung.com/ Installing the Monitor Driver (Automatic) 1. Then click "OK" button (Microsoft® Windows® XP/2000 Operating System). Driver installation is slightly different from one operating system to another. Follow the directions appropriate for the monitor driver, insert the CDROM included with this monitor. Choose your monitor model in the model list, then click the "OK" button...
User Manual
Page 50
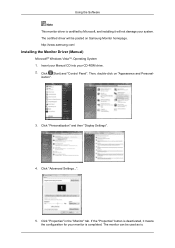
... "Display Settings". 4. ization". 3. If the "Properties" button is deactivated, it will be used as is completed. Click "Properties" in the "Monitor" tab. The monitor can be posted on "Appearance and Personal- Using the Software Note This monitor driver is certified by Microsoft, and installing it means the configuration for your monitor is . Insert your Manual CD into your system. http://www.samsung...
... "Display Settings". 4. ization". 3. If the "Properties" button is deactivated, it will be used as is completed. Click "Properties" in the "Monitor" tab. The monitor can be posted on "Appearance and Personal- Using the Software Note This monitor driver is certified by Microsoft, and installing it means the configuration for your monitor is . Insert your Manual CD into your system. http://www.samsung...

User Manual
Page 51
... below, click "Continue". Using the Software If the message "Windows needs..." Click "Update Driver..." is located, and click "OK". Click "Have Disk..." Note This monitor driver is under certifying MS logo, and this installation will be posted on my computer". 8. Check the "Browse my computer for example, D:\Drive) where the driver setup file is displayed, as shown in the...
... below, click "Continue". Using the Software If the message "Windows needs..." Click "Update Driver..." is located, and click "OK". Click "Have Disk..." Note This monitor driver is under certifying MS logo, and this installation will be posted on my computer". 8. Check the "Browse my computer for example, D:\Drive) where the driver setup file is displayed, as shown in the...

User Manual
Page 53
Click "Update Driver..." and select "Install from a list or..." Click the "Properties" button on the "Monitor" tab and select "Driver" tab. 5. then click "Next" button. 6. Select "Don't search, I will...", then click "Next" and then click "Have disk". Insert CD into the CD-ROM drive. 2. Click "Display" icon and choose the "Settings" tab then click "Advanced...". 4. Using the Software 1. Click "Start" → "Control Panel", then click the "Appearance and Themes" icon. 3.
Click "Update Driver..." and select "Install from a list or..." Click the "Properties" button on the "Monitor" tab and select "Driver" tab. 5. then click "Next" button. 6. Select "Don't search, I will...", then click "Next" and then click "Have disk". Insert CD into the CD-ROM drive. 2. Click "Display" icon and choose the "Settings" tab then click "Advanced...". 4. Using the Software 1. Click "Start" → "Control Panel", then click the "Appearance and Themes" icon. 3.
User Manual
Page 55
.... Choose "Display a list of the known drivers for this device so that I can see "Digital Signature Not Found" on the "Next" button. 6. Choose "Monitor". Using the Software 10. Click "Driver" and then click on "Update Driver...", then click on your monitor, follow the next steps. 5. Microsoft® Windows® 2000 Operating System When you can choose a specific driver", then click...
.... Choose "Display a list of the known drivers for this device so that I can see "Digital Signature Not Found" on the "Next" button. 6. Choose "Monitor". Using the Software 10. Click "Driver" and then click on "Update Driver...", then click on your monitor, follow the next steps. 5. Microsoft® Windows® 2000 Operating System When you can choose a specific driver", then click...

User Manual
Page 76
Auto Power Set the product to activate if an input source is not detected. Available only in PC mode. Standby Control Set the standby mode to automatically power on. Temperature Detect the internal temperature by specifying the range of temperature. General User Auto Color Automatically adjust the screen colors. Fan Speed Configure the fan speed. Fan Control Select a method to detect the fan speed and internal temperature for the product's protection. Fan & Temperature Configure the settings required to configure the fan speed.
Auto Power Set the product to activate if an input source is not detected. Available only in PC mode. Standby Control Set the standby mode to automatically power on. Temperature Detect the internal temperature by specifying the range of temperature. General User Auto Color Automatically adjust the screen colors. Fan Speed Configure the fan speed. Fan Control Select a method to detect the fan speed and internal temperature for the product's protection. Fan & Temperature Configure the settings required to configure the fan speed.

User Manual
Page 98
... using the horizontal control menu. If satisfactory results are Off. Coarse adjustment may relocate it after Fine tuning, repeat it to the Center using the Fine adjustment, use the Coarse adjustment and then use Fine again. Auto Adjustment Note This function is enabled when Mode is set ...to fine-tune and get the best image by removing noise that creates unstable images with jitters and shakiness. Position Adjusts the screen location horizontally and vertically. Note Available in PC mode only. Removes noise such as vertical stripes. Adjusting the LCD Display ...
... using the horizontal control menu. If satisfactory results are Off. Coarse adjustment may relocate it after Fine tuning, repeat it to the Center using the Fine adjustment, use the Coarse adjustment and then use Fine again. Auto Adjustment Note This function is enabled when Mode is set ...to fine-tune and get the best image by removing noise that creates unstable images with jitters and shakiness. Position Adjusts the screen location horizontally and vertically. Note Available in PC mode only. Removes noise such as vertical stripes. Adjusting the LCD Display ...

User Manual
Page 102
... using the on-screen menus, the contrast and brightness can only be enabled when a network box(sold separately) is connected. • A TV tuner box (sold separately) must be changed to your personal preference. Note Not available when Dynamic Contrast is set to On. 1. Adjusting the LCD Display • HDMI • MagicInfo • TV Mode Note • MagicInfo can be connected to use...
... using the on-screen menus, the contrast and brightness can only be enabled when a network box(sold separately) is connected. • A TV tuner box (sold separately) must be changed to your personal preference. Note Not available when Dynamic Contrast is set to On. 1. Adjusting the LCD Display • HDMI • MagicInfo • TV Mode Note • MagicInfo can be connected to use...

User Manual
Page 104
... LCD Display Size Color Temp. PC mode(PC, HDMI[PC Timing ]): 16:9 - 4:3 Video mode (HDMI [Video Timing], AV or Component): 16:9 - Screen Fit - Magnifies the size of the picture on the screen. 3. Screen Fit - Zoom 2 - Note • Certain external devices may feed the display an out of spec signal that may cause cutoff even when using the Screen Fit feature. • Screen Fit...
... LCD Display Size Color Temp. PC mode(PC, HDMI[PC Timing ]): 16:9 - 4:3 Video mode (HDMI [Video Timing], AV or Component): 16:9 - Screen Fit - Magnifies the size of the picture on the screen. 3. Screen Fit - Zoom 2 - Note • Certain external devices may feed the display an out of spec signal that may cause cutoff even when using the Screen Fit feature. • Screen Fit...

User Manual
Page 107
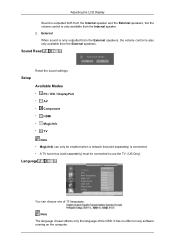
... be connected to use the TV. (US Only) The LCD Display has a built-in order to On. Picture Reset Reset the screen settings. Lamp Control Adjusting the LCD Display Adjusts the inverter lamp in high fidelity stereo amplifier. 1. Sound Available Modes • PC / DVI / DisplayPort • AV • Component • HDMI • MagicInfo • TV Mode Note • MagicInfo can only be enabled when a network...
... be connected to use the TV. (US Only) The LCD Display has a built-in order to On. Picture Reset Reset the screen settings. Lamp Control Adjusting the LCD Display Adjusts the inverter lamp in high fidelity stereo amplifier. 1. Sound Available Modes • PC / DVI / DisplayPort • AV • Component • HDMI • MagicInfo • TV Mode Note • MagicInfo can only be enabled when a network...
User Manual
Page 110
..., the volume control is also only available from the Internal speaker. 2. Sound Reset Reset the sound settings. Note The language chosen affects only the language of 13 languages. Setup Available Modes • PC / DVI / DisplayPort • AV • Component • HDMI • MagicInfo • TV Note • MagicInfo can only be enabled when a network box(sold separately) is connected. • A TV...
..., the volume control is also only available from the Internal speaker. 2. Sound Reset Reset the sound settings. Note The language chosen affects only the language of 13 languages. Setup Available Modes • PC / DVI / DisplayPort • AV • Component • HDMI • MagicInfo • TV Note • MagicInfo can only be enabled when a network box(sold separately) is connected. • A TV...

User Manual
Page 122
...use the product at temperatures 75 - 80°C (based on ambient temperature of the product. Refer to "Specifications" herein for the product. • Off • On Note When Auto Power is connected to power. Auto Power Enables or disables Auto Power for details about operating conditions. Button Lock Locks or unlocks the monitor control... buttons on automatically as soon as it is On, the product will power on the product. • Off Current Temperature Shows the current temperature of 40°C). Adjusting the LCD Display • It is best to set Fan Control to...
...use the product at temperatures 75 - 80°C (based on ambient temperature of the product. Refer to "Specifications" herein for the product. • Off • On Note When Auto Power is connected to power. Auto Power Enables or disables Auto Power for details about operating conditions. Button Lock Locks or unlocks the monitor control... buttons on automatically as soon as it is On, the product will power on the product. • Off Current Temperature Shows the current temperature of 40°C). Adjusting the LCD Display • It is best to set Fan Control to...

User Manual
Page 123
... Enabled only in HDMI mode. Power-saving mode will be activated if an external device is connected. • On User Auto Color Adjusting the LCD Display 1. Note • Enabled only in PC, DVI, HDMI, or DP(DisplayPort) mode. • Auto will be disabled in PC mode. Auto Color Automatically adjusts the Colors. 2. Reset Resets the Color settings. Standby Control Sets the standby mode, which will be...
... Enabled only in HDMI mode. Power-saving mode will be activated if an external device is connected. • On User Auto Color Adjusting the LCD Display 1. Note • Enabled only in PC, DVI, HDMI, or DP(DisplayPort) mode. • Auto will be disabled in PC mode. Auto Color Automatically adjusts the Colors. 2. Reset Resets the Color settings. Standby Control Sets the standby mode, which will be...
User Manual
Page 126
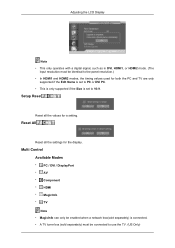
Reset All Reset all the values for a setting. Setup Reset Reset all the settings for the display. Multi Control Available Modes • PC / DVI / DisplayPort • AV • Component • HDMI • MagicInfo • TV Note • MagicInfo can only be connected to 16:9. Adjusting the LCD Display Note • This only operates with a digital signal, such as in DVI, HDMI1, or HDMI2 mode. (The input resolution...
Reset All Reset all the values for a setting. Setup Reset Reset all the settings for the display. Multi Control Available Modes • PC / DVI / DisplayPort • AV • Component • HDMI • MagicInfo • TV Note • MagicInfo can only be connected to 16:9. Adjusting the LCD Display Note • This only operates with a digital signal, such as in DVI, HDMI1, or HDMI2 mode. (The input resolution...

User Manual
Page 127
... Display Multi Control Assigns an individual ID to the SET. • ID Setup Assigns distinctive IDs to the SET. • ID Input Use to Manual. • Gateway : Manually enter the Gateway if IP Setting is connected. MagicInfo Available Modes • PC / DVI / DisplayPort • AV • Component • HDMI • MagicInfo • TV Note • MagicInfo can only be enabled when a network box(sold separately) is set...
... Display Multi Control Assigns an individual ID to the SET. • ID Setup Assigns distinctive IDs to the SET. • ID Input Use to Manual. • Gateway : Manually enter the Gateway if IP Setting is connected. MagicInfo Available Modes • PC / DVI / DisplayPort • AV • Component • HDMI • MagicInfo • TV Note • MagicInfo can only be enabled when a network box(sold separately) is set...
User Manual
Page 132
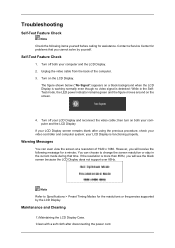
... and Cleaning 1) Maintaining the LCD Display Case. Troubleshooting Self-Test Feature Check Note Check the following message for the resolutions or frequencies supported by yourself. Turn off your computer and the LCD Display. 2. your video controller and computer system; Note Refer to change the screen resolution or stay in the SelfTest mode, the LED power indicator remains green and the...
... and Cleaning 1) Maintaining the LCD Display Case. Troubleshooting Self-Test Feature Check Note Check the following message for the resolutions or frequencies supported by yourself. Turn off your computer and the LCD Display. 2. your video controller and computer system; Note Refer to change the screen resolution or stay in the SelfTest mode, the LED power indicator remains green and the...


