User Manual (ENGLISH)
Page 2
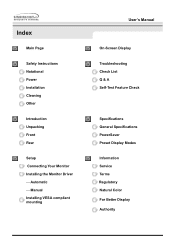
Manual Installing VESA compliant mounting User's Manual On-Screen Display Troubleshooting Check List Q & A Self-Test Feature Check Specifications General Specifications PowerSaver Preset Display Modes Information Service Terms Regulatory Natural Color For Better Display Authority Automatic - Index Main Page Safety Instructions Notational Power Installation Cleaning Other Introduction Unpacking Front Rear Setup Connecting Your Monitor Installing the Monitor Driver -
Manual Installing VESA compliant mounting User's Manual On-Screen Display Troubleshooting Check List Q & A Self-Test Feature Check Specifications General Specifications PowerSaver Preset Display Modes Information Service Terms Regulatory Natural Color For Better Display Authority Automatic - Index Main Page Safety Instructions Notational Power Installation Cleaning Other Introduction Unpacking Front Rear Setup Connecting Your Monitor Installing the Monitor Driver -

User Manual (ENGLISH)
Page 12
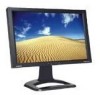
Introduction Front User's Manual 1. Menu button 5. When you push the Source button to change the input source or turn on the monitor, a message appears in the menu. analog or digital.) Note:If you select the Digital mode, you to the graphic card with a digital port using the DVI cable. These buttons allow you must connect your monitor to highlight and adjust items in the center of the screen displaying the current mode -analog or digital input signal.) This light glows green during normal operation, and blinks green once...
Introduction Front User's Manual 1. Menu button 5. When you push the Source button to change the input source or turn on the monitor, a message appears in the menu. analog or digital.) Note:If you select the Digital mode, you to the graphic card with a digital port using the DVI cable. These buttons allow you must connect your monitor to highlight and adjust items in the center of the screen displaying the current mode -analog or digital input signal.) This light glows green during normal operation, and blinks green once...
User Manual (ENGLISH)
Page 14
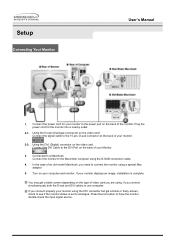
.... 2-1. Connected to have the monitor double-check the input signal source. If your computer and monitor. Setup Connecting Your Monitor User's Manual 1. Using the D-sub (Analogue) connector on the video card. If you connect simultaneously both the D-sub and DVI cables to the power port on the back of the monitor. Connect the monitor to connect the monitor using the DVI connector but get a blank screen depending on your monitor displays an image, installation is set to the DVI Port on the back of your monitor using a special Mac adaptor. 5. Turn...
.... 2-1. Connected to have the monitor double-check the input signal source. If your computer and monitor. Setup Connecting Your Monitor User's Manual 1. Using the D-sub (Analogue) connector on the video card. If you connect simultaneously both the D-sub and DVI cables to the power port on the back of the monitor. Connect the monitor to connect the monitor using the DVI connector but get a blank screen depending on your monitor displays an image, installation is set to the DVI Port on the back of your monitor using a special Mac adaptor. 5. Turn...
User Manual (ENGLISH)
Page 17
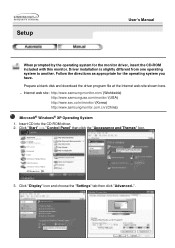
... into the CD-ROM driver. 2. Click "Start" -> "Control Panel" then click the "Appearance and Themes" Icon. 3. Internet web site : http://www.samsung-monitor.com/ (Worldwide) http://www.samsungusa.com/monitor/ (USA) http://www.sec.co.kr/monitor/ (Korea) http://www.samsungmonitor.com.cn/ (China) Microsoft® Windows® XP Operating System 1. Prepare a blank disk and download the driver program file at...
... into the CD-ROM driver. 2. Click "Start" -> "Control Panel" then click the "Appearance and Themes" Icon. 3. Internet web site : http://www.samsung-monitor.com/ (Worldwide) http://www.samsungusa.com/monitor/ (USA) http://www.sec.co.kr/monitor/ (Korea) http://www.samsungmonitor.com.cn/ (China) Microsoft® Windows® XP Operating System 1. Prepare a blank disk and download the driver program file at...
User Manual (ENGLISH)
Page 18
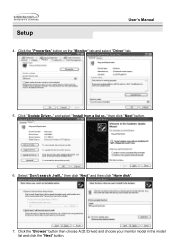
then click "Next" button. 6. then click "Next" and then click "Have disk". 7. Click the "Browse" button then choose A:(D:\Driver) and choose your monitor model in the model list and click the "Next" button. Select "Don't search ,I will.." Setup User's Manual 4. Click "Update Driver.." and select "Install from a list or.." Click the "Properties" button on the "Monitor" tab and select "Driver" tab. 5.
then click "Next" button. 6. then click "Next" and then click "Have disk". 7. Click the "Browse" button then choose A:(D:\Driver) and choose your monitor model in the model list and click the "Next" button. Select "Don't search ,I will.." Setup User's Manual 4. Click "Update Driver.." and select "Install from a list or.." Click the "Properties" button on the "Monitor" tab and select "Driver" tab. 5.
User Manual (ENGLISH)
Page 20
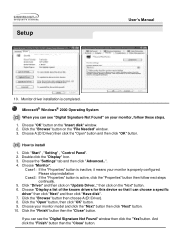
... "Close" button. Choose "OK" button on the "File Needed" window. 3. Click the "Browse" button on the "Insert disk" window. 2. Click "Start" , "Setting" , "Control Panel". 2. Click the "Open" button, then click "OK" button. 9. Monitor driver installation is active, click the "Properties" button then follow these steps. 1. Case1: If the "Properties" button is inactive, it means your monitor model and click the "Next" button then click "Next" button. 10. Setup User's Manual 10. How to install 1. Choose "Monitor". then...
... "Close" button. Choose "OK" button on the "File Needed" window. 3. Click the "Browse" button on the "Insert disk" window. 2. Click "Start" , "Setting" , "Control Panel". 2. Click the "Open" button, then click "OK" button. 9. Monitor driver installation is active, click the "Properties" button then follow these steps. 1. Case1: If the "Properties" button is inactive, it means your monitor model and click the "Next" button then click "Next" button. 10. Setup User's Manual 10. How to install 1. Choose "Monitor". then...

User Manual (ENGLISH)
Page 21
... need to use (Resolution, Number of resolution, colors or frequency). Linux Operating System To execute X-Window, you connected to a different mode (lower mode of colors and Vertical frequency) and then click OK. 4. The third screen is for your computer and click "OK". 11. The next screen is for your mouse. 3. Enter the model name of all, set a horizontal frequency for selecting a keyboard. 5. Select the "Monitor" tab. 5. Click Start, Settings, Control Panel, and then double-click Display...
... need to use (Resolution, Number of resolution, colors or frequency). Linux Operating System To execute X-Window, you connected to a different mode (lower mode of colors and Vertical frequency) and then click OK. 4. The third screen is for your computer and click "OK". 11. The next screen is for your mouse. 3. Enter the model name of all, set a horizontal frequency for selecting a keyboard. 5. Select the "Monitor" tab. 5. Click Start, Settings, Control Panel, and then double-click Display...
User Manual (ENGLISH)
Page 22
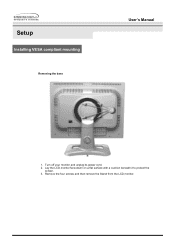
Lay the LCD monitor face-down on a flat surface with a cushion beneath it to protect the screen. 3. Remove the four screws and then remove the Stand from the LCD monitor. Turn off your monitor and unplug its power cord. 2. Setup Installing VESA compliant mounting Removing the base User's Manual 1.
Lay the LCD monitor face-down on a flat surface with a cushion beneath it to protect the screen. 3. Remove the four screws and then remove the Stand from the LCD monitor. Turn off your monitor and unplug its power cord. 2. Setup Installing VESA compliant mounting Removing the base User's Manual 1.

User Manual (ENGLISH)
Page 24
Make a selection using [ - ] or [ + ] button. On Screen Display (OSD) Adjusting the OSD settings 1. Activate the OSD menu by pushing the Menu button. 2. Adjust the OSD settings using [ - ] or [ + ] button and then push the Menu button. 3.
Make a selection using [ - ] or [ + ] button. On Screen Display (OSD) Adjusting the OSD settings 1. Activate the OSD menu by pushing the Menu button. 2. Adjust the OSD settings using [ - ] or [ + ] button and then push the Menu button. 3.

User Manual (ENGLISH)
Page 25
Push the Menu button to open the Brightness adjustment screen. 3. Adjust Brightness. 1. Push the [ - ] button or [ + ] button until the Contrast screen is displayed. 3. Use the [ + ] button to increase the brightness or [ - ] button to decrease the contrast. Push the Menu button to open the Contrast adjustment screen. 4. Use the [ + ] button to increase the contrast or [ - ] button to decrease the brightness. Adjust Contrast. 1. Push the Menu button. 2. How to adjust Brightness - Brightness Menu Contrast Menu How to adjust Contrast - Push the Menu button. 2.
Push the Menu button to open the Brightness adjustment screen. 3. Adjust Brightness. 1. Push the [ - ] button or [ + ] button until the Contrast screen is displayed. 3. Use the [ + ] button to increase the brightness or [ - ] button to decrease the contrast. Push the Menu button to open the Contrast adjustment screen. 4. Use the [ + ] button to increase the contrast or [ - ] button to decrease the brightness. Adjust Contrast. 1. Push the Menu button. 2. How to adjust Brightness - Brightness Menu Contrast Menu How to adjust Contrast - Push the Menu button. 2.
User Manual (ENGLISH)
Page 38
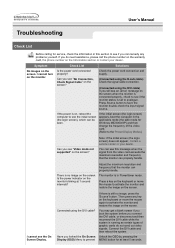
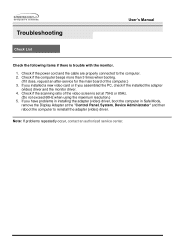
... change the frequency of graphic cards do need assistance, please call the phone number on the warranty card, the phone number on the monitor. Connected using the DVI cable) If you see "Video mode not supported" on the screen when the monitor is connected properly, check to see "No Connection, Check Signal Cable" on the screen? (Connected using the D-sub cable) Check the signal cable connection. (Connected using the DVI cable? Check List Solutions Is the power cord connected properly? Press Source button to activate the monitor and restore the image on the screen...
... change the frequency of graphic cards do need assistance, please call the phone number on the warranty card, the phone number on the monitor. Connected using the DVI cable) If you see "Video mode not supported" on the screen when the monitor is connected properly, check to see "No Connection, Check Signal Cable" on the screen? (Connected using the D-sub cable) Check the signal cable connection. (Connected using the DVI cable? Check List Solutions Is the power cord connected properly? Press Source button to activate the monitor and restore the image on the screen...
User Manual (ENGLISH)
Page 39
... frequency per resolution may differ from product to product.) For Windows ME/2000/XP: Set the colors properly at the screen through a cellophane paper? Have you changed after running a program or due to the OSD. Troubleshooting User's Manual Check List changes? Check the signal cable connection. Reboot the computer. Set the video card by referring to a crash between applications? Have you installed the monitor driver? Readjust Position by referring to the video card manual and the Preset Display Modes...
... frequency per resolution may differ from product to product.) For Windows ME/2000/XP: Set the colors properly at the screen through a cellophane paper? Have you changed after running a program or due to the OSD. Troubleshooting User's Manual Check List changes? Check the signal cable connection. Reboot the computer. Set the video card by referring to a crash between applications? Have you installed the monitor driver? Readjust Position by referring to the video card manual and the Preset Display Modes...
User Manual (ENGLISH)
Page 40
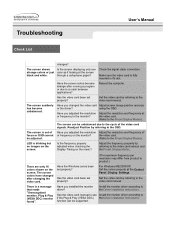
Troubleshooting User's Manual Check List Check the following items if there is set at the "Control Panel, System, Device Administrator" and then reboot the computer to the computer. 2. Check if the power cord and the cable are properly connected to reinstall the adapter (video) driver. Check if the scanning ratio of the computer.) 3. Note: If problems repeatedly occur, contact an authorized service center. Check if the computer beeps more than 3 times...
Troubleshooting User's Manual Check List Check the following items if there is set at the "Control Panel, System, Device Administrator" and then reboot the computer to the computer. 2. Check if the power cord and the cable are properly connected to reinstall the adapter (video) driver. Check if the scanning ratio of the computer.) 3. Note: If problems repeatedly occur, contact an authorized service center. Check if the computer beeps more than 3 times...

User Manual (ENGLISH)
Page 42
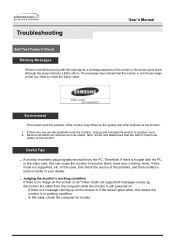
... illustration: The three boxes inside the border are red, green and blue. Failure of any of the computer. 3. Turn on both your computer and the monitor. 2. This box also appears during normal operation if the video cable becomes disconnected or damaged. 4. Turn off your monitor and reconnect the video cable; Troubleshooting User's Manual Self-Test Feature Check Your monitor provides a self test feature that allows you...
... illustration: The three boxes inside the border are red, green and blue. Failure of any of the computer. 3. Turn on both your computer and the monitor. 2. This box also appears during normal operation if the video cable becomes disconnected or damaged. 4. Turn off your monitor and reconnect the video cable; Troubleshooting User's Manual Self-Test Feature Check Your monitor provides a self test feature that allows you...
User Manual (ENGLISH)
Page 43
... screen or the screen goes blank although the power indicator LED is still on the screen or if the screen goes white, this can cause the monitor to another room. 2. A monitor recreates visual signals received from the computer while the monitor is still powered on. . Judging the monitor's working condition If there is no image on the screen or an "Video mode not supported" message comes up on . Troubleshooting User's Manual Self-Test Feature Check...
... screen or the screen goes blank although the power indicator LED is still on the screen or if the screen goes white, this can cause the monitor to another room. 2. A monitor recreates visual signals received from the computer while the monitor is still powered on. . Judging the monitor's working condition If there is no image on the screen or an "Video mode not supported" message comes up on . Troubleshooting User's Manual Self-Test Feature Check...
User Manual (ENGLISH)
Page 44
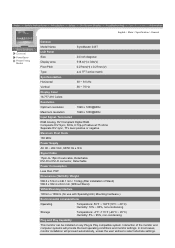
...will provide the best operating conditions and monitor settings. General PowerSaver Preset Timing Modes English > Main > Specification > General General Model Name SyncMaster 243T LCD Panel Size 24 inch diagonal Display area 518.4(H) x 324(V) Pixel Pitch 0.27mm(H) x 0.27mm(V) Type a-si TFT active matrix Synchronization Horizontal 30 ~ 81 kHz Vertical 56 ~ 75 Hz Display Color 16,777,216 Colors Resolution Optimum resolution 1920 x 1200@60Hz Maximum resolution 1920 x 1200@60Hz Input Signal, Terminated RGB Analog, DVI Compliant Digital RGB. Composite H/V Sync, SOG, 0.7Vp...
...will provide the best operating conditions and monitor settings. General PowerSaver Preset Timing Modes English > Main > Specification > General General Model Name SyncMaster 243T LCD Panel Size 24 inch diagonal Display area 518.4(H) x 324(V) Pixel Pitch 0.27mm(H) x 0.27mm(V) Type a-si TFT active matrix Synchronization Horizontal 30 ~ 81 kHz Vertical 56 ~ 75 Hz Display Color 16,777,216 Colors Resolution Optimum resolution 1920 x 1200@60Hz Maximum resolution 1920 x 1200@60Hz Input Signal, Terminated RGB Analog, DVI Compliant Digital RGB. Composite H/V Sync, SOG, 0.7Vp...

User Manual (ENGLISH)
Page 46
... Operation Power saving mode EPA/ENERGY 2000 Machanical Power Switch off Power Indicator Green Green, Blinking Black Power Consumption Less than 75W Less than 2W 0W This monitor is not needed, or when leaving it has not been used with a computer equipped with a VESA DPMS compliant video card installed in power management system called PowerSaver. This system saves energy by switching your monitor into a low-power mode when it unattended for energy efficiency. Use a software utility installed...
... Operation Power saving mode EPA/ENERGY 2000 Machanical Power Switch off Power Indicator Green Green, Blinking Black Power Consumption Less than 75W Less than 2W 0W This monitor is not needed, or when leaving it has not been used with a computer equipped with a VESA DPMS compliant video card installed in power management system called PowerSaver. This system saves energy by switching your monitor into a low-power mode when it unattended for energy efficiency. Use a software utility installed...

User Manual (ENGLISH)
Page 50
...; Resolution The number of monitors to create and display an image for performing multiple tasks as 60 Hz. This number shows the accuracy of the screen can be detected. In this case, flickering of the display. To avoid this means the screen is composed of red, green and blue dots. Example: If the resolution is 1024 X 768, this problem, there is a Flicker-free Mode using a vertical frequency over 70 Hz. • Horizontal Frequency...
...; Resolution The number of monitors to create and display an image for performing multiple tasks as 60 Hz. This number shows the accuracy of the screen can be detected. In this case, flickering of the display. To avoid this means the screen is composed of red, green and blue dots. Example: If the resolution is 1024 X 768, this problem, there is a Flicker-free Mode using a vertical frequency over 70 Hz. • Horizontal Frequency...
User Manual (ENGLISH)
Page 51
...-7310 Fax) 949-922-8301 Warning User must use only UL Listed detachable power cord with NEMA configuration 6-15P type (tandem blades) plug cap. For 120 Volt applications, use shielded signal interface cables to the instruction manual. For 240 Volt applications use the equipment according to maintain FCC compliance for help. Install and use only UL Listed Detachable power supply cord with NEMA configuration 5-15P type (parallel...
...-7310 Fax) 949-922-8301 Warning User must use only UL Listed detachable power cord with NEMA configuration 6-15P type (tandem blades) plug cap. For 120 Volt applications, use shielded signal interface cables to the instruction manual. For 240 Volt applications use the equipment according to maintain FCC compliance for help. Install and use only UL Listed Detachable power supply cord with NEMA configuration 5-15P type (parallel...

User Manual (ENGLISH)
Page 60
... with precision of RED, GREEN, BLUE and WHITE color seem to be seen. Information User's Manual For Better Display 1. But the pixels of 99.999% above is not provided in the screen if the best quality of picture. Adjust computer resolution and screen injection rate (refresh rate) in this product. Let LCD area not to be forced but to be bright sometimes or some of time, residual image or blurriness may...
... with precision of RED, GREEN, BLUE and WHITE color seem to be seen. Information User's Manual For Better Display 1. But the pixels of 99.999% above is not provided in the screen if the best quality of picture. Adjust computer resolution and screen injection rate (refresh rate) in this product. Let LCD area not to be forced but to be bright sometimes or some of time, residual image or blurriness may...


