
User Manual (user Manual) (ver.1.0) (English)
Page 2
...the Stand 2-2 Removing the Stand 2-3 Installing the Stand for the Wall Mount 2-4 Connecting with a PC 2-5 Kensington Lock 2-6 USING THE PRODUCT Setting the Optimal Resolution 3-1 Standard Signal Mode Table 3-2 Installing the Device Driver 3-3 Product Operating Buttons 3-4 Using the Screen Adjustment Menu (OSD: On Screen Display) . . . . 3-5 INSTALLING THE SOFTWARE Natural Color 4-1 MagicTune 4-2 MultiScreen 4-3 TROUBLESHOOTING Monitor Self-Diagnosis 5-1 Before Requesting Service 5-2 FAQ 5-3 MORE INFORMATION Specifications 6-1 Power Saving Function 6-2 Contact SAMSUNG WORLDWIDE...
...the Stand 2-2 Removing the Stand 2-3 Installing the Stand for the Wall Mount 2-4 Connecting with a PC 2-5 Kensington Lock 2-6 USING THE PRODUCT Setting the Optimal Resolution 3-1 Standard Signal Mode Table 3-2 Installing the Device Driver 3-3 Product Operating Buttons 3-4 Using the Screen Adjustment Menu (OSD: On Screen Display) . . . . 3-5 INSTALLING THE SOFTWARE Natural Color 4-1 MagicTune 4-2 MultiScreen 4-3 TROUBLESHOOTING Monitor Self-Diagnosis 5-1 Before Requesting Service 5-2 FAQ 5-3 MORE INFORMATION Specifications 6-1 Power Saving Function 6-2 Contact SAMSUNG WORLDWIDE...
User Manual (user Manual) (ver.1.0) (English)
Page 4
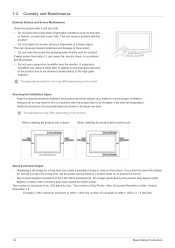
... a stand When installing the product with a wall-mount About persistent images • Displaying a still image for a long time can cause fire, electric shock, or a problem with the product due to appear on the product. Vertical Resolution x 3 Example ) If the maximum resolution is 1680 x 1050 x 3 = 5,292,000. 1-2 Major Safety Precautions If water enters the product, it for a long time, set the power-saving mode or a screen saver...
... a stand When installing the product with a wall-mount About persistent images • Displaying a still image for a long time can cause fire, electric shock, or a problem with the product due to appear on the product. Vertical Resolution x 3 Example ) If the maximum resolution is 1680 x 1050 x 3 = 5,292,000. 1-2 Major Safety Precautions If water enters the product, it for a long time, set the power-saving mode or a screen saver...
User Manual (user Manual) (ver.1.0) (English)
Page 8
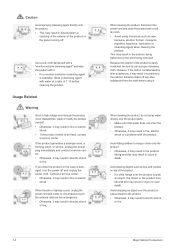
... circumstance touch the antenna cable as this may result in injury or death. Avoid letting children to the exterior; Avoid dropping an object over the product or cause impact to use a proper cleansing cloth. When thunder or lighting occurs, unplug the power cord and under no monitor-exclusive cleansing agent is easily scratched, be fixed, contact a service center. When cleaning...
... circumstance touch the antenna cable as this may result in injury or death. Avoid letting children to the exterior; Avoid dropping an object over the product or cause impact to use a proper cleansing cloth. When thunder or lighting occurs, unplug the power cord and under no monitor-exclusive cleansing agent is easily scratched, be fixed, contact a service center. When cleaning...
User Manual (user Manual) (ver.1.0) (English)
Page 9
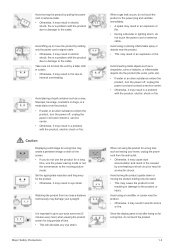
...ports, etc). • If water or an alien substance enters the product, turn the power off , unplug the power cord and contact a service center. • Otherwise, it may result in a problem with the product, electric shock or fire. Since the display panel is important to the cable. Avoid lifting up or move the product by holding only the stand... • During a thunder or lighting storm, do not use the power-saving mode or set the screensaver to the cable. Major Safety Precautions When a gas leak occurs, do not touch the product or the power plug and ventilate immediately. • ...
...ports, etc). • If water or an alien substance enters the product, turn the power off , unplug the power cord and contact a service center. • Otherwise, it may result in a problem with the product, electric shock or fire. Since the display panel is important to the cable. Avoid lifting up or move the product by holding only the stand... • During a thunder or lighting storm, do not use the power-saving mode or set the screensaver to the cable. Major Safety Precautions When a gas leak occurs, do not touch the product or the power plug and ventilate immediately. • ...
User Manual (user Manual) (ver.1.0) (English)
Page 14
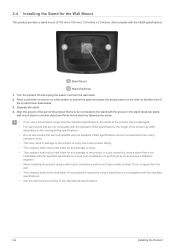
... cushion on a flat surface to protect the panel and place the product down on the corresponding specifications. • Do not use screws that are incompatible with the standard VESA specifications and do not assemble them using excessive force. • This may result in the stand (desk-top stand, wall mount stand or another stand) and firmly fix the stand by fastening the screw. • If you use a screw that is...
... cushion on a flat surface to protect the panel and place the product down on the corresponding specifications. • Do not use screws that are incompatible with the standard VESA specifications and do not assemble them using excessive force. • This may result in the stand (desk-top stand, wall mount stand or another stand) and firmly fix the stand by fastening the screw. • If you use a screw that is...
User Manual (user Manual) (ver.1.0) (English)
Page 15
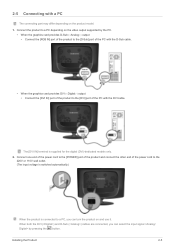
... can turn the product on the product model. 1. Connect one end of the power cord to the [POWER] port of the product and connect the other end of the power cord to the 220V or 110V wall outlet. (The input voltage is switched automatically.) When the product is supplied for the digital (DVI)-dedicated models only. 2. 2-5 Connecting with the DVI cable. Connect the product to a PC depending on the video output supported by...
... can turn the product on the product model. 1. Connect one end of the power cord to the [POWER] port of the product and connect the other end of the power cord to the 220V or 110V wall outlet. (The input voltage is switched automatically.) When the product is supplied for the digital (DVI)-dedicated models only. 2. 2-5 Connecting with the DVI cable. Connect the product to a PC depending on the video output supported by...
User Manual (user Manual) (ver.1.0) (English)
Page 16
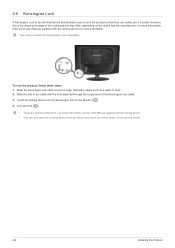
... Kensington lock cable. 3. Insert the locking device into the Kensington slot on the model and the manufacturer, for more information, refer to lock the product so that they can purchase the locking device from an electronics store, an online shop, or our service center. 2-6 Installing the Product 2-6 Kensington Lock A Kensington Lock is an anti-theft device that enables users to the User Manual supplied...
... Kensington lock cable. 3. Insert the locking device into the Kensington slot on the model and the manufacturer, for more information, refer to lock the product so that they can purchase the locking device from an electronics store, an online shop, or our service center. 2-6 Installing the Product 2-6 Kensington Lock A Kensington Lock is an anti-theft device that enables users to the User Manual supplied...
User Manual (user Manual) (ver.1.0) (English)
Page 18
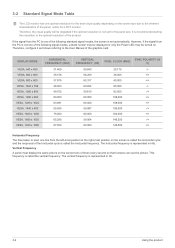
... signal modes, a blank screen may be displayed or only the Power LED may be degraded if the optimal resolution is not one optimal resolution for the best visual quality depending on the screen size due to the inherent characteristics of the panel, unlike for the panel size. It is called the horizontal frequency. Vertical Frequency A panel must display the same picture on the screen tens of the graphics card. Therefore, the visual quality will be turned...
... signal modes, a blank screen may be displayed or only the Power LED may be degraded if the optimal resolution is not one optimal resolution for the best visual quality depending on the screen size due to the inherent characteristics of the panel, unlike for the panel size. It is called the horizontal frequency. Vertical Frequency A panel must display the same picture on the screen tens of the graphics card. Therefore, the visual quality will be turned...
User Manual (user Manual) (ver.1.0) (English)
Page 19
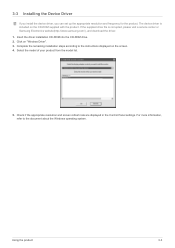
The device driver is corrupted, please visit a service center or Samsung Electronics website(http://www.samsung.com/), and download the driver. 1. Click on the CD-ROM supplied with the product. Check if the appropriate resolution and screen refresh rate are displayed in the Control Panel settings. For more information, refer to the instructions displayed on the screen. 4. 3-3 Installing the Device Driver If you install the device driver, you can set up the appropriate resolution and frequency for...
The device driver is corrupted, please visit a service center or Samsung Electronics website(http://www.samsung.com/), and download the driver. 1. Click on the CD-ROM supplied with the product. Check if the appropriate resolution and screen refresh rate are displayed in the Control Panel settings. For more information, refer to the instructions displayed on the screen. 4. 3-3 Installing the Device Driver If you install the device driver, you can set up the appropriate resolution and frequency for...
User Manual (user Manual) (ver.1.0) (English)
Page 20
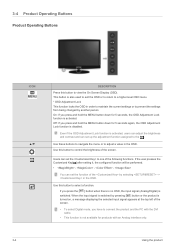
Even if the OSD Adjustment Lock function is activated, users can adjust the brightness and contrast and can set the function of the by selecting -> in the OSD. This button is switched by another person On: If you have to connect the product and the PC with an Analog interface only. 3-4 Using the product Use this button to view the On Screen Display (OSD). When the input signal is also used to exit the...
Even if the OSD Adjustment Lock function is activated, users can adjust the brightness and contrast and can set the function of the by selecting -> in the OSD. This button is switched by another person On: If you have to connect the product and the PC with an Analog interface only. 3-4 Using the product Use this button to view the On Screen Display (OSD). When the input signal is also used to exit the...
User Manual (user Manual) (ver.1.0) (English)
Page 21
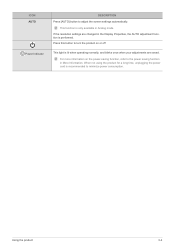
... the resolution settings are saved. Using the product 3-4 When not using the product for a long time, unplugging the power cord is lit when operating normally, and blinks once when your adjustments are changed in the Display Properties, the AUTO adjustment function is only available in More Information. For more information on or off This light is recommended to minimize power consumption. Press this button to turn the...
... the resolution settings are saved. Using the product 3-4 When not using the product for a long time, unplugging the power cord is lit when operating normally, and blinks once when your adjustments are changed in the Display Properties, the AUTO adjustment function is only available in More Information. For more information on or off This light is recommended to minimize power consumption. Press this button to turn the...

User Manual (user Manual) (ver.1.0) (English)
Page 22
...mode or mode. 3-5 Using the product 3-5 Using the Screen Adjustment Menu (OSD: On Screen Display) The Screen Adjustment Menu (OSD: On Screen Display) Structure Top Menus PICTURE Brightness Fine COLOR MagicColor Color Effect SIZE & POSI- H-Position TION SETUP&RESE T Reset Auto Source Contrast Response Time Red Gamma V-Position Sub Menus Sharpness Green Image Size MagicBright Blue Coarse Color Tone Menu Transparency PC/AV Mode Language Display Time Off Timer On/Off Off Timer Setting Customized Key INFORMATION Monitor functions may vary according to models. PICTURE...
...mode or mode. 3-5 Using the product 3-5 Using the Screen Adjustment Menu (OSD: On Screen Display) The Screen Adjustment Menu (OSD: On Screen Display) Structure Top Menus PICTURE Brightness Fine COLOR MagicColor Color Effect SIZE & POSI- H-Position TION SETUP&RESE T Reset Auto Source Contrast Response Time Red Gamma V-Position Sub Menus Sharpness Green Image Size MagicBright Blue Coarse Color Tone Menu Transparency PC/AV Mode Language Display Time Off Timer On/Off Off Timer Setting Customized Key INFORMATION Monitor functions may vary according to models. PICTURE...
User Manual (user Manual) (ver.1.0) (English)
Page 25
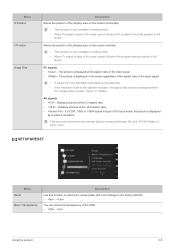
... screen regardless of the aspect ratio of the input signal. • A signal not in the standard mode table is not supported. • If the resolution is set when the external input is connected through DVI and is input in AV mode ,select to adjust horizontal position in 0-6 levels. AV signals • - The picture is set to . SETUP&RESET Menu Reset Menu Transparency Description Use this function to restore the visual quality and color settings to the factory defaults. • - Using...
... screen regardless of the aspect ratio of the input signal. • A signal not in the standard mode table is not supported. • If the resolution is set when the external input is connected through DVI and is input in AV mode ,select to adjust horizontal position in 0-6 levels. AV signals • - The picture is set to . SETUP&RESET Menu Reset Menu Transparency Description Use this function to restore the visual quality and color settings to the factory defaults. • - Using...
User Manual (user Manual) (ver.1.0) (English)
Page 26
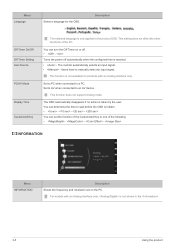
... does not support Analog mode. The monitor automatically selects an input signal. • - Set to AV when connected to one of the PC. Turns the power off . • - This function is not available for the OSD. Description Off Timer On/Off Off Timer Setting Auto Source PC/AV Mode Display Time Customized Key The selected language is reached. • - INFORMATION Menu INFORMATION Description Shows the frequency and resolution set the function...
... does not support Analog mode. The monitor automatically selects an input signal. • - Set to AV when connected to one of the PC. Turns the power off . • - This function is not available for the OSD. Description Off Timer On/Off Off Timer Setting Auto Source PC/AV Mode Display Time Customized Key The selected language is reached. • - INFORMATION Menu INFORMATION Description Shows the frequency and resolution set the function...
User Manual (user Manual) (ver.1.0) (English)
Page 28
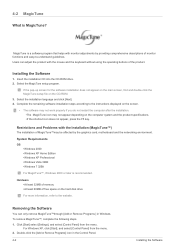
... keyboard without using the operating buttons of monitor functions and easy-to the website. To remove MagicTune™, complete the following steps. 1. Insert the installation CD into the CD-ROM drive. 2. Select the installation language and click [Next]. 4. For Windows XP, click [Start], and select [Control Panel] from the menu. MagicTune is a software program that helps with the Installation (MagicTune™) The installation of free space on...
... keyboard without using the operating buttons of monitor functions and easy-to the website. To remove MagicTune™, complete the following steps. 1. Insert the installation CD into the CD-ROM drive. 2. Select the installation language and click [Next]. 4. For Windows XP, click [Start], and select [Control Panel] from the menu. MagicTune is a software program that helps with the Installation (MagicTune™) The installation of free space on...
User Manual (user Manual) (ver.1.0) (English)
Page 30
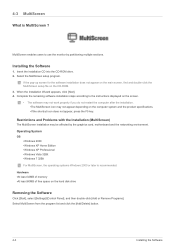
MultiScreen enables users to the instructions displayed on the screen. • The software may not work properly if you do not restart the computer after the installation. •The MultiScreen icon may be affected by partitioning multiple sections. Complete the remaining software installation steps according to use the monitor by the graphics card, motherboard and the networking environment. Restrictions and Problems with the Installation (MultiScreen...
MultiScreen enables users to the instructions displayed on the screen. • The software may not work properly if you do not restart the computer after the installation. •The MultiScreen icon may be affected by partitioning multiple sections. Complete the remaining software installation steps according to use the monitor by the graphics card, motherboard and the networking environment. Restrictions and Problems with the Installation (MultiScreen...
User Manual (user Manual) (ver.1.0) (English)
Page 32
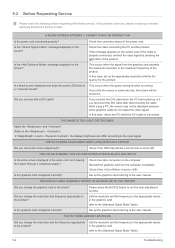
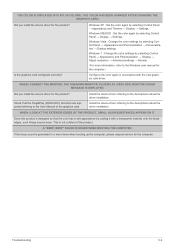
... the power cord connected properly? Check the cable connection to run the auto adjustment function. Check if the is connected. Please press the [AUTO] button to the computer. Did you change the resolution and frequency appropriate to the product? Set the resolution and the frequency to the input signal. 5-2 Before Requesting Service Please check the following before requesting After-Sales service. Is the message displayed on the screen even if the cable is set to the user manual. Check the cable connecting...
... the power cord connected properly? Check the cable connection to run the auto adjustment function. Check if the is connected. Please press the [AUTO] button to the computer. Did you change the resolution and frequency appropriate to the product? Set the resolution and the frequency to the input signal. 5-2 Before Requesting Service Please check the following before requesting After-Sales service. Is the message displayed on the screen even if the cable is set to the user manual. Check the cable connecting...
User Manual (user Manual) (ver.1.0) (English)
Page 33
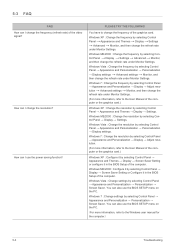
... I CONNECT THE MONITOR, THE 'UNKNOWN MONITOR, PLUG&PLAY (VESA DDC) MONITOR FOUND' MESSAGE IS DISPLAYED. Troubleshooting 5-2 Install the device driver referring to the Windows user manual for the product? Is the graphics card configured correctly? THE COLOR IS DISPLAYED IN 16 BIT (16 COLORS). This is designed so that the color has a soft appearance by selecting Control Panel → Appearance and Themes → Display → Settings. THE COLOR HAS BEEN CHANGED AFTER CHANGING THE GRAPHICS CARD...
... I CONNECT THE MONITOR, THE 'UNKNOWN MONITOR, PLUG&PLAY (VESA DDC) MONITOR FOUND' MESSAGE IS DISPLAYED. Troubleshooting 5-2 Install the device driver referring to the Windows user manual for the product? Is the graphics card configured correctly? THE COLOR IS DISPLAYED IN 16 BIT (16 COLORS). This is designed so that the color has a soft appearance by selecting Control Panel → Appearance and Themes → Display → Settings. THE COLOR HAS BEEN CHANGED AFTER CHANGING THE GRAPHICS CARD...
User Manual (user Manual) (ver.1.0) (English)
Page 34
... settings → Monitor, and then change the refresh rate under Monitor Settings. (For more information, refer to the User Manual of the computer. Windows 7 : Change settings by selecting Control Panel → Display → Settings. How can also use the power saving function? You can I use the BIOS SETUP menu on the PC. (For more information, refer to the Windows user manual for the computer.) 5-3 Troubleshooting Windows Vista : Change the frequency by selecting Control Panel → Appearance and Themes → Display → Settings. Windows ME...
... settings → Monitor, and then change the refresh rate under Monitor Settings. (For more information, refer to the User Manual of the computer. Windows 7 : Change settings by selecting Control Panel → Display → Settings. How can also use the power saving function? You can I use the BIOS SETUP menu on the PC. (For more information, refer to the Windows user manual for the computer.) 5-3 Troubleshooting Windows Vista : Change the frequency by selecting Control Panel → Appearance and Themes → Display → Settings. Windows ME...
User Manual (user Manual) (ver.1.0) (English)
Page 36
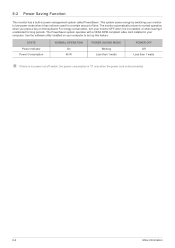
..., turn your monitor to normal operation when you press a key on your computer. The PowerSaver system operates with a VESA DPM compliant video card installed in power management system called PowerSaver. Use the software utility installed on the keyboard. This system saves energy by switching your monitor OFF when it is disconnected. 6-2 More Information STATE Power Indicator Power Consumption NORMAL OPERATION On 45 W POWER SAVING MODE Blinking Less than 1 watts POWER...
..., turn your monitor to normal operation when you press a key on your computer. The PowerSaver system operates with a VESA DPM compliant video card installed in power management system called PowerSaver. Use the software utility installed on the keyboard. This system saves energy by switching your monitor OFF when it is disconnected. 6-2 More Information STATE Power Indicator Power Consumption NORMAL OPERATION On 45 W POWER SAVING MODE Blinking Less than 1 watts POWER...


