
Quick Guide (easy Manual) (ver.1.0) (Korean)
Page 7
... the product away from combustible chemical sprays or inflammable substances. Disconnect the plug from the outlet during storms or lightning or if it is damaged, turn the monitor off and unplug the power cord. This may cause a malfunction, electric shock or fire. This may cause a breakdown, electric shock or fire due...
... the product away from combustible chemical sprays or inflammable substances. Disconnect the plug from the outlet during storms or lightning or if it is damaged, turn the monitor off and unplug the power cord. This may cause a malfunction, electric shock or fire. This may cause a breakdown, electric shock or fire due...
Quick Guide (easy Manual) (ver.1.0) (Korean)
Page 8
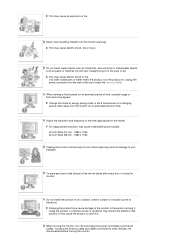
... in damage to a changing picture when away from the wall outlet and contact the Service Center. If an alien substances or water enters the product, turn off , unplug the power connector from the monitor for an extended period of the product or may cause the product to vibrations may shorten the...explosion or fire. Do not install the product on an unstable, uneven surface or a location prone to other devices, are disconnected before moving the monitor, turn the product off and unplug the power cord. Change the mode to energy saving mode or set a screensaver to your eyesight.
... in damage to a changing picture when away from the wall outlet and contact the Service Center. If an alien substances or water enters the product, turn off , unplug the power connector from the monitor for an extended period of the product or may cause the product to vibrations may shorten the...explosion or fire. Do not install the product on an unstable, uneven surface or a location prone to other devices, are disconnected before moving the monitor, turn the product off and unplug the power cord. Change the mode to energy saving mode or set a screensaver to your eyesight.

Quick Guide (easy Manual) (ver.1.0) (Korean)
Page 11
...by the warranty. Avoid using a combination of characters and background color with Logo or Moving image cycle. What is not a product defect. Turn the power off for a long time. Change the Color Information periodically (Use 2 different colors). Avoid using Grey colors, which encase the ... accumulates between the two electrodes which can cause Image retention easily. All display products, including LCD,are subject to a new video image. Turn the power off for a long time, a slight difference in use - However, if the same image is recommended. Please follow set ...
...by the warranty. Avoid using a combination of characters and background color with Logo or Moving image cycle. What is not a product defect. Turn the power off for a long time. Change the Color Information periodically (Use 2 different colors). Avoid using Grey colors, which encase the ... accumulates between the two electrodes which can cause Image retention easily. All display products, including LCD,are subject to a new video image. Turn the power off for a long time, a slight difference in use - However, if the same image is recommended. Please follow set ...

Quick Guide (easy Manual) (ver.1.0) (Korean)
Page 13
... so as to buy optional items. Unpacking Without Stand With Stand Monitor Contact a local dealer to provide a sharper and more natural video display. If you turn the power off and on again after switching RTA off, the RTA function is automatically switched On (Factory Setting) Package Contents Please make sure the...
... so as to buy optional items. Unpacking Without Stand With Stand Monitor Contact a local dealer to provide a sharper and more natural video display. If you turn the power off and on again after switching RTA off, the RTA function is automatically switched On (Factory Setting) Package Contents Please make sure the...
Quick Guide (easy Manual) (ver.1.0) (Korean)
Page 16
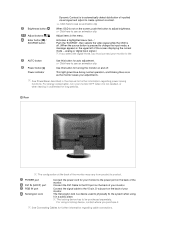
... the monitor saves your monitor OFF when it is not needed, or when leaving it unattended for long periods. For using it . For energy conservation, turn your adjustments. POWER port DVI IN (HDCP) port RGB IN port Kensington Lock Connect the power cord for your monitor to the AUTO button Power... 15-pin, D-sub port on the back of your monitor. The Kensington lock is a device used to see an animation clip Use this button for turning the monitor on and off . (When the source button is pressed to the power port on the back of the monitor. analog or digital input...
... the monitor saves your monitor OFF when it is not needed, or when leaving it unattended for long periods. For using it . For energy conservation, turn your adjustments. POWER port DVI IN (HDCP) port RGB IN port Kensington Lock Connect the power cord for your monitor to the AUTO button Power... 15-pin, D-sub port on the back of your monitor. The Kensington lock is a device used to see an animation clip Use this button for turning the monitor on and off . (When the source button is pressed to the power port on the back of the monitor. analog or digital input...

Quick Guide (easy Manual) (ver.1.0) (Korean)
Page 17
... the monitor to the DVI Port on the video card. - Using the Stand Monitor Assembly If the monitor and the computer are connected, you can turn them .
... the monitor to the DVI Port on the video card. - Using the Stand Monitor Assembly If the monitor and the computer are connected, you can turn them .

Quick Guide (easy Manual) (ver.1.0) (Korean)
Page 18
Monitor and Bottom Attaching a Base This monitor accepts a 100 mm x 100 mm VESA-compliant mounting interface pad. Mounting interface pad (Sold separately) Turn off your monitor and unplug its power cord. Remove three screws and then remove the stand from the LCD monitor. Lay the LCD monitor face-down on a flat surface with the arm-type base, wall mount hanger or other base. A. Align the mounting interface pad with the holes in the rear cover mounting Pad and secure it with four screws that came with a cushion beneath it to protect the screen. Monitor B.
Monitor and Bottom Attaching a Base This monitor accepts a 100 mm x 100 mm VESA-compliant mounting interface pad. Mounting interface pad (Sold separately) Turn off your monitor and unplug its power cord. Remove three screws and then remove the stand from the LCD monitor. Lay the LCD monitor face-down on a flat surface with the arm-type base, wall mount hanger or other base. A. Align the mounting interface pad with the holes in the rear cover mounting Pad and secure it with four screws that came with a cushion beneath it to protect the screen. Monitor B.

Quick Guide (easy Manual) (ver.1.0) (Korean)
Page 36
...are replaced with the factory default values. Transparency Display Time MENU , , , MENU Change the transparency of the background of time the menu will be automatically turned off . - 5 sec, 10 sec, 20 sec, 200 sec MENU , , , MENU Setup Menu Auto Source Image Reset Color Reset RTA Description ...Select Auto Source for a certain time period. If you turn the power off and on again after switching RTA off, the RTA function is turned off if no adjustments are made for the monitor to provide a sharper and more natural video...
...are replaced with the factory default values. Transparency Display Time MENU , , , MENU Change the transparency of the background of time the menu will be automatically turned off . - 5 sec, 10 sec, 20 sec, 200 sec MENU , , , MENU Setup Menu Auto Source Image Reset Color Reset RTA Description ...Select Auto Source for a certain time period. If you turn the power off and on again after switching RTA off, the RTA function is turned off if no adjustments are made for the monitor to provide a sharper and more natural video...
Quick Guide (easy Manual) (ver.1.0) (Korean)
Page 38
... 60 Hz" message appears for Windows ME/XP/2000) and then change to see the initial screen(the login screen), which can handle properly. I cannot turn on the screen. Can you see "Check Signal Cable" on the screen? (Connected using the D-sub cable) Check the signal cable connection. (Connected using the...
... 60 Hz" message appears for Windows ME/XP/2000) and then change to see the initial screen(the login screen), which can handle properly. I cannot turn on the screen. Can you see "Check Signal Cable" on the screen? (Connected using the D-sub cable) Check the signal cable connection. (Connected using the...
Quick Guide (easy Manual) (ver.1.0) (Korean)
Page 41
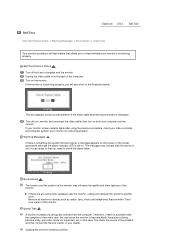
... fans, clocks and telephones that are any sub woofer speakers near the monitor, unplug and relocate the woofer to check the signal cable. Turn off both your monitor is a problem with the input signal, a message appears on the monitor. The message may influence the quality and...indicate that you will see a box in the illustration below. Judging the monitor's working condition Self-Test Feature Check Turn off your computer and the monitor. then turn on both your monitor and reconnect the video cable; your computer and the monitor. Useful Tips A monitor recreates ...
... fans, clocks and telephones that are any sub woofer speakers near the monitor, unplug and relocate the woofer to check the signal cable. Turn off both your monitor is a problem with the input signal, a message appears on the monitor. The message may influence the quality and...indicate that you will see a box in the illustration below. Judging the monitor's working condition Self-Test Feature Check Turn off your computer and the monitor. then turn on both your monitor and reconnect the video cable; your computer and the monitor. Useful Tips A monitor recreates ...

Quick Guide (easy Manual) (ver.1.0) (Korean)
Page 44
... time. But the pixels of the monitor and the computer systems will proceed automatically, unless the user wishes to select alternate settings. For energy conservation, turn your monitor to low-power mode when it is not from bad quality and you press a key on the keyboard. Use the software utility installed...
... time. But the pixels of the monitor and the computer systems will proceed automatically, unless the user wishes to select alternate settings. For energy conservation, turn your monitor to low-power mode when it is not from bad quality and you press a key on the keyboard. Use the software utility installed...

Quick Guide (easy Manual) (ver.1.0) (Korean)
Page 48
... saves energy by using advanced semiconductor technology with a VESA DPMS compliant video card installed in your computer to set up this feature. For energy conservation, turn your monitor to low-power mode when it unattended for long periods. State Power Indicator Power Consumption Normal Operation Blue Less than 55 W Power saving...
... saves energy by using advanced semiconductor technology with a VESA DPMS compliant video card installed in your computer to set up this feature. For energy conservation, turn your monitor to low-power mode when it unattended for long periods. State Power Indicator Power Consumption Normal Operation Blue Less than 55 W Power saving...

Quick Guide (easy Manual) (ver.1.0) (Korean)
Page 53
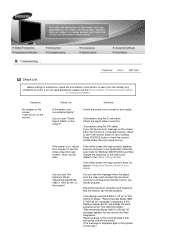
... 8000-4726 http://www.samsung.com/in http://www.samsung.com/id http://www.samsung.com/jp http://www.samsung.com/my http://www.samsung.com/ph http://www.samsung.com/sg http://www.samsung.com/th http://www.samsung.com/tw http://www.samsung.com/vn http://www.samsung.com/za http://www.samsung.com/mea Terms Dot...Interlace method is called the 'Dot Pitch'. Plug & Play This is called the NonInterlace method while showing odd lines and then even lines in turn is a function that used for the user. Unit : mm Vertical Frequency The screen must be redrawn several times per second is composed of...
... 8000-4726 http://www.samsung.com/in http://www.samsung.com/id http://www.samsung.com/jp http://www.samsung.com/my http://www.samsung.com/ph http://www.samsung.com/sg http://www.samsung.com/th http://www.samsung.com/tw http://www.samsung.com/vn http://www.samsung.com/za http://www.samsung.com/mea Terms Dot...Interlace method is called the 'Dot Pitch'. Plug & Play This is called the NonInterlace method while showing odd lines and then even lines in turn is a function that used for the user. Unit : mm Vertical Frequency The screen must be redrawn several times per second is composed of...

Service Manual
Page 15
... image for the majority of horizontal and vertical dots used for the user. Example: If the resolution is 1280 x 1024 , this repetition per second in turn is the same as 60 Hz. - External Device Input External device input refers to video input from a TV broadcast. - This number shows the accuracy of...
... image for the majority of horizontal and vertical dots used for the user. Example: If the resolution is 1280 x 1024 , this repetition per second in turn is the same as 60 Hz. - External Device Input External device input refers to video input from a TV broadcast. - This number shows the accuracy of...

Service Manual
Page 16
... source. 14-3 If you connect simultaneously both the D-Sub and DVI cables to analog. Using the DVI (Digital) connector on the back of your monitor. 2-3. Turn on your monitor displays an image, installation is set to one computer. - Plug the power cord for your monitor to the power port on the...
... source. 14-3 If you connect simultaneously both the D-Sub and DVI cables to analog. Using the DVI (Digital) connector on the back of your monitor. 2-3. Turn on your monitor displays an image, installation is set to one computer. - Plug the power cord for your monitor to the power port on the...

Service Manual
Page 24
... 2-2 Feature No Feature Feature Operating method If 206BW/226BW turns on in some resolution for the first time, it can 1 Auto Auto execute Auto adjustment automatically for the high Quality 2 Auto Power 206BW/226BW can check the change of Source on/off Automatically ...and change the source to the active Input 3 Wall mount 206BW/226BW supports Wall mount (100 X 100) Gamma & 4 Color 206BW/226BW supports 3 step Adjustment temperature for Gamma & Color temperature Adjust 5 206BW/226BW supports 7 different brightness mode Magic Bright (Custom, Text, Internet, Game,...
... 2-2 Feature No Feature Feature Operating method If 206BW/226BW turns on in some resolution for the first time, it can 1 Auto Auto execute Auto adjustment automatically for the high Quality 2 Auto Power 206BW/226BW can check the change of Source on/off Automatically ...and change the source to the active Input 3 Wall mount 206BW/226BW supports Wall mount (100 X 100) Gamma & 4 Color 206BW/226BW supports 3 step Adjustment temperature for Gamma & Color temperature Adjust 5 206BW/226BW supports 7 different brightness mode Magic Bright (Custom, Text, Internet, Game,...

Service Manual
Page 37
.... / Push the 'SOURCE', then selects the video signal while the OSD is pressed to the incoming video signal. POWER port Connect the power cord for turn the monitor on the back of the screen displaying the current mode -- For using a locking device, contact where you must connect your monitor to the...
.... / Push the 'SOURCE', then selects the video signal while the OSD is pressed to the incoming video signal. POWER port Connect the power cord for turn the monitor on the back of the screen displaying the current mode -- For using a locking device, contact where you must connect your monitor to the...

Service Manual
Page 38
10-3 Using the Stand 10-3-1 Removing the base 10 Operating Instructions and Installation A 1. Remove four screws(A) and then remove the Stand from the LCD monitor. 10-3 Turn off your monitor and unplug its power cord. 2. Lay the LCD monitor face-down on a flat surface with a cushion beneath it to protect the screen. 3.
10-3 Using the Stand 10-3-1 Removing the base 10 Operating Instructions and Installation A 1. Remove four screws(A) and then remove the Stand from the LCD monitor. 10-3 Turn off your monitor and unplug its power cord. 2. Lay the LCD monitor face-down on a flat surface with a cushion beneath it to protect the screen. 3.

Service Manual
Page 39
... it with four screws that came with a cushion beneath it to protect the screen. 3. Monitor B. A. This monitor accepts a 100mm x 100mm VESA-compliant mounting interface pad. 1. 2. 3. 4. Turn off your monitor and unplug its power cord. 2. Remove four screws and then remove the stand from the LCD monitor. 4. 10 Operating Instructions and Installation...
... it with four screws that came with a cushion beneath it to protect the screen. 3. Monitor B. A. This monitor accepts a 100mm x 100mm VESA-compliant mounting interface pad. 1. 2. 3. 4. Turn off your monitor and unplug its power cord. 2. Remove four screws and then remove the stand from the LCD monitor. 4. 10 Operating Instructions and Installation...


