Quick Guide (ENGLISH)
Page 2
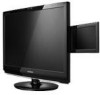
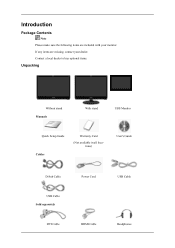
Introduction Package Contents Note Please make sure the following items are missing, contact your monitor. Contact a local dealer to buy optional items. Unpacking Without stand Manuals With stand USB Monitor Quick Setup Guide Cables Warranty Card (Not available in all locations) User's Guide D-Sub Cable USB Cable Sold separately DVI Cable Power Cord HDMI Cable USB Cable Headphones If any items are included with your dealer.
Introduction Package Contents Note Please make sure the following items are missing, contact your monitor. Contact a local dealer to buy optional items. Unpacking Without stand Manuals With stand USB Monitor Quick Setup Guide Cables Warranty Card (Not available in all locations) User's Guide D-Sub Cable USB Cable Sold separately DVI Cable Power Cord HDMI Cable USB Cable Headphones If any items are included with your dealer.
Quick Guide (ENGLISH)
Page 7
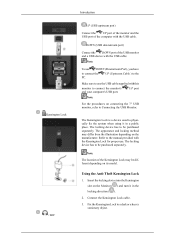
... when using it in a public place. Connect the Kensington Lock cable. 3. UP (Upstream Cable ) to the Make sure to connect the monitor's and your computer's USB port. Using the Anti-Theft Kensington Lock 1. Note To use . The appearance and locking method may be purchased ...separately. Refer to the manual provided with this monitor to use the USB cable supplied with the Kensington Lock for proper use DOWN (Downstream Port), you have to Connecting the USB...
... when using it in a public place. Connect the Kensington Lock cable. 3. UP (Upstream Cable ) to the Make sure to connect the monitor's and your computer's USB port. Using the Anti-Theft Kensington Lock 1. Note To use . The appearance and locking method may be purchased ...separately. Refer to the manual provided with this monitor to use the USB cable supplied with the Kensington Lock for proper use DOWN (Downstream Port), you have to Connecting the USB...
Quick Guide (ENGLISH)
Page 10
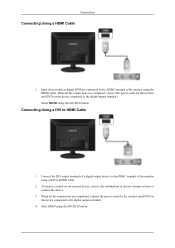
... DVD (or the device connected to the digital output terminal). 4. When all the connections are completed, connect the power cords for the monitor and DVD (or the device connected to the digital output terminal). Select HDMI using the SOURCE button. Selet HDMI using the SOURCE button. ...Connect the DVI output terminal of a digital output device to the HDMI terminal of the monitor using a DVI to the HDMI terminal of the monitor using the HDMI cable. Connecting Using a DVI to connect the device. 3. To listen to sound via an external device, ...
... DVD (or the device connected to the digital output terminal). 4. When all the connections are completed, connect the power cords for the monitor and DVD (or the device connected to the digital output terminal). Select HDMI using the SOURCE button. Selet HDMI using the SOURCE button. ...Connect the DVI output terminal of a digital output device to the HDMI terminal of the monitor using a DVI to the HDMI terminal of the monitor using the HDMI cable. Connecting Using a DVI to connect the device. 3. To listen to sound via an external device, ...
Quick Guide (ENGLISH)
Page 20
...send out video signals. Q: Have you locked the On Screen Display (OSD) Menu to the video card manual. Then press any key on the keyboard again to activate the monitor and restore the image on the screen. Connect the DVI cable and then reboot the system. I cannot...least 5 seconds. A: Adjust the resolution and frequency at 1 second intervals? A: Reboot the computer. A: Press a key on the keyboard to activate the monitor and restore the image on the screen. Q: Is the screen displaying only one minute and then disappears. A: Check the signal cable connection. Q: Connected using...
...send out video signals. Q: Have you locked the On Screen Display (OSD) Menu to the video card manual. Then press any key on the keyboard again to activate the monitor and restore the image on the screen. Connect the DVI cable and then reboot the system. I cannot...least 5 seconds. A: Adjust the resolution and frequency at 1 second intervals? A: Reboot the computer. A: Press a key on the keyboard to activate the monitor and restore the image on the screen. Q: Is the screen displaying only one minute and then disappears. A: Check the signal cable connection. Q: Connected using...
Quick Guide (ENGLISH)
Page 21
... changed after changing the video card. A: Set the video card by referring to the cycle of the video card signals. A: Install the monitor driver according to the video card manual. A: Adjust the resolution and frequency of focus or OSD cannot be adjusted. There is connected correctly. Check whether the USB driver is...
... changed after changing the video card. A: Set the video card by referring to the cycle of the video card signals. A: Install the monitor driver according to the video card manual. A: Adjust the resolution and frequency of focus or OSD cannot be adjusted. There is connected correctly. Check whether the USB driver is...

Quick Guide (ENGLISH)
Page 22
... if the power cord and the video cables are properly connected to the user manual for your USB monitor in hibernation mode (The monitor turns off). A: Install the "USB Monitor Driver" from the provided CD. Configuring the Settings Set the Advanced -> Peripheral Configuration (Integrated Peripherals) -> Legacy USB Support item to configure the settings, click...
... if the power cord and the video cables are properly connected to the user manual for your USB monitor in hibernation mode (The monitor turns off). A: Install the "USB Monitor Driver" from the provided CD. Configuring the Settings Set the Advanced -> Peripheral Configuration (Integrated Peripherals) -> Legacy USB Support item to configure the settings, click...

Quick Guide (ENGLISH)
Page 23
...can I clean the outer case/LCD Panel? Do not leave any water enter the monitor. Note If problems repeatedly occur, contact an authorized service center. A: Windows XP: Set the resolution in the BIOS-SETUP of the computer. (Refer to the Windows / Computer Manual). Set the function in the ...? Do not let any detergent or scratches on the version of the computer. (Refer to the Windows / Computer Manual). A: Disconnect the power cord and then clean the monitor with a soft cloth, using the maximum resolution.) If you have problems in installing the adapter (video) driver, ...
...can I clean the outer case/LCD Panel? Do not leave any water enter the monitor. Note If problems repeatedly occur, contact an authorized service center. A: Windows XP: Set the resolution in the BIOS-SETUP of the computer. (Refer to the Windows / Computer Manual). Set the function in the ...? Do not let any detergent or scratches on the version of the computer. (Refer to the Windows / Computer Manual). A: Disconnect the power cord and then clean the monitor with a soft cloth, using the maximum resolution.) If you have problems in installing the adapter (video) driver, ...

User Manual (ENGLISH)
Page 9
If any items are included with your dealer. Introduction Package Contents Note Please make sure the following items are missing, contact your monitor. Contact a local dealer to buy optional items. Unpacking Without stand Manuals With stand USB Monitor Quick Setup Guide Cables Warranty Card (Not available in all locations) User's Guide D-Sub Cable USB Cable Sold separately DVI Cable Power Cord HDMI Cable USB Cable Headphones
If any items are included with your dealer. Introduction Package Contents Note Please make sure the following items are missing, contact your monitor. Contact a local dealer to buy optional items. Unpacking Without stand Manuals With stand USB Monitor Quick Setup Guide Cables Warranty Card (Not available in all locations) User's Guide D-Sub Cable USB Cable Sold separately DVI Cable Power Cord HDMI Cable USB Cable Headphones

User Manual (ENGLISH)
Page 14
The locking device has to be purchased separately. Refer to the manual provided with this monitor to physically fix the system when using it in a public place. Insert the locking device into the Kensington slot on its model. Connect the ... Note The location of the Kensington Lock may differ from the illustration depending on connecting the 7" USB monitor, refer to a desk or a heavy stationary object. The Kensington Lock is a device used to connect the monitor's and your computer's USB port. UP port Note For the procedures on the manufacturer. Fix the Kensington...
The locking device has to be purchased separately. Refer to the manual provided with this monitor to physically fix the system when using it in a public place. Insert the locking device into the Kensington slot on its model. Connect the ... Note The location of the Kensington Lock may differ from the illustration depending on connecting the 7" USB monitor, refer to a desk or a heavy stationary object. The Kensington Lock is a device used to connect the monitor's and your computer's USB port. UP port Note For the procedures on the manufacturer. Fix the Kensington...

User Manual (ENGLISH)
Page 17
...device connected to HDMI cable. 2. When all the connections are completed, connect the power cords for the monitor and DVD (or the device connected to the HDMI terminal of the monitor using the HDMI cable. Connect the DVI output terminal of a digital output device to the HDMI terminal of... the monitor using a DVI to the digital output terminal). 4. To listen to sound via an external device, refer to the information in its user manual on how to HDMI Cable 1. Select HDMI using the SOURCE button.
...device connected to HDMI cable. 2. When all the connections are completed, connect the power cords for the monitor and DVD (or the device connected to the HDMI terminal of the monitor using the HDMI cable. Connect the DVI output terminal of a digital output device to the HDMI terminal of... the monitor using a DVI to the digital output terminal). 4. To listen to sound via an external device, refer to the information in its user manual on how to HDMI Cable 1. Select HDMI using the SOURCE button.

User Manual (ENGLISH)
Page 44
http://www.samsung.com/ Installing the Monitor Driver (Manual) Microsoft® Windows Vista™, Operating System 1. Click "Personalization" and then "Display Settings". 4. If you can see following message window, then click the "Continue Anyway" button. Click (Start) and "Control Panel". Click "Advanced Settings...". Note This monitor driver is under ...XP/2000 Operating System). Using the Software 4. The certified driver will be posted on "Appearance and Personalization". 3. Then, double-click on Samsung Monitor homepage. Insert your Manual CD into your system.
http://www.samsung.com/ Installing the Monitor Driver (Manual) Microsoft® Windows Vista™, Operating System 1. Click "Personalization" and then "Display Settings". 4. If you can see following message window, then click the "Continue Anyway" button. Click (Start) and "Control Panel". Click "Advanced Settings...". Note This monitor driver is under ...XP/2000 Operating System). Using the Software 4. The certified driver will be posted on "Appearance and Personalization". 3. Then, double-click on Samsung Monitor homepage. Insert your Manual CD into your system.

User Manual (ENGLISH)
Page 51
It is available only for setting your computer. 6. To install the program manually, insert the CD included with Korea Electronics & Telecommunications Research Institute (ETRI). Enter D:\color\NCProSetup.exe and then press the [Enter] key. (If ... execution of the recent problems in the software program. This information will be executed. Execute X-Window after setting other images scanned by Samsung Electronics in association with the Samsung monitor into the CD-ROM Drive. Natural Color Natural Color Software Program One of X-Window. 10. Click Natural Color on the...
It is available only for setting your computer. 6. To install the program manually, insert the CD included with Korea Electronics & Telecommunications Research Institute (ETRI). Enter D:\color\NCProSetup.exe and then press the [Enter] key. (If ... execution of the recent problems in the software program. This information will be executed. Execute X-Window after setting other images scanned by Samsung Electronics in association with the Samsung monitor into the CD-ROM Drive. Natural Color Natural Color Software Program One of X-Window. 10. Click Natural Color on the...

User Manual (ENGLISH)
Page 72
Adjusting the Monitor MENU → , → Auto Source → , → MENU Select Auto Source for the monitor to automatically select the signal source. • Auto • Manual MENU MENU Image Size PC Mode
Adjusting the Monitor MENU → , → Auto Source → , → MENU Select Auto Source for the monitor to automatically select the signal source. • Auto • Manual MENU MENU Image Size PC Mode

User Manual (ENGLISH)
Page 79
...no image on the screen. Please change to the Preset Timing Modes). Is the power indicator on the monitor blinking at least 5 seconds. A: Press a key on the keyboard again to the video card manual. Then press any key on the keyboard to a crash between ap- connect and then reconnect the ...DVI cable while the system is no image, press the 'SOURCE/ ' button. Connect the DVI cable and then reboot the system. A: Unlock the OSD by referring to activate the monitor and ...
...no image on the screen. Please change to the Preset Timing Modes). Is the power indicator on the monitor blinking at least 5 seconds. A: Press a key on the keyboard again to the video card manual. Then press any key on the keyboard to a crash between ap- connect and then reconnect the ...DVI cable while the system is no image, press the 'SOURCE/ ' button. Connect the DVI cable and then reboot the system. A: Unlock the OSD by referring to activate the monitor and ...

User Manual (ENGLISH)
Page 80
...the Control Panel → Display → Settings. LED is no images on a PC. Q: See the video card manual to the USB device Troubleshooting section on the monitor? Q: Have you adjusted the resolution or frequency on the Microsoft customer support website. 1. The screen is displayed. 3. A:... Adjust the frequency properly by referring to the video card manual. Readjust Position by referring to the video card manual and the Preset Timing Modes. (The maximum frequency per resolution may occur. I cannot turn the monitor on the screen. A: Set the video card by referring to...
...the Control Panel → Display → Settings. LED is no images on a PC. Q: See the video card manual to the USB device Troubleshooting section on the monitor? Q: Have you adjusted the resolution or frequency on the Microsoft customer support website. 1. The screen is displayed. 3. A:... Adjust the frequency properly by referring to the video card manual. Readjust Position by referring to the video card manual and the Preset Timing Modes. (The maximum frequency per resolution may occur. I cannot turn the monitor on the screen. A: Set the video card by referring to...

User Manual (ENGLISH)
Page 81
...support option to configure the settings, click here. 1. Q: Check whether your mouse or press any key to the user manual for your USB monitor is in the BIOS Setup menu and reboot the computer. Check if the computer beeps more information, visit the Microsoft website...Advanced -> Peripheral Configuration (Integrated Peripherals) -> Legacy USB Support item to the computer. Entering the BIOS Setup screen may differ for your USB monitor in the "Display Properties" window. A: Move your computer is connected? Press [F2] to "Full". Save the settings and reboot the ...
...support option to configure the settings, click here. 1. Q: Check whether your mouse or press any key to the user manual for your USB monitor is in the BIOS Setup menu and reboot the computer. Check if the computer beeps more information, visit the Microsoft website...Advanced -> Peripheral Configuration (Integrated Peripherals) -> Legacy USB Support item to the computer. Entering the BIOS Setup screen may differ for your USB monitor in the "Display Properties" window. A: Move your computer is connected? Press [F2] to "Full". Save the settings and reboot the ...

User Manual (ENGLISH)
Page 82
... can I change the frequency? Q & A Q: How can vary, depending on the case. A: Note that video card support can I clean the outer case/LCD Panel? A: Windows XP: Set the resolution in the Control Panel → Appearance and Themes → Display → Settings. Do not let any detergent or ... details. Set the function in the BIOS-SETUP of the computer. (Refer to the Windows / Computer Manual). Do not leave any water enter the monitor. Troubleshooting Check if the scanning ratio of the video screen is set the Power Saving function? Q: How I adjusts the resolution?...
... can I change the frequency? Q & A Q: How can vary, depending on the case. A: Note that video card support can I clean the outer case/LCD Panel? A: Windows XP: Set the resolution in the Control Panel → Appearance and Themes → Display → Settings. Do not let any detergent or ... details. Set the function in the BIOS-SETUP of the computer. (Refer to the Windows / Computer Manual). Do not leave any water enter the monitor. Troubleshooting Check if the scanning ratio of the video screen is set the Power Saving function? Q: How I adjusts the resolution?...

User Manual (ENGLISH)
Page 87
The frequency of the Horizontal Cycle is the same as follows. 22" Monitor Display Mode IBM, 640 x 350 IBM, 640 x 480 IBM, 720 x 400 MAC, 640 x 480 MAC, 832 ...768 VESA, 1024 x 768 VESA, 1152 x 864 VESA, 1280 x 960 VESA, 1280 x 1024 VESA, 1680 x 1050 USB Monitor Horizontal Frequency (kHz) 31.469 31.469 31.469 35.000 68.681 49.726 37.861 37.500 35.156 37.879...called the Horizontal Cycle and the inverse number of this repetition is on. Refer to the video card manual and adjusts the screen as the following Preset Timing Modes, the screen will be adjusted automatically. Specifications ...
The frequency of the Horizontal Cycle is the same as follows. 22" Monitor Display Mode IBM, 640 x 350 IBM, 640 x 480 IBM, 720 x 400 MAC, 640 x 480 MAC, 832 ...768 VESA, 1024 x 768 VESA, 1152 x 864 VESA, 1280 x 960 VESA, 1280 x 1024 VESA, 1680 x 1050 USB Monitor Horizontal Frequency (kHz) 31.469 31.469 31.469 35.000 68.681 49.726 37.861 37.500 35.156 37.879...called the Horizontal Cycle and the inverse number of this repetition is on. Refer to the video card manual and adjusts the screen as the following Preset Timing Modes, the screen will be adjusted automatically. Specifications ...


