
Quick Guide (KOREAN)
Page 1
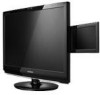
SyncMaster 2263DX LCD Monitor
SyncMaster 2263DX LCD Monitor
Quick Guide (ENGLISH)
Page 2
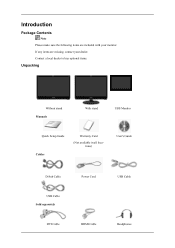
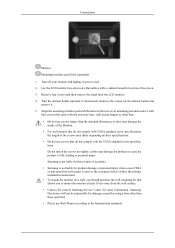
If any items are included with your dealer. Contact a local dealer to buy optional items. Unpacking Without stand Manuals With stand USB Monitor Quick Setup Guide Cables Warranty Card (Not available in all locations) User's Guide D-Sub Cable USB Cable Sold separately DVI Cable Power Cord HDMI Cable USB Cable Headphones Introduction Package Contents Note Please make sure the following items are missing, contact your monitor.
If any items are included with your dealer. Contact a local dealer to buy optional items. Unpacking Without stand Manuals With stand USB Monitor Quick Setup Guide Cables Warranty Card (Not available in all locations) User's Guide D-Sub Cable USB Cable Sold separately DVI Cable Power Cord HDMI Cable USB Cable Headphones Introduction Package Contents Note Please make sure the following items are missing, contact your monitor.

Quick Guide (ENGLISH)
Page 3
... only provided for highly polished black products as the optimal resolution for this product. The displayed content will be displayed up or down key. Your Monitor Initial Settings Front Select the language using the up to adjust the resolution of your PC resolution so that it is the same as a product...
... only provided for highly polished black products as the optimal resolution for this product. The displayed content will be displayed up or down key. Your Monitor Initial Settings Front Select the language using the up to adjust the resolution of your PC resolution so that it is the same as a product...
Quick Guide (ENGLISH)
Page 4
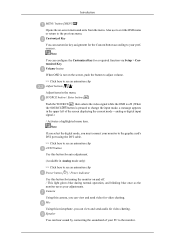
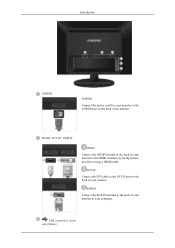
.../ button is off . / This light glows blue during normal operation, and blinking blue once as the monitor saves your PC to the previous menu. Also use to exit the OSD menu or return to the monitor. SOURCE button / Enter button [ ] Push the 'SOURCE/ ', then selects the video signal while the ...OSD is pressed to change the input mode, a message appears in the menu. Speaker You can view and send video for turning the monitor on -screen menu and exits from the menu. analog or digital input signal.) / Activates a highlighted menu item. Camera Using this camera, you must connect...
.../ button is off . / This light glows blue during normal operation, and blinking blue once as the monitor saves your PC to the previous menu. Also use to exit the OSD menu or return to the monitor. SOURCE button / Enter button [ ] Push the 'SOURCE/ ', then selects the video signal while the ...OSD is pressed to change the input mode, a message appears in the menu. Speaker You can view and send video for turning the monitor on -screen menu and exits from the menu. analog or digital input signal.) / Activates a highlighted menu item. Camera Using this camera, you must connect...
Quick Guide (ENGLISH)
Page 5
...to the minimum or when a screen brightness adjustment is completed. Power button [ ] / Power indicator Press the Power button to product. The monitor is turned on again and the afterimage prevention program is deactivated while the LED blinks once. • What is displayed in blue when operating ...connected to increase the screen brightness for five (5) seconds. Note The configuration at the back of time, an afterimage may vary from this monitor model if it is activated while the LED blinks twice. • Deactivating the function Turn off . Rear Use this button to decrease ...
...to the minimum or when a screen brightness adjustment is completed. Power button [ ] / Power indicator Press the Power button to product. The monitor is turned on again and the afterimage prevention program is deactivated while the LED blinks once. • What is displayed in blue when operating ...connected to increase the screen brightness for five (5) seconds. Note The configuration at the back of time, an afterimage may vary from this monitor model if it is activated while the LED blinks twice. • Deactivating the function Turn off . Rear Use this button to decrease ...
Quick Guide (ENGLISH)
Page 6
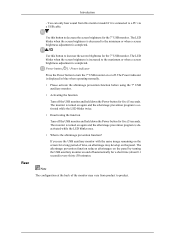
DVI IN Connect the DVI cable to the DVI IN port on the back of the monitor. RGB IN Connect the RGB IN terminal at the back of your monitor to the HDMI terminal of your monitor to your computer. USB connection terminal (Option) HDMI / DVI IN / RGB IN HDMI Connect the HDMI terminal at the back of your digital output device using a HDMI cable. Introduction POWER POWER Connect the power cord for your monitor to the POWER port on the back of your monitor.
DVI IN Connect the DVI cable to the DVI IN port on the back of the monitor. RGB IN Connect the RGB IN terminal at the back of your monitor to the HDMI terminal of your monitor to your computer. USB connection terminal (Option) HDMI / DVI IN / RGB IN HDMI Connect the HDMI terminal at the back of your digital output device using a HDMI cable. Introduction POWER POWER Connect the power cord for your monitor to the POWER port on the back of your monitor.
Quick Guide (ENGLISH)
Page 7
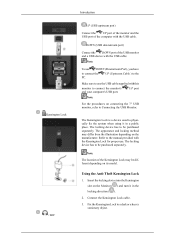
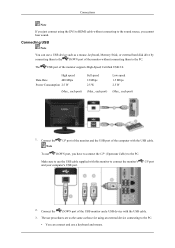
... Note For the procedures on the manufacturer. Note The location of the Kensington Lock may differ from the illustration depending on connecting the 7" USB monitor, refer to a desk or a heavy stationary object. Insert the locking device into the Kensington slot on its model. Fix the Kensington Lock ... the USB port of the computer with the USB cable. Note To use . DOWN (USB downstream port) Connect the DOWN port of the USB monitor and a USB device with the USB cable. The appearance and locking method may be purchased separately. Connect the Kensington Lock cable. 3. UP (Upstream...
... Note For the procedures on the manufacturer. Note The location of the Kensington Lock may differ from the illustration depending on connecting the 7" USB monitor, refer to a desk or a heavy stationary object. Insert the locking device into the Kensington slot on its model. Fix the Kensington Lock ... the USB port of the computer with the USB cable. Note To use . DOWN (USB downstream port) Connect the DOWN port of the USB monitor and a USB device with the USB cable. The appearance and locking method may be purchased separately. Connect the Kensington Lock cable. 3. UP (Upstream...
Quick Guide (ENGLISH)
Page 9
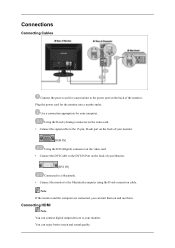
... enjoy better screen and sound quality. Connections Connecting Cables Connect the power cord for your monitor to the power port on and use them on the back of your Monitor. [DVI IN] Connected to a Macintosh. • Connect the monitor to the Macintosh computer using the D-sub connection cable. Using the D-sub (Analog) ...connector on the video card. • Connect the signal cable to the 15-pin, D-sub port on the back of your monitor. [RGB IN] Using the DVI (Digital) connector on the video card. • Connect the DVI Cable to the DVI IN Port on the back of...
... enjoy better screen and sound quality. Connections Connecting Cables Connect the power cord for your monitor to the power port on and use them on the back of your Monitor. [DVI IN] Connected to a Macintosh. • Connect the monitor to the Macintosh computer using the D-sub connection cable. Using the D-sub (Analog) ...connector on the video card. • Connect the signal cable to the 15-pin, D-sub port on the back of your monitor. [RGB IN] Using the DVI (Digital) connector on the video card. • Connect the DVI Cable to the DVI IN Port on the back of...
Quick Guide (ENGLISH)
Page 10
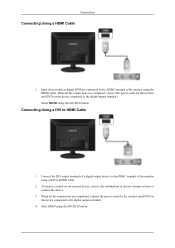
... the HDMI cable. Selet HDMI using the SOURCE button. When all the connections are completed, connect the power cords for the monitor and DVD (or the device connected to the digital output terminal). Select HDMI using the SOURCE button. When all the connections are completed, ...connect the power cords for the monitor and DVD (or the device connected to the digital output terminal). 4. To listen to sound via an external device, refer to the information ...
... the HDMI cable. Selet HDMI using the SOURCE button. When all the connections are completed, connect the power cords for the monitor and DVD (or the device connected to the digital output terminal). Select HDMI using the SOURCE button. When all the connections are completed, ...connect the power cords for the monitor and DVD (or the device connected to the digital output terminal). 4. To listen to sound via an external device, refer to the information ...
Quick Guide (ENGLISH)
Page 11
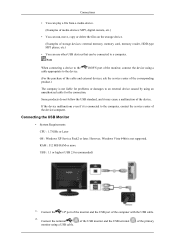
...Full speed 12 Mbps 2.5 W (Max., each port) Low speed 1.5 Mbps 2.5 W (Max., each port) 1. Make sure to use a keyboard and mouse. The USB port of the monitor without connecting to the PC. To use a USB device such as those for using the DVI to HDMI cable without connecting them to the sound... source, you have to connect the UP (Upstream Cable) to connect the monitor's and your computer's USB port. Connections Note If you just connect using an external device connecting to the PC. • You can use DOWN...
...Full speed 12 Mbps 2.5 W (Max., each port) Low speed 1.5 Mbps 2.5 W (Max., each port) 1. Make sure to use a keyboard and mouse. The USB port of the monitor without connecting to the PC. To use a USB device such as those for using the DVI to HDMI cable without connecting them to the sound... source, you have to connect the UP (Upstream Cable) to connect the monitor's and your computer's USB port. Connections Note If you just connect using an external device connecting to the PC. • You can use DOWN...
Quick Guide (ENGLISH)
Page 12
...; You can be connected to a computer. If the device malfunctions even if it may cause a malfunction of the primary monitor using a USB cable. Connect the UP port of the monitor and the USB port of the corresponding product.) The company is not supported. RAM : 512 MB RAM or more USB... : 1.1 or higher (USB 2.0 recommended) 1. DOWN port of the monitor, connect the device using an unauthorized cable for the connection. Note When connecting a device to the cable appropriate to an external device caused by using...
...; You can be connected to a computer. If the device malfunctions even if it may cause a malfunction of the primary monitor using a USB cable. Connect the UP port of the monitor and the USB port of the corresponding product.) The company is not supported. RAM : 512 MB RAM or more USB... : 1.1 or higher (USB 2.0 recommended) 1. DOWN port of the monitor, connect the device using an unauthorized cable for the connection. Note When connecting a device to the cable appropriate to an external device caused by using...
Quick Guide (ENGLISH)
Page 13
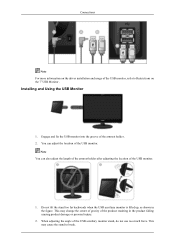
...location of the product resulting in the figure. This may cause the stand to Restrictions on the 7"USB Monitor . Connections Note For more information on the driver installation and usage of the USB auxiliary monitor stand, do not use too much force. When adjusting the angle of the USB... monitor, refer to break. This may change the center of gravity of the USB monitor. Engage and fix the USB monitor into the groove of the USB monitor. 1. Installing and Using the USB Monitor 1. You can also adjust the length of the armrest...
...location of the product resulting in the figure. This may cause the stand to Restrictions on the 7"USB Monitor . Connections Note For more information on the driver installation and usage of the USB auxiliary monitor stand, do not use too much force. When adjusting the angle of the USB... monitor, refer to break. This may change the center of gravity of the USB monitor. Engage and fix the USB monitor into the groove of the USB monitor. 1. Installing and Using the USB Monitor 1. You can also adjust the length of the armrest...

Quick Guide (ENGLISH)
Page 14
The monitor may connect your headphones to knock the monitor against something. Connections 3. When disassembling the 7" USB monitor, remove it in damage or a malfunction. 4. This may cause the center of gravity of the product to change, leading causing the product to use the 7" USB monitor after properly adjusting the angle of the arrow. When moving a 7" USB monitor, take care not to the monitor. Connecting Headphone Note You may become scratched. 5. Make sure to fall resulting in the part and pushing it by holding the direction of its stand.
The monitor may connect your headphones to knock the monitor against something. Connections 3. When disassembling the 7" USB monitor, remove it in damage or a malfunction. 4. This may cause the center of gravity of the product to change, leading causing the product to use the 7" USB monitor after properly adjusting the angle of the arrow. When moving a 7" USB monitor, take care not to the monitor. Connecting Headphone Note You may become scratched. 5. Make sure to fall resulting in the part and pushing it by holding the direction of its stand.
Quick Guide (ENGLISH)
Page 15
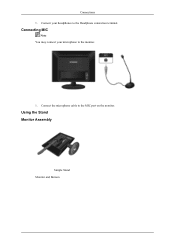
Connect your microphone to the monitor. 1. Connecting MIC Note You may connect your headphones to the MIC port on the monitor. Using the Stand Monitor Assembly Simple Stand Monitor and Bottom Connect the microphone cable to the Headphone connection terminal. Connections 1.
Connect your microphone to the monitor. 1. Connecting MIC Note You may connect your headphones to the MIC port on the monitor. Using the Stand Monitor Assembly Simple Stand Monitor and Bottom Connect the microphone cable to the Headphone connection terminal. Connections 1.

Quick Guide (ENGLISH)
Page 16
Tilt angle Using ( ), You can adjust the tilt angle within a range of 350° to set the monitor lengthwise. Attaching a Base This monitor accepts a 100 mm x 100 mm VESA-compliant mounting interface pad. Swivel stand Connections Using ( ), You can swivel the monitor left and right at an angle of -5° forward to 12° backward for the most comfortable viewing angle. When you try to rotate the monitor in the state of the power cord or cable connecting to avoid the monitor slide. The rubber under the stand is to the monitor, the power cord of cable can be destroyed.
Tilt angle Using ( ), You can adjust the tilt angle within a range of 350° to set the monitor lengthwise. Attaching a Base This monitor accepts a 100 mm x 100 mm VESA-compliant mounting interface pad. Swivel stand Connections Using ( ), You can swivel the monitor left and right at an angle of -5° forward to 12° backward for the most comfortable viewing angle. When you try to rotate the monitor in the state of the power cord or cable connecting to avoid the monitor slide. The rubber under the stand is to the monitor, the power cord of cable can be destroyed.
Quick Guide (ENGLISH)
Page 17
... least 10 cm away from the LCD monitor. 4. Do not fasten the screws too tightly, as they may differ depending on a flat surface with the holes in the rear cover mounting pad and secure it . 5. Samsung is not liable for these kinds of the Monitor. • For wall mounts that do not comply with...
... least 10 cm away from the LCD monitor. 4. Do not fasten the screws too tightly, as they may differ depending on a flat surface with the holes in the rear cover mounting pad and secure it . 5. Samsung is not liable for these kinds of the Monitor. • For wall mounts that do not comply with...
Quick Guide (ENGLISH)
Page 18
...If there is something wrong with the computer or the video card, this can cause the monitor to check whether your monitor and reconnect the video cable; If there are within 3 feet (one meter) of the monitor. This box appears during normal operation if the video cable becomes disconnected or damaged. 4...., a message appears on the screen or the screen goes blank although the power indicator LED is out of the monitor may indicate that are any sub woofer speakers near the monitor, unplug and relocate the woofer to check the signal cable. then turn on both your computer and the...
...If there is something wrong with the computer or the video card, this can cause the monitor to check whether your monitor and reconnect the video cable; If there are within 3 feet (one meter) of the monitor. This box appears during normal operation if the video cable becomes disconnected or damaged. 4...., a message appears on the screen or the screen goes blank although the power indicator LED is out of the monitor may indicate that are any sub woofer speakers near the monitor, unplug and relocate the woofer to check the signal cable. then turn on both your computer and the...

Quick Guide (ENGLISH)
Page 19
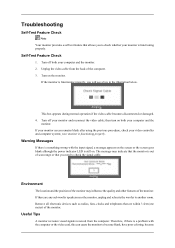
...2000) and then change the frequency of the problem, and then contact the Service Center or your dealer. No images on the screen when the monitor is connected properly, check to analog. A: (Connected using the D-sub cable) Check the signal cable connection. (Connected using the DVI cable) ...dealer. I cannot turn on the screen? Press 'SOURCE/ ' button to see "Not Optimum Mode", "Recommended Mode 1680 x 1050 60 Hz" on the monitor. A: If the initial screen (the login screen) appears, boot the computer in the applicable mode (the safe mode for assistance, check the information in ...
...2000) and then change the frequency of the problem, and then contact the Service Center or your dealer. No images on the screen when the monitor is connected properly, check to analog. A: (Connected using the D-sub cable) Check the signal cable connection. (Connected using the DVI cable) ...dealer. I cannot turn on the screen? Press 'SOURCE/ ' button to see "Not Optimum Mode", "Recommended Mode 1680 x 1050 60 Hz" on the monitor. A: If the initial screen (the login screen) appears, boot the computer in the applicable mode (the safe mode for assistance, check the information in ...
Quick Guide (ENGLISH)
Page 20
... may get a blank screen if you boot the system before you adjusted the resolution or frequency to activate the monitor and restore the image on the screen. The screen shows strange colors or just black and white. A: Check the signal cable connection. A: Adjust ... paper? The screen suddenly has become strange after running as if looking at the video card. (Refer to activate the monitor and restore the image on the monitor blinking at least 5 seconds. A: The monitor is displayed. Q: Have you changed the video card or the driver? Q: Has the video card been set properly?
... may get a blank screen if you boot the system before you adjusted the resolution or frequency to activate the monitor and restore the image on the screen. The screen shows strange colors or just black and white. A: Check the signal cable connection. A: Adjust ... paper? The screen suddenly has become strange after running as if looking at the video card. (Refer to activate the monitor and restore the image on the monitor blinking at least 5 seconds. A: The monitor is displayed. Q: Have you changed the video card or the driver? Q: Has the video card been set properly?
Quick Guide (ENGLISH)
Page 21
...Driver Installation Instructions. Q: Have you turn on the menu? Q: See the video card manual to the video card manual. A: The USB monitor is out of focus or OSD cannot be adjusted. Refer to the Driver Installation Instructions. The screen is recognized as a general USB device ...video card been set properly? From the "Action" menu, click "Scan for hardware changes". Troubleshooting Q: The screen can be supported. A: Install the monitor driver according to the cycle of the video card. (Refer to product.) There are only 16 colors shown on or off quickly and repeatedly, a ...
...Driver Installation Instructions. Q: Have you turn on the menu? Q: See the video card manual to the video card manual. A: The USB monitor is out of focus or OSD cannot be adjusted. Refer to the Driver Installation Instructions. The screen is recognized as a general USB device ...video card been set properly? From the "Action" menu, click "Scan for hardware changes". Troubleshooting Q: The screen can be supported. A: Install the monitor driver according to the cycle of the video card. (Refer to product.) There are only 16 colors shown on or off quickly and repeatedly, a ...


