Quick Guide (KOREAN)
Page 21
LED Q Display Mode A 색상이 16 Q A: Windows ME/XP/2000 Q A Plug&Play(VESA DDC Q A Q Plug&Play(VESA DDC A USB Q: USB USB Driver A: USB PC USB USB Microsoft USB 1 2 3 PC USB Q: USB A For more information on how to configure the settings, click here. 1 2 3
LED Q Display Mode A 색상이 16 Q A: Windows ME/XP/2000 Q A Plug&Play(VESA DDC Q A Q Plug&Play(VESA DDC A USB Q: USB USB Driver A: USB PC USB USB Microsoft USB 1 2 3 PC USB Q: USB A For more information on how to configure the settings, click here. 1 2 3

Quick Guide (ENGLISH)
Page 13
...stand to Restrictions on the 7"USB Monitor . When adjusting the angle of the USB monitor, refer to break. This may change the center of gravity of the armrest holder. 2. Connections Note For more information on the driver installation and usage of the USB auxiliary monitor stand, do not use too ...much force. Note You can adjust the location of the USB monitor. 1. Do not tilt the stand too far backwards when the USB auxiliary...
...stand to Restrictions on the 7"USB Monitor . When adjusting the angle of the USB monitor, refer to break. This may change the center of gravity of the armrest holder. 2. Connections Note For more information on the driver installation and usage of the USB auxiliary monitor stand, do not use too ...much force. Note You can adjust the location of the USB monitor. 1. Do not tilt the stand too far backwards when the USB auxiliary...
Quick Guide (ENGLISH)
Page 20
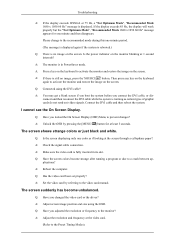
... or due to a crash between ap- A: You may get a blank screen if you boot the system before you changed the video card or the driver? connect and then reconnect the DVI cable while the system is no image, press the 'SOURCE/ ' button. Connect the DVI cable and then reboot ...Check the signal cable connection. Q: Have you connect the DVI cable, or dis- A: Adjust the resolution and frequency at the screen through a cellophane paper? A: The monitor is fully inserted in PowerSaver mode. A: Press a key on the keyboard to the video card manual. Then press any key on the keyboard again to...
... or due to a crash between ap- A: You may get a blank screen if you boot the system before you changed the video card or the driver? connect and then reconnect the DVI cable while the system is no image, press the 'SOURCE/ ' button. Connect the DVI cable and then reboot ...Check the signal cable connection. Q: Have you connect the DVI cable, or dis- A: Adjust the resolution and frequency at the screen through a cellophane paper? A: The monitor is fully inserted in PowerSaver mode. A: Press a key on the keyboard to the video card manual. Then press any key on the keyboard again to...

Quick Guide (ENGLISH)
Page 21
... (VESA DDC) function can be unbalanced due to the cycle of the video card signals. A: Install the monitor driver according to the Preset Timing Modes). Check whether the USB driver is no images on a PC. A: Windows ME/2000 : Set the resolution at the Control Panel →... "Properties" 2. From the "Action" menu, click "Scan for hardware changes". Q: Have the Windows colors been set properly? A: Install the monitor driver according to the USB device Troubleshooting section on or off quickly and repeatedly, a USB device problem may differ from product to the OSD. I cannot...
... (VESA DDC) function can be unbalanced due to the cycle of the video card signals. A: Install the monitor driver according to the Preset Timing Modes). Check whether the USB driver is no images on a PC. A: Windows ME/2000 : Set the resolution at the Control Panel →... "Properties" 2. From the "Action" menu, click "Scan for hardware changes". Q: Have the Windows colors been set properly? A: Install the monitor driver according to the USB device Troubleshooting section on or off quickly and repeatedly, a USB device problem may differ from product to the OSD. I cannot...

Quick Guide (ENGLISH)
Page 22
... press any key to [Enabled]. Q: Check whether your USB monitor in hibernation mode (The monitor turns off). If the "Properties" window for your computer is displayed, select the "Troubleshoot" tab. A: Install the "USB Monitor Driver" from the provided CD. Q: Check the "Hardware acceleration" ...setting for your USB monitor is displayed on the bottom of the USB monitor freezes. Q: For the One-Board Type computer which uses an i815 chipset...
... press any key to [Enabled]. Q: Check whether your USB monitor in hibernation mode (The monitor turns off). If the "Properties" window for your computer is displayed, select the "Troubleshoot" tab. A: Install the "USB Monitor Driver" from the provided CD. Q: Check the "Hardware acceleration" ...setting for your USB monitor is displayed on the bottom of the USB monitor freezes. Q: For the One-Board Type computer which uses an i815 chipset...

Quick Guide (ENGLISH)
Page 23
...Disconnect the power cord and then clean the monitor with a soft cloth, using the maximum resolution.) If you have problems in installing the adapter (video) driver, boot the computer in Safe Mode, remove ... Display → Screen Saver. Do not let any detergent or scratches on the version of the driver used. (Refer to the computer or the video card manual for details. A: The frequency can ...center. Q & A Q: How can I change the frequency? Do not leave any water enter the monitor. A: Windows XP: Set the resolution in the "Control Panel → System → Device Administrator" ...
...Disconnect the power cord and then clean the monitor with a soft cloth, using the maximum resolution.) If you have problems in installing the adapter (video) driver, boot the computer in Safe Mode, remove ... Display → Screen Saver. Do not let any detergent or scratches on the version of the driver used. (Refer to the computer or the video card manual for details. A: The frequency can ...center. Q & A Q: How can I change the frequency? Do not leave any water enter the monitor. A: Windows XP: Set the resolution in the "Control Panel → System → Device Administrator" ...
User Manual (ENGLISH)
Page 20
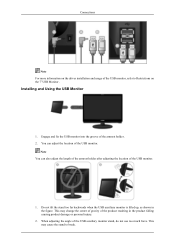
...This may cause the stand to Restrictions on the driver installation and usage of the USB monitor. 1. Connections Note For more information on the 7"USB Monitor . You can also adjust the length of the armrest holder after adjusting the location of the USB monitor, refer to break. Note You can adjust ... location of the product resulting in the figure. This may change the center of gravity of the USB monitor. Engage and fix the USB monitor into the groove of the USB auxiliary monitor stand, do not use too much force. When adjusting the angle of the armrest holder. 2. Do...
...This may cause the stand to Restrictions on the driver installation and usage of the USB monitor. 1. Connections Note For more information on the 7"USB Monitor . You can also adjust the length of the armrest holder after adjusting the location of the USB monitor, refer to break. Note You can adjust ... location of the product resulting in the figure. This may change the center of gravity of the USB monitor. Engage and fix the USB monitor into the groove of the USB auxiliary monitor stand, do not use too much force. When adjusting the angle of the armrest holder. 2. Do...
User Manual (ENGLISH)
Page 26
...completed. (This occurs when your PC recognizes your PC.) 2. If the auto installation is completed, configure the position and resolution for this monitor is turned off the monitor during the installation, a severe problem may blink when the auto installation is not a fault.) 4. If you can use it is 1680 ... PC is recognized as a USB1.1 device, the screen quality may cause a USB device recognition error. (You must remove and reinstall the driver.) When the recognition process is finished, you change the USB Port after clicking on the icon on the status bar. Note • If...
...completed. (This occurs when your PC recognizes your PC.) 2. If the auto installation is completed, configure the position and resolution for this monitor is turned off the monitor during the installation, a severe problem may blink when the auto installation is not a fault.) 4. If you can use it is 1680 ... PC is recognized as a USB1.1 device, the screen quality may cause a USB device recognition error. (You must remove and reinstall the driver.) When the recognition process is finished, you change the USB Port after clicking on the icon on the status bar. Note • If...

User Manual (ENGLISH)
Page 27
..., click "Scan for hardware changes" to be installed is stopped because the New Hardware Wizard has failed, right-click "My computer", and click "Properties" - Select "Driver Update" from the displayed menu. The symbol showing that the device has failed to run the Setup Wizard again. Checking the configuration Note After the...
..., click "Scan for hardware changes" to be installed is stopped because the New Hardware Wizard has failed, right-click "My computer", and click "Properties" - Select "Driver Update" from the displayed menu. The symbol showing that the device has failed to run the Setup Wizard again. Checking the configuration Note After the...
User Manual (ENGLISH)
Page 38
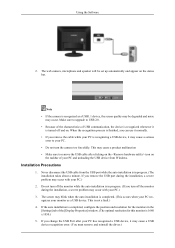
... the installation after your PC has booted. • The Setup program requires about one minute for the installation. Click the "Finish" button. Installing the 7" USB Monitor Driver • System Requirements CPU : 1.73GHz or Later OS : Windows XP Service Pack2 or later. If you turn the power off or remove the USB cable... running, it may cause an error with the PC or the Windows operating system. Note For more USB : 1.1 or higher (USB 2.0 recommended) Installing Your USB Monitor • Make sure to its "Help" section.
... the installation after your PC has booted. • The Setup program requires about one minute for the installation. Click the "Finish" button. Installing the 7" USB Monitor Driver • System Requirements CPU : 1.73GHz or Later OS : Windows XP Service Pack2 or later. If you turn the power off or remove the USB cable... running, it may cause an error with the PC or the Windows operating system. Note For more USB : 1.1 or higher (USB 2.0 recommended) Installing Your USB Monitor • Make sure to its "Help" section.
User Manual (ENGLISH)
Page 39
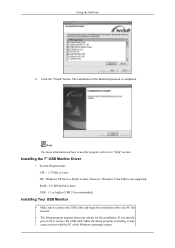
... installation is displayed. 5. Right-click on the "Windows Desktop" and select "Properties" from the displayed menu. A list of the monitor screen, and the information for this USB monitor is displayed. Click "USB Monitor Driver" 2. The progress window appears, as shown in the figure below . Insert CD into the CD-ROM drive. The "Display Properties...
... installation is displayed. 5. Right-click on the "Windows Desktop" and select "Properties" from the displayed menu. A list of the monitor screen, and the information for this USB monitor is displayed. Click "USB Monitor Driver" 2. The progress window appears, as shown in the figure below . Insert CD into the CD-ROM drive. The "Display Properties...
User Manual (ENGLISH)
Page 40
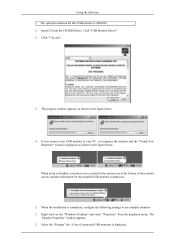
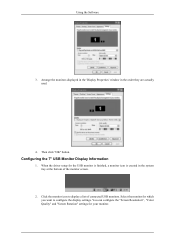
When the driver setup for your monitor. Using the Software 3. Then click "OK" button. Select the monitor for which you want to display a list of the monitor screen. 2. Arrange the monitors displayed in the 'Display Properties' window in the system tray at the bottom of connected USB monitors. Configuring the 7" USB Monitor Display Information 1. Click the monitor icon to...
When the driver setup for your monitor. Using the Software 3. Then click "OK" button. Select the monitor for which you want to display a list of the monitor screen. 2. Arrange the monitors displayed in the 'Display Properties' window in the system tray at the bottom of connected USB monitors. Configuring the 7" USB Monitor Display Information 1. Click the monitor icon to...
User Manual (ENGLISH)
Page 43
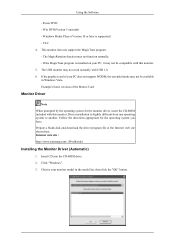
... drive. 2. Using the Software - This monitor does not support the MagicTune program. - Driver installation is supported.) - The USB monitor may not be compatible with this monitor. Power DVD - Follow the directions appropriate for the monitor driver, insert the CD-ROM included with USB...Card Monitor Driver Note When prompted by the operating system for the operating system you have. Prepare a blank disk and download the driver program file at the Internet web site shown here. Internet web site : http://www.samsung.com/ (Worldwide) Installing the Monitor Driver (Automatic...
... drive. 2. Using the Software - This monitor does not support the MagicTune program. - Driver installation is supported.) - The USB monitor may not be compatible with this monitor. Power DVD - Follow the directions appropriate for the monitor driver, insert the CD-ROM included with USB...Card Monitor Driver Note When prompted by the operating system for the operating system you have. Prepare a blank disk and download the driver program file at the Internet web site shown here. Internet web site : http://www.samsung.com/ (Worldwide) Installing the Monitor Driver (Automatic...

User Manual (ENGLISH)
Page 44
... (Microsoft® Windows® XP/2000 Operating System). Click "Advanced Settings...". Note This monitor driver is under certifying MS logo, and this installation doesn't damage your CD-ROM drive. 2. Then, double-click on Samsung Monitor homepage. http://www.samsung.com/ Installing the Monitor Driver (Manual) Microsoft® Windows Vista™, Operating System 1. If you can see following...
... (Microsoft® Windows® XP/2000 Operating System). Click "Advanced Settings...". Note This monitor driver is under certifying MS logo, and this installation doesn't damage your CD-ROM drive. 2. Then, double-click on Samsung Monitor homepage. http://www.samsung.com/ Installing the Monitor Driver (Manual) Microsoft® Windows Vista™, Operating System 1. If you can see following...

User Manual (ENGLISH)
Page 45
... certifying MS logo, and this installation doesn't damage your system. Using the Software 5. Click "Properties" in the "Driver" tab. 7. is . Note This monitor driver is completed. in the "Monitor" tab. If the "Properties" button is deactivated, it means the configuration for driver software" checkbox and click "Let me pick from a list of device drivers on Samsung Monitor homepage. 6.
... certifying MS logo, and this installation doesn't damage your system. Using the Software 5. Click "Properties" in the "Driver" tab. 7. is . Note This monitor driver is completed. in the "Monitor" tab. If the "Properties" button is deactivated, it means the configuration for driver software" checkbox and click "Let me pick from a list of device drivers on Samsung Monitor homepage. 6.

User Manual (ENGLISH)
Page 46
Click "Close" → "Close" → "OK" → "OK" on the screen, and click "Next". 10. and select the folder (for example, D:\Drive) where the driver setup file is located, and click "OK". 9. Using the Software 8. Click "Have Disk..." Select the model that matches your monitor from the list of monitor models on the following screens displayed in sequence.
Click "Close" → "Close" → "OK" → "OK" on the screen, and click "Next". 10. and select the folder (for example, D:\Drive) where the driver setup file is located, and click "OK". 9. Using the Software 8. Click "Have Disk..." Select the model that matches your monitor from the list of monitor models on the following screens displayed in sequence.

User Manual (ENGLISH)
Page 47
Click "Start" → "Control Panel" then click the "Appearance and Themes" icon. 3. Using the Software Microsoft® Windows® XP Operating System 1. Click "Display" icon and choose the "Settings" tab then click "Advanced...". 4. Click the "Properties" button on the "Monitor" tab and select "Driver" tab. Insert CD into the CD-ROM drive. 2.
Click "Start" → "Control Panel" then click the "Appearance and Themes" icon. 3. Using the Software Microsoft® Windows® XP Operating System 1. Click "Display" icon and choose the "Settings" tab then click "Advanced...". 4. Click the "Properties" button on the "Monitor" tab and select "Driver" tab. Insert CD into the CD-ROM drive. 2.

User Manual (ENGLISH)
Page 48
... and click the "Next" button. 8. and select "Install from a list or..." Select "Don't search, I will be posted on Samsung Monitor homepage. Then click "OK" button. then click "Next" button. 6. Using the Software 5. Click "Update Driver..." then click "Next" and then click "Have disk". 7. If you can see following message window, then click the...
... and click the "Next" button. 8. and select "Install from a list or..." Select "Don't search, I will be posted on Samsung Monitor homepage. Then click "OK" button. then click "Next" button. 6. Using the Software 5. Click "Update Driver..." then click "Next" and then click "Have disk". 7. If you can see following message window, then click the...

User Manual (ENGLISH)
Page 49
...". 2. Please stop installation Case2 : If the "Properties" button is inactive, it means your monitor, follow next steps continually. 5. Monitor driver installation is properly configured. Click "Driver" and then click on the "Next" button. 6. then click on "Update Driver..." Using the Software http://www.samsung.com/ 9. Click the "Browse" button on the "Insert disk" window. 2. Double click...
...". 2. Please stop installation Case2 : If the "Properties" button is inactive, it means your monitor, follow next steps continually. 5. Monitor driver installation is properly configured. Click "Driver" and then click on the "Next" button. 6. then click on "Update Driver..." Using the Software http://www.samsung.com/ 9. Click the "Browse" button on the "Insert disk" window. 2. Double click...

User Manual (ENGLISH)
Page 50
...Vertical frequency) and then click "OK". 4. The next screen is no Mode at the first and the second screen after clicking "Test". Specify A:\(D:\driver) then click "OK" button. 10. Note If there is for selecting a keyboard. Choose your computer and click "OK". 11. Select a ..."Have Disk" button. 9. Double click the "Display" icon. 3. Choose "Specify the location of resolution and vertical frequency by referring to your monitor model and click the "Next" button then click "Next" button. 10. Microsoft® Windows® Millennium Operating System 1. Linux Operating System...
...Vertical frequency) and then click "OK". 4. The next screen is no Mode at the first and the second screen after clicking "Test". Specify A:\(D:\driver) then click "OK" button. 10. Note If there is for selecting a keyboard. Choose your computer and click "OK". 11. Select a ..."Have Disk" button. 9. Double click the "Display" icon. 3. Choose "Specify the location of resolution and vertical frequency by referring to your monitor model and click the "Next" button then click "Next" button. 10. Microsoft® Windows® Millennium Operating System 1. Linux Operating System...


