User Manual (ENGLISH)
Page 10
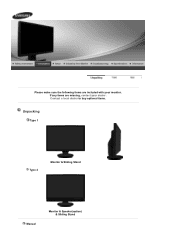
If any items are included with your dealer. Please make sure the following items are missing, contact your monitor. Contact a local dealer to buy optional items. Unpacking Type 1 Type 2 Monitor & Sliding Stand Manual Monitor & Speaker(option) & Sliding Stand
If any items are included with your dealer. Please make sure the following items are missing, contact your monitor. Contact a local dealer to buy optional items. Unpacking Type 1 Type 2 Monitor & Sliding Stand Manual Monitor & Speaker(option) & Sliding Stand

User Manual (ENGLISH)
Page 16
Connect a headphone to the black terminal at the right of the speaker. Using the Stand Sliding Stand Stand Stopper Swivel stand Failing to the red terminal at the right of the speaker. Connect a microphone to do so may damage the unit. 6. For removal, push and lift up part ( ) towards the inside and remove it.
Connect a headphone to the black terminal at the right of the speaker. Using the Stand Sliding Stand Stand Stopper Swivel stand Failing to the red terminal at the right of the speaker. Connect a microphone to do so may damage the unit. 6. For removal, push and lift up part ( ) towards the inside and remove it.

User Manual (ENGLISH)
Page 17
Removing the base 1. Using ( ),You can adjust the tilt angle forward and backward for the most comfortable viewing angle. Turn off your monitor and unplug its power cord. 2. Tilt angle Using ( ), You can swivel the monitor left and right at an angle of 330 ° to protect the screen. 3. Lay the LCD monitor face-down on a flat surface with a cushion beneath it to set the monitor lengthwise. Remove two screws ( ) and then remove the Stand from the LCD monitor. The rubber under the stand is to avoid the monitor slide.
Removing the base 1. Using ( ),You can adjust the tilt angle forward and backward for the most comfortable viewing angle. Turn off your monitor and unplug its power cord. 2. Tilt angle Using ( ), You can swivel the monitor left and right at an angle of 330 ° to protect the screen. 3. Lay the LCD monitor face-down on a flat surface with a cushion beneath it to set the monitor lengthwise. Remove two screws ( ) and then remove the Stand from the LCD monitor. The rubber under the stand is to avoid the monitor slide.

User Manual (ENGLISH)
Page 18
...and then remove the stand from one operating system to protect the screen. 3. Follow the directions appropriate for the operating system you to the International standards. Insert the CD into the CD-ROM drive. 2. Lay the LCD monitor face-down on a...slightly different from the LCD monitor. 4. Choose your monitor and unplug its power cord. 2. Attaching a Base This monitor accepts a 100 mm x 100 mm VESA-compliant mounting interface pad. A. Monitor B. Mounting interface pad (Sold separately) 1. Contact the nearest Samsung Service Center for the monitor driver, insert the...
...and then remove the stand from one operating system to protect the screen. 3. Follow the directions appropriate for the operating system you to the International standards. Insert the CD into the CD-ROM drive. 2. Lay the LCD monitor face-down on a...slightly different from the LCD monitor. 4. Choose your monitor and unplug its power cord. 2. Attaching a Base This monitor accepts a 100 mm x 100 mm VESA-compliant mounting interface pad. A. Monitor B. Mounting interface pad (Sold separately) 1. Contact the nearest Samsung Service Center for the monitor driver, insert the...

User Manual (ENGLISH)
Page 53
General General Model Name SyncMaster 225BW LCD Panel Size 22" Diagonal (55.9 cm) Display area 477.7 mm (H) x 300.1 mm (V) Pixel Pitch 0.282 mm (H) x 0.282 mm (V) Synchronization Horizontal 31 ~ 81 kHz Vertical 56 ~ 75 Hz Display ... Power Supply AC 100 - 240 V~ (+/- 10 %), 50/60 Hz Signal Cable 15pin-to-15pin D-sub cable, Detachable DVI-D to DVI-D connector, Detachable Dimensions (WxDxH)/ (Without Stand) 504.7 x 65.8 x 335.1 mm / 19.9 x 2.6 x 13.2 inch Dimensions (WxDxH)/ Weight (Lowest HAS)
General General Model Name SyncMaster 225BW LCD Panel Size 22" Diagonal (55.9 cm) Display area 477.7 mm (H) x 300.1 mm (V) Pixel Pitch 0.282 mm (H) x 0.282 mm (V) Synchronization Horizontal 31 ~ 81 kHz Vertical 56 ~ 75 Hz Display ... Power Supply AC 100 - 240 V~ (+/- 10 %), 50/60 Hz Signal Cable 15pin-to-15pin D-sub cable, Detachable DVI-D to DVI-D connector, Detachable Dimensions (WxDxH)/ (Without Stand) 504.7 x 65.8 x 335.1 mm / 19.9 x 2.6 x 13.2 inch Dimensions (WxDxH)/ Weight (Lowest HAS)


