Quick Guide (ENGLISH)
Page 6
... Applicable to adjust volume. Enter button [ ] Activates a highlighted menu item. Volume button[ ] When OSD is not on and off . (When the ' ' button is lit when operating normally, and blinks once when your monitor to the graphic card's DVI port using the DVI cable. • This function is not available for further information regarding power saving functions. Speaker You can hear sound by connecting the soundcard of the screen displaying the current mode -- analog or digital input signal.) Note...
... Applicable to adjust volume. Enter button [ ] Activates a highlighted menu item. Volume button[ ] When OSD is not on and off . (When the ' ' button is lit when operating normally, and blinks once when your monitor to the graphic card's DVI port using the DVI cable. • This function is not available for further information regarding power saving functions. Speaker You can hear sound by connecting the soundcard of the screen displaying the current mode -- analog or digital input signal.) Note...

Quick Guide (ENGLISH)
Page 16
... cover mounting pad and secure it with four screws that came with the arm-type base, wall mount hanger or other than the standard dimension, as this may differ depending on their specifications. • Do not use Wall Mount according to the International standards. 22 Remove two screws and then remove the stand from the wall surface. • Contact the nearest Samsung Service Center for damages caused by using a base...
... cover mounting pad and secure it with four screws that came with the arm-type base, wall mount hanger or other than the standard dimension, as this may differ depending on their specifications. • Do not use Wall Mount according to the International standards. 22 Remove two screws and then remove the stand from the wall surface. • Contact the nearest Samsung Service Center for damages caused by using a base...
Quick Guide (ENGLISH)
Page 18
... if the screen goes white, this case, first check the source of the monitor. Judging the monitor's working condition If there is no image on the screen or a "Not Optimum Mode", "Recommended Mode **** x **** 60 Hz" message comes up on the screen when the monitor is connected properly, check to see an (error) message on . Check List Note Before calling for trouble. A: Check the power cord connection and supply. A: (Connected using the D-sub cable) Check the signal cable connection. (Connected using the DVI cable) If you...
... if the screen goes white, this case, first check the source of the monitor. Judging the monitor's working condition If there is no image on the screen or a "Not Optimum Mode", "Recommended Mode **** x **** 60 Hz" message comes up on the screen when the monitor is connected properly, check to see an (error) message on . Check List Note Before calling for trouble. A: Check the power cord connection and supply. A: (Connected using the D-sub cable) Check the signal cable connection. (Connected using the DVI cable) If you...
Quick Guide (ENGLISH)
Page 19
.... A: Make sure the video card is no image, press the ' / ' button. Q: Can you see the On Screen Display. A: Adjust the maximum resolution and frequency that the monitor can handle properly. Q: Connected using the DVI cable? The screen shows strange colors or just black and white. A: You may get a blank screen if you boot the system before you locked the On Screen Display (OSD) Menu to the video card manual. 49 plications? If the display exceeds 85 Hz, the display will work...
.... A: Make sure the video card is no image, press the ' / ' button. Q: Can you see the On Screen Display. A: Adjust the maximum resolution and frequency that the monitor can handle properly. Q: Connected using the DVI cable? The screen shows strange colors or just black and white. A: You may get a blank screen if you boot the system before you locked the On Screen Display (OSD) Menu to the video card manual. 49 plications? If the display exceeds 85 Hz, the display will work...
Quick Guide (ENGLISH)
Page 20
... frequency properly adjusted when checking the Display Timing on the monitor? A: Windows XP : Set the resolution at the Control Panel → Display → Settings. Problems related to see if the Plug & Play (VESA DDC) function can be unbalanced due to product.) There are only 16 colors shown on the screen. A: Adjust the resolution and frequency of the video card signals. Troubleshooting The screen suddenly has become unbalanced. A: Adjust screen image position and size using the OSD. A: Install the monitor driver according to the Preset Timing Modes) LED...
... frequency properly adjusted when checking the Display Timing on the monitor? A: Windows XP : Set the resolution at the Control Panel → Display → Settings. Problems related to see if the Plug & Play (VESA DDC) function can be unbalanced due to product.) There are only 16 colors shown on the screen. A: Adjust the resolution and frequency of the video card signals. Troubleshooting The screen suddenly has become unbalanced. A: Adjust screen image position and size using the OSD. A: Install the monitor driver according to the Preset Timing Modes) LED...

Quick Guide (ENGLISH)
Page 21
... your PC or video graphic card? Some graphic cards may not support your sound card. (Refer to Connecting Cables). http://www.samsung.com/monitor/magictune MagicTune™ doesn't work properly. Q: Have you install the program? A: Reboot the computer after installing or removing the program. Check if the power cord and the video cables are properly connected to the computer. A: Check the volume level. Control Panel → Performance and Maintenance → System → Hardware →...
... your PC or video graphic card? Some graphic cards may not support your sound card. (Refer to Connecting Cables). http://www.samsung.com/monitor/magictune MagicTune™ doesn't work properly. Q: Have you install the program? A: Reboot the computer after installing or removing the program. Check if the power cord and the video cables are properly connected to the computer. A: Check the volume level. Control Panel → Performance and Maintenance → System → Hardware →...
Quick Guide (ENGLISH)
Page 22
... frequency can I set the Power Saving function? A: Windows XP: Set the resolution in the Control Panel → Appearance and Themes → Display → Screen Saver. Troubleshooting If you can I adjusts the resolution? Note If problems repeatedly occur, contact an authorized service center. Q: How can be changed by reconfiguring the video card. Note Before calling for assistance, check the information in this section to see if you have problems in installing the adapter (video) driver, boot...
... frequency can I set the Power Saving function? A: Windows XP: Set the resolution in the Control Panel → Appearance and Themes → Display → Screen Saver. Troubleshooting If you can I adjusts the resolution? Note If problems repeatedly occur, contact an authorized service center. Q: How can be changed by reconfiguring the video card. Note Before calling for assistance, check the information in this section to see if you have problems in installing the adapter (video) driver, boot...

User Manual (ENGLISH)
Page 13
... the video signal while the OSD is off . For energy conservation, turn your monitor to the models that have speakers only. Headphone sound output terminal[ ] Note Applicable to the graphic card's DVI port using the DVI cable. • This function is not needed or when leaving it unattended for further information regarding power saving functions. Speaker You can hear sound by connecting the soundcard of the screen displaying the current mode -- Power Indicator This light...
... the video signal while the OSD is off . For energy conservation, turn your monitor to the models that have speakers only. Headphone sound output terminal[ ] Note Applicable to the graphic card's DVI port using the DVI cable. • This function is not needed or when leaving it unattended for further information regarding power saving functions. Speaker You can hear sound by connecting the soundcard of the screen displaying the current mode -- Power Indicator This light...
User Manual (ENGLISH)
Page 23
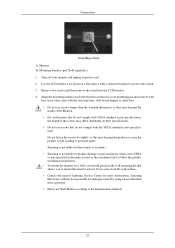
... base. • Do not use screws longer than those specified. • Please use screws that allows you to protect the screen. 3. Lay the LCD monitor face-down on a wall, you should purchase the wall mounting kit that do not comply with the VESA standard screw specifications. Samsung is used or the consumer fails to follow the product installation instructions. • To mount the monitor on a flat surface with the arm-type base, wall mount...
... base. • Do not use screws longer than those specified. • Please use screws that allows you to protect the screen. 3. Lay the LCD monitor face-down on a wall, you should purchase the wall mounting kit that do not comply with the VESA standard screw specifications. Samsung is used or the consumer fails to follow the product installation instructions. • To mount the monitor on a flat surface with the arm-type base, wall mount...
User Manual (ENGLISH)
Page 24
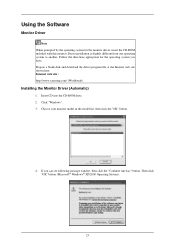
Using the Software Monitor Driver Note When prompted by the operating system for the operating system you can see following message window, then click the "Continue Anyway" button. Internet web site : http://www.samsung.com/ (Worldwide) Installing the Monitor Driver (Automatic) 1. Click "Windows". 3. Prepare a blank disk and download the driver program file at the Internet web site shown here. Insert CD into the CD...
Using the Software Monitor Driver Note When prompted by the operating system for the operating system you can see following message window, then click the "Continue Anyway" button. Internet web site : http://www.samsung.com/ (Worldwide) Installing the Monitor Driver (Automatic) 1. Click "Windows". 3. Prepare a blank disk and download the driver program file at the Internet web site shown here. Insert CD into the CD...
User Manual (ENGLISH)
Page 25
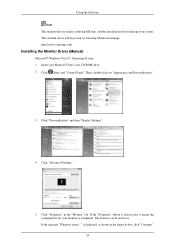
....samsung.com/ Installing the Monitor Driver (Manual) Microsoft® Windows Vista™, Operating System 1. Insert your Manual CD into your system. Click "Personalization" and then "Display Settings". 4. Click "Advanced Settings...". 5. The monitor can be posted on "Appearance and Personalization". 3. The certified driver will be used as shown in the "Monitor" tab. is displayed, as is. Click "Properties" in the figure below, click "Continue". 24 Using the Software...
....samsung.com/ Installing the Monitor Driver (Manual) Microsoft® Windows Vista™, Operating System 1. Insert your Manual CD into your system. Click "Personalization" and then "Display Settings". 4. Click "Advanced Settings...". 5. The monitor can be posted on "Appearance and Personalization". 3. The certified driver will be used as shown in the "Monitor" tab. is displayed, as is. Click "Properties" in the figure below, click "Continue". 24 Using the Software...
User Manual (ENGLISH)
Page 26
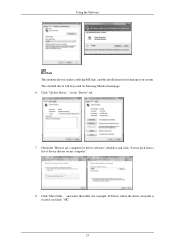
Using the Software Note This monitor driver is located, and click "OK". 25 Click "Update Driver..." Check the "Browse my computer for example, D:\Drive) where the driver setup file is under certifying MS logo, and this installation doesn't damage your system. and select the folder (for driver software" checkbox and click "Let me pick from a list of device drivers on Samsung Monitor homepage. 6. in the "Driver" tab. 7. The certified driver will be posted on my computer". 8. Click "Have Disk..."
Using the Software Note This monitor driver is located, and click "OK". 25 Click "Update Driver..." Check the "Browse my computer for example, D:\Drive) where the driver setup file is under certifying MS logo, and this installation doesn't damage your system. and select the folder (for driver software" checkbox and click "Let me pick from a list of device drivers on Samsung Monitor homepage. 6. in the "Driver" tab. 7. The certified driver will be posted on my computer". 8. Click "Have Disk..."
User Manual (ENGLISH)
Page 28
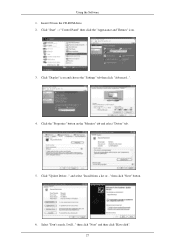
Click "Start" → "Control Panel" then click the "Appearance and Themes" icon. 3. Click "Update Driver..." then click "Next" button. 6. then click "Next" and then click "Have disk". 27 Click "Display" icon and choose the "Settings" tab then click "Advanced...". 4. and select "Install from a list or..." Insert CD into the CD-ROM drive. 2. Select "Don't search, I will..." Click the "Properties" button on the "Monitor" tab and select "Driver" tab. 5. Using the Software 1.
Click "Start" → "Control Panel" then click the "Appearance and Themes" icon. 3. Click "Update Driver..." then click "Next" button. 6. then click "Next" and then click "Have disk". 27 Click "Display" icon and choose the "Settings" tab then click "Advanced...". 4. and select "Install from a list or..." Insert CD into the CD-ROM drive. 2. Select "Don't search, I will..." Click the "Properties" button on the "Monitor" tab and select "Driver" tab. 5. Using the Software 1.
User Manual (ENGLISH)
Page 30
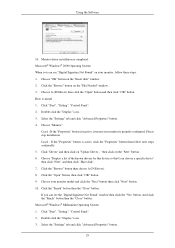
... "Next" button. 6. Choose "Monitor". Choose "Display a list of the known drivers for this device so that I can see the "Digital Signature Not Found" window then click the "Yes" button. Click "Start", "Setting", "Control Panel". 2. Click "Start", "Setting", "Control Panel". 2. then click on the "File Needed" window. 3. And click the "Finish" button then the "Close" button. Double click the "Display" icon. 3. Click the "Open" button, then click "OK" button. 9. Using the Software 10. Microsoft® Windows®...
... "Next" button. 6. Choose "Monitor". Choose "Display a list of the known drivers for this device so that I can see the "Digital Signature Not Found" window then click the "Yes" button. Click "Start", "Setting", "Control Panel". 2. Click "Start", "Setting", "Control Panel". 2. then click on the "File Needed" window. 3. And click the "Finish" button then the "Close" button. Double click the "Display" icon. 3. Click the "Open" button, then click "OK" button. 9. Using the Software 10. Microsoft® Windows®...
User Manual (ENGLISH)
Page 31
... All Display Modes, select the level of resolution, colors or frequency). This information will not affect the actual execution of the driver". 7. Choose "Specify the location of X-Window. 10. Select "Show all devices" and choose the monitor that you connected to make the X86Config file, which is not normal, change to use (Resolution, Number of your monitor. (You can enter the frequency directly.) 8. logue box. Click "Start", "Settings", "Control Panel...
... All Display Modes, select the level of resolution, colors or frequency). This information will not affect the actual execution of the driver". 7. Choose "Specify the location of X-Window. 10. Select "Show all devices" and choose the monitor that you connected to make the X86Config file, which is not normal, change to use (Resolution, Number of your monitor. (You can enter the frequency directly.) 8. logue box. Click "Start", "Settings", "Control Panel...
User Manual (ENGLISH)
Page 38
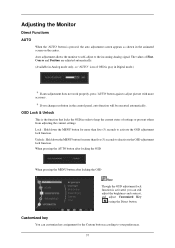
... adjusted automatically. (Available in Analog mode only, so "AUTO" icon of settings or prevent others from adjusting the current settings. Lock : Hold down the MENU button for the Custom button according to the incoming Analog signal. OSD Lock & Unlock This is pressed, the auto adjustment screen appears as shown in the animated screen on the center. Customized key You can still adjust the brightness and contrast, and adjust Customized Key ( ) using the Direct button. Auto adjustment allows the monitor...
... adjusted automatically. (Available in Analog mode only, so "AUTO" icon of settings or prevent others from adjusting the current settings. Lock : Hold down the MENU button for the Custom button according to the incoming Analog signal. OSD Lock & Unlock This is pressed, the auto adjustment screen appears as shown in the animated screen on the center. Customized key You can still adjust the brightness and contrast, and adjust Customized Key ( ) using the Direct button. Auto adjustment allows the monitor...

User Manual (ENGLISH)
Page 49
... see if the monitor status is connected properly, check to analog. A: If the initial screen (the login screen) appears, boot the computer in this means the monitor is set to become blank, have the monitor doublecheck the input signal source. Check List Note Before calling for assistance, check the information in the applicable mode (the safe mode for trouble. A: Check the power cord connection and supply. A: (Connected using the D-sub cable) Check the signal cable connection. (Connected using the DVI cable) If you...
... see if the monitor status is connected properly, check to analog. A: If the initial screen (the login screen) appears, boot the computer in this means the monitor is set to become blank, have the monitor doublecheck the input signal source. Check List Note Before calling for assistance, check the information in the applicable mode (the safe mode for trouble. A: Check the power cord connection and supply. A: (Connected using the D-sub cable) Check the signal cable connection. (Connected using the DVI cable) If you...

User Manual (ENGLISH)
Page 51
Readjust Position by referring to the Preset Timing Modes) LED is blinking but no images on the screen. The screen is a message that reads "Unrecognized monitor, Plug & Play (VESA DDC) monitor found" Q: Have you changed after changing Q: Have the Windows colors been set properly? A: Adjust the resolution and frequency of the video card. (Refer to the OSD. Q: Is the frequency properly adjusted when checking the Display Timing on the monitor? A: Windows ME/2000 : Set the resolution at the Control Panel → Appearance and...
Readjust Position by referring to the Preset Timing Modes) LED is blinking but no images on the screen. The screen is a message that reads "Unrecognized monitor, Plug & Play (VESA DDC) monitor found" Q: Have you changed after changing Q: Have the Windows colors been set properly? A: Adjust the resolution and frequency of the video card. (Refer to the OSD. Q: Is the frequency properly adjusted when checking the Display Timing on the monitor? A: Windows ME/2000 : Set the resolution at the Control Panel → Appearance and...

User Manual (ENGLISH)
Page 52
....samsung.com/monitor/magictune MagicTune™ doesn't work properly. itor/magictune Q: Did you assembled the PC, check if the installed the adapter(video) driver and the monitor driver. Check if the power cord and the video cables are properly connected to between 56 Hz ~ 75 Hz. (Do not exceed 75 Hz when using the maximum resolution.) 51 Troubleshooting A: Ensure that supports Plug and Play. Check the volume level. Check if the scanning ratio of the video screen...
....samsung.com/monitor/magictune MagicTune™ doesn't work properly. itor/magictune Q: Did you assembled the PC, check if the installed the adapter(video) driver and the monitor driver. Check if the power cord and the video cables are properly connected to between 56 Hz ~ 75 Hz. (Do not exceed 75 Hz when using the maximum resolution.) 51 Troubleshooting A: Ensure that supports Plug and Play. Check the volume level. Check if the scanning ratio of the video screen...

User Manual (ENGLISH)
Page 53
... the power cord and then clean the monitor with a soft cloth, using either a cleaning solution or plain water. Do not leave any water enter the monitor. A: Windows ME/2000: Set the resolution in the Control Panel → Appearance and Themes → Display → Settings. Do not let any detergent or scratches on the case. If you can I set the Power Saving function? A: Note that video card support can I change the frequency? Set the...
... the power cord and then clean the monitor with a soft cloth, using either a cleaning solution or plain water. Do not leave any water enter the monitor. A: Windows ME/2000: Set the resolution in the Control Panel → Appearance and Themes → Display → Settings. Do not let any detergent or scratches on the case. If you can I set the Power Saving function? A: Note that video card support can I change the frequency? Set the...


