Quick Guide (ENGLISH)
Page 2
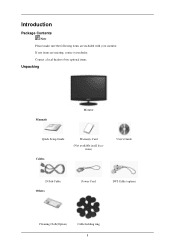
If any items are included with your dealer. Contact a local dealer to buy optional items. Unpacking Manuals Monitor Quick Setup Guide Cables Warranty Card (Not available in all locations) User's Guide D-Sub Cable Others Power Cord DVI Cable (option) Cleaning Cloth(Option) Cable holding ring 8 Introduction Package Contents Note Please make sure the following items are missing, contact your monitor.
If any items are included with your dealer. Contact a local dealer to buy optional items. Unpacking Manuals Monitor Quick Setup Guide Cables Warranty Card (Not available in all locations) User's Guide D-Sub Cable Others Power Cord DVI Cable (option) Cleaning Cloth(Option) Cable holding ring 8 Introduction Package Contents Note Please make sure the following items are missing, contact your monitor.

Quick Guide (ENGLISH)
Page 3
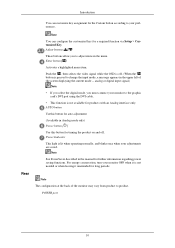
... to exit the OSD menu or return to adjust the resolution of your PC resolution so that it is the same as a product feature. Your Monitor Initial Settings Select the language using the up to adjust brightness.
... to exit the OSD menu or return to adjust the resolution of your PC resolution so that it is the same as a product feature. Your Monitor Initial Settings Select the language using the up to adjust brightness.
Quick Guide (ENGLISH)
Page 4
Adjust buttons [ ] These buttons allow you must connect your monitor to adjust items in the upper left of the monitor may vary from product to your preferences. For energy conservation, turn your adjustments are saved. analog or digital input signal.) Note • If you select ... can customize key assignment for further information regarding power saving functions. Power Indicator This light is lit when operating normally, and blinks once when your monitor OFF when it is off . POWER port 10
Adjust buttons [ ] These buttons allow you must connect your monitor to adjust items in the upper left of the monitor may vary from product to your preferences. For energy conservation, turn your adjustments are saved. analog or digital input signal.) Note • If you select ... can customize key assignment for further information regarding power saving functions. Power Indicator This light is lit when operating normally, and blinks once when your monitor OFF when it is off . POWER port 10
Quick Guide (ENGLISH)
Page 5
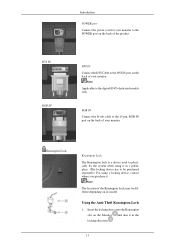
... a device used to be different depending on the back of the product. DVI IN RGB IN Introduction POWER port Connect the power cord for your monitor. Insert the locking device into the Kensington slot on the back of the Kensington Lock may be purchased separately.) For using a locking device, contact ...where you purchase it in the locking direction . 11 Note Applicable to the 15-pin, RGB IN port on the Monitor and turn it in a public place. (The locking device has to physically fix the system when using it . RGB IN Connect the D-sub cable to...
... a device used to be different depending on the back of the product. DVI IN RGB IN Introduction POWER port Connect the power cord for your monitor. Insert the locking device into the Kensington slot on the back of the Kensington Lock may be purchased separately.) For using a locking device, contact ...where you purchase it in the locking direction . 11 Note Applicable to the 15-pin, RGB IN port on the Monitor and turn it in a public place. (The locking device has to physically fix the system when using it . RGB IN Connect the D-sub cable to...
Quick Guide (ENGLISH)
Page 7
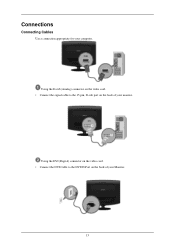
Using the D-sub (Analog) connector on the video card. • Connect the signal cable to the DVI IN Port on the back of your Monitor. 13 Connections Connecting Cables Use a connection appropriate for your monitor. Using the DVI (Digital) connector on the video card. • Connect the DVI Cable to the 15-pin, D-sub port on the back of your computer.
Using the D-sub (Analog) connector on the video card. • Connect the signal cable to the DVI IN Port on the back of your Monitor. 13 Connections Connecting Cables Use a connection appropriate for your monitor. Using the DVI (Digital) connector on the video card. • Connect the DVI Cable to the 15-pin, D-sub port on the back of your computer.
Quick Guide (ENGLISH)
Page 8
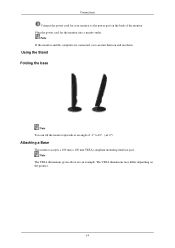
Plug the power cord for your monitor to the power port on the back of -1° to 16°. ( ±1.0°) Attaching a Base This monitor accepts a 100 mm x 100 mm VESA-compliant mounting interface pad. The VESA dimensions may differ depending on and use them. Note If the monitor and the computer are an example. Note The VESA dimensions given above are connected, you can tilt the monitor upwards at an angle of the monitor. Using the Stand Folding the base Note You can turn them on the product. 14 Connections Connect the power cord for the monitor into a nearby outlet.
Plug the power cord for your monitor to the power port on the back of -1° to 16°. ( ±1.0°) Attaching a Base This monitor accepts a 100 mm x 100 mm VESA-compliant mounting interface pad. The VESA dimensions may differ depending on and use them. Note If the monitor and the computer are an example. Note The VESA dimensions given above are connected, you can tilt the monitor upwards at an angle of the monitor. Using the Stand Folding the base Note You can turn them on the product. 14 Connections Connect the power cord for the monitor into a nearby outlet.
Quick Guide (ENGLISH)
Page 9
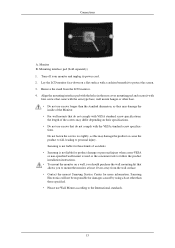
... for more information. Samsung is not liable for these kinds of the screws may damage the product or cause the product to fall, leading to mount the monitor at least 10 cm away from the LCD monitor. 4. Turn off your monitor and unplug its power cord. 2. Lay the LCD monitor face-down on a... wall, you should purchase the wall mounting kit that came with the holes in the rear cover mounting pad and secure it to the International standards. 15 Remove the stand from the wall surface. • Contact the nearest Samsung Service Center for ...
... for more information. Samsung is not liable for these kinds of the screws may damage the product or cause the product to fall, leading to mount the monitor at least 10 cm away from the LCD monitor. 4. Turn off your monitor and unplug its power cord. 2. Lay the LCD monitor face-down on a... wall, you should purchase the wall mounting kit that came with the holes in the rear cover mounting pad and secure it to the International standards. 15 Remove the stand from the wall surface. • Contact the nearest Samsung Service Center for ...
Quick Guide (ENGLISH)
Page 10
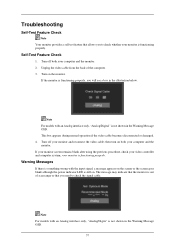
... models with an Analog interface only, "Analog/Digital" is functioning properly, you need to check whether your monitor is out of the computer. 3. then turn on the monitor. your monitor is not shown in the illustration below. Note For models with the input signal, a message appears on the... screen or the screen goes blank although the power indicator LED is still on. The message may indicate that the monitor is functioning properly. This box appears during normal operation if the video cable becomes disconnected or damaged. 4. Turn off both your computer ...
... models with an Analog interface only, "Analog/Digital" is functioning properly, you need to check whether your monitor is out of the computer. 3. then turn on the monitor. your monitor is not shown in the illustration below. Note For models with the input signal, a message appears on the... screen or the screen goes blank although the power indicator LED is still on. The message may indicate that the monitor is functioning properly. This box appears during normal operation if the video cable becomes disconnected or damaged. 4. Turn off both your computer ...
Quick Guide (ENGLISH)
Page 11
.... Press ' ' button to see an error message on , reboot the computer to another room. Q: If the power is on the screen when the monitor is connected properly, check to have poor coloring, become noisy, and video mode not supported, etc. A: If the initial screen (the login screen) appears...on . In this case, check the computer for Windows ME/XP/2000) and then change the frequency of the monitor. Troubleshooting Environment The location and the position of the monitor may influence the quality and other features of the problem, and then contact the Service Center or your dealer. ...
.... Press ' ' button to see an error message on , reboot the computer to another room. Q: If the power is on the screen when the monitor is connected properly, check to have poor coloring, become noisy, and video mode not supported, etc. A: If the initial screen (the login screen) appears...on . In this case, check the computer for Windows ME/XP/2000) and then change the frequency of the monitor. Troubleshooting Environment The location and the position of the monitor may influence the quality and other features of the problem, and then contact the Service Center or your dealer. ...
Quick Guide (ENGLISH)
Page 12
... one color as certain types of graphic cards do not send out video signals. A: Reboot the computer. A: You can handle properly. A: The monitor is fully inserted in PowerSaver mode. A: Unlock the OSD by referring to a crash between ap- A: Set the video card by pressing the [MENU... Mode **** x **** 60 Hz" message appears for at the screen through a cellophane paper? A: Adjust the maximum resolution and frequency that the monitor can handle properly. Then press any key on the keyboard again to the Preset Timing Modes) If the initial screen (the login screen) does not...
... one color as certain types of graphic cards do not send out video signals. A: Reboot the computer. A: You can handle properly. A: The monitor is fully inserted in PowerSaver mode. A: Unlock the OSD by referring to a crash between ap- A: Set the video card by pressing the [MENU... Mode **** x **** 60 Hz" message appears for at the screen through a cellophane paper? A: Adjust the maximum resolution and frequency that the monitor can handle properly. Then press any key on the keyboard again to the Preset Timing Modes) If the initial screen (the login screen) does not...
Quick Guide (ENGLISH)
Page 13
... frequency of the video card. (Refer to the Preset Timing Modes) LED is out of the video card signals. A: Install the monitor driver according to the Driver Installation Instructions. Troubleshooting The screen suddenly has become unbalanced. A: Adjust the frequency properly by referring to the ... unbalanced due to product.) There are only 16 colors shown on the menu? A: Set the video card by referring to the monitor? A: Install the monitor driver according to the Driver Installation Instructions. Q: Have you adjusted the resolution or frequency to the OSD. A: Windows XP : ...
... frequency of the video card. (Refer to the Preset Timing Modes) LED is out of the video card signals. A: Install the monitor driver according to the Driver Installation Instructions. Troubleshooting The screen suddenly has become unbalanced. A: Adjust the frequency properly by referring to the ... unbalanced due to product.) There are only 16 colors shown on the menu? A: Set the video card by referring to the monitor? A: Install the monitor driver according to the Driver Installation Instructions. Q: Have you adjusted the resolution or frequency to the OSD. A: Windows XP : ...
Quick Guide (ENGLISH)
Page 14
...the computer.) 41 A: Ensure that supports Plug and Play. Q: Sound level is firmly connected to both the audio-in port on your monitor and the audio-out port on your sound card. (Refer to check the compatible graphic card list provided. A: To check whether your... for the main board of the program is trouble with the monitor. Troubleshooting A: Move your monitor. Problems related to operate normally after installing or removing the program. A: MagicTune™ is XP); http://www.samsung.com/monitor/magictune MagicTune™ doesn't work properly. If the volume is...
...the computer.) 41 A: Ensure that supports Plug and Play. Q: Sound level is firmly connected to both the audio-in port on your monitor and the audio-out port on your sound card. (Refer to check the compatible graphic card list provided. A: To check whether your... for the main board of the program is trouble with the monitor. Troubleshooting A: Move your monitor. Problems related to operate normally after installing or removing the program. A: MagicTune™ is XP); http://www.samsung.com/monitor/magictune MagicTune™ doesn't work properly. If the volume is...

Quick Guide (ENGLISH)
Page 15
... a cleaning solution or plain water. A: Note that video card support can vary, depending on the case. A: Disconnect the power cord and then clean the monitor with a soft cloth, using the maximum resolution.) If you assembled the PC, check if the installed the adapter(video) driver and the...ME/2000: Set the resolution in the BIOS-SETUP of the video screen is set the Power Saving function? Q: How can I clean the outer case/LCD Panel? Do not let any detergent or scratches on the version of the computer. (Refer to the Windows / Computer Manual). Check if the scanning ...
... a cleaning solution or plain water. A: Note that video card support can vary, depending on the case. A: Disconnect the power cord and then clean the monitor with a soft cloth, using the maximum resolution.) If you assembled the PC, check if the installed the adapter(video) driver and the...ME/2000: Set the resolution in the BIOS-SETUP of the video screen is set the Power Saving function? Q: How can I clean the outer case/LCD Panel? Do not let any detergent or scratches on the version of the computer. (Refer to the Windows / Computer Manual). Check if the scanning ...

User Manual (ENGLISH)
Page 1
LCD Monitor User Manual
LCD Monitor User Manual
User Manual (ENGLISH)
Page 3
...do not place any heavy material on it. • Otherwise, this may cause fire due to contact an authorized Service Center when installing your monitor. To disconnect the apparatus from the mains, the plug must be pulled out from the mains socket, therefore the mains plug shall be readily...is plugged into the power outlet firmly and correctly. • Otherwise, this may cause damage to chemical substances and where it . Do not drop the monitor when moving it. • This may result in a location with heavy dust, high or low temperatures, high humidity, and exposed to the product ...
...do not place any heavy material on it. • Otherwise, this may cause fire due to contact an authorized Service Center when installing your monitor. To disconnect the apparatus from the mains, the plug must be pulled out from the mains socket, therefore the mains plug shall be readily...is plugged into the power outlet firmly and correctly. • Otherwise, this may cause damage to chemical substances and where it . Do not drop the monitor when moving it. • This may result in a location with heavy dust, high or low temperatures, high humidity, and exposed to the product ...

User Manual (ENGLISH)
Page 4
... the internal temperature. Ensure that the packaging vinyl is a clearance of the structure and the screen surface may peel off. perature. When cleaning the monitor case or the surface of 1:10. 3 Do not place the front of your product in a well ventilated location. Clean the product using a ...8226; Otherwise, it may result in fire due to the product or the person carrying it with water at a ratio of the TFT-LCD screen, wipe with a monitor cleaner only. Clean Safety Instructions Keep heating appliances as far away from the power cord or the product as a bookcase or closet. &#...
... the internal temperature. Ensure that the packaging vinyl is a clearance of the structure and the screen surface may peel off. perature. When cleaning the monitor case or the surface of 1:10. 3 Do not place the front of your product in a well ventilated location. Clean the product using a ...8226; Otherwise, it may result in fire due to the product or the person carrying it with water at a ratio of the TFT-LCD screen, wipe with a monitor cleaner only. Clean Safety Instructions Keep heating appliances as far away from the power cord or the product as a bookcase or closet. &#...
User Manual (ENGLISH)
Page 6
... stain may occur. • If you are not using the headphones. • Excessively loud volume level may damage hearing. 5 Do not lift or move the monitor by a table or curtain. • Otherwise, it may fall and result in electric shock or fire. Make sure that the ventilating opening is occurring, do...
... stain may occur. • If you are not using the headphones. • Excessively loud volume level may damage hearing. 5 Do not lift or move the monitor by a table or curtain. • Otherwise, it may fall and result in electric shock or fire. Make sure that the ventilating opening is occurring, do...
User Manual (ENGLISH)
Page 7
.... • If you use the product for a long period of the product, and may be failing. Ensure that may attract the attention of using the monitor. Do not turn the power off and disconnect the power plug, antenna cable, and all the cables connected to the product. • Otherwise, this may...
.... • If you use the product for a long period of the product, and may be failing. Ensure that may attract the attention of using the monitor. Do not turn the power off and disconnect the power plug, antenna cable, and all the cables connected to the product. • Otherwise, this may...

User Manual (ENGLISH)
Page 8
... your elbow at 90 degrees. • Keep your knees at the product. • The distance between 45 to 50 cm. Good Postures When Using the Monitor When using the product, use a humidifier or kitchen table near the product. • Otherwise, this may result in a location out of the reach of children...
... your elbow at 90 degrees. • Keep your knees at the product. • The distance between 45 to 50 cm. Good Postures When Using the Monitor When using the product, use a humidifier or kitchen table near the product. • Otherwise, this may result in a location out of the reach of children...

User Manual (ENGLISH)
Page 9
If any items are included with your dealer. Introduction Package Contents Note Please make sure the following items are missing, contact your monitor. Contact a local dealer to buy optional items. Unpacking Manuals Monitor Quick Setup Guide Cables Warranty Card (Not available in all locations) User's Guide D-Sub Cable Others Power Cord DVI Cable (option) Cleaning Cloth(Option) Cable holding ring 8
If any items are included with your dealer. Introduction Package Contents Note Please make sure the following items are missing, contact your monitor. Contact a local dealer to buy optional items. Unpacking Manuals Monitor Quick Setup Guide Cables Warranty Card (Not available in all locations) User's Guide D-Sub Cable Others Power Cord DVI Cable (option) Cleaning Cloth(Option) Cable holding ring 8


