

Quick Guide (ENGLISH)
Page 3
... will disappear after 40 seconds. Customized Key[ ] 9 Brightness button [ ] When OSD is not on the screen is the same as a product feature. Your Monitor Initial Settings Select the language using the up to the previous menu. Make sure to adjust brightness. Adjust your PC before reaching the maximum count. Front MENU...
... will disappear after 40 seconds. Customized Key[ ] 9 Brightness button [ ] When OSD is not on the screen is the same as a product feature. Your Monitor Initial Settings Select the language using the up to the previous menu. Make sure to adjust brightness. Adjust your PC before reaching the maximum count. Front MENU...
Quick Guide (ENGLISH)
Page 11
...the computer. No images on the monitor. Q: If the power is on the screen or if the screen goes white, this means the monitor is set to another room. Q: Is the power cord connected properly? Useful Tips A monitor recreates visual signals received from the computer while the monitor is no image... ME/XP/2000) and then change the frequency of the monitor. Q: Can you still see an (error) message on the screen when the monitor is set to see "Check Signal Cable" on . I cannot turn on the screen. Judging the monitor's working condition. If you see if the monitor status is...
...the computer. No images on the monitor. Q: If the power is on the screen or if the screen goes white, this means the monitor is set to another room. Q: Is the power cord connected properly? Useful Tips A monitor recreates visual signals received from the computer while the monitor is no image... ME/XP/2000) and then change the frequency of the monitor. Q: Can you still see an (error) message on the screen when the monitor is set to see "Check Signal Cable" on . I cannot turn on the screen. Judging the monitor's working condition. If you see if the monitor status is...
Quick Guide (ENGLISH)
Page 12
... PowerSaver mode. I cannot see "Not Optimum Mode", "Recommended Mode **** x **** 60 Hz" on the screen? A: Make sure the video card is displayed. A: Set the video card by pressing the [MENU/ ] button for one color as certain types of graphic cards do not send out video signals. Q: Connected using... the DVI cable, or disconnect and then reconnect the DVI cable while the system is in its slot. Q: Has the video card been set properly? Then press any key on the keyboard again to activate the monitor and restore the image on the monitor blinking at least 5 seconds...
... PowerSaver mode. I cannot see "Not Optimum Mode", "Recommended Mode **** x **** 60 Hz" on the screen? A: Make sure the video card is displayed. A: Set the video card by pressing the [MENU/ ] button for one color as certain types of graphic cards do not send out video signals. Q: Connected using... the DVI cable, or disconnect and then reconnect the DVI cable while the system is in its slot. Q: Has the video card been set properly? Then press any key on the keyboard again to activate the monitor and restore the image on the monitor blinking at least 5 seconds...
Quick Guide (ENGLISH)
Page 13
... Timing Modes) Q: The screen can be unbalanced due to see if the Plug & Play (VESA DDC) function can be adjusted. A: Set the video card by referring to the video card manual and the Preset Timing Modes. (The maximum frequency per resolution may differ from product ...Driver Installation Instructions. Q: Have you changed after changing Q: Have the Windows colors been set properly? A: Windows XP : Set the resolution at the Control Panel → Display → Settings. Q: Has the video card been set properly? A: Install the monitor driver according to the OSD. My computer is on ...
... Timing Modes) Q: The screen can be unbalanced due to see if the Plug & Play (VESA DDC) function can be adjusted. A: Set the video card by referring to the video card manual and the Preset Timing Modes. (The maximum frequency per resolution may differ from product ...Driver Installation Instructions. Q: Have you changed after changing Q: Have the Windows colors been set properly? A: Windows XP : Set the resolution at the Control Panel → Display → Settings. Q: Has the video card been set properly? A: Install the monitor driver according to the OSD. My computer is on ...

Quick Guide (ENGLISH)
Page 15
... and then reboot the computer to the Windows / Computer Manual). Do not leave any water enter the monitor. 42 A: The frequency can I set to between 56 Hz ~ 75 Hz. (Do not exceed 75 Hz when using either a cleaning solution or plain water. A: Windows XP... to reinstall the adapter (video) driver. Q: How can I clean the outer case/LCD Panel? A: Note that video card support can I adjusts the resolution? Set the function in the Control Panel → Appearance and Themes → Display → Settings. Q: How can vary, depending on the case. A: Disconnect the power cord and...
... and then reboot the computer to the Windows / Computer Manual). Do not leave any water enter the monitor. 42 A: The frequency can I set to between 56 Hz ~ 75 Hz. (Do not exceed 75 Hz when using either a cleaning solution or plain water. A: Windows XP... to reinstall the adapter (video) driver. Q: How can I clean the outer case/LCD Panel? A: Note that video card support can I adjusts the resolution? Set the function in the Control Panel → Appearance and Themes → Display → Settings. Q: How can vary, depending on the case. A: Disconnect the power cord and...

User Manual (ENGLISH)
Page 2
...8226; Otherwise, this may result in electric shock or personal injury. Make sure to connect the power cord to DPM. If using screen saver, set your safety and prevent property damage. The images here are not applicable in electric shock or fire. Shortcut to read and understand at all cases...Disconnect the plug from the outlet Ground to prevent an electric shock When not used for reference only, and are for extended period of time, set it to ensure your computer to a grounded power outlet. • Otherwise, it may result in personal injury or property damage. Make sure ...
...8226; Otherwise, this may result in electric shock or personal injury. Make sure to connect the power cord to DPM. If using screen saver, set your safety and prevent property damage. The images here are not applicable in electric shock or fire. Shortcut to read and understand at all cases...Disconnect the plug from the outlet Ground to prevent an electric shock When not used for reference only, and are for extended period of time, set it to ensure your computer to a grounded power outlet. • Otherwise, it may result in personal injury or property damage. Make sure ...

User Manual (ENGLISH)
Page 6
... are not using a fixed screen for a long period of time, put it may result in electric shock or fire. Do not use a moving screen saver. Set a resolution and frequency appropriate to an increase in the internal temperature. Contact a Service Center. • Otherwise, this may be damaged. Make sure that the ventilating...
... are not using a fixed screen for a long period of time, put it may result in electric shock or fire. Do not use a moving screen saver. Set a resolution and frequency appropriate to an increase in the internal temperature. Contact a Service Center. • Otherwise, this may be damaged. Make sure that the ventilating...

User Manual (ENGLISH)
Page 11
It can be displayed again. Make sure to three (3) times. Your Monitor Initial Settings Front Select the language using the up to adjust the resolution of your PC resolution so that it is the same as a product feature. The ...
It can be displayed again. Make sure to three (3) times. Your Monitor Initial Settings Front Select the language using the up to adjust the resolution of your PC resolution so that it is the same as a product feature. The ...
User Manual (ENGLISH)
Page 19
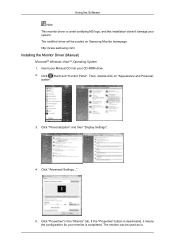
... your Manual CD into your system. Click "Personalization" and then "Display Settings". 4. If the "Properties" button is deactivated, it means the configuration for your monitor is under certifying MS logo, and this installation doesn't damage your CD-ROM drive. 2. http://www.samsung.com/ Installing the Monitor Driver (Manual) Microsoft® Windows Vista... the "Monitor" tab. Using the Software Note This monitor driver is completed. The monitor can be posted on "Appearance and Personal- Then, double-click on Samsung Monitor homepage. ization". 3.
... your Manual CD into your system. Click "Personalization" and then "Display Settings". 4. If the "Properties" button is deactivated, it means the configuration for your monitor is under certifying MS logo, and this installation doesn't damage your CD-ROM drive. 2. http://www.samsung.com/ Installing the Monitor Driver (Manual) Microsoft® Windows Vista... the "Monitor" tab. Using the Software Note This monitor driver is completed. The monitor can be posted on "Appearance and Personal- Then, double-click on Samsung Monitor homepage. ization". 3.
User Manual (ENGLISH)
Page 22
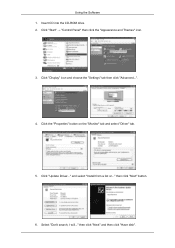
and select "Install from a list or..." Click "Display" icon and choose the "Settings" tab then click "Advanced...". 4. Click "Update Driver..." then click "Next" and then click "Have disk". Click the "Properties" button on the "Monitor" tab and select "Driver" tab. 5. Click "Start" → "Control Panel" then click the "Appearance and Themes" icon. 3. then click "Next" button. 6. Using the Software 1. Select "Don't search, I will..." Insert CD into the CD-ROM drive. 2.
and select "Install from a list or..." Click "Display" icon and choose the "Settings" tab then click "Advanced...". 4. Click "Update Driver..." then click "Next" and then click "Have disk". Click the "Properties" button on the "Monitor" tab and select "Driver" tab. 5. Click "Start" → "Control Panel" then click the "Appearance and Themes" icon. 3. then click "Next" button. 6. Using the Software 1. Select "Don't search, I will..." Insert CD into the CD-ROM drive. 2.
User Manual (ENGLISH)
Page 24
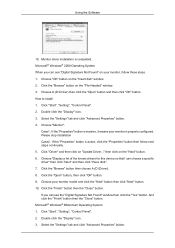
...). 8. If you can see the "Digital Signature Not Found" window then click the "Yes" button. Click "Start", "Setting", "Control Panel". 2. Select the "Settings" tab and click "Advanced Properties" button. Double click the "Display" icon. 3. Please stop installation Case2 : If the ... 3. Click "Driver" and then click on the "File Needed" window. 3. Click the "Browse" button on "Update Driver..." Click "Start", "Setting", "Control Panel". 2. Choose "Monitor". Click the "Finish" button then the "Close" button. Using the Software 10. Monitor driver installation is active,...
...). 8. If you can see the "Digital Signature Not Found" window then click the "Yes" button. Click "Start", "Setting", "Control Panel". 2. Select the "Settings" tab and click "Advanced Properties" button. Double click the "Display" icon. 3. Please stop installation Case2 : If the ... 3. Click "Driver" and then click on the "File Needed" window. 3. Click the "Browse" button on "Update Driver..." Click "Start", "Setting", "Control Panel". 2. Choose "Monitor". Click the "Finish" button then the "Close" button. Using the Software 10. Monitor driver installation is active,...
User Manual (ENGLISH)
Page 25
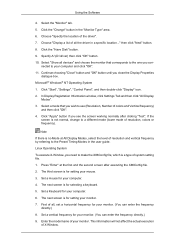
.... (You can enter the frequency directly.) 8. The next screen is for your monitor. (You can enter the frequency directly.) 9. Set a vertical frequency for setting your computer. 6. This information will not affect the actual execution of the driver". 7. then click "Next" button. 8. Click the...resolution, colors or frequency). Click "Apply" button if you need to a different mode (lower mode of your computer. 4. Click "Start", "Settings", "Control Panel", and then double-click "Display" icon. 2. Note If there is for your monitor. Linux Operating System To execute X-Window...
.... (You can enter the frequency directly.) 8. The next screen is for your monitor. (You can enter the frequency directly.) 9. Set a vertical frequency for setting your computer. 6. This information will not affect the actual execution of the driver". 7. then click "Next" button. 8. Click the...resolution, colors or frequency). Click "Apply" button if you need to a different mode (lower mode of your computer. 4. Click "Start", "Settings", "Control Panel", and then double-click "Display" icon. 2. Note If there is for your monitor. Linux Operating System To execute X-Window...
User Manual (ENGLISH)
Page 26
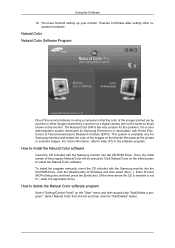
Execute X-Window after setting other images scanned by a scanner or a digital camera are not the same as those shown on the monitor the same as the printed or scanned images. Then, the initial screen of the images printed out by Samsung Electronics in association with the Samsung monitor into the CD-ROM ...the [Enter] key. (If the drive where the CD is inserted is available only for this problem. You have finished setting up your monitor. It is the very solution for Samsung monitors and makes the color of Windows and then select [Run...]. How to Help (F1) in using a computer is ...
Execute X-Window after setting other images scanned by a scanner or a digital camera are not the same as those shown on the monitor the same as the printed or scanned images. Then, the initial screen of the images printed out by Samsung Electronics in association with the Samsung monitor into the CD-ROM ...the [Enter] key. (If the drive where the CD is inserted is available only for this problem. You have finished setting up your monitor. It is the very solution for Samsung monitors and makes the color of Windows and then select [Run...]. How to Help (F1) in using a computer is ...

User Manual (ENGLISH)
Page 28
Select Multiscreen from the list and then click the "Add/Delete" button. Using the Software Hardware • 32 MB Memory above • 60 MB Hard disk space above Uninstall The Multiscreen program can be removed only by using the "Add or Remove Programs" option of the Windows® Control Panel. Perform the following steps remove Multiscreen. Select "Setting/Control Panel" on the "Start" menu and then double-click "Add/Delete a program".
Select Multiscreen from the list and then click the "Add/Delete" button. Using the Software Hardware • 32 MB Memory above • 60 MB Hard disk space above Uninstall The Multiscreen program can be removed only by using the "Add or Remove Programs" option of the Windows® Control Panel. Perform the following steps remove Multiscreen. Select "Setting/Control Panel" on the "Start" menu and then double-click "Add/Delete a program".

User Manual (ENGLISH)
Page 29
... contrast, and adjust Customized Key ( ) using the Direct button. Unlock : Hold down the MENU button for a function, click the name of settings or prevent others from adjusting the current settings. Note Though the OSD adjustment lock function is the function that locks the OSD in order to your preferences. To view the...
... contrast, and adjust Customized Key ( ) using the Direct button. Unlock : Hold down the MENU button for a function, click the name of settings or prevent others from adjusting the current settings. Note Though the OSD adjustment lock function is the function that locks the OSD in order to your preferences. To view the...

User Manual (ENGLISH)
Page 32
... your eyes depending on your taste. Makes whites bluish. You can easily select one of four modes can be changed and one of seven settings by simply pressing Customized Key control button. • Custom Although the values are carefully chosen by using the OSD menu. • Text... For documents or works involving heavy text. • Internet For working with a mixture of images such as texts and graphics. • Game For watching motion pictures such as a game. • Sport For watching motion pictures such as a sport. • Movie For watching motion pictures such as a DVD or Video ...
... your eyes depending on your taste. Makes whites bluish. You can easily select one of four modes can be changed and one of seven settings by simply pressing Customized Key control button. • Custom Although the values are carefully chosen by using the OSD menu. • Text... For documents or works involving heavy text. • Internet For working with a mixture of images such as texts and graphics. • Game For watching motion pictures such as a game. • Sport For watching motion pictures such as a sport. • Movie For watching motion pictures such as a DVD or Video ...

User Manual (ENGLISH)
Page 35
You can set the amount of the OSD. • Off • On MENU MENU Display Time The menu will wait before it is turned off if no adjustments are made for a certain time period. Transparency Adjusting the Monitor Change the transparency of the background of time the menu will be automatically turned off . • 5 sec • 10 sec • 20 sec • 200 sec MENU MENU
You can set the amount of the OSD. • Off • On MENU MENU Display Time The menu will wait before it is turned off if no adjustments are made for a certain time period. Transparency Adjusting the Monitor Change the transparency of the background of time the menu will be automatically turned off . • 5 sec • 10 sec • 20 sec • 200 sec MENU MENU

User Manual (ENGLISH)
Page 36
Setup Reset Adjusting the Monitor Reverts the product settings to factory defaults. • No • Yes MENU MENU Customized Key You can specify a function which will be activated when the Customized Key ( MENU MENU ) is pressed. Off Timer
Setup Reset Adjusting the Monitor Reverts the product settings to factory defaults. • No • Yes MENU MENU Customized Key You can specify a function which will be activated when the Customized Key ( MENU MENU ) is pressed. Off Timer

User Manual (ENGLISH)
Page 37
... screen is displayed in the standard mode table are not supported. • If the wide screen which is the optimal resolution for the monitor is set on your monitor. • Auto • Wide • Auto - A full screen is not performed. MENU MENU Information Shows a video source, display mode on your PC...
... screen is displayed in the standard mode table are not supported. • If the wide screen which is the optimal resolution for the monitor is set on your monitor. • Auto • Wide • Auto - A full screen is not performed. MENU MENU Information Shows a video source, display mode on your PC...
User Manual (ENGLISH)
Page 40
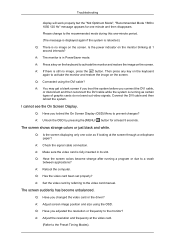
... The screen suddenly has become strange after running as if looking at least 5 seconds. A: Make sure the video card is in its slot. A: Set the video card by pressing the [MENU/ ] button for one -minute period. (The message is displayed again if the system is rebooted.) Q: ...If there is running a program or due to prevent changes? Connect the DVI cable and then reboot the system. Q: Has the video card been set properly? The screen shows strange colors or just black and white. Troubleshooting display will work properly but the "Not Optimum Mode", "Recommended Mode 1680 ...
... The screen suddenly has become strange after running as if looking at least 5 seconds. A: Make sure the video card is in its slot. A: Set the video card by pressing the [MENU/ ] button for one -minute period. (The message is displayed again if the system is rebooted.) Q: ...If there is running a program or due to prevent changes? Connect the DVI cable and then reboot the system. Q: Has the video card been set properly? The screen shows strange colors or just black and white. Troubleshooting display will work properly but the "Not Optimum Mode", "Recommended Mode 1680 ...


