Quick Guide (ENGLISH)
Page 2
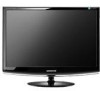
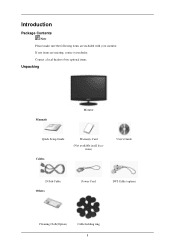
Contact a local dealer to buy optional items. Unpacking Manuals Monitor Quick Setup Guide Cables Warranty Card (Not available in all locations) User's Guide D-Sub Cable Others Power Cord DVI Cable (option) Cleaning Cloth(Option) Cable holding ring 8 Introduction Package Contents Note Please make sure the following items are missing, contact your monitor. If any items are included with your dealer.
Contact a local dealer to buy optional items. Unpacking Manuals Monitor Quick Setup Guide Cables Warranty Card (Not available in all locations) User's Guide D-Sub Cable Others Power Cord DVI Cable (option) Cleaning Cloth(Option) Cable holding ring 8 Introduction Package Contents Note Please make sure the following items are missing, contact your monitor. If any items are included with your dealer.
Quick Guide (ENGLISH)
Page 4
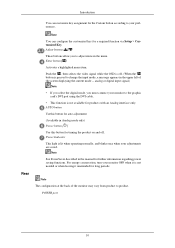
...AUTO button Usethis button for auto adjustment. (Available in the upper left of the monitor may vary from product to product. Power Indicator This light is lit when operating normally, and blinks once ...when your monitor OFF when it is not needed or when leaving it unattended for further information ... appears in Analog mode only) Power button [ ] Use this button for the Custom button according to your monitor to adjust items in the manual for long periods. analog or digital input signal.) Note • If you...
...AUTO button Usethis button for auto adjustment. (Available in the upper left of the monitor may vary from product to product. Power Indicator This light is lit when operating normally, and blinks once ...when your monitor OFF when it is not needed or when leaving it unattended for further information ... appears in Analog mode only) Power button [ ] Use this button for the Custom button according to your monitor to adjust items in the manual for long periods. analog or digital input signal.) Note • If you...
Quick Guide (ENGLISH)
Page 5
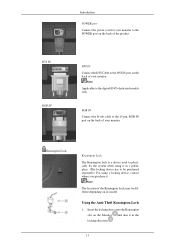
... cable to the 15-pin, RGB IN port on the back of the product. DVI IN RGB IN Introduction POWER port Connect the power cord for your monitor to the POWER port on the back of your monitor. Insert the locking device into the Kensington slot on its model. Note Applicable to ... a locking device, contact where you purchase it in a public place. (The locking device has to be different depending on the Monitor and turn it . DVI IN Connect the DVI Cable to the DVI IN port on the back of the Kensington Lock may be purchased separately.) For using it in the locking direction . 11...
... cable to the 15-pin, RGB IN port on the back of the product. DVI IN RGB IN Introduction POWER port Connect the power cord for your monitor to the POWER port on the back of your monitor. Insert the locking device into the Kensington slot on its model. Note Applicable to ... a locking device, contact where you purchase it in a public place. (The locking device has to be different depending on the Monitor and turn it . DVI IN Connect the DVI Cable to the DVI IN port on the back of the Kensington Lock may be purchased separately.) For using it in the locking direction . 11...
Quick Guide (ENGLISH)
Page 7
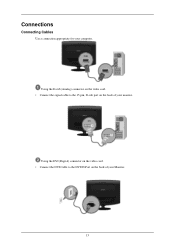
Using the D-sub (Analog) connector on the video card. • Connect the signal cable to the DVI IN Port on the back of your monitor. Using the DVI (Digital) connector on the video card. • Connect the DVI Cable to the 15-pin, D-sub port on the back of your Monitor. 13 Connections Connecting Cables Use a connection appropriate for your computer.
Using the D-sub (Analog) connector on the video card. • Connect the signal cable to the DVI IN Port on the back of your monitor. Using the DVI (Digital) connector on the video card. • Connect the DVI Cable to the 15-pin, D-sub port on the back of your Monitor. 13 Connections Connecting Cables Use a connection appropriate for your computer.

Quick Guide (ENGLISH)
Page 11
...Service Center or your dealer. I cannot turn on the screen. A: (Connected using the D-sub cable) Check the signal cable connection. (Connected using the DVI cable) If you can remedy any sub woofer speakers near the monitor, unplug and relocate the woofer to analog. In this case, first check the source of the... room. In this can be seen. Q: Is the power cord connected properly? Q: If the power is on the screen when the monitor is connected properly, check to see if the monitor status is set to see if you still see an error message on , reboot the computer to see if the...
...Service Center or your dealer. I cannot turn on the screen. A: (Connected using the D-sub cable) Check the signal cable connection. (Connected using the DVI cable) If you can remedy any sub woofer speakers near the monitor, unplug and relocate the woofer to analog. In this case, first check the source of the... room. In this can be seen. Q: Is the power cord connected properly? Q: If the power is on the screen when the monitor is connected properly, check to see if the monitor status is set to see if you still see an error message on , reboot the computer to see if the...

Quick Guide (ENGLISH)
Page 12
...running a program or due to the video card manual. 39 Q: Have you connect the DVI cable, or disconnect and then reconnect the DVI cable while the system is no image, press the ' ' button. A: The monitor is fully inserted in PowerSaver mode. A: Unlock the OSD by referring to a crash ... the image on the screen. Is the power indicator on the monitor blinking at the screen through a cellophane paper? A: Adjust the maximum resolution and frequency that the monitor can handle properly. Connect the DVI cable and then reboot the system. The screen shows strange colors or...
...running a program or due to the video card manual. 39 Q: Have you connect the DVI cable, or disconnect and then reconnect the DVI cable while the system is no image, press the ' ' button. A: The monitor is fully inserted in PowerSaver mode. A: Unlock the OSD by referring to a crash ... the image on the screen. Is the power indicator on the monitor blinking at the screen through a cellophane paper? A: Adjust the maximum resolution and frequency that the monitor can handle properly. Connect the DVI cable and then reboot the system. The screen shows strange colors or...

Quick Guide (KOREAN)
Page 7
• D-Sub D-Sub( RGB IN D-Sub DVI( • DVI DVI IN DVI 13
• D-Sub D-Sub( RGB IN D-Sub DVI( • DVI DVI IN DVI 13

User Manual (ENGLISH)
Page 9
Introduction Package Contents Note Please make sure the following items are missing, contact your monitor. Contact a local dealer to buy optional items. Unpacking Manuals Monitor Quick Setup Guide Cables Warranty Card (Not available in all locations) User's Guide D-Sub Cable Others Power Cord DVI Cable (option) Cleaning Cloth(Option) Cable holding ring 8 If any items are included with your dealer.
Introduction Package Contents Note Please make sure the following items are missing, contact your monitor. Contact a local dealer to buy optional items. Unpacking Manuals Monitor Quick Setup Guide Cables Warranty Card (Not available in all locations) User's Guide D-Sub Cable Others Power Cord DVI Cable (option) Cleaning Cloth(Option) Cable holding ring 8 If any items are included with your dealer.

User Manual (ENGLISH)
Page 11
Rear Note You can customize key assignment for the Custom button according to your monitor to the graphic card's DVI port using the DVI cable. • This function is not available for products with an Analog interface only. Push the ' ', then selects the video signal while the OSD...configuration at the back of the screen displaying the current mode -- Power Indicator This light is lit when operating normally, and blinks once when your monitor OFF when it is not needed or when leaving it unattended for long periods. POWER port 10 Adjust buttons [ ] These buttons allow you must...
Rear Note You can customize key assignment for the Custom button according to your monitor to the graphic card's DVI port using the DVI cable. • This function is not available for products with an Analog interface only. Push the ' ', then selects the video signal while the OSD...configuration at the back of the screen displaying the current mode -- Power Indicator This light is lit when operating normally, and blinks once when your monitor OFF when it is not needed or when leaving it unattended for long periods. POWER port 10 Adjust buttons [ ] These buttons allow you must...

User Manual (ENGLISH)
Page 12
...IN Connect the D-sub cable to the 15-pin, RGB IN port on the back of your monitor. DVI IN Connect the DVI Cable to the DVI IN port on the back of your monitor. Note Applicable to the digital (DVI)-dedicated models only. DVI IN RGB IN Introduction POWER port Connect the power cord for your... monitor to the POWER port on the back of the Kensington Lock may be purchased separately.) For using it in the locking direction . 11 ...
...IN Connect the D-sub cable to the 15-pin, RGB IN port on the back of your monitor. DVI IN Connect the DVI Cable to the DVI IN port on the back of your monitor. Note Applicable to the digital (DVI)-dedicated models only. DVI IN RGB IN Introduction POWER port Connect the power cord for your... monitor to the POWER port on the back of the Kensington Lock may be purchased separately.) For using it in the locking direction . 11 ...

User Manual (ENGLISH)
Page 14
Connections Connecting Cables Use a connection appropriate for your Monitor. 13 Using the DVI (Digital) connector on the video card. • Connect the DVI Cable to the 15-pin, D-sub port on the back of your monitor. Using the D-sub (Analog) connector on the video card. • Connect the signal cable to the DVI IN Port on the back of your computer.
Connections Connecting Cables Use a connection appropriate for your Monitor. 13 Using the DVI (Digital) connector on the video card. • Connect the DVI Cable to the 15-pin, D-sub port on the back of your monitor. Using the D-sub (Analog) connector on the video card. • Connect the signal cable to the DVI IN Port on the back of your computer.
User Manual (ENGLISH)
Page 30
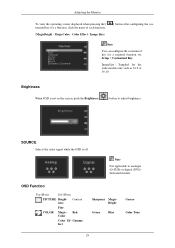
Image Size) ] button after configuring the cus- Brightness When OSD is off. Adjusting the Monitor To view the operating screen displayed when pressing the [ tomized key for a required function via Setup > Customized Key. MagicColor - Gamma fect Sharpness ...PICTURE Bright- SOURCE Selects the video signal while the OSD is not on the screen, push the Brightness ( ) button to analogue (D-SUB)-or-digital (DVI)dedicated models. Color Effect - Contrast ness Fine COLOR Magic- Note You can configure the customized key for a function, click the name of each function. ...
Image Size) ] button after configuring the cus- Brightness When OSD is off. Adjusting the Monitor To view the operating screen displayed when pressing the [ tomized key for a required function via Setup > Customized Key. MagicColor - Gamma fect Sharpness ...PICTURE Bright- SOURCE Selects the video signal while the OSD is not on the screen, push the Brightness ( ) button to analogue (D-SUB)-or-digital (DVI)dedicated models. Color Effect - Contrast ness Fine COLOR Magic- Note You can configure the customized key for a function, click the name of each function. ...

User Manual (ENGLISH)
Page 35
... set to see the full image without any cutoff when DVI (480p/576p/720p/1080i/1080p) signals are input. A full screen is displayed regardless of the screen aspect ratio of the screen displayed on your monitor. Sets the picture to 16:10 wide mode. • Screen Fit- Sets the picture to 4:3 normal... and the 'PC/AV Mode' is set to 'AV'. • 4 : 3 - Use the function to the DVI terminal and the 'PC/AV Mode' is set on your PC, this function is not performed. Adjusting the Monitor Menu Image Size Description (Available in Analog mode only) Note When TV signal is input in AV...
... set to see the full image without any cutoff when DVI (480p/576p/720p/1080i/1080p) signals are input. A full screen is displayed regardless of the screen aspect ratio of the screen displayed on your monitor. Sets the picture to 16:10 wide mode. • Screen Fit- Sets the picture to 4:3 normal... and the 'PC/AV Mode' is set to 'AV'. • 4 : 3 - Use the function to the DVI terminal and the 'PC/AV Mode' is set on your PC, this function is not performed. Adjusting the Monitor Menu Image Size Description (Available in Analog mode only) Note When TV signal is input in AV...

User Manual (ENGLISH)
Page 36
You can select the language used to analogue (D-SUB)-or-digital (DVI)-dedicated models. 35 Auto Source Select Auto Source for the monitor to automatically select the signal source. • Auto • Manual Note Not applicable to display the menus. Off Timer On/ You ...of the OSD. Change the transparency of the background of nine languages. You can enable or disable the Off Time function. SETUP&RESET Adjusting the Monitor Menu Reset Description Reverts the product settings to factory defaults. • Yes • No Menu Transpar- Language • On : The menus ...
You can select the language used to analogue (D-SUB)-or-digital (DVI)-dedicated models. 35 Auto Source Select Auto Source for the monitor to automatically select the signal source. • Auto • Manual Note Not applicable to display the menus. Off Timer On/ You ...of the OSD. Change the transparency of the background of nine languages. You can enable or disable the Off Time function. SETUP&RESET Adjusting the Monitor Menu Reset Description Reverts the product settings to factory defaults. • Yes • No Menu Transpar- Language • On : The menus ...
User Manual (ENGLISH)
Page 37
If not set the amount of the screen when a 480P, 576P, 720P, 1080i, or 1080P video signal is input in DVI mode. Note For models with the size of time the menu will wait before it is turned off if no adjustments are made for the ...wide models only such as 16:9 or 16:10. Adjusting the Monitor Menu PC/AV Mode Description This function allows the screen to be displayed at the optimal quality in accordance with an Analog interface only, "Analog...
If not set the amount of the screen when a 480P, 576P, 720P, 1080i, or 1080P video signal is input in DVI mode. Note For models with the size of time the menu will wait before it is turned off if no adjustments are made for the ...wide models only such as 16:9 or 16:10. Adjusting the Monitor Menu PC/AV Mode Description This function allows the screen to be displayed at the optimal quality in accordance with an Analog interface only, "Analog...
User Manual (ENGLISH)
Page 39
...feet (one meter) of the monitor. Q: If the power is on . Remove all electronic devices such as radios, fans, clocks and telephones that are any problems yourself. A: (Connected using the D-sub cable) Check the signal cable connection. (Connected using the DVI cable) If you do need assistance..., please call the phone number on the screen when the monitor is set to have poor coloring, become blank, have the monitor double-check the input signal source. Troubleshooting Environment The ...
...feet (one meter) of the monitor. Q: If the power is on . Remove all electronic devices such as radios, fans, clocks and telephones that are any problems yourself. A: (Connected using the D-sub cable) Check the signal cable connection. (Connected using the DVI cable) If you do need assistance..., please call the phone number on the screen when the monitor is set to have poor coloring, become blank, have the monitor double-check the input signal source. Troubleshooting Environment The ...
User Manual (ENGLISH)
Page 40
... the power indicator on the screen. A: Press a key on the keyboard to the video card manual. 39 Q: Connected using the DVI cable? plications? A: Adjust the maximum resolution and frequency that the monitor can see the On Screen Display. Q: Has the video card been set properly? A: Set the video card by pressing the...
... the power indicator on the screen. A: Press a key on the keyboard to the video card manual. 39 Q: Connected using the DVI cable? plications? A: Adjust the maximum resolution and frequency that the monitor can see the On Screen Display. Q: Has the video card been set properly? A: Set the video card by pressing the...
User Manual (ENGLISH)
Page 69
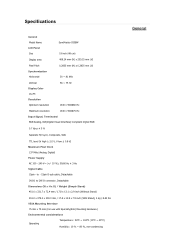
Specifications General Model Name LCD Panel Size SyncMaster 933BW 19 inch (48 cm) Display area 408.24 mm (H) x 255.15 mm (V) Pixel Pitch Synchronization Horizontal 0.2835 mm (H) x 0.2835 mm (V) 30 ~ 81 kHz Vertical ... Pixel Clock 137 MHz (Analog, Digital) Power Supply AC 100 - 240 V~ (+/- 10 %), 50/60 Hz ± 3 Hz Signal Cable 15pin - to - 15pin D-sub cable, Detachable DVI-D to DVI-D connector, Detachable Dimensions (W x H x D) / Weight (Simple Stand) 451.0 x 331.7 x 72.4 mm / 17.8 x 13.1 x 2.9 inch (Without Stand) 451.0 x 379.3 x 200.0 mm / 17.8 x 14.9 x 7.9 inch (With Stand...
Specifications General Model Name LCD Panel Size SyncMaster 933BW 19 inch (48 cm) Display area 408.24 mm (H) x 255.15 mm (V) Pixel Pitch Synchronization Horizontal 0.2835 mm (H) x 0.2835 mm (V) 30 ~ 81 kHz Vertical ... Pixel Clock 137 MHz (Analog, Digital) Power Supply AC 100 - 240 V~ (+/- 10 %), 50/60 Hz ± 3 Hz Signal Cable 15pin - to - 15pin D-sub cable, Detachable DVI-D to DVI-D connector, Detachable Dimensions (W x H x D) / Weight (Simple Stand) 451.0 x 331.7 x 72.4 mm / 17.8 x 13.1 x 2.9 inch (Without Stand) 451.0 x 379.3 x 200.0 mm / 17.8 x 14.9 x 7.9 inch (With Stand...

User Manual (ENGLISH)
Page 73
Specifications General Model Name LCD Panel Size SyncMaster 933BWPLUS 19 inch (48 cm) Display area 408.24 mm (H) x 255.15 mm (V) Pixel Pitch Synchronization Horizontal 0.2835 mm (H) x 0.2835 mm (V) 30 ~ 81 kHz Vertical ... Pixel Clock 137 MHz (Analog, Digital) Power Supply AC 100 - 240 V~ (+/- 10 %), 50/60 Hz ± 3 Hz Signal Cable 15pin - to - 15pin D-sub cable, Detachable DVI-D to DVI-D connector, Detachable Dimensions (W x H x D) / Weight (Simple Stand) 451.0 x 331.7 x 72.4 mm / 17.8 x 13.1 x 2.9 inch (Without Stand) 451.0 x 379.3 x 200.0 mm / 17.8 x 14.9 x 7.9 inch (With Stand...
Specifications General Model Name LCD Panel Size SyncMaster 933BWPLUS 19 inch (48 cm) Display area 408.24 mm (H) x 255.15 mm (V) Pixel Pitch Synchronization Horizontal 0.2835 mm (H) x 0.2835 mm (V) 30 ~ 81 kHz Vertical ... Pixel Clock 137 MHz (Analog, Digital) Power Supply AC 100 - 240 V~ (+/- 10 %), 50/60 Hz ± 3 Hz Signal Cable 15pin - to - 15pin D-sub cable, Detachable DVI-D to DVI-D connector, Detachable Dimensions (W x H x D) / Weight (Simple Stand) 451.0 x 331.7 x 72.4 mm / 17.8 x 13.1 x 2.9 inch (Without Stand) 451.0 x 379.3 x 200.0 mm / 17.8 x 14.9 x 7.9 inch (With Stand...

User Manual (ENGLISH)
Page 77
to - 15pin D-sub cable, Detachable DVI-D to DVI-D connector, Detachable Dimensions (W x H x D) / Weight (Simple Stand) 451.0 x 331.7 x 72.4 mm / 17.8 x 13.1 x 2.9 inch (Without Stand) 451.0 x 379.3 x 200.0 mm / 17.8 x 14.9 x 7.9 inch (With ...Environmental considerations Operating Temperature : 50°F ~ 104°F (10°C ~ 40°C) Humidity : 10 % ~ 80 %, non-condensing General Specifications General Model Name LCD Panel Size SyncMaster 933GW 19 inch (48 cm) Display area 408.24 mm (H) x 255.15 mm (V) Pixel Pitch Synchronization Horizontal 0.2835 mm (H) x 0.2835 mm (V) 30 ~ ...
to - 15pin D-sub cable, Detachable DVI-D to DVI-D connector, Detachable Dimensions (W x H x D) / Weight (Simple Stand) 451.0 x 331.7 x 72.4 mm / 17.8 x 13.1 x 2.9 inch (Without Stand) 451.0 x 379.3 x 200.0 mm / 17.8 x 14.9 x 7.9 inch (With ...Environmental considerations Operating Temperature : 50°F ~ 104°F (10°C ~ 40°C) Humidity : 10 % ~ 80 %, non-condensing General Specifications General Model Name LCD Panel Size SyncMaster 933GW 19 inch (48 cm) Display area 408.24 mm (H) x 255.15 mm (V) Pixel Pitch Synchronization Horizontal 0.2835 mm (H) x 0.2835 mm (V) 30 ~ ...


