User Manual (ENGLISH)
Page 7
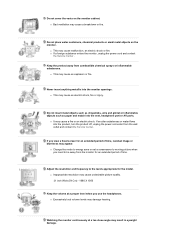
z Excessively loud volume levels may cause malfunction, an electric shock or fire. z If a foreign substance enters the monitor, unplug the power cord and contact the Service Center . z Change the mode to energy save or set a screensaver to moving picture when you need to the levels appropriate for an extended period of time. Watching the monitor continuously at a proper level when you view a fixed screen for the...
z Excessively loud volume levels may cause malfunction, an electric shock or fire. z If a foreign substance enters the monitor, unplug the power cord and contact the Service Center . z Change the mode to energy save or set a screensaver to moving picture when you need to the levels appropriate for an extended period of time. Watching the monitor continuously at a proper level when you view a fixed screen for the...
User Manual (ENGLISH)
Page 11
... the incoming Analog signal. The values of the screen displaying the current mode -- Analog/Digital(PC) : MagicBright™ button [] MagicBright™ is pressed, the Auto Adjustment screen appears as a DVD or Video CD. >>Click here to see an animation clip AV/S-Video/ Component : Mode button The Monitor has four automatic picture settings ("Dynamic", "Standard", "Movie" and "Custom") that are connected to view a sharper image than in Analog/Digital(PC) Mode Only ) In Analog or Digital Mode, turns on...
... the incoming Analog signal. The values of the screen displaying the current mode -- Analog/Digital(PC) : MagicBright™ button [] MagicBright™ is pressed, the Auto Adjustment screen appears as a DVD or Video CD. >>Click here to see an animation clip AV/S-Video/ Component : Mode button The Monitor has four automatic picture settings ("Dynamic", "Standard", "Movie" and "Custom") that are connected to view a sharper image than in Analog/Digital(PC) Mode Only ) In Analog or Digital Mode, turns on...
User Manual (ENGLISH)
Page 15
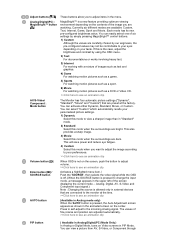
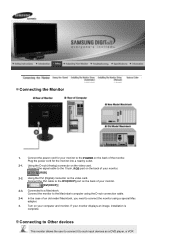
... POWER on the back of the monitor. Using the D-sub (Analog) connector on the video card. Connect the power cord for the monitor into a nearby outlet. 2-1. If your monitor to the DVI(HDCP) port on your monitor. [DVI(HDCP)] 2-3. Connect the signal cable to the Macintosh computer using a special Mac adapter. 3. Connect the monitor to the 15-pin, RGB port on the back of your monitor. [RGB] 2-2. Connected to such input devices as a DVD player, a VCR Plug the power cord for your monitor displays an image, installation...
... POWER on the back of the monitor. Using the D-sub (Analog) connector on the video card. Connect the power cord for the monitor into a nearby outlet. 2-1. If your monitor to the DVI(HDCP) port on your monitor. [DVI(HDCP)] 2-3. Connect the signal cable to the Macintosh computer using a special Mac adapter. 3. Connect the monitor to the 15-pin, RGB port on the back of your monitor. [RGB] 2-2. Connected to such input devices as a DVD player, a VCR Plug the power cord for your monitor displays an image, installation...
User Manual (ENGLISH)
Page 20
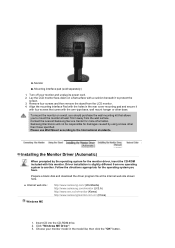
... unplug its power cord. 2. To mount the monitor on a flat surface with a cushion beneath it with four screws that allows you have. Samsung Electronics will not be responsible for the monitor driver, insert the CD-ROM included with the holes in the model list, then click the "OK" button. Driver installation is slightly different from the LCD monitor. 4. A. Turn off your monitor model in the rear cover mounting pad and...
... unplug its power cord. 2. To mount the monitor on a flat surface with a cushion beneath it with four screws that allows you have. Samsung Electronics will not be responsible for the monitor driver, insert the CD-ROM included with the holes in the model list, then click the "OK" button. Driver installation is slightly different from the LCD monitor. 4. A. Turn off your monitor model in the rear cover mounting pad and...
User Manual (ENGLISH)
Page 22
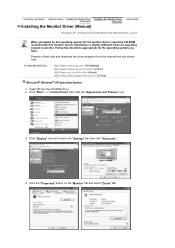
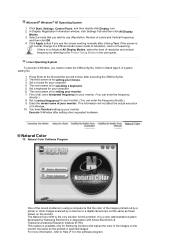
.../ (China) Microsoft® Windows® XP Operating System 1. Click "Display" icon and choose the "Settings" tab then click "Advanced..". 4. Click the "Properties" button on the "Monitor" tab and select "Driver" tab. Prepare a blank disk and download the driver program file at the Internet web site shown here. Insert CD into the CD-ROM driver. 2. Click "Start" -> "Control Panel" then click the "Appearance...
.../ (China) Microsoft® Windows® XP Operating System 1. Click "Display" icon and choose the "Settings" tab then click "Advanced..". 4. Click the "Properties" button on the "Monitor" tab and select "Driver" tab. Prepare a blank disk and download the driver program file at the Internet web site shown here. Insert CD into the CD-ROM driver. 2. Click "Start" -> "Control Panel" then click the "Appearance...
User Manual (ENGLISH)
Page 23
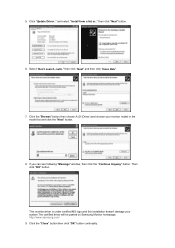
... model list and click the "Next" button. 8. and select "Install from a list or.." Click the "Browse" button then choose A:(D:\Driver) and choose your system.The certified driver will .." 5. then click "Next" button. 6. Select "Don't search ,I will be posted on Samsung Monitor homepage. then click "Next" and then click "Have disk". 7. http://www.samsung.com/ 9. If you can see following "Message" window...
... model list and click the "Next" button. 8. and select "Install from a list or.." Click the "Browse" button then choose A:(D:\Driver) and choose your system.The certified driver will .." 5. then click "Next" button. 6. Select "Don't search ,I will be posted on Samsung Monitor homepage. then click "Next" and then click "Have disk". 7. http://www.samsung.com/ 9. If you can see following "Message" window...
User Manual (ENGLISH)
Page 24
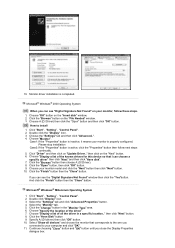
... choose the monitor that I can see "Digital Signature Not Found" on your monitor model and click the "Next" button then click "Next" button. 10. Specify A:\(D:\driver) then click "OK" button. 10. Microsoft® Windows® 2000 Operating System When you connected to install 1. Click the "Browse" button then choose A:(D:\Driver). 8. Click the "Finish" button then the "Close" button. Click "Start" , "Setting" , "Control Panel". 2. Case1: If the "Properties" button is inactive...
... choose the monitor that I can see "Digital Signature Not Found" on your monitor model and click the "Next" button then click "Next" button. 10. Specify A:\(D:\driver) then click "OK" button. 10. Microsoft® Windows® 2000 Operating System When you connected to install 1. Click the "Browse" button then choose A:(D:\Driver). 8. Click the "Finish" button then the "Close" button. Click "Start" , "Setting" , "Control Panel". 2. Case1: If the "Properties" button is inactive...
User Manual (ENGLISH)
Page 25
... images on the monitor the same as those shown on the monitor. Click Start, Settings, Control Panel, and then double-click Display icon. 2. In Display Registration Information window, click Settings Tab and then click All Display Modes. 3. Execute X-Window after executing the X86Config file. 2. Click Apply button if you need to make the X86Config file, which is not normal, change to the Preset Timing Modes in the software program. Set a vertical frequency for Samsung monitors...
... images on the monitor the same as those shown on the monitor. Click Start, Settings, Control Panel, and then double-click Display icon. 2. In Display Registration Information window, click Settings Tab and then click All Display Modes. 3. Execute X-Window after executing the X86Config file. 2. Click Apply button if you need to make the X86Config file, which is not normal, change to the Preset Timing Modes in the software program. Set a vertical frequency for Samsung monitors...

User Manual (ENGLISH)
Page 39
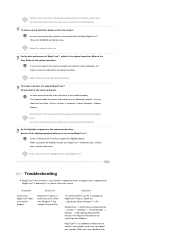
... easy to use program that goes through the tuning process with easy to understand instructions and back ground patterns designed for each user can be challenging. It is recommended using the Display Data Channel Command Interface (DDC/CI) protocol. Color Overview | Installation | OSD Mode | | Uninstall | Troubleshooting Calibration Overview What is a software utility that are controlled via software to eliminate the need to the display are best suited for...
... easy to use program that goes through the tuning process with easy to understand instructions and back ground patterns designed for each user can be challenging. It is recommended using the Display Data Channel Command Interface (DDC/CI) protocol. Color Overview | Installation | OSD Mode | | Uninstall | Troubleshooting Calibration Overview What is a software utility that are controlled via software to eliminate the need to the display are best suited for...
User Manual (ENGLISH)
Page 52
... have a problem with Window OS that supports Plug and Play. Visit the video card manufacturer's homepage and download and install the latest driver. Solutions * To check whether your PC is XP); Please install a new video card driver. You can access MagicTune™. Troubleshooting z MagicTune™ may not support your system. For the best performance of MagicTune™, adjust to the User Guide for the optimal resolution. MagicTune™ is an additional software for...
... have a problem with Window OS that supports Plug and Play. Visit the video card manufacturer's homepage and download and install the latest driver. Solutions * To check whether your PC is XP); Please install a new video card driver. You can access MagicTune™. Troubleshooting z MagicTune™ may not support your system. For the best performance of MagicTune™, adjust to the User Guide for the optimal resolution. MagicTune™ is an additional software for...
User Manual (ENGLISH)
Page 64
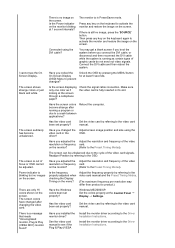
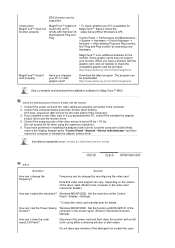
.... Is the screen displaying only one color as certain types of the video resolution or frequency card. Has the video card been set properly? The screen colors have changed the Adjust screen image position and size using the DVI cable? There is no image, press the 'SOURCE' button. Connected using the video card or the OSD. Check the signal cable connection. The screen suddenly has become strange after changing the video card. Have you installed the monitor driver? on the monitor? (Refer to the Driver Installation Instructions. The screen is still no image on the...
.... Is the screen displaying only one color as certain types of the video resolution or frequency card. Has the video card been set properly? The screen colors have changed the Adjust screen image position and size using the DVI cable? There is no image, press the 'SOURCE' button. Connected using the video card or the OSD. Check the signal cable connection. The screen suddenly has become strange after changing the video card. Have you installed the monitor driver? on the monitor? (Refer to the Driver Installation Instructions. The screen is still no image on the...
User Manual (ENGLISH)
Page 65
... 'Plug and Play monitor' by reconfiguring the video card. Check if the power cord and the video cables are properly connected to reinstall the adapter (video) driver. If problems repeatedly occur, contact an authorized service center. Have you assembled the PC, check if the installed the adapter (video) driver and the monitor driver. 4. How can vary, depending on PC (VGA) with a soft cloth, using the maximum resolution.) 5. Check if the scanning ratio of the driver used. (Refer to Windows/Computer Manual...
... 'Plug and Play monitor' by reconfiguring the video card. Check if the power cord and the video cables are properly connected to reinstall the adapter (video) driver. If problems repeatedly occur, contact an authorized service center. Have you assembled the PC, check if the installed the adapter (video) driver and the monitor driver. 4. How can vary, depending on PC (VGA) with a soft cloth, using the maximum resolution.) 5. Check if the scanning ratio of the driver used. (Refer to Windows/Computer Manual...
User Manual (ENGLISH)
Page 69
..., unless the user wishes to be bright sometimes or some of RED, GREEN, BLUE and WHITE color seem to select alternate settings. Use a software utility installed on your computer to change without uneasiness. The monitor automatically returns to normal operation when you can be seen. But the pixels of black pixels could be installed on the keyboard. In most cases, monitor installation will provide the best operating conditions and monitor settings. This...
..., unless the user wishes to be bright sometimes or some of RED, GREEN, BLUE and WHITE color seem to select alternate settings. Use a software utility installed on your computer to change without uneasiness. The monitor automatically returns to normal operation when you can be seen. But the pixels of black pixels could be installed on the keyboard. In most cases, monitor installation will provide the best operating conditions and monitor settings. This...
User Manual (ENGLISH)
Page 74
... shall not be the trademarks or registered trademarks of Samsung Electronics Co., Ltd. Reproduction in display screen that is appeared as window termination button is applied, you can use Fine/Coarse adjustment function. 5. If you may appear. VESA, DPMS and DDC are registered trademarks of Video Electronics Standard Association; { Resolution: 1680 X 1050 { Vertical frequency (refresh rate): 60 Hz 2. All rights reserved. As an ENERGY...
... shall not be the trademarks or registered trademarks of Samsung Electronics Co., Ltd. Reproduction in display screen that is appeared as window termination button is applied, you can use Fine/Coarse adjustment function. 5. If you may appear. VESA, DPMS and DDC are registered trademarks of Video Electronics Standard Association; { Resolution: 1680 X 1050 { Vertical frequency (refresh rate): 60 Hz 2. All rights reserved. As an ENERGY...
Service Manual
Page 3
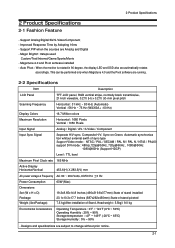
... Frequency Display Colors Maximum Resolution TFT-LCD panel, RGB vertical stripe, normally black transmissive, 21-Inch viewable, 0.270 (H) x 0.270 (V) mm pixel pitch Horizontal : 31 kHz ~ 80 kHz (Automatic) Vertical : 56 Hz ~ 75 Hz (WSXGA+ : 60 Hz) 16.7 Million colors Horizontal : 1680 Pixels Vertical : 1050 Pixels Input Signal Analog / Digital / AV / S-Video / Component Input Sync Signal Seperate H/V sync, Composite H/V, Sync-on-Green, Automatic synchroniza tion whitout external swith of sync type Support Video mode : NTSC / PAL / SECAM / PAL M / PAL N / NT43 / PAL60 support DVI mode...
... Frequency Display Colors Maximum Resolution TFT-LCD panel, RGB vertical stripe, normally black transmissive, 21-Inch viewable, 0.270 (H) x 0.270 (V) mm pixel pitch Horizontal : 31 kHz ~ 80 kHz (Automatic) Vertical : 56 Hz ~ 75 Hz (WSXGA+ : 60 Hz) 16.7 Million colors Horizontal : 1680 Pixels Vertical : 1050 Pixels Input Signal Analog / Digital / AV / S-Video / Component Input Sync Signal Seperate H/V sync, Composite H/V, Sync-on-Green, Automatic synchroniza tion whitout external swith of sync type Support Video mode : NTSC / PAL / SECAM / PAL M / PAL N / NT43 / PAL60 support DVI mode...
Service Manual
Page 7
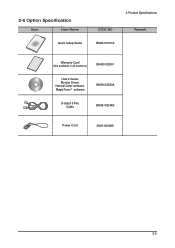
2-6 Option Specification Item Item Name Quick Setup Guide 2 Product Specifications CODE.NO BN96-03197A Remark Warranty Card (Not available in all locations) BH68-00261F User's Guide, Monitor Driver, Natural Color software, MagicTune™ software BN59-00520A D-Sub(15 Pin) Cable BN39-00244B Power Cord 3903-000085 2-5
2-6 Option Specification Item Item Name Quick Setup Guide 2 Product Specifications CODE.NO BN96-03197A Remark Warranty Card (Not available in all locations) BH68-00261F User's Guide, Monitor Driver, Natural Color software, MagicTune™ software BN59-00520A D-Sub(15 Pin) Cable BN39-00244B Power Cord 3903-000085 2-5
Service Manual
Page 17
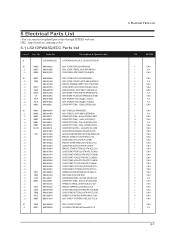
URL : http://itself.sec.samsung.co.kr/ 6-1 LS21DPWASQ/EDC Parts list Level Loc. Description & Specification 0 LS21DPWASQ/EDC 215TW,WSA1/S21A2-LDP,21,LCD-MO,NETHERLAN 0.1 M0002 BN90-00823S ..2 M0013 BN96-03390A ...3 M0006 BN63-02470A ASSY COVER REAR;LS21DPWAB/XAA ASSY COVER P-REAR;LS21DP,HIPS HB BK24 COVER-REAR;LS215TW,HIPS,T2.3,HB,BK24 0.1 M0001 BN90-00898A ..2 T0003 BN96-03194B ...3 BN61...
URL : http://itself.sec.samsung.co.kr/ 6-1 LS21DPWASQ/EDC Parts list Level Loc. Description & Specification 0 LS21DPWASQ/EDC 215TW,WSA1/S21A2-LDP,21,LCD-MO,NETHERLAN 0.1 M0002 BN90-00823S ..2 M0013 BN96-03390A ...3 M0006 BN63-02470A ASSY COVER REAR;LS21DPWAB/XAA ASSY COVER P-REAR;LS21DP,HIPS HB BK24 COVER-REAR;LS215TW,HIPS,T2.3,HB,BK24 0.1 M0001 BN90-00898A ..2 T0003 BN96-03194B ...3 BN61...
Service Manual
Page 31
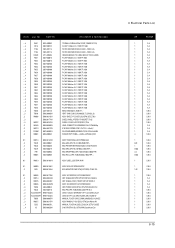
... CBF SIGNAL-DVI(D);1703FP,24P/24P,20276-D ASSY ACCESSORY;LS21DPWASQ/EDC CBF-POWER CORD;DT,EU,FP3/YES,IEC320 C13/ BAG PE;LDPE,T0.05,W250,L400,TRP,28,2 CARD-12,BLOC WARRANTY;TFT LCD,BASIC,EU,M CARD-01;TFT LCD,SRC,RUSSIA,S/W,120,W210* MANUAL FLYER-CARD;COMM,SAMSUNG,18 LANG,E ASSY MANUAL P-IB+QSG;215TW,SyncMaster,W/ MANUAL FLYER-04,QSG;LCDQUICK SETUP GUIDE S/W DRIVER-01,IB;215TW,W/W,SyncMaster,Do 6 Electrical Parts...
... CBF SIGNAL-DVI(D);1703FP,24P/24P,20276-D ASSY ACCESSORY;LS21DPWASQ/EDC CBF-POWER CORD;DT,EU,FP3/YES,IEC320 C13/ BAG PE;LDPE,T0.05,W250,L400,TRP,28,2 CARD-12,BLOC WARRANTY;TFT LCD,BASIC,EU,M CARD-01;TFT LCD,SRC,RUSSIA,S/W,120,W210* MANUAL FLYER-CARD;COMM,SAMSUNG,18 LANG,E ASSY MANUAL P-IB+QSG;215TW,SyncMaster,W/ MANUAL FLYER-04,QSG;LCDQUICK SETUP GUIDE S/W DRIVER-01,IB;215TW,W/W,SyncMaster,Do 6 Electrical Parts...
Service Manual
Page 54
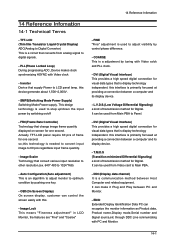
... used to Panel. - SMPS(Switching Mode Power Supply) Switching Mode Power supply. FINE "Fine" adjustment is a adjustment by control phase difference. - COARSE This is used from analog signal to Main PBA. - It can recognize the monitor information as Product data, Product name,Display mode,Serial number and Signal source,etc through DDC Line communicating with Video clock - It can be used to 60 pcs regardless input frame quantity. - DDC(Display data channel) It is needed to convert input image to adjust...
... used to Panel. - SMPS(Switching Mode Power Supply) Switching Mode Power supply. FINE "Fine" adjustment is a adjustment by control phase difference. - COARSE This is used from analog signal to Main PBA. - It can recognize the monitor information as Product data, Product name,Display mode,Serial number and Signal source,etc through DDC Line communicating with Video clock - It can be used to 60 pcs regardless input frame quantity. - DDC(Display data channel) It is needed to convert input image to adjust...
Service Manual
Page 58
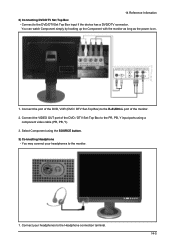
... connector. Select Component using a component video cable (PR, PB, Y). 3. You may connect your headphones to the Headphone connection terminal. 14-5 Connect to the PR, PB, Y input ports using the SOURCE button. 3) Connecting Headphone - Connect your headphones to the R-AUDIO-L port of the DVD, VCR (DVD / DTV Set-Top Box) to the monitor. 1. 14 Reference Infomation 2) Connecting DVD/DTV Set Top Box - Connect the port of the monitor. 2. You can watch Component simply by hooking...
... connector. Select Component using a component video cable (PR, PB, Y). 3. You may connect your headphones to the Headphone connection terminal. 14-5 Connect to the PR, PB, Y input ports using the SOURCE button. 3) Connecting Headphone - Connect your headphones to the R-AUDIO-L port of the DVD, VCR (DVD / DTV Set-Top Box) to the monitor. 1. 14 Reference Infomation 2) Connecting DVD/DTV Set Top Box - Connect the port of the monitor. 2. You can watch Component simply by hooking...


