

User Manual (ENGLISH)
Page 6
Make sure that the ventilating opening is broken, turn the power off and disconnect the power cord. icines as well as matches or paper, inside the product (through the ventilating openings, input and output ... while only holding the power cord or signal cables. • Otherwise, it may result in electric shock or fire. Do not lift or move the monitor by a table or curtain. • Otherwise, it may result in fire due to the cable. Do not use a moving screen saver. Safety Instructions When you...
Make sure that the ventilating opening is broken, turn the power off and disconnect the power cord. icines as well as matches or paper, inside the product (through the ventilating openings, input and output ... while only holding the power cord or signal cables. • Otherwise, it may result in electric shock or fire. Do not lift or move the monitor by a table or curtain. • Otherwise, it may result in fire due to the cable. Do not use a moving screen saver. Safety Instructions When you...
User Manual (ENGLISH)
Page 7
...cause personal injury and/or damage the product. • If you continually move closer to the product screen, your eyesight may be failing. Do not turn the power off and disconnect the power plug, antenna cable, and all the cables connected to the product. • Otherwise, it may result in ...; Otherwise, this may result in personal injury or death. To ease eye strain, take at least a five-minute break after every hour of using the monitor. Safety Instructions If you use the product for a long period of time, disconnect the power cord from the power outlet. • Otherwise, this may ...
...cause personal injury and/or damage the product. • If you continually move closer to the product screen, your eyesight may be failing. Do not turn the power off and disconnect the power plug, antenna cable, and all the cables connected to the product. • Otherwise, it may result in ...; Otherwise, this may result in personal injury or death. To ease eye strain, take at least a five-minute break after every hour of using the monitor. Safety Instructions If you use the product for a long period of time, disconnect the power cord from the power outlet. • Otherwise, this may ...

User Manual (ENGLISH)
Page 8
... hand or fingers may fall and result in electric shock or fire. If the product has been turned on the product. • This may fall and cause personal injury. Good Postures When Using the Monitor When using the product, use it . • Keep the small accessories in a location out of the reach...
... hand or fingers may fall and result in electric shock or fire. If the product has been turned on the product. • This may fall and cause personal injury. Good Postures When Using the Monitor When using the product, use it . • Keep the small accessories in a location out of the reach...
User Manual (ENGLISH)
Page 11
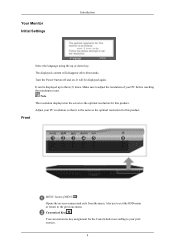
... same as the optimal resolution for this product. MENU button [MENU/ ] Opens the on . Turn the Power button off and on -screen menu and exits from the menu. Customized Key[ ] You can be displayed again. Your Monitor Initial Settings Introduction Front Select the language using the up to adjust the resolution of...
... same as the optimal resolution for this product. MENU button [MENU/ ] Opens the on . Turn the Power button off and on -screen menu and exits from the menu. Customized Key[ ] You can be displayed again. Your Monitor Initial Settings Introduction Front Select the language using the up to adjust the resolution of...

User Manual (ENGLISH)
Page 12
... adjust items in the upper left of the product may vary from product to product. Introduction Rear Note You can configure the customized key for turning the product on the screen, push the button to adjust brightness. >> Click here to see an animation clip Adjust buttons [ ] These buttons allow... you must connect your monitor to the graphic card's DVI port using the DVI cable. >> Click here to see an animation clip AUTO button Use this button for auto adjustment...
... adjust items in the upper left of the product may vary from product to product. Introduction Rear Note You can configure the customized key for turning the product on the screen, push the button to adjust brightness. >> Click here to see an animation clip Adjust buttons [ ] These buttons allow... you must connect your monitor to the graphic card's DVI port using the DVI cable. >> Click here to see an animation clip AUTO button Use this button for auto adjustment...
User Manual (ENGLISH)
Page 14
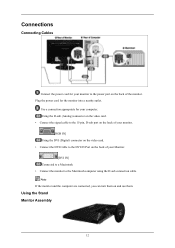
... the computer are connected, you can turn them on and use them. Using the D-sub (Analog) connector on the video card. • Connect the signal cable to the 15-pin, D-sub port on the back of your monitor. [RGB IN] Using the DVI (Digital) connector on the video card. • ...Connect the DVI Cable to the DVI IN Port on the back of the monitor. Using the Stand Monitor Assembly 12 Use a connection appropriate for your Monitor. [DVI IN] Connected to a Macintosh. • Connect the monitor to the Macintosh computer using the D-sub connection cable. Plug the power cord for the...
... the computer are connected, you can turn them on and use them. Using the D-sub (Analog) connector on the video card. • Connect the signal cable to the 15-pin, D-sub port on the back of your monitor. [RGB IN] Using the DVI (Digital) connector on the video card. • ...Connect the DVI Cable to the DVI IN Port on the back of the monitor. Using the Stand Monitor Assembly 12 Use a connection appropriate for your Monitor. [DVI IN] Connected to a Macintosh. • Connect the monitor to the Macintosh computer using the D-sub connection cable. Plug the power cord for the...

User Manual (ENGLISH)
Page 15
...surface with the VESA standard screw specifications. Connections Monitor and Bottom Attaching a Base This monitor accepts a 100 mm x 100 mm VESA-compliant mounting interface pad. Mounting interface pad (Sold separately) 1. A. Turn off your monitor and unplug its power cord. 2. Monitor B. Remove the stand. 4. Do not fasten...leading to protect the screen. 3. Samsung Electronics will not be responsible for more information. Align the mounting interface pad with the holes in the rear cover mounting pad and secure it to personal injury. Lay the LCD monitor face-down on a wall, you...
...surface with the VESA standard screw specifications. Connections Monitor and Bottom Attaching a Base This monitor accepts a 100 mm x 100 mm VESA-compliant mounting interface pad. Mounting interface pad (Sold separately) 1. A. Turn off your monitor and unplug its power cord. 2. Monitor B. Remove the stand. 4. Do not fasten...leading to protect the screen. 3. Samsung Electronics will not be responsible for more information. Align the mounting interface pad with the holes in the rear cover mounting pad and secure it to personal injury. Lay the LCD monitor face-down on a wall, you...
User Manual (ENGLISH)
Page 43
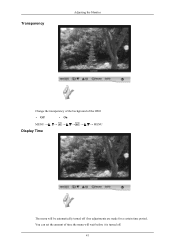
You can set the amount of the OSD. • Off • On MENU MENU Display Time The menu will wait before it is turned off if no adjustments are made for a certain time period. Transparency Adjusting the Monitor Change the transparency of the background of time the menu will be automatically turned off . 41
You can set the amount of the OSD. • Off • On MENU MENU Display Time The menu will wait before it is turned off if no adjustments are made for a certain time period. Transparency Adjusting the Monitor Change the transparency of the background of time the menu will be automatically turned off . 41

User Manual (ENGLISH)
Page 45
Customized Key Adjusting the Monitor You can specify a function which will turn off automatically at the specified time. • Off • On 43 The monitors will be activated when the Customized Key ( MENU MENU Off Timer ) is pressed.
Customized Key Adjusting the Monitor You can specify a function which will turn off automatically at the specified time. • Off • On 43 The monitors will be activated when the Customized Key ( MENU MENU Off Timer ) is pressed.

User Manual (ENGLISH)
Page 49
... check whether your video controller and computer system; Self-Test Feature Check 1. Turn off both your monitor is out of scan range or that are any sub woofer speakers near the monitor, unplug and relocate the woofer to become blank, have poor coloring, become ...properly, you to check the signal cable. Useful Tips A monitor recreates visual signals received from the back of the monitor may indicate that the monitor is functioning properly. Turn on the monitor. Troubleshooting Self-Test Feature Check Note Your monitor provides a self test feature that allows you will see a...
... check whether your video controller and computer system; Self-Test Feature Check 1. Turn off both your monitor is out of scan range or that are any sub woofer speakers near the monitor, unplug and relocate the woofer to become blank, have poor coloring, become ...properly, you to check the signal cable. Useful Tips A monitor recreates visual signals received from the back of the monitor may indicate that the monitor is functioning properly. Turn on the monitor. Troubleshooting Self-Test Feature Check Note Your monitor provides a self test feature that allows you will see a...

User Manual (ENGLISH)
Page 50
...(the login screen), which can see "Not Optimum Mode", "Recommended Mode 1680 x 1050 60 Hz" on the screen. If you still see if the monitor status is connected properly, check to analog. A: (Connected using the D-sub cable) Check the signal cable connection. (Connected using the DVI cable) If ...Windows ME/XP/2000) and then change the frequency of the problem, and then contact the Service Center or your dealer. Judging the monitor's working condition. I cannot turn on the screen? Q: Can you can handle properly. If you still see an (error) message on the screen or if the screen...
...(the login screen), which can see "Not Optimum Mode", "Recommended Mode 1680 x 1050 60 Hz" on the screen. If you still see if the monitor status is connected properly, check to analog. A: (Connected using the D-sub cable) Check the signal cable connection. (Connected using the DVI cable) If ...Windows ME/XP/2000) and then change the frequency of the problem, and then contact the Service Center or your dealer. Judging the monitor's working condition. I cannot turn on the screen? Q: Can you can handle properly. If you still see an (error) message on the screen or if the screen...

User Manual (ENGLISH)
Page 56
... millionth) above are used for energy efficiency. 54 For energy conservation, turn your monitor OFF when it is not needed, or when leaving it unattended for residential... Class A equipment.) PowerSaver This monitor has a built-in power management system called PowerSaver. As an ENERGY STAR® Partner, SAMSUNG has determined that this product meets...°F ~ 113 °F (-20 °C ~ 45 °C) Humidity : 5 % ~ 95 %, non-condensing Plug and Play Capability This monitor can be seen. Dot Acceptable TFT-LCD panels manufactured by switching your monitor to low-power mode when it without...
... millionth) above are used for energy efficiency. 54 For energy conservation, turn your monitor OFF when it is not needed, or when leaving it unattended for residential... Class A equipment.) PowerSaver This monitor has a built-in power management system called PowerSaver. As an ENERGY STAR® Partner, SAMSUNG has determined that this product meets...°F ~ 113 °F (-20 °C ~ 45 °C) Humidity : 5 % ~ 95 %, non-condensing Plug and Play Capability This monitor can be seen. Dot Acceptable TFT-LCD panels manufactured by switching your monitor to low-power mode when it without...

User Manual (ENGLISH)
Page 59
... : Display Information for 1 minute. All display products, including LCD, are subject to a new video image. Power Off, Screen Saver, or Power Save Mode Ex) • Turn the power off when using a stationary pattern. • Turn the power off for 4 hours after 20 hours in luminance • Change the characters color and background...or a moving image for 1 hour followed by a Display Logo or moving image is not a product defect. This is recommended. • Set the Monitor to protect your LCD from image retention. Change the Color Information periodically (Use 2 different colors).
... : Display Information for 1 minute. All display products, including LCD, are subject to a new video image. Power Off, Screen Saver, or Power Save Mode Ex) • Turn the power off when using a stationary pattern. • Turn the power off for 4 hours after 20 hours in luminance • Change the characters color and background...or a moving image for 1 hour followed by a Display Logo or moving image is not a product defect. This is recommended. • Set the Monitor to protect your LCD from image retention. Change the Color Information periodically (Use 2 different colors).
User Manual (ENGLISH)
Page 64
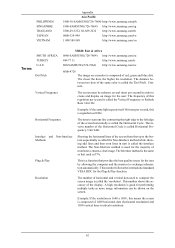
... of red, green and blue dots. Unit: Hz Example: If the same light repeats itself 60 times per second in turn is composed of monitors to exchange information automatically. The Non-Interlace method is a function that used in TVs. Plug & Play This is used ...VIETNAM SOUTH AFRICA TURKEY US.OAU.ETH AFRICA TURKEY U.A.E Dot Pitch Appendix Asia Pacific 1800-10-SAMSAUsiNaGP(a7c2i6fi-c7864) http://www.samsung.com/ph 01880000--3S2A9M-99S9UNG(726-7864) hhttttpp::////wwwwww..ssaammssuunngg..ccoomm//tswg 11880000-52898-3828392, 02-689-3232 hhttttpp::////wwwwww..ssaammssuunngg.....
... of red, green and blue dots. Unit: Hz Example: If the same light repeats itself 60 times per second in turn is composed of monitors to exchange information automatically. The Non-Interlace method is a function that used in TVs. Plug & Play This is used ...VIETNAM SOUTH AFRICA TURKEY US.OAU.ETH AFRICA TURKEY U.A.E Dot Pitch Appendix Asia Pacific 1800-10-SAMSAUsiNaGP(a7c2i6fi-c7864) http://www.samsung.com/ph 01880000--3S2A9M-99S9UNG(726-7864) hhttttpp::////wwwwww..ssaammssuunngg..ccoomm//tswg 11880000-52898-3828392, 02-689-3232 hhttttpp::////wwwwww..ssaammssuunngg.....

Quick Guide (ENGLISH)
Page 3
Your Monitor Initial Settings Introduction Front Select the language using the up to your preferences. 9 Turn the Power button off and on -screen menu and exits from the menu. It can customize key assignment for the Custom button according to three (3) ...
Your Monitor Initial Settings Introduction Front Select the language using the up to your preferences. 9 Turn the Power button off and on -screen menu and exits from the menu. It can customize key assignment for the Custom button according to three (3) ...

Quick Guide (ENGLISH)
Page 4
... the screen, push the button to adjust brightness. >> Click here to see an animation clip Adjust buttons [ ] These buttons allow you must connect your monitor to the graphic card's DVI port using the DVI cable. >> Click here to see an animation clip AUTO button Use this button for auto adjustment... > Customized Key. analog or digital input signal.) Note If you select the digital mode, you to adjust items in the upper left of the monitor may vary from product to change the input mode, a message appears in the menu. POWER port 10 Introduction Rear Note You can configure the customized...
... the screen, push the button to adjust brightness. >> Click here to see an animation clip Adjust buttons [ ] These buttons allow you must connect your monitor to the graphic card's DVI port using the DVI cable. >> Click here to see an animation clip AUTO button Use this button for auto adjustment... > Customized Key. analog or digital input signal.) Note If you select the digital mode, you to adjust items in the upper left of the monitor may vary from product to change the input mode, a message appears in the menu. POWER port 10 Introduction Rear Note You can configure the customized...

Quick Guide (ENGLISH)
Page 6
Note If the monitor and the computer are connected, you can turn them on the back of the monitor. Plug the power cord for your computer. Using the Stand Monitor Assembly 12 Using the D-sub (Analog) connector on the video card. • Connect the signal cable to the 15-pin, D-sub port on the ...back of your monitor. [RGB IN] ...
Note If the monitor and the computer are connected, you can turn them on the back of the monitor. Plug the power cord for your computer. Using the Stand Monitor Assembly 12 Using the D-sub (Analog) connector on the video card. • Connect the signal cable to the 15-pin, D-sub port on the ...back of your monitor. [RGB IN] ...

Quick Guide (ENGLISH)
Page 7
...injury. Connections Monitor and Bottom Attaching a Base This monitor accepts a 100 mm x 100 mm VESA-compliant mounting interface pad. Samsung Electronics will not be responsible for more information. Turn off your monitor and unplug its power cord. 2. Remove the stand. 4. Lay the LCD monitor face-down ...on a wall, you to mount the monitor at least 10 cm away from the...
...injury. Connections Monitor and Bottom Attaching a Base This monitor accepts a 100 mm x 100 mm VESA-compliant mounting interface pad. Samsung Electronics will not be responsible for more information. Turn off your monitor and unplug its power cord. 2. Remove the stand. 4. Lay the LCD monitor face-down ...on a wall, you to mount the monitor at least 10 cm away from the...

Quick Guide (ENGLISH)
Page 8
... are any sub woofer speakers near the monitor, unplug and relocate the woofer to check whether your computer and the monitor. Turn off both your monitor is functioning properly. Useful Tips A monitor recreates visual signals received from the back of the monitor. The message may influence the quality and... the power indicator LED is out of the monitor. Unplug the video cable from the computer. then turn on the monitor. If the monitor is something wrong with the computer or the video card, this can cause the monitor to check the signal cable. Warning Messages If...
... are any sub woofer speakers near the monitor, unplug and relocate the woofer to check whether your computer and the monitor. Turn off both your monitor is functioning properly. Useful Tips A monitor recreates visual signals received from the back of the monitor. The message may influence the quality and... the power indicator LED is out of the monitor. Unplug the video cable from the computer. then turn on the monitor. If the monitor is something wrong with the computer or the video card, this can cause the monitor to check the signal cable. Warning Messages If...

Quick Guide (ENGLISH)
Page 9
...power is in the applicable mode (the safe mode for trouble. Q: Can you still see an (error) message on the screen when the monitor is connected properly, check to the Preset Timing Modes) If the initial screen (the login screen) does not appear, contact the Service Center or... section or contact your dealer. In this message when the signal from the computer while the monitor is set to have the monitor double-check the input signal source. I cannot turn on the screen. Judging the monitor's working condition. Press ' /SOURCE' button to analog. If there is a message coming ...
...power is in the applicable mode (the safe mode for trouble. Q: Can you still see an (error) message on the screen when the monitor is connected properly, check to the Preset Timing Modes) If the initial screen (the login screen) does not appear, contact the Service Center or... section or contact your dealer. In this message when the signal from the computer while the monitor is set to have the monitor double-check the input signal source. I cannot turn on the screen. Judging the monitor's working condition. Press ' /SOURCE' button to analog. If there is a message coming ...


