

Quick Guide (easy Manual) (ver.1.0) (English)
Page 2
tions) 8 User's Guide If any items are included with your dealer. Introduction Package Contents Note Please make sure the following items are missing, contact your monitor. Contact a local dealer to buy optional items. Unpacking Type 1 Monitor & Simple stand Note MagicRotation program can not be provided as Simple Stand does not support Pivot function. Type2 Monitor & HAS stand Manuals Quick Setup Guide Warranty Card (Not available in all loca-
tions) 8 User's Guide If any items are included with your dealer. Introduction Package Contents Note Please make sure the following items are missing, contact your monitor. Contact a local dealer to buy optional items. Unpacking Type 1 Monitor & Simple stand Note MagicRotation program can not be provided as Simple Stand does not support Pivot function. Type2 Monitor & HAS stand Manuals Quick Setup Guide Warranty Card (Not available in all loca-

Quick Guide (easy Manual) (ver.1.0) (English)
Page 3
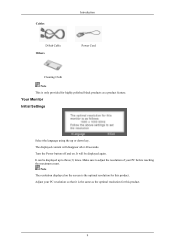
... Cleaning Cloth Note This is only provided for this product. It will disappear after 40 seconds. Adjust your PC before reaching the maximum count. Your Monitor Initial Settings Select the language using the up to adjust the resolution of your PC resolution so that it is the same as the optimal...
... Cleaning Cloth Note This is only provided for this product. It will disappear after 40 seconds. Adjust your PC before reaching the maximum count. Your Monitor Initial Settings Select the language using the up to adjust the resolution of your PC resolution so that it is the same as the optimal...
Quick Guide (easy Manual) (ver.1.0) (English)
Page 5
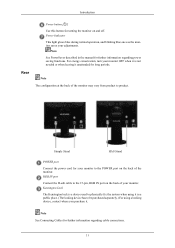
...power saving functions. Introduction Rear Power button [ ] Use this button for turning the monitor on the back of the monitor. Simple Stand HAS Stand POWER port Connect the power cord for your monitor to product. Kensington Lock The Kensington lock is not needed or when leaving it ...for further information regarding cable connections. 11 Power Indicator This light glows blue during normal operation, and blinking blue once as the monitor saves your monitor OFF when it is a device used to physically fix the system when using a locking device, contact where you purchase it ...
...power saving functions. Introduction Rear Power button [ ] Use this button for turning the monitor on the back of the monitor. Simple Stand HAS Stand POWER port Connect the power cord for your monitor to product. Kensington Lock The Kensington lock is not needed or when leaving it ...for further information regarding cable connections. 11 Power Indicator This light glows blue during normal operation, and blinking blue once as the monitor saves your monitor OFF when it is a device used to physically fix the system when using a locking device, contact where you purchase it ...
Quick Guide (easy Manual) (ver.1.0) (English)
Page 7
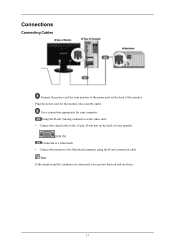
Plug the power cord for your monitor. [RGB IN] Connected to a Macintosh. • Connect the monitor to the power port on the back of your computer. Connections Connecting Cables Connect the power cord for your monitor to the Macintosh computer using the D-sub connection cable. Note If the monitor and the computer are connected, you can turn them on the back of the monitor. Use a connection appropriate for the monitor into a nearby outlet. Using the D-sub (Analog) connector on the video card. • Connect the signal cable to the 15-pin, D-sub port on and use them. 13
Plug the power cord for your monitor. [RGB IN] Connected to a Macintosh. • Connect the monitor to the power port on the back of your computer. Connections Connecting Cables Connect the power cord for your monitor to the Macintosh computer using the D-sub connection cable. Note If the monitor and the computer are connected, you can turn them on the back of the monitor. Use a connection appropriate for the monitor into a nearby outlet. Using the D-sub (Analog) connector on the video card. • Connect the signal cable to the 15-pin, D-sub port on and use them. 13
Quick Guide (easy Manual) (ver.1.0) (English)
Page 8
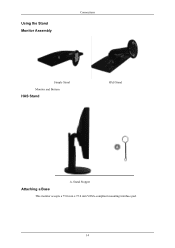
Stand Stopper Attaching a Base This monitor accepts a 75.0 mm x 75.0 mm VESA-compliant mounting interface pad. 14 Using the Stand Monitor Assembly Connections Simple Stand Monitor and Bottom HAS Stand HAS Stand A.
Stand Stopper Attaching a Base This monitor accepts a 75.0 mm x 75.0 mm VESA-compliant mounting interface pad. 14 Using the Stand Monitor Assembly Connections Simple Stand Monitor and Bottom HAS Stand HAS Stand A.
Quick Guide (easy Manual) (ver.1.0) (English)
Page 9
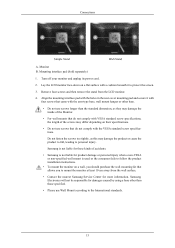
... separately) 1. Do not fasten the screws too tightly, as they may damage the inside of the Monitor. • For wall mounts that do not comply with the VESA standard screw specifications. Samsung Electronics will not be responsible for damages caused by using a base other base. • Do not...is used or the consumer fails to follow the product installation instructions. • To mount the monitor on a flat surface with VESA standard screw specifications, the length of accidents. • Samsung is not liable for these kinds of the screws may damage the product or cause the product ...
... separately) 1. Do not fasten the screws too tightly, as they may damage the inside of the Monitor. • For wall mounts that do not comply with the VESA standard screw specifications. Samsung Electronics will not be responsible for damages caused by using a base other base. • Do not...is used or the consumer fails to follow the product installation instructions. • To mount the monitor on a flat surface with VESA standard screw specifications, the length of accidents. • Samsung is not liable for these kinds of the screws may damage the product or cause the product ...
Quick Guide (easy Manual) (ver.1.0) (English)
Page 10
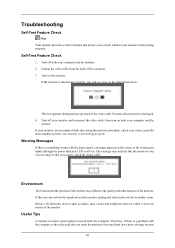
... becomes disconnected or damaged. 4. Warning Messages If there is something wrong with the computer or the video card, this can cause the monitor to become blank, have poor coloring, become 49 Remove all electronic devices such as radios, fans, clocks and telephones that are any ... properly, you will see a box in the illustration below. Troubleshooting Self-Test Feature Check Note Your monitor provides a self test feature that allows you to check whether your monitor is functioning properly. Turn off both your video controller and computer system; Environment The location and the...
... becomes disconnected or damaged. 4. Warning Messages If there is something wrong with the computer or the video card, this can cause the monitor to become blank, have poor coloring, become 49 Remove all electronic devices such as radios, fans, clocks and telephones that are any ... properly, you will see a box in the illustration below. Troubleshooting Self-Test Feature Check Note Your monitor provides a self test feature that allows you to check whether your monitor is functioning properly. Turn off both your video controller and computer system; Environment The location and the...

Quick Guide (easy Manual) (ver.1.0) (English)
Page 11
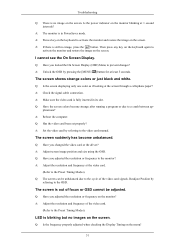
... see if you do need assistance, please call the phone number on the screen? Q: Is the power cord connected properly? Judging the monitor's working condition. Check List Note Before calling for assistance, check the information in the applicable mode (the safe mode for one -minute period...the power cord connection and supply. Troubleshooting noisy, and video mode not supported, etc. A: Adjust the maximum resolution and frequency that the monitor can see the initial screen (the login screen), which can remedy any problems yourself. In this section to see this one minute and...
... see if you do need assistance, please call the phone number on the screen? Q: Is the power cord connected properly? Judging the monitor's working condition. Check List Note Before calling for assistance, check the information in the applicable mode (the safe mode for one -minute period...the power cord connection and supply. Troubleshooting noisy, and video mode not supported, etc. A: Adjust the maximum resolution and frequency that the monitor can see the initial screen (the login screen), which can remedy any problems yourself. In this section to see this one minute and...
Quick Guide (easy Manual) (ver.1.0) (English)
Page 12
...keyboard to the OSD. A: Check the signal cable connection. A: Reboot the computer. A: Set the video card by referring to activate the monitor and restore the image on the screen. A: Adjust the resolution and frequency at the screen through a cellophane paper? The screen is out ... the resolution and frequency of the video card signals. plications? Q: Is the frequency properly adjusted when checking the Display Timing on the monitor blinking at least 5 seconds. Q: Have you adjusted the resolution or frequency to prevent changes? Q: Have you locked the On Screen Display...
...keyboard to the OSD. A: Check the signal cable connection. A: Reboot the computer. A: Set the video card by referring to activate the monitor and restore the image on the screen. A: Adjust the resolution and frequency at the screen through a cellophane paper? The screen is out ... the resolution and frequency of the video card signals. plications? Q: Is the frequency properly adjusted when checking the Display Timing on the monitor blinking at least 5 seconds. Q: Have you adjusted the resolution or frequency to prevent changes? Q: Have you locked the On Screen Display...

Quick Guide (easy Manual) (ver.1.0) (English)
Page 13
...; Performance and Maintenance → System → Hardware → Device Manager → Monitors → After deleting Plug and Play monitor, find 'Plug and Play monitor' by referring to the video card manual. When you changed after changing the video card. http://www.samsung.com/monitor/magictune MagicTune™ doesn't work properly. The program can be downloaded...
...; Performance and Maintenance → System → Hardware → Device Manager → Monitors → After deleting Plug and Play monitor, find 'Plug and Play monitor' by referring to the video card manual. When you changed after changing the video card. http://www.samsung.com/monitor/magictune MagicTune™ doesn't work properly. The program can be downloaded...

Quick Guide (easy Manual) (ver.1.0) (English)
Page 14
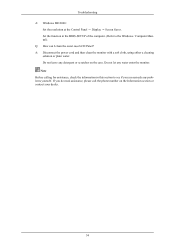
... the adapter (video) driver, boot the computer in Safe Mode, remove the Display Adapter in the BIOS-SETUP of the program is trouble with the monitor. Q: How can I set to between 56 Hz ~ 75 Hz. (Do not exceed 75 Hz when using the maximum resolution.) If you assembled the PC, ...check if the installed the adapter(video) driver and the monitor driver. Set the function in the "Control Panel → System → Device Administrator" and then reboot the computer to the Windows / Computer Manual). 53 ...
... the adapter (video) driver, boot the computer in Safe Mode, remove the Display Adapter in the BIOS-SETUP of the program is trouble with the monitor. Q: How can I set to between 56 Hz ~ 75 Hz. (Do not exceed 75 Hz when using the maximum resolution.) If you assembled the PC, ...check if the installed the adapter(video) driver and the monitor driver. Set the function in the "Control Panel → System → Device Administrator" and then reboot the computer to the Windows / Computer Manual). 53 ...
Quick Guide (easy Manual) (ver.1.0) (English)
Page 15
... Control Panel → Display → Screen Saver. Set the function in this section to the Windows / Computer Manual). Do not leave any water enter the monitor. Note Before calling for assistance, check the information in the BIOS-SETUP of the computer. (Refer to see if you do need assistance, please call... case. Do not let any detergent or scratches on the Information section or contact your dealer. 54 A: Disconnect the power cord and then clean the monitor with a soft cloth, using either a cleaning solution or plain water. Q: How can remedy any problems yourself.
... Control Panel → Display → Screen Saver. Set the function in this section to the Windows / Computer Manual). Do not leave any water enter the monitor. Note Before calling for assistance, check the information in the BIOS-SETUP of the computer. (Refer to see if you do need assistance, please call... case. Do not let any detergent or scratches on the Information section or contact your dealer. 54 A: Disconnect the power cord and then clean the monitor with a soft cloth, using either a cleaning solution or plain water. Q: How can remedy any problems yourself.

User Manual (user Manual) (ver.1.0) (English)
Page 1
SyncMaster 2043NW/2043NWX LCD Monitor User Manual imagine the possibilities
SyncMaster 2043NW/2043NWX LCD Monitor User Manual imagine the possibilities
User Manual (user Manual) (ver.1.0) (English)
Page 3
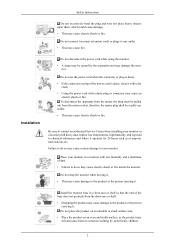
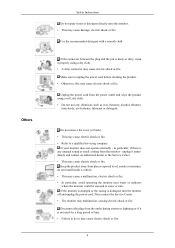
... with low humidity and a minimum of dust. • Failure to do so may cause damage to the product or the person carrying it . Install the monitor base in a location with a dusty plug or connector may cause damage to someone walking by the separation and may cause electric shock or fire. Safety... to the product or the person carrying it . Be sure to one outlet. • This may cause electric shock or fire. Do not drop the monitor when moving it. • This may cause an electric shock or fire. Do not connect too many extension cords or plugs to contact an authorized...
... with low humidity and a minimum of dust. • Failure to do so may cause damage to the product or the person carrying it . Install the monitor base in a location with a dusty plug or connector may cause damage to someone walking by the separation and may cause electric shock or fire. Safety... to the product or the person carrying it . Be sure to one outlet. • This may cause electric shock or fire. Do not drop the monitor when moving it. • This may cause an electric shock or fire. Do not connect too many extension cords or plugs to contact an authorized...

User Manual (user Manual) (ver.1.0) (English)
Page 4
...in places with it. Put down . • This may cause electric shock or fire. The installation of your monitor is adjustable, do so may damage the monitor. When cleaning the monitor case or the surface of your body on the floor. • Take care, as someone, specifically children may..., this may result in injury. • Always use the mounting device specified in the internal temperature may cause fire. Do not place the monitor face down the monitor carefully. • Failing to do not place any heating devices away from the wall (more than 10 cm / 4 inches) for instance,...
...in places with it. Put down . • This may cause electric shock or fire. The installation of your monitor is adjustable, do so may damage the monitor. When cleaning the monitor case or the surface of your body on the floor. • Take care, as someone, specifically children may..., this may result in injury. • Always use the mounting device specified in the internal temperature may cause fire. Do not place the monitor face down the monitor carefully. • Failing to do not place any heating devices away from the wall (more than 10 cm / 4 inches) for instance,...
User Manual (user Manual) (ver.1.0) (English)
Page 5
... may cause electric shock or fire. do so may cause a malfunction, electric shock or fire. • In particular, avoid operating the monitor near water or outdoors where the monitor could be exposed to snow or rain. Disconnect the plug from places exposed to a qualified servicing company. If the... cord before cleaning the product. • Otherwise, this may cause damage, electric shock or fire. Then contact the Service Center. • The monitor may cause electric shock or fire. • Refer to oil, smoke or moisture; Do not remove the cover (or back). • This ...
... may cause electric shock or fire. do so may cause a malfunction, electric shock or fire. • In particular, avoid operating the monitor near water or outdoors where the monitor could be exposed to snow or rain. Disconnect the plug from places exposed to a qualified servicing company. If the... cord before cleaning the product. • Otherwise, this may cause damage, electric shock or fire. Then contact the Service Center. • The monitor may cause electric shock or fire. • Refer to oil, smoke or moisture; Do not remove the cover (or back). • This ...

User Manual (user Manual) (ver.1.0) (English)
Page 6
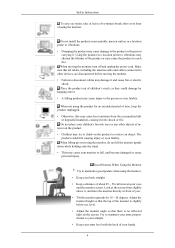
...damage to the cable. If an alien substances or water enters the product, turn the product off, unplug the power connector from the monitor for an extended period of time, residual image or blurriness may result in damage to the cable. Never insert anything metallic into the vent...to damage to your eyesight. 5 Adjusts the resolution and frequency to the level appropriate for an extended period of time. Do not move the monitor by pulling only the wire or the signal cable. • This may cause undesirable picture quality. Do not place water containers, chemical products...
...damage to the cable. If an alien substances or water enters the product, turn the product off, unplug the power connector from the monitor for an extended period of time, residual image or blurriness may result in damage to the cable. Never insert anything metallic into the vent...to damage to your eyesight. 5 Adjusts the resolution and frequency to the level appropriate for an extended period of time. Do not move the monitor by pulling only the wire or the signal cable. • This may cause undesirable picture quality. Do not place water containers, chemical products...
User Manual (user Manual) (ver.1.0) (English)
Page 7
... your arms level with the back of your arms perpendicular to catch fire. When not using the product for an extended period of using the monitor. • Keep your back straight. • Keep a distance of about 45 ~ 50 cm between your children's favorite toys or any other devices, are disconnected...product to the product or the person carrying it and cause fire or electric shock. Make sure that the top of you. • Tilt the monitor upwards by hanging onto it. • A falling product may cause injury to disconnect cables may cause damage to retrieve an object. The product could...
... your arms level with the back of your arms perpendicular to catch fire. When not using the product for an extended period of using the monitor. • Keep your back straight. • Keep a distance of about 45 ~ 50 cm between your children's favorite toys or any other devices, are disconnected...product to the product or the person carrying it and cause fire or electric shock. Make sure that the top of you. • Tilt the monitor upwards by hanging onto it. • A falling product may cause injury to disconnect cables may cause damage to retrieve an object. The product could...
User Manual (user Manual) (ver.1.0) (English)
Page 9
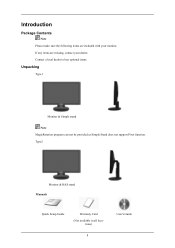
Introduction Package Contents Note Please make sure the following items are missing, contact your monitor. tions) 8 User's Guide Type2 Monitor & HAS stand Manuals Quick Setup Guide Warranty Card (Not available in all loca- If any items are included with your dealer. Contact a local dealer to buy optional items. Unpacking Type 1 Monitor & Simple stand Note MagicRotation program can not be provided as Simple Stand does not support Pivot function.
Introduction Package Contents Note Please make sure the following items are missing, contact your monitor. tions) 8 User's Guide Type2 Monitor & HAS stand Manuals Quick Setup Guide Warranty Card (Not available in all loca- If any items are included with your dealer. Contact a local dealer to buy optional items. Unpacking Type 1 Monitor & Simple stand Note MagicRotation program can not be provided as Simple Stand does not support Pivot function.
User Manual (user Manual) (ver.1.0) (English)
Page 10
The displayed content will be displayed up or down key. Adjust your PC before reaching the maximum count. Your Monitor Initial Settings Select the language using the up to adjust the resolution of your PC resolution so that it is the same as the optimal ...
The displayed content will be displayed up or down key. Adjust your PC before reaching the maximum count. Your Monitor Initial Settings Select the language using the up to adjust the resolution of your PC resolution so that it is the same as the optimal ...


