
User Manual (ENGLISH)
Page 5
...Clean Other English > Main > Safety Instructions > Installation Put your monitor in the owner's manual. Set down . z The TFT-LCD surface may result in injury. Installing a wall bracket must be damaged or broken. Place the monitor on a flat and stable surface. Leave a space for ventilation...use the mounting device specified in a location with low humidity and a minimum of dust. Do not drop the monitor when moving it. z The monitor can cause injury by a qualified professional. Do not place the monitor face down the monitor carefully. z It could result inside the monitor. z ...
...Clean Other English > Main > Safety Instructions > Installation Put your monitor in the owner's manual. Set down . z The TFT-LCD surface may result in injury. Installing a wall bracket must be damaged or broken. Place the monitor on a flat and stable surface. Leave a space for ventilation...use the mounting device specified in a location with low humidity and a minimum of dust. Do not drop the monitor when moving it. z The monitor can cause injury by a qualified professional. Do not place the monitor face down the monitor carefully. z It could result inside the monitor. z ...
User Manual (ENGLISH)
Page 28
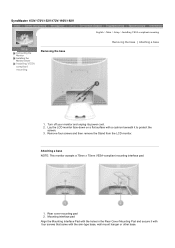
Remove four screws and then remove the Stand from the LCD monitor. Rear cover mounting pad 2. Mounting interface pad Align the Mounting Interface Pad with the arm-type base, wall mount hanger or other base. SyncMaster 153V/173V/152V/172V/193V/192V Connecting the Monitor Installing the Monitor Driver Installing VESA compliant mounting Removing the base English > Main > Setup > Installing VESA...
Remove four screws and then remove the Stand from the LCD monitor. Rear cover mounting pad 2. Mounting interface pad Align the Mounting Interface Pad with the arm-type base, wall mount hanger or other base. SyncMaster 153V/173V/152V/172V/193V/192V Connecting the Monitor Installing the Monitor Driver Installing VESA compliant mounting Removing the base English > Main > Setup > Installing VESA...

User Manual (ENGLISH)
Page 29
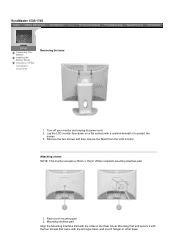
... it to protect the screen. 3. Turn off your monitor and unplug its power cord. 2. SyncMaster 153S/173S Connecting the Monitor Installing the Monitor Driver Installing VESA compliant mounting Removing the base 1. Rear cover mounting pad 2. Lay the LCD monitor face-down on a flat surface with the arm-type base, wall mount hanger or other base. Attaching a base NOTE: This...
... it to protect the screen. 3. Turn off your monitor and unplug its power cord. 2. SyncMaster 153S/173S Connecting the Monitor Installing the Monitor Driver Installing VESA compliant mounting Removing the base 1. Rear cover mounting pad 2. Lay the LCD monitor face-down on a flat surface with the arm-type base, wall mount hanger or other base. Attaching a base NOTE: This...

User Manual (ENGLISH)
Page 30
... NOTE: This monitor accepts a 100mm x 100mm VESA-compliant mounting interface pad. 1. Rear cover mounting pad 2. SyncMaster 153B/173B Removing the base Connecting the Monitor Installing the Monitor Driver Installing VESA compliant mounting 1. Remove two screws and then remove the Stand from the LCD monitor. Lay the LCD monitor face-down on a flat surface with the arm-type base, wall mount hanger or...
... NOTE: This monitor accepts a 100mm x 100mm VESA-compliant mounting interface pad. 1. Rear cover mounting pad 2. SyncMaster 153B/173B Removing the base Connecting the Monitor Installing the Monitor Driver Installing VESA compliant mounting 1. Remove two screws and then remove the Stand from the LCD monitor. Lay the LCD monitor face-down on a flat surface with the arm-type base, wall mount hanger or...

User Manual (ENGLISH)
Page 29
Align the Mounting Interface Pad with the holes in the Rear Cover Mounting Pad and secure it with the four screws that came with the arm-type base, wall mount hanger or other base.
Align the Mounting Interface Pad with the holes in the Rear Cover Mounting Pad and secure it with the four screws that came with the arm-type base, wall mount hanger or other base.
User Manual (ENGLISH)
Page 30
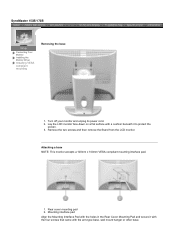
... the Stand from the LCD monitor. Turn off your monitor and unplug its power cord. 2. Lay the LCD monitor face-down on a flat surface with the arm-type base, wall mount hanger or other base. Rear cover mounting pad 2. Attaching a base NOTE: This monitor accepts a 75mm x 75mm VESA-compliant mounting interface pad. 1. Mounting interface pad Align the Mounting Interface Pad with the...
... the Stand from the LCD monitor. Turn off your monitor and unplug its power cord. 2. Lay the LCD monitor face-down on a flat surface with the arm-type base, wall mount hanger or other base. Rear cover mounting pad 2. Attaching a base NOTE: This monitor accepts a 75mm x 75mm VESA-compliant mounting interface pad. 1. Mounting interface pad Align the Mounting Interface Pad with the...
User Manual (ENGLISH)
Page 31
... arm-type base, wall mount hanger or other base. Remove the two screws and then remove the Stand from the LCD monitor. SyncMaster 153B/173B Removing the base Connecting Your Monitor Installing the Monitor Driver Installing VESA compliant mounting 1. Attaching a base NOTE: This monitor accepts a 100mm x 100mm VESA-compliant mounting interface pad. 1. Rear cover mounting pad 2. Mounting interface pad Align the...
... arm-type base, wall mount hanger or other base. Remove the two screws and then remove the Stand from the LCD monitor. SyncMaster 153B/173B Removing the base Connecting Your Monitor Installing the Monitor Driver Installing VESA compliant mounting 1. Attaching a base NOTE: This monitor accepts a 100mm x 100mm VESA-compliant mounting interface pad. 1. Rear cover mounting pad 2. Mounting interface pad Align the...


