
User Manual (ENGLISH)
Page 9
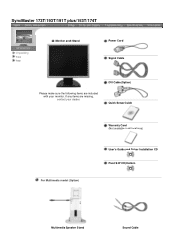
DVI Cable(Option) Quick Setup Guide For Multimedia model (Option) Warranty Card (Not available in all locations) User's Guide and Driver Installation CD Pivot S/W CD(Option) Multimedia Speaker Stand Sound Cable If any items are included with your dealer. SyncMaster 173T/193T/191T plus/153T/174T Unpacking Front Rear Monitor andt Stand Power Cord Signal Cable Please make sure the following items are missing, contact your monitor.
DVI Cable(Option) Quick Setup Guide For Multimedia model (Option) Warranty Card (Not available in all locations) User's Guide and Driver Installation CD Pivot S/W CD(Option) Multimedia Speaker Stand Sound Cable If any items are included with your dealer. SyncMaster 173T/193T/191T plus/153T/174T Unpacking Front Rear Monitor andt Stand Power Cord Signal Cable Please make sure the following items are missing, contact your monitor.
User Manual (ENGLISH)
Page 10
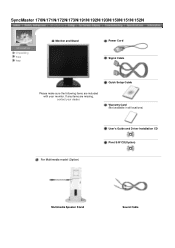
Quick Setup Guide Warranty Card (Not available in all locations) For Multimedia model (Option) User's Guide and Driver Installation CD Pivot S/W CD(Option) Multimedia Speaker Stand Sound Cable If any items are included with your dealer. SyncMaster 170N/171N/172N/173N/191N/192N/193N/150N/151N/152N Unpacking Front Rear Monitor and Stand Power Cord Signal Cable Please make sure the following items are missing, contact your monitor.
Quick Setup Guide Warranty Card (Not available in all locations) For Multimedia model (Option) User's Guide and Driver Installation CD Pivot S/W CD(Option) Multimedia Speaker Stand Sound Cable If any items are included with your dealer. SyncMaster 170N/171N/172N/173N/191N/192N/193N/150N/151N/152N Unpacking Front Rear Monitor and Stand Power Cord Signal Cable Please make sure the following items are missing, contact your monitor.
User Manual (ENGLISH)
Page 11
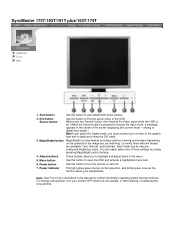
...the 'Source' button, then Selects the Video signal while the OSD is off . 7. Adjust buttons These buttons allow you must connect your monitor to change the input mode, a message appears in the center of the screen displaying the current mode -- Note: See PowerSaver described in... functions. For energy conservation, turn the monitor on the contents of three settings by simply pressing MagicBright control buttons. 4. Currently three different modes are watching. Menu button Use this button to auto adjustment direct access. 2. SyncMaster 173T/193T/191T plus/153T/174T Unpacking ...
...the 'Source' button, then Selects the Video signal while the OSD is off . 7. Adjust buttons These buttons allow you must connect your monitor to change the input mode, a message appears in the center of the screen displaying the current mode -- Note: See PowerSaver described in... functions. For energy conservation, turn the monitor on the contents of three settings by simply pressing MagicBright control buttons. 4. Currently three different modes are watching. Menu button Use this button to auto adjustment direct access. 2. SyncMaster 173T/193T/191T plus/153T/174T Unpacking ...
User Manual (ENGLISH)
Page 12
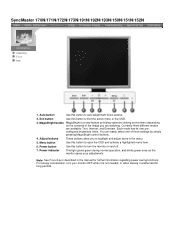
...6. Power indicator This light glows green during normal operation, and blinks green once as the monitor saves your monitor OFF when it unattended for further information regarding power saving functions. For energy conservation, turn the monitor on the contents of three settings by simply pressing MagicBright control buttons. 4. Auto button Use... items in the manual for long periods. Each mode has its own preconfigured brightness value. Note: See PowerSaver described in the menu. 5. SyncMaster 170N/171N/172N/173N/191N/192N/193N/150N/151N/152N Unpacking Front Rear 1.
...6. Power indicator This light glows green during normal operation, and blinks green once as the monitor saves your monitor OFF when it unattended for further information regarding power saving functions. For energy conservation, turn the monitor on the contents of three settings by simply pressing MagicBright control buttons. 4. Auto button Use... items in the manual for long periods. Each mode has its own preconfigured brightness value. Note: See PowerSaver described in the menu. 5. SyncMaster 170N/171N/172N/173N/191N/192N/193N/150N/151N/152N Unpacking Front Rear 1.
User Manual (ENGLISH)
Page 13
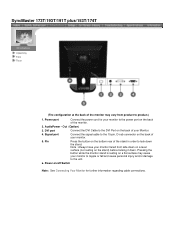
SyncMaster 173T/193T/191T plus/153T/174T Unpacking Front Rear (The configuration at the back of the monitor. 2. Pressing the button while the monitor stand is resting on the stand) before locking it down the stand. a. Note : Always have your monitor to the unit. Power on/off Switch Note: See Connecting Your Monitor for your monitor... regarding cable connections. DVI port Connect the DVI Cable to the DVI Port on the back of the monitor may cause your monitor to topple or fall and cause personal injury and/or damage to the power port on the back of your...
SyncMaster 173T/193T/191T plus/153T/174T Unpacking Front Rear (The configuration at the back of the monitor. 2. Pressing the button while the monitor stand is resting on the stand) before locking it down the stand. a. Note : Always have your monitor to the unit. Power on/off Switch Note: See Connecting Your Monitor for your monitor... regarding cable connections. DVI port Connect the DVI Cable to the DVI Port on the back of the monitor may cause your monitor to topple or fall and cause personal injury and/or damage to the power port on the back of your...
User Manual (ENGLISH)
Page 14
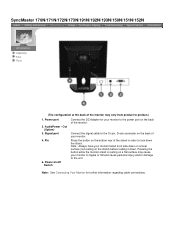
SyncMaster 170N/171N/172N/173N/191N/192N/193N/150N/151N/152N Unpacking Front Rear (The configuration at the back of your monitor. Note: See Connecting Your Monitor for your monitor to the power port on the back of the stand in order to the 15-pin, D-sub connector on the stand) before locking it down ...the stand. Signal port 4. Connect the signal cable to lock down . Note : Always have your monitor to topple or fall and cause personal injury and/or damage to product.) 1. Pressing the button while the...
SyncMaster 170N/171N/172N/173N/191N/192N/193N/150N/151N/152N Unpacking Front Rear (The configuration at the back of your monitor. Note: See Connecting Your Monitor for your monitor to the power port on the back of the stand in order to the 15-pin, D-sub connector on the stand) before locking it down ...the stand. Signal port 4. Connect the signal cable to lock down . Note : Always have your monitor to topple or fall and cause personal injury and/or damage to product.) 1. Pressing the button while the...
User Manual (ENGLISH)
Page 15
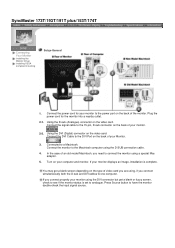
SyncMaster 173T/193T/191T plus/153T/174T Connecting Your Monitor Installing the Monitor Driver Installing VESA compliant mounting Setup-General 1. Connected to have the monitor double-check the input signal source. If your computer and monitor. Using the D-sub (Analogue) connector on your monitor displays an image, installation is set to see if the monitor... a blank screen depending on the type of an old model Macintosh, you need to connect the monitor using , if you connect properly your monitor. 2-2. In the case of video card you are using a special Mac adaptor. 5. You may...
SyncMaster 173T/193T/191T plus/153T/174T Connecting Your Monitor Installing the Monitor Driver Installing VESA compliant mounting Setup-General 1. Connected to have the monitor double-check the input signal source. If your computer and monitor. Using the D-sub (Analogue) connector on your monitor displays an image, installation is set to see if the monitor... a blank screen depending on the type of an old model Macintosh, you need to connect the monitor using , if you connect properly your monitor. 2-2. In the case of video card you are using a special Mac adaptor. 5. You may...
User Manual (ENGLISH)
Page 17
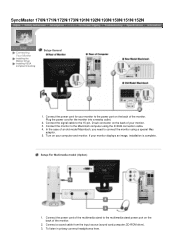
... 1. In the case of an old model Macintosh, you need to the 15-pin, D-sub connector on the back of the monitor. Turn on the back of the monitor. 2. If your computer and monitor. To listen in privacy,connect headphones here. Connect the signal cable to connect the...computer,CD-ROM drive). 3. Connect the monitor to the multimedia stand power port on the back of the multimedia stand to the Macintosh computer using a special Mac adaptor. 5. Connect the power cord for the monitor into a nearby outlet. 2. SyncMaster 170N/171N/172N/173N/191N/192N/193N/150N/151N/152N Connecting...
... 1. In the case of an old model Macintosh, you need to the 15-pin, D-sub connector on the back of the monitor. Turn on the back of the monitor. 2. If your computer and monitor. To listen in privacy,connect headphones here. Connect the signal cable to connect the...computer,CD-ROM drive). 3. Connect the monitor to the multimedia stand power port on the back of the multimedia stand to the Macintosh computer using a special Mac adaptor. 5. Connect the power cord for the monitor into a nearby outlet. 2. SyncMaster 170N/171N/172N/173N/191N/192N/193N/150N/151N/152N Connecting...
User Manual (ENGLISH)
Page 42
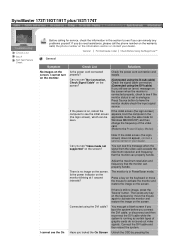
... the OSD by pressing the General | For Multimedia model | Check Before Using the MagicTune™ General Symptom No images on the monitor blinking at 1 second intervals? Check List Solutions Is the power cord connected properly? Note: If the initial screen (the login screen...monitor is on, reboot the computer to see the initial screen (the login screen), which can see "No Connection, Check Signal Cable" on the screen? (Connected using the D-sub cable) Check the signal cable connection. (Connected using the DVI cable? Connect the DVI cable and then reboot the system. SyncMaster...
... the OSD by pressing the General | For Multimedia model | Check Before Using the MagicTune™ General Symptom No images on the monitor blinking at 1 second intervals? Check List Solutions Is the power cord connected properly? Note: If the initial screen (the login screen...monitor is on, reboot the computer to see the initial screen (the login screen), which can see "No Connection, Check Signal Cable" on the screen? (Connected using the D-sub cable) Check the signal cable connection. (Connected using the DVI cable? Connect the DVI cable and then reboot the system. SyncMaster...
User Manual (ENGLISH)
Page 45
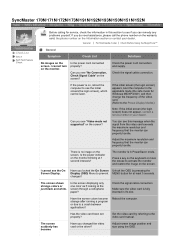
... see this section to see if you see "Video mode not supported" on the keyboard or move the mouse to a crash between applications? SyncMaster 170N/171N/172N/173N/191N/192N/193N/150N/151N/152N Check List Q & A Self-Test Feature Check Before calling for at least 5 seconds. Can you ...button for service, check the information in this message when the signal from the video card exceeds the maximum resolution and frequency that the monitor can be seen. Adjust screen image position and size using the OSD. There is in it's slot. Set the video card by ...
... see this section to see if you see "Video mode not supported" on the keyboard or move the mouse to a crash between applications? SyncMaster 170N/171N/172N/173N/191N/192N/193N/150N/151N/152N Check List Q & A Self-Test Feature Check Before calling for at least 5 seconds. Can you ...button for service, check the information in this message when the signal from the video card exceeds the maximum resolution and frequency that the monitor can be seen. Adjust screen image position and size using the OSD. There is in it's slot. Set the video card by ...
User Manual (ENGLISH)
Page 50
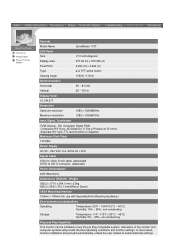
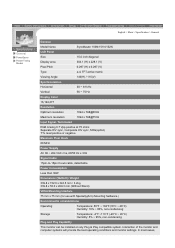
...45°C) Humidity: 5% ~ 95%, non-condensing Plug and Play Capability This monitor can be installed on any Plug & Play compatible system. In most cases, monitor installation will provide the best operating conditions and monitor settings. Composite H/V Sync, SOG(option), 0.7Vp-p Positive at 75 ohms Separate... 3Hz Signal Cable 15pin-to-15pin D-sub cable, detachable DVI-D to select alternate settings. General PowerSaver Preset Timing Modes General Model Name SyncMaster 173T LCD Panel Size 17.0 inch diagonal Display area 337.92 (H) x 270.336 (V) Pixel Pitch 0.264 (H) x 0.264 ...
...45°C) Humidity: 5% ~ 95%, non-condensing Plug and Play Capability This monitor can be installed on any Plug & Play compatible system. In most cases, monitor installation will provide the best operating conditions and monitor settings. Composite H/V Sync, SOG(option), 0.7Vp-p Positive at 75 ohms Separate... 3Hz Signal Cable 15pin-to-15pin D-sub cable, detachable DVI-D to select alternate settings. General PowerSaver Preset Timing Modes General Model Name SyncMaster 173T LCD Panel Size 17.0 inch diagonal Display area 337.92 (H) x 270.336 (V) Pixel Pitch 0.264 (H) x 0.264 ...

User Manual (ENGLISH)
Page 52
..., 60/50 Hz ± 3Hz Signal Cable 15pin-to-15pin D-sub cable, detachable DVI-D to select alternate settings. Interaction of the monitor and computer systems will proceed automatically, unless the user wishes to DVI-D connector, detachable Power Consumption 42W (Maximum) Dimensions (WxDxH) / ... ~ 45°C) Humidity: 5% ~ 95%, non-condensing Plug and Play Capability This monitor can be installed on any Plug & Play compatible system. General PowerSaver Preset Timing Modes General Model Name SyncMaster 193T/191T plus LCD Panel Size 19.0 inch diagonal Display area 376.32 (H) x ...
..., 60/50 Hz ± 3Hz Signal Cable 15pin-to-15pin D-sub cable, detachable DVI-D to select alternate settings. Interaction of the monitor and computer systems will proceed automatically, unless the user wishes to DVI-D connector, detachable Power Consumption 42W (Maximum) Dimensions (WxDxH) / ... ~ 45°C) Humidity: 5% ~ 95%, non-condensing Plug and Play Capability This monitor can be installed on any Plug & Play compatible system. General PowerSaver Preset Timing Modes General Model Name SyncMaster 193T/191T plus LCD Panel Size 19.0 inch diagonal Display area 376.32 (H) x ...

User Manual (ENGLISH)
Page 54
... will provide the best operating conditions and monitor settings. General PowerSaver Preset Timing Modes General Model Name SyncMaster 170N/171N/172N/173N LCD Panel Size 17.0 inch diagonal Display area 337.92 (H) x 270.336 (V) Pixel Pitch 0.264 (H) x 0.264 (V) Type a-si TFT...140 MHz Power Supply AC 90 ~ 264 VAC rms, 60/50 Hz ± 3Hz Signal Cable 15pin-to select alternate settings. Interaction of the monitor and computer systems will proceed automatically, unless the user wishes to -15pin D-sub cable, detachable Power Consumption 42W (Maximum) Dimensions (WxDxH) / Weight...
... will provide the best operating conditions and monitor settings. General PowerSaver Preset Timing Modes General Model Name SyncMaster 170N/171N/172N/173N LCD Panel Size 17.0 inch diagonal Display area 337.92 (H) x 270.336 (V) Pixel Pitch 0.264 (H) x 0.264 (V) Type a-si TFT...140 MHz Power Supply AC 90 ~ 264 VAC rms, 60/50 Hz ± 3Hz Signal Cable 15pin-to select alternate settings. Interaction of the monitor and computer systems will proceed automatically, unless the user wishes to -15pin D-sub cable, detachable Power Consumption 42W (Maximum) Dimensions (WxDxH) / Weight...

User Manual (ENGLISH)
Page 56
General PowerSaver Preset Timing Modes General Model Name SyncMaster 191N/192N/193N LCD Panel Size 19.0 inch diagonal Display area 376.32 (H) x 301.056 (V) Pixel Pitch 0.294 (H) x 0.294 (V) Type a-si TFT active matrix Viewing ... Clock 135 MHz Power Supply AC 90 ~ 264 VAC rms, 60/50 Hz ± 3Hz Signal Cable 15pin-to select alternate settings. Interaction of the monitor and computer systems will proceed automatically, unless the user wishes to -15pin D-sub cable, detachable Power Consumption 45W (Maximum) Dimensions (WxDxH) / Weight 416.3 x 207.0 x 411...
General PowerSaver Preset Timing Modes General Model Name SyncMaster 191N/192N/193N LCD Panel Size 19.0 inch diagonal Display area 376.32 (H) x 301.056 (V) Pixel Pitch 0.294 (H) x 0.294 (V) Type a-si TFT active matrix Viewing ... Clock 135 MHz Power Supply AC 90 ~ 264 VAC rms, 60/50 Hz ± 3Hz Signal Cable 15pin-to select alternate settings. Interaction of the monitor and computer systems will proceed automatically, unless the user wishes to -15pin D-sub cable, detachable Power Consumption 45W (Maximum) Dimensions (WxDxH) / Weight 416.3 x 207.0 x 411...
User Manual (ENGLISH)
Page 58
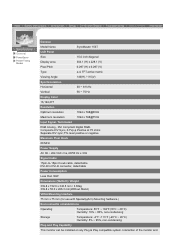
... Temperature: -4°F ~113°F (-20°C ~ 45°C) Humidity: 5% ~ 95%, non-condensing Plug and Play Capability This monitor can be installed on any Plug & Play compatible system. General PowerSaver Preset Timing Modes General Model Name SyncMaster 153T LCD Panel Size 15.0 inch diagonal Display area 304.1 (H) x 228.1 (V) Pixel Pitch 0.297 (H) x 0.297 (V) Type...,194,277 Resolution Optimum resolution 1024 x 768@60Hz Maximum resolution 1024 x 768@75Hz Input Signal, Terminated RGB Analog , DVI Compliant Digital RGB. Interaction of the monitor and
... Temperature: -4°F ~113°F (-20°C ~ 45°C) Humidity: 5% ~ 95%, non-condensing Plug and Play Capability This monitor can be installed on any Plug & Play compatible system. General PowerSaver Preset Timing Modes General Model Name SyncMaster 153T LCD Panel Size 15.0 inch diagonal Display area 304.1 (H) x 228.1 (V) Pixel Pitch 0.297 (H) x 0.297 (V) Type...,194,277 Resolution Optimum resolution 1024 x 768@60Hz Maximum resolution 1024 x 768@75Hz Input Signal, Terminated RGB Analog , DVI Compliant Digital RGB. Interaction of the monitor and
User Manual (ENGLISH)
Page 60
... computer systems will provide the best operating conditions and monitor settings. General PowerSaver Preset Timing Modes English > Main > Specification > General General Model Name SyncMaster 150N/151N/152N LCD Panel Size 15.0 inch diagonal Display area 304.1 (H) x 228.1 (V) Pixel Pitch 0.297 (H) x 0.297 (V) Type a-si TFT active matrix Viewing ... Humidity: 10% ~ 80%, non-condensing Storage Temperature: -4°F ~113°F (-20°C ~ 45°C) Humidity: 5% ~ 95%, non-condensing Plug and Play Capability This monitor can be installed on any Plug & Play compatible system.
... computer systems will provide the best operating conditions and monitor settings. General PowerSaver Preset Timing Modes English > Main > Specification > General General Model Name SyncMaster 150N/151N/152N LCD Panel Size 15.0 inch diagonal Display area 304.1 (H) x 228.1 (V) Pixel Pitch 0.297 (H) x 0.297 (V) Type a-si TFT active matrix Viewing ... Humidity: 10% ~ 80%, non-condensing Storage Temperature: -4°F ~113°F (-20°C ~ 45°C) Humidity: 5% ~ 95%, non-condensing Plug and Play Capability This monitor can be installed on any Plug & Play compatible system.

User Manual (ENGLISH)
Page 64
... power management system called PowerSaver. As an ENERGY STAR® Partner, SAMSUNG has determined that this feature. The PowerSaver system operates with VESA DPMS functionality. For energy conservation, turn your monitor OFF when it unattended for long periods. SyncMaster 170N/171N/172N/173N/173T/193T/191T plus/174T State Power Indicator Power Consumption Normal...
... power management system called PowerSaver. As an ENERGY STAR® Partner, SAMSUNG has determined that this feature. The PowerSaver system operates with VESA DPMS functionality. For energy conservation, turn your monitor OFF when it unattended for long periods. SyncMaster 170N/171N/172N/173N/173T/193T/191T plus/174T State Power Indicator Power Consumption Normal...

User Manual (ENGLISH)
Page 65
... set up this product meets the ENERGY STAR® guidelines for a certain amount of time. This system saves energy by switching your monitor into a low-power mode when it is EPA ENERGY STAR® compliant and ENERGY2000 compliant when used for energy efficiency. Use a ...with VESA DPMS functionality. As an ENERGY STAR® Partner, SAMSUNG has determined that this feature. General PowerSaver Preset Timing Modes SyncMaster 150N/151N/152N/153T This monitor has a built-in your computer. For energy conservation, turn your monitor OFF when it has not been used with a computer equipped ...
... set up this product meets the ENERGY STAR® guidelines for a certain amount of time. This system saves energy by switching your monitor into a low-power mode when it is EPA ENERGY STAR® compliant and ENERGY2000 compliant when used for energy efficiency. Use a ...with VESA DPMS functionality. As an ENERGY STAR® Partner, SAMSUNG has determined that this feature. General PowerSaver Preset Timing Modes SyncMaster 150N/151N/152N/153T This monitor has a built-in your computer. For energy conservation, turn your monitor OFF when it has not been used with a computer equipped ...


