

User Manual (user Manual) (ver.1.0) (English)
Page 2
Main Page Safety Instructions Notational Power Installation Cleaning Other Introduction Unpacking Front Rear Setup Connecting Your Monitor Installing the Monitor Driver Automatic Manual On-Screen Display Troubleshooting Check List Q & A Self-Test Feature Check Specifications General Specifications PowerSaver Preset Display Modes Information Service Terms Regulatory Natural Color For Better Display Authority
Main Page Safety Instructions Notational Power Installation Cleaning Other Introduction Unpacking Front Rear Setup Connecting Your Monitor Installing the Monitor Driver Automatic Manual On-Screen Display Troubleshooting Check List Q & A Self-Test Feature Check Specifications General Specifications PowerSaver Preset Display Modes Information Service Terms Regulatory Natural Color For Better Display Authority

User Manual (user Manual) (ver.1.0) (English)
Page 7
.... z This may cause an electric shock or a fire. Notational Power Installation Clean Other Do not remove cover(or back). z This may cause a breakdown, electric shock or a fire due to damage to move the monitor right or left by pulling on the monitor. in particular, if there are any heavy objects on the wire or the signal cable. Keep all power adaptors apart.
.... z This may cause an electric shock or a fire. Notational Power Installation Clean Other Do not remove cover(or back). z This may cause a breakdown, electric shock or a fire due to damage to move the monitor right or left by pulling on the monitor. in particular, if there are any heavy objects on the wire or the signal cable. Keep all power adaptors apart.

User Manual (user Manual) (ver.1.0) (English)
Page 15
... the power port on the back of the monitor. If your monitor to the Macintosh computer using a special Mac adaptor. 5. In the case of your computer and monitor. Turn on the back of an old model Macintosh, you need to connect the monitor using the D-SUB connection cable. 4. Connect the signal cable to the 15-pin, D-sub connector on your monitor. 3. SyncMaster 152x Connecting Your Monitor Installing the Monitor Driver Connecting Your Monitor Using the Stand Setup-General 1. Plug the power cord for your monitor displays an image, installation...
... the power port on the back of the monitor. If your monitor to the Macintosh computer using a special Mac adaptor. 5. In the case of your computer and monitor. Turn on the back of an old model Macintosh, you need to connect the monitor using the D-SUB connection cable. 4. Connect the signal cable to the 15-pin, D-sub connector on your monitor. 3. SyncMaster 152x Connecting Your Monitor Installing the Monitor Driver Connecting Your Monitor Using the Stand Setup-General 1. Plug the power cord for your monitor displays an image, installation...

User Manual (user Manual) (ver.1.0) (English)
Page 16
... old model Macintosh, you connect properly your Monitor. 3. In the case of video card you are using a special Mac adaptor. 5. Turn on the back of your monitor using the D-SUB connection cable. 4. Connect the DC Adapter for the monitor into a nearby outlet. 2-1. Connect the DVI Cable to analogue. Connected to have the monitor double-check the input signal source. Press Source button to a Macintosh. Plug the power cord for your monitor to the power port on your monitor displays an image, installation is set to the DVI Port on...
... old model Macintosh, you connect properly your Monitor. 3. In the case of video card you are using a special Mac adaptor. 5. Turn on the back of your monitor using the D-SUB connection cable. 4. Connect the DC Adapter for the monitor into a nearby outlet. 2-1. Connect the DVI Cable to analogue. Connected to have the monitor double-check the input signal source. Press Source button to a Macintosh. Plug the power cord for your monitor to the power port on your monitor displays an image, installation is set to the DVI Port on...

User Manual (user Manual) (ver.1.0) (English)
Page 18
.... 2. Choose your monitor model in the model list, then click the "OK" button. 4. Choose your monitor model in the "Warning" window. 5. Click "Windows XP/2000 Driver". 3. Windows XP/2000 1. Click "Windows ME Driver". 3. z Internet web site : http://www.samsung-monitor.com/ (Worldwide) http://www.samsungusa.com/monitor/ (USA) http://www.sec.co.kr/monitor/ (Korea) http://www.samsungmonitor.com.cn/ (China) Windows ME 1. Connecting Your Monitor Installing the Monitor Driver When prompted...
.... 2. Choose your monitor model in the model list, then click the "OK" button. 4. Choose your monitor model in the "Warning" window. 5. Click "Windows XP/2000 Driver". 3. Windows XP/2000 1. Click "Windows ME Driver". 3. z Internet web site : http://www.samsung-monitor.com/ (Worldwide) http://www.samsungusa.com/monitor/ (USA) http://www.sec.co.kr/monitor/ (Korea) http://www.samsungmonitor.com.cn/ (China) Windows ME 1. Connecting Your Monitor Installing the Monitor Driver When prompted...

User Manual (user Manual) (ver.1.0) (English)
Page 20
....samsung-monitor.com/ (Worldwide) http://www.samsungusa.com/monitor/ (USA) http://www.sec.co.kr/monitor/ (Korea) http://www.samsungmonitor.com.cn/ (China) Microsoft® Windows® XP Operating System 1. Prepare a blank disk and download the driver program file at the Internet web site shown here. Click "Display" icon and choose the "Settings" tab then click "Advanced..". 4. Connecting Your Monitor Installing the Monitor Driver...
....samsung-monitor.com/ (Worldwide) http://www.samsungusa.com/monitor/ (USA) http://www.sec.co.kr/monitor/ (Korea) http://www.samsungmonitor.com.cn/ (China) Microsoft® Windows® XP Operating System 1. Prepare a blank disk and download the driver program file at the Internet web site shown here. Click "Display" icon and choose the "Settings" tab then click "Advanced..". 4. Connecting Your Monitor Installing the Monitor Driver...

User Manual (user Manual) (ver.1.0) (English)
Page 21
5. Select "Don't search ,I will.." then click "Next" and then click "Have disk". 7. If you can see following "Message" window, then click the "Continue Anyway" button. Then click "OK" button. and select "Install from a list or.." Click the "Browse" button then choose A:(D:\Driver) and choose your monitor model in the model list and click the "Next" button. 8. then click "Next" button. 6. Click "Update Driver.."
5. Select "Don't search ,I will.." then click "Next" and then click "Have disk". 7. If you can see following "Message" window, then click the "Continue Anyway" button. Then click "OK" button. and select "Install from a list or.." Click the "Browse" button then choose A:(D:\Driver) and choose your monitor model in the model list and click the "Next" button. 8. then click "Next" button. 6. Click "Update Driver.."

User Manual (user Manual) (ver.1.0) (English)
Page 22
... click on "Update Driver.." Click the "Browse" button then choose A:(D:\Driver). 8. If you can choose a specific driver" then click "Next" and then click "Have disk". 7. Click "Start" , "Setting" , "Control Panel". 2. Microsoft® Windows® 2000 Operating System When you can see "Digital Signature Not Found" on the "Insert disk" window. 2. Choose "Monitor". Choose A:(D:\Driver) then click the "Open" button and then click "OK" button. Click the "Open" button, then click...
... click on "Update Driver.." Click the "Browse" button then choose A:(D:\Driver). 8. If you can choose a specific driver" then click "Next" and then click "Have disk". 7. Click "Start" , "Setting" , "Control Panel". 2. Microsoft® Windows® 2000 Operating System When you can see "Digital Signature Not Found" on the "Insert disk" window. 2. Choose "Monitor". Choose A:(D:\Driver) then click the "Open" button and then click "OK" button. Click the "Open" button, then click...
User Manual (user Manual) (ver.1.0) (English)
Page 23
Click the "Change" button in the user guide. then click "Next" button. 8. Click the "Have Disk" button 9. Note: If there is a type of system setting file. 1. Press Enter at All Display Modes, select the level of all the driver in a specific location.." The third screen is for your mouse. 3. Set a mouse for setting your monitor. First of resolution and vertical frequency by referring to the Preset Display Modes in the "Monitor Type...
Click the "Change" button in the user guide. then click "Next" button. 8. Click the "Have Disk" button 9. Note: If there is a type of system setting file. 1. Press Enter at All Display Modes, select the level of all the driver in a specific location.." The third screen is for your mouse. 3. Set a mouse for setting your monitor. First of resolution and vertical frequency by referring to the Preset Display Modes in the "Monitor Type...

User Manual (user Manual) (ver.1.0) (English)
Page 25
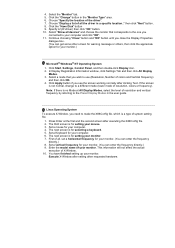
... z Windows XP Professional MagicTune™ runs in a multi-user environment, or having a single user have multiple defined presets based on the desktop. Click [Next] English > Main > Adjust Your Monitor > MagicTune™ Installation Connecting Your Monitor Installing the Monitor Driver MagicTune™ Installation 1. Overview 2. Step-By-Step Installation 1. In most cases even simple adjustments to Brightness, or Contrast require navigation of the monitor. All adjustments to the display are not easy to use monitor...
... z Windows XP Professional MagicTune™ runs in a multi-user environment, or having a single user have multiple defined presets based on the desktop. Click [Next] English > Main > Adjust Your Monitor > MagicTune™ Installation Connecting Your Monitor Installing the Monitor Driver MagicTune™ Installation 1. Overview 2. Step-By-Step Installation 1. In most cases even simple adjustments to Brightness, or Contrast require navigation of the monitor. All adjustments to the display are not easy to use monitor...

User Manual (user Manual) (ver.1.0) (English)
Page 35
... adjustment screen. 4. Push the Menu button to adjust individual R,G,B color control. 1. Follow these steps to open the Color Control adjustment screen. Use the [-] or [+] button to adjust Color Temperature - Push the Menu button. 2. Press the [ - ] button or [ + ] button to adjust Color Tontrol - Push the [ - ] button or [ + ] button until the Color Control screen is selected, sRGB mode exits) How to select User Adjusted, Reddish, Bluish or sRGB . (When you adjust the Brightness and Contrast after sRGB mode is displayed. 3. Color Temperature Menu Color Control Menu...
... adjustment screen. 4. Push the Menu button to adjust individual R,G,B color control. 1. Follow these steps to open the Color Control adjustment screen. Use the [-] or [+] button to adjust Color Temperature - Push the Menu button. 2. Press the [ - ] button or [ + ] button to adjust Color Tontrol - Push the [ - ] button or [ + ] button until the Color Control screen is selected, sRGB mode exits) How to select User Adjusted, Reddish, Bluish or sRGB . (When you adjust the Brightness and Contrast after sRGB mode is displayed. 3. Color Temperature Menu Color Control Menu...

User Manual (user Manual) (ver.1.0) (English)
Page 41
... black and white. Is the screen displaying only one color as if looking at 1 second intervals? Reboot the computer. Adjust screen image position and size using the OSD. Check the power cord connection and supply. Can you see "No Connection, Check Signal Cable" on the screen? Press a key on the keyboard or move the mouse to activate the monitor and restore the image on , reboot the computer to the video card manual. Have you changed the video card or the driver? SyncMaster 152x Check...
... black and white. Is the screen displaying only one color as if looking at 1 second intervals? Reboot the computer. Adjust screen image position and size using the OSD. Check the power cord connection and supply. Can you see "No Connection, Check Signal Cable" on the screen? Press a key on the keyboard or move the mouse to activate the monitor and restore the image on , reboot the computer to the video card manual. Have you changed the video card or the driver? SyncMaster 152x Check...

User Manual (user Manual) (ver.1.0) (English)
Page 42
... the video card signals. Check if the power cord and the cable are only 16 colors shown on the screen. If you have changed after -service for the main board of focus or OSD cannot be supported. LED is trouble with the monitor. 1. Have the Windows colors been set properly? Install the monitor driver according to the Driver Installation Instructions. Install the monitor driver according to the Driver Installation Instructions. Have you installed the monitor driver? Readjust Position by referring to see if the Plug & Play (VESA DDC...
... the video card signals. Check if the power cord and the cable are only 16 colors shown on the screen. If you have changed after -service for the main board of focus or OSD cannot be supported. LED is trouble with the monitor. 1. Have the Windows colors been set properly? Install the monitor driver according to the Driver Installation Instructions. Install the monitor driver according to the Driver Installation Instructions. Have you installed the monitor driver? Readjust Position by referring to see if the Plug & Play (VESA DDC...
User Manual (user Manual) (ver.1.0) (English)
Page 43
... the monitor double-check the input signal source. Connect the DVI cable and then reboot the system. Connected using the DVI cable) If you locked the On Screen Unlock the OSD by pressing the Display (OSD) Menu to see an (error) message on the screen. Have the screen colors become Reboot the computer. Press Source button to analogue. I cannot turn on the screen. Check the signal cable connection. Make sure the video card is on the monitor blinking at 1 second intervals? Adjust the maximum resolution and frequency that the monitor...
... the monitor double-check the input signal source. Connect the DVI cable and then reboot the system. Connected using the DVI cable) If you locked the On Screen Unlock the OSD by pressing the Display (OSD) Menu to see an (error) message on the screen. Have the screen colors become Reboot the computer. Press Source button to analogue. I cannot turn on the screen. Check the signal cable connection. Make sure the video card is on the monitor blinking at 1 second intervals? Adjust the maximum resolution and frequency that the monitor...

User Manual (user Manual) (ver.1.0) (English)
Page 44
... assembled the PC, check if the installed the adapter (video) driver and the monitor driver. 4. The screen can be supported. Readjust Position by referring to the OSD. Is the frequency properly adjusted when checking the Display Timing on the screen. The screen colors have problems in installing the adapter (video) driver, boot the computer in Safe Mode, remove the Display Adapter at the Control Panel, Display, Settings. Set the video card by referring to the video card manual. Check if the power cord and the cable are only 16 colors shown on the monitor...
... assembled the PC, check if the installed the adapter (video) driver and the monitor driver. 4. The screen can be supported. Readjust Position by referring to the OSD. Is the frequency properly adjusted when checking the Display Timing on the screen. The screen colors have problems in installing the adapter (video) driver, boot the computer in Safe Mode, remove the Display Adapter at the Control Panel, Display, Settings. Set the video card by referring to the video card manual. Check if the power cord and the cable are only 16 colors shown on the monitor...

User Manual (user Manual) (ver.1.0) (English)
Page 46
... appear indicates a problem with the input signal, a message appears on the screen or the screen goes blank although the power indicator LED is functioning properly. 1. Failure of any woofer speakers near the monitor, unplug and relocate the woofer to check the signal cable. The message may influence the quality and other features of scan range or that you need to another room. 2. Remove all electronic devices...
... appear indicates a problem with the input signal, a message appears on the screen or the screen goes blank although the power indicator LED is functioning properly. 1. Failure of any woofer speakers near the monitor, unplug and relocate the woofer to check the signal cable. The message may influence the quality and other features of scan range or that you need to another room. 2. Remove all electronic devices...

User Manual (user Manual) (ver.1.0) (English)
Page 52
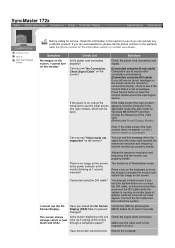
... compliant video card installed in power management system called PowerSaver. Use a software utility installed on the keyboard. State Normal Operation Power saving mode EPA/ENERGY 2000 Power Switch off Power Indicator Green Green, Blinking Black Power Consumption Max 30W Max 2W Max 1W This monitor is not needed, or when leaving it is EPA ENERGY STAR® compliant and ENERGY2000 compliant when used for energy efficiency. SyncMaster 152x General PowerSaver Preset Timing Modes This monitor...
... compliant video card installed in power management system called PowerSaver. Use a software utility installed on the keyboard. State Normal Operation Power saving mode EPA/ENERGY 2000 Power Switch off Power Indicator Green Green, Blinking Black Power Consumption Max 30W Max 2W Max 1W This monitor is not needed, or when leaving it is EPA ENERGY STAR® compliant and ENERGY2000 compliant when used for energy efficiency. SyncMaster 152x General PowerSaver Preset Timing Modes This monitor...

User Manual (user Manual) (ver.1.0) (English)
Page 53
... Operation Power saving mode EPA/ENERGY 2000 Power Switch off Power Indicator Green Green, Blinking Black Power Consumption Less than 40W Less than 2W (Analog) Less than 3W (Digital) Less than 1W(at 110V) This monitor is not needed, or when leaving it has not been used with a computer equipped with a VESA DPMS compliant video card installed in power management system called PowerSaver. Use a software utility installed on the keyboard. For energy conservation, turn your...
... Operation Power saving mode EPA/ENERGY 2000 Power Switch off Power Indicator Green Green, Blinking Black Power Consumption Less than 40W Less than 2W (Analog) Less than 3W (Digital) Less than 1W(at 110V) This monitor is not needed, or when leaving it has not been used with a computer equipped with a VESA DPMS compliant video card installed in power management system called PowerSaver. Use a software utility installed on the keyboard. For energy conservation, turn your...
User Manual (user Manual) (ver.1.0) (English)
Page 60
... power supply cord with IEC320 style terminations. For 240 Volt applications use only UL Listed Detachable power supply cord with NEMA configuration 515P type (parallel blades) plug cap. z Connect the equipment into an outlet on , the user is available from that interference will not occur in a particular installation. If necessary, consult your dealer or an experienced radio/television technician for help. User Information Changes...
... power supply cord with IEC320 style terminations. For 240 Volt applications use only UL Listed Detachable power supply cord with NEMA configuration 515P type (parallel blades) plug cap. z Connect the equipment into an outlet on , the user is available from that interference will not occur in a particular installation. If necessary, consult your dealer or an experienced radio/television technician for help. User Information Changes...

User Manual (user Manual) (ver.1.0) (English)
Page 68
... be bright sometimes or some of picture. Change the mode to energy save or set a screensaver to moving picture when you need to enjoy the best quality of black pixels could be scrubbed out softly. You can have an uneven quality of time, residual image or blurriness may appear. Service Terms Regulatory Natural Color For Better Display Authority For Better Display 1. Adjust computer resolution and screen injection rate (refresh rate) in control panel of...
... be bright sometimes or some of picture. Change the mode to energy save or set a screensaver to moving picture when you need to enjoy the best quality of black pixels could be scrubbed out softly. You can have an uneven quality of time, residual image or blurriness may appear. Service Terms Regulatory Natural Color For Better Display Authority For Better Display 1. Adjust computer resolution and screen injection rate (refresh rate) in control panel of...


