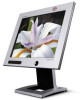
User Manual
Page 2
Main Page Safety Instructions Notational Power Installation Cleaning Other Introduction Unpacking Front Rear Setup Connecting Your Monitor Installing the Monitor Driver Automatic Manual On-Screen Display Troubleshooting Check List Q & A Self-Test Feature Check Specifications General Specifications PowerSaver Preset Display Modes Information Service Terms Regulatory Natural Color For Better Display Authority
Main Page Safety Instructions Notational Power Installation Cleaning Other Introduction Unpacking Front Rear Setup Connecting Your Monitor Installing the Monitor Driver Automatic Manual On-Screen Display Troubleshooting Check List Q & A Self-Test Feature Check Specifications General Specifications PowerSaver Preset Display Modes Information Service Terms Regulatory Natural Color For Better Display Authority

User Manual
Page 7
... magnetic substances. Do not use or store inflammable substances near the monitor. Notational Power Installation Clean Other Do not remove cover(or back). z Refer servicing to move the monitor right or left by pulling on the monitor. z This will reduce eye fatigue. z This may cause a breakdown, electric shock or a fire due to damage to the cable. Keep the monitor away from it immediately...
... magnetic substances. Do not use or store inflammable substances near the monitor. Notational Power Installation Clean Other Do not remove cover(or back). z Refer servicing to move the monitor right or left by pulling on the monitor. z This will reduce eye fatigue. z This may cause a breakdown, electric shock or a fire due to damage to the cable. Keep the monitor away from it immediately...

User Manual
Page 11
A PC-compatible computer does not need an adapter. 4. Connect the DVI Cable to the DVI Port on the back of your monitor to the power port on your computer and monitor. Connecting Your Monitor Installing the Monitor Driver 1. Connect the DC Adapter for your Monitor. If you are using a Macintosh computer, connect the cable to the 15-pin, D-sub connector on your adapter(Adapter not included). Note: Turn on the back of the monitor. 2. Connect the signal cable to a Macintosh adapter, and set the...
A PC-compatible computer does not need an adapter. 4. Connect the DVI Cable to the DVI Port on the back of your monitor to the power port on your computer and monitor. Connecting Your Monitor Installing the Monitor Driver 1. Connect the DC Adapter for your Monitor. If you are using a Macintosh computer, connect the cable to the 15-pin, D-sub connector on your adapter(Adapter not included). Note: Turn on the back of the monitor. 2. Connect the signal cable to a Macintosh adapter, and set the...
User Manual
Page 12
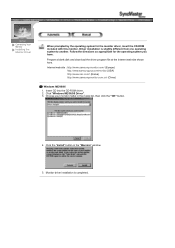
Click the "Install" button in the model list, then click the "OK" button. 4. Internet web site : http://www.samsung-monitor.com/ (Europe) http://www.samsungusa.com/monitor (USA) http://www.sec.co.kr/ (Korea) http://www.samsungmonitor.com.cn/ (China) Windows ME/98/95 1. Choose your monitor model in the "Warning" window. 5. Connecting Your Monitor Installing the Monitor Driver When prompted by the operating system for the...
Click the "Install" button in the model list, then click the "OK" button. 4. Internet web site : http://www.samsung-monitor.com/ (Europe) http://www.samsungusa.com/monitor (USA) http://www.sec.co.kr/ (Korea) http://www.samsungmonitor.com.cn/ (China) Windows ME/98/95 1. Choose your monitor model in the "Warning" window. 5. Connecting Your Monitor Installing the Monitor Driver When prompted by the operating system for the...
User Manual
Page 14
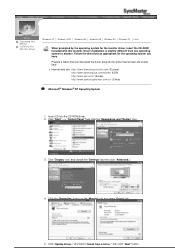
... with this monitor. Click "Start" -> "Control Panel" then click the "Appearance and Themes" Icon. 3. then click "Next" button. Driver installation is slightly different from a list or.." Click "Display" icon and choose the "Settings" tab then click "Advanced..". 4. Click "Update Driver.." Insert CD into the CD-ROM driver. 2. and select "Install from one operating system to another. Prepare a blank disk and download the driver program file...
... with this monitor. Click "Start" -> "Control Panel" then click the "Appearance and Themes" Icon. 3. then click "Next" button. Driver installation is slightly different from a list or.." Click "Display" icon and choose the "Settings" tab then click "Advanced..". 4. Click "Update Driver.." Insert CD into the CD-ROM driver. 2. and select "Install from one operating system to another. Prepare a blank disk and download the driver program file...
User Manual
Page 16
... click "OK". 11. Click "Start" , "Setting" , "Control Panel". 2. button. 8. Click the "Open" button, then click "OK" button. 9. Double click "Display" icon. 3. Click the "Change" button in a specific location.." Specify A:\(D:\driver) then click "OK" button. 10. Select "Show all the driver in the "Monitor Type" area. 6. Specify A:\(D:\driver) then click "OK" button. 9. Choose A:(D:\Driver) then click the "Open" button and then click "OK" button. If you connected to install 1. Microsoft® Windows® Millennium Operating System...
... click "OK". 11. Click "Start" , "Setting" , "Control Panel". 2. button. 8. Click the "Open" button, then click "OK" button. 9. Double click "Display" icon. 3. Click the "Change" button in a specific location.." Specify A:\(D:\driver) then click "OK" button. 10. Select "Show all the driver in the "Monitor Type" area. 6. Specify A:\(D:\driver) then click "OK" button. 9. Choose A:(D:\Driver) then click the "Open" button and then click "OK" button. If you connected to install 1. Microsoft® Windows® Millennium Operating System...

User Manual
Page 17
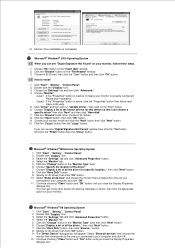
... to the Preset Display Modes in the user guide. In the "Display Properties" window, click the "Settings" tab and click "Change Display Type". 3. In the Select Device window, click the appropriate monitor model and then click OK. 6. Continue choosing "Close" button and "OK" button until you wish to use (Resolution, Number of resolution, colors or frequency). In the "Display Properties" window, click the Settings tab and then click "Advanced Properties" button. 3. Click Start, Settings, Control Panel, and then...
... to the Preset Display Modes in the user guide. In the "Display Properties" window, click the "Settings" tab and click "Change Display Type". 3. In the Select Device window, click the appropriate monitor model and then click OK. 6. Continue choosing "Close" button and "OK" button until you wish to use (Resolution, Number of resolution, colors or frequency). In the "Display Properties" window, click the Settings tab and then click "Advanced Properties" button. 3. Click Start, Settings, Control Panel, and then...

User Manual
Page 23
... the Menu ( ) button to open the Color Control adjustment screen. On Screen Display Menu How to adjust individual R,G,B color control. 1 Push the Menu ( ) button. 2 Push the - Color Control Follow these steps to adjust Color Temperature Color Temperature Color temperature is displayed. 3 Push the Menu ( ) button twice to select R(ed), G(reen) or B(lue) and Push the Menu ( ) button. 4 Press the - or + button to select User Adjusted, Reddish or Bluish. Note: Not Available This function doesn't work in Digital input. Use the - or + button to adjust the color setting. button...
... the Menu ( ) button to open the Color Control adjustment screen. On Screen Display Menu How to adjust individual R,G,B color control. 1 Push the Menu ( ) button. 2 Push the - Color Control Follow these steps to adjust Color Temperature Color Temperature Color temperature is displayed. 3 Push the Menu ( ) button twice to select R(ed), G(reen) or B(lue) and Push the Menu ( ) button. 4 Press the - or + button to select User Adjusted, Reddish or Bluish. Note: Not Available This function doesn't work in Digital input. Use the - or + button to adjust the color setting. button...

User Manual
Page 24
... effect on any software running on the computer. 1 Push the Menu ( ) button. 2 Push the - button or + button to select the language you would like to select Normal, Expanded 1 or Expanded 2. On Screen Display Menu How to adjust Image Size If your computer or video board supplies a signal rate and addressability lower than 1280 x 1024, this LCD Monitor provides a scaling processor that can choose one of six languages.(English, German, Spanish, French...
... effect on any software running on the computer. 1 Push the Menu ( ) button. 2 Push the - button or + button to select the language you would like to select Normal, Expanded 1 or Expanded 2. On Screen Display Menu How to adjust Image Size If your computer or video board supplies a signal rate and addressability lower than 1280 x 1024, this LCD Monitor provides a scaling processor that can choose one of six languages.(English, German, Spanish, French...

User Manual
Page 29
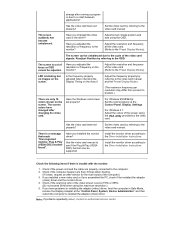
... black and white. If you locked the On Screen Display (OSD) Menu to activate the monitor and restore the image on the monitor blinking at the screen through a cellophane paper? There is fully inserted in Interlace Mode. (Interlace Mode: Vertical frequency 43Hz, 87Hz(i), etc) The signal from anything that the monitor can create a strong magnetic field. Are there any problems yourself. Move the monitor away from the video card exceeds the maximum resolution...
... black and white. If you locked the On Screen Display (OSD) Menu to activate the monitor and restore the image on the monitor blinking at the screen through a cellophane paper? There is fully inserted in Interlace Mode. (Interlace Mode: Vertical frequency 43Hz, 87Hz(i), etc) The signal from anything that the monitor can create a strong magnetic field. Are there any problems yourself. Move the monitor away from the video card exceeds the maximum resolution...
User Manual
Page 30
....) There are properly connected to reinstall the adapter (video) driver. Check if the power cord and the cable are only 16 colors shown on the monitor? If you changed after changing the video card. Has the video card been set properly? Have you adjusted the resolution or frequency on the screen. LED is a message that reads "Unrecognized monitor, Plug & Play (VESA DDC) monitor found". For Windows 95/98/2k/Xp: Set the colors properly at the "Control Panel, System, Device Administrator...
....) There are properly connected to reinstall the adapter (video) driver. Check if the power cord and the cable are only 16 colors shown on the monitor? If you changed after changing the video card. Has the video card been set properly? Have you adjusted the resolution or frequency on the screen. LED is a message that reads "Unrecognized monitor, Plug & Play (VESA DDC) monitor found". For Windows 95/98/2k/Xp: Set the colors properly at the "Control Panel, System, Device Administrator...

User Manual
Page 31
... power cord and then clean the monitor with a soft cloth, using the VGA Utility provided by reconfiguring the video card. How can I clean the outer case/LCD Panel? Do not leave any water to Windows/Computer Manual). Do not allow any remains of the computer or the screen saver. (Refer to go inside the monitor. Windows 3.1: Change the resolution and the colors using the VGA Utility provided by the video card. * Contact the video card...
... power cord and then clean the monitor with a soft cloth, using the VGA Utility provided by reconfiguring the video card. How can I clean the outer case/LCD Panel? Do not leave any water to Windows/Computer Manual). Do not allow any remains of the computer or the screen saver. (Refer to go inside the monitor. Windows 3.1: Change the resolution and the colors using the VGA Utility provided by the video card. * Contact the video card...

User Manual
Page 32
... that are red, green and blue. Unplug the video cable from the back of the boxes to another room. 2. Failure of the monitor. If your monitor screen remains blank after using the previous procedure, check your monitor and reconnect the video cable; Turn on both your monitor is functioning properly. 1. Turn off both your monitor is still on the screen or the screen goes blank although the power indicator LED is functioning...
... that are red, green and blue. Unplug the video cable from the back of the boxes to another room. 2. Failure of the monitor. If your monitor screen remains blank after using the previous procedure, check your monitor and reconnect the video cable; Turn on both your monitor is functioning properly. 1. Turn off both your monitor is still on the screen or the screen goes blank although the power indicator LED is functioning...
User Manual
Page 34
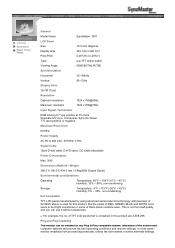
... Model Name SyncMaster 151P LCD Panel Size 15.0 inch diagonal Display area 304.1(H) x 228.1(V) Pixel Pitch 0.297(H) x 0.297(V) Type a-si TFT active matrix Viewing Angle 80/80/80/70(L/R/T/B) Synchronization Horizontal 30 ~60kHz Vertical 56~75Hz Display Color 16.7M (True) Resolution Optimum resolution 1024 x 768@60Hz Maximum resolution 1024 x 768@75Hz Input Signal, Terminated RGB Analog 0.7 Vpp positive at 75 ohms Separate H/V sync, Composite, Sync-On-Green TTL level positive or negative Maximum Pixel Clock 80 MHz Power Supply...
... Model Name SyncMaster 151P LCD Panel Size 15.0 inch diagonal Display area 304.1(H) x 228.1(V) Pixel Pitch 0.297(H) x 0.297(V) Type a-si TFT active matrix Viewing Angle 80/80/80/70(L/R/T/B) Synchronization Horizontal 30 ~60kHz Vertical 56~75Hz Display Color 16.7M (True) Resolution Optimum resolution 1024 x 768@60Hz Maximum resolution 1024 x 768@75Hz Input Signal, Terminated RGB Analog 0.7 Vpp positive at 75 ohms Separate H/V sync, Composite, Sync-On-Green TTL level positive or negative Maximum Pixel Clock 80 MHz Power Supply...

User Manual
Page 35
... computer. State Normal Operation Power saving mode EPA/ENERGY 2000 Power Switch off Power Indicator Power Consumption Green Less than 30W Green, Blinking Less than 2W Black Less than 1W This monitor is not needed, or when leaving it has not been used with a computer equipped with a VESA DPMS compliant video card installed in power management system called PowerSaver. This system saves energy by switching your monitor OFF when it is EPA...
... computer. State Normal Operation Power saving mode EPA/ENERGY 2000 Power Switch off Power Indicator Power Consumption Green Less than 30W Green, Blinking Less than 2W Black Less than 1W This monitor is not needed, or when leaving it has not been used with a computer equipped with a VESA DPMS compliant video card installed in power management system called PowerSaver. This system saves energy by switching your monitor OFF when it is EPA...

User Manual
Page 37
... Timing Modes General Model Name SyncMaster 171P LCD Panel Size 17.0 inch diagonal Display area 337.92(H) x 270.336(V) Pixel Pitch 0.264(H) x 0.264(V) Type a-si TFT active matrix Viewing Angle 85/85/85/85(L/R/T/B) Synchronization Horizontal 30 ~81kHz Vertical 56~85Hz Display Color 16.7M(True) Resolution Optimum resolution 1280 x 1024@60Hz Maximum resolution 1280 x 1024@76Hz Input Signal, Terminated RGB Analog 0.7 Vpp positive at 75 ohms Separate H/V sync, Composite, SOG TTL level positive or...
... Timing Modes General Model Name SyncMaster 171P LCD Panel Size 17.0 inch diagonal Display area 337.92(H) x 270.336(V) Pixel Pitch 0.264(H) x 0.264(V) Type a-si TFT active matrix Viewing Angle 85/85/85/85(L/R/T/B) Synchronization Horizontal 30 ~81kHz Vertical 56~85Hz Display Color 16.7M(True) Resolution Optimum resolution 1280 x 1024@60Hz Maximum resolution 1280 x 1024@76Hz Input Signal, Terminated RGB Analog 0.7 Vpp positive at 75 ohms Separate H/V sync, Composite, SOG TTL level positive or...

User Manual
Page 38
State Normal Operation Power saving mode EPA/ENERGY 2000 Power Switch off Power Indicator Power Consumption Green Less than 40W Green, Blinking Less than 3W Black Less than 1W This monitor is not needed, or when leaving it has not been used for long periods. This system saves energy by switching your computer. Use a software utility installed on the keyboard. For energy conservation, turn your computer to normal operation when you...
State Normal Operation Power saving mode EPA/ENERGY 2000 Power Switch off Power Indicator Power Consumption Green Less than 40W Green, Blinking Less than 3W Black Less than 1W This monitor is not needed, or when leaving it has not been used for long periods. This system saves energy by switching your computer. Use a software utility installed on the keyboard. For energy conservation, turn your computer to normal operation when you...
User Manual
Page 42
... screen is composed of horizontal and vertical dots used to compose the screen image is called Horizontal Frequency. This number shows the accuracy of monitors to exchange information automatically. Service Terms Regulatory Natural Color For Better Display Authority Dot Pitch The image on the screen. The Non-Interlace method is good for performing multiple tasks as that provides the best quality screen for the user. High resolution is used in turn...
... screen is composed of horizontal and vertical dots used to compose the screen image is called Horizontal Frequency. This number shows the accuracy of monitors to exchange information automatically. Service Terms Regulatory Natural Color For Better Display Authority Dot Pitch The image on the screen. The Non-Interlace method is good for performing multiple tasks as that provides the best quality screen for the user. High resolution is used in turn...
User Manual
Page 43
... accordance with NEMA configuration 515P type (parallel blades) plug cap. However, there is available from that interference will not occur in a particular installation. If this device must use shielded signal interface cables to Identify and Resolve Radio/TV Interference Problems helpful. z Connect the equipment into an outlet on , the user is connected. z Consult the dealer or an experienced radio/TV...
... accordance with NEMA configuration 515P type (parallel blades) plug cap. However, there is available from that interference will not occur in a particular installation. If this device must use shielded signal interface cables to Identify and Resolve Radio/TV Interference Problems helpful. z Connect the equipment into an outlet on , the user is connected. z Consult the dealer or an experienced radio/TV...

User Manual
Page 49
... screen injection rate (refresh rate) in display screen that is not from bad quality and you can use FINE/COARSE adjustment function. When you can have a stain on it. 4. TFT LCD panel manufactured by using advanced semiconductor technology with the quality of picture, you can get better quality of picture by executing "auto adjustment function" in control panel of black pixels could be scrubbed out softly. But the pixels of RED, GREEN, BLUE and WHITE color...
... screen injection rate (refresh rate) in display screen that is not from bad quality and you can use FINE/COARSE adjustment function. When you can have a stain on it. 4. TFT LCD panel manufactured by using advanced semiconductor technology with the quality of picture, you can get better quality of picture by executing "auto adjustment function" in control panel of black pixels could be scrubbed out softly. But the pixels of RED, GREEN, BLUE and WHITE color...


