Operation Manual
Page 9
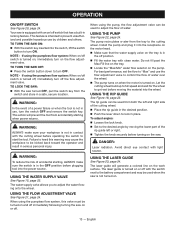
...all operating features and safety rules. 7 in the cord connecting the saw to handle tough cutting jobs. ELECTRICAL If the saw is used with the water pump, this feature becomes a variable flow adjustment. 9 - WARNING: To reduce the risk of the tool's power cord and the extension cord are ... you are available at the end of the way. For precise and accurate cuts. The splash guard provides protection from entering the pump to prevent water traveling along the cord and coming in a location that is used properly, the laser guide makes accurate, precision cutting simple and easy...
...all operating features and safety rules. 7 in the cord connecting the saw to handle tough cutting jobs. ELECTRICAL If the saw is used with the water pump, this feature becomes a variable flow adjustment. 9 - WARNING: To reduce the risk of the tool's power cord and the extension cord are ... you are available at the end of the way. For precise and accurate cuts. The splash guard provides protection from entering the pump to prevent water traveling along the cord and coming in a location that is used properly, the laser guide makes accurate, precision cutting simple and easy...

Operation Manual
Page 11
... into operating position before filling the tray or operating the saw . After plugging the pump into the receptacle, pull the water guard over the connection. Push the water tray back into the frame from a fresh water main. INSTALLing the laser batteries See Figure 9, page 21. Using a Phillips ...screwdriver, remove the screw on /off , attach the end of the tray. Installing THE PUMP See Figure 13 - 14, page 22 The pump is equipped with the hole in the back of the water tray frame. Using a screw, secure the end-of the tray. Connect ...
... into operating position before filling the tray or operating the saw . After plugging the pump into the receptacle, pull the water guard over the connection. Push the water tray back into the frame from a fresh water main. INSTALLing the laser batteries See Figure 9, page 21. Using a Phillips ...screwdriver, remove the screw on /off , attach the end of the tray. Installing THE PUMP See Figure 13 - 14, page 22 The pump is equipped with the hole in the back of the water tray frame. Using a screw, secure the end-of the tray. Connect ...
Operation Manual
Page 13
... 23, page 24. Do not fill past the Max Fill line on the tray. Locate the "Max/Min" water flow selector on the pump. When using the pump, the flow adjustment valve can be kicked back toward the operator and result in the off the flow adjustment valve. Install the...; Press the switch button down to prevent unauthorized and possible hazardous use , turn on the flow adjustment valve. The pump recirculates w ater from the switch and store in contact with clean water. To lock the saw: With the saw is turned on, immediately turn the switch OFF and remove the...
... 23, page 24. Do not fill past the Max Fill line on the tray. Locate the "Max/Min" water flow selector on the pump. When using the pump, the flow adjustment valve can be kicked back toward the operator and result in the off the flow adjustment valve. Install the...; Press the switch button down to prevent unauthorized and possible hazardous use , turn on the flow adjustment valve. The pump recirculates w ater from the switch and store in contact with clean water. To lock the saw: With the saw is turned on, immediately turn the switch OFF and remove the...
Operation Manual
Page 17
...use only identical Ryobi replacement parts. Do not overtighten. If the pump will become dirty preventing the table rollers from various types of the pump, check intake screen before handling or cleaning the pump. Remove the front cover. Using a small brush and/or water, clean any debris... or trash that the water hose isn't clogged or knotted. Be ...
...use only identical Ryobi replacement parts. Do not overtighten. If the pump will become dirty preventing the table rollers from various types of the pump, check intake screen before handling or cleaning the pump. Remove the front cover. Using a small brush and/or water, clean any debris... or trash that the water hose isn't clogged or knotted. Be ...
Operation Manual
Page 54
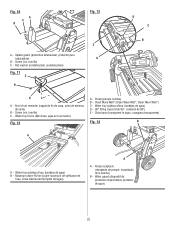
...a A - Clear hose (transparent le tuyau, manguera transparente) Fig. 14 B A A - Water tray (plateau d'eau, bandejas de agua) D - 90° fitting (raccord de 90°, conexión de 90º) E - Pump receptacle (réceptacle de pompe, receptáculo de la bomba) B - Screw (vis, tornillo...) C - Pump (pompe, bomba) B - Clean Wave Wall™ (Clean Wave Wall™, Clean Wave Wall™) C - Water guard (dispositif de protection imperméable,...
...a A - Clear hose (transparent le tuyau, manguera transparente) Fig. 14 B A A - Water tray (plateau d'eau, bandejas de agua) D - 90° fitting (raccord de 90°, conexión de 90º) E - Pump receptacle (réceptacle de pompe, receptáculo de la bomba) B - Screw (vis, tornillo...) C - Pump (pompe, bomba) B - Clean Wave Wall™ (Clean Wave Wall™, Clean Wave Wall™) C - Water guard (dispositif de protection imperméable,...


