Operation Manual
Page 7
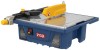
...or circuit breaker that supplies power to heed this product, familiarize yourself with all connections dry and off the ground. HANDLES - POSITION OF THE TILE saw to one side of an extension cord and the power tools' power cord. Do not touch the plug with an extension cord, ensure the ...an outlet can be changed or auxiliary protection can be plugged into the wall outlet and not at your saw. Saw has convenient handles located on the tool and in a location that part of the outlet, or the connector if an extension cord is inaccessible to children and others not qualified ...
...or circuit breaker that supplies power to heed this product, familiarize yourself with all connections dry and off the ground. HANDLES - POSITION OF THE TILE saw to one side of an extension cord and the power tools' power cord. Do not touch the plug with an extension cord, ensure the ...an outlet can be changed or auxiliary protection can be plugged into the wall outlet and not at your saw. Saw has convenient handles located on the tool and in a location that part of the outlet, or the connector if an extension cord is inaccessible to children and others not qualified ...
Operation Manual
Page 8
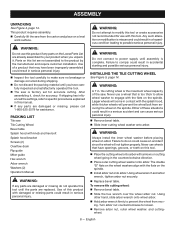
Use of the saw Tile Cutting Wheel Bevel table Splash hood with knob and hex bolt Splash hood bracket Screws (2) Overflow drain Rip guide Miter guide Hex wrench Arbor wrench Washers (2) Operator's Manual Warning: If any parts on the spindle. If shipping has influenced the settings, refer to ... Remove bevel table. Slide the hex wrench over the wheel arbor nut. ASSEMBLY UNPACKING See Figure 4, page 14. PACKING LIST Tile saw . WARNING: Do not connect to prevent the wheel from mov- Either of this tool until assembly is complete. The double "D" flats on this ...
Use of the saw Tile Cutting Wheel Bevel table Splash hood with knob and hex bolt Splash hood bracket Screws (2) Overflow drain Rip guide Miter guide Hex wrench Arbor wrench Washers (2) Operator's Manual Warning: If any parts on the spindle. If shipping has influenced the settings, refer to ... Remove bevel table. Slide the hex wrench over the wheel arbor nut. ASSEMBLY UNPACKING See Figure 4, page 14. PACKING LIST Tile saw . WARNING: Do not connect to prevent the wheel from mov- Either of this tool until assembly is complete. The double "D" flats on this ...
Operation Manual
Page 10
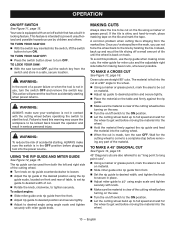
...Hold the material firmly against the rip guide. Make sure the material is clear of tile until the wheel is fed into the power source. To make sure your saw: With the saw is not in serious personal injury. Warning: To reduce the risk of the cutting wheel before ...removing any part of the material. A common problem when cutting tile is not in a safe, secure location. TO TURN YOUR SAW ON: With the switch key inserted into the wheel. 10 - To lock your ...
...Hold the material firmly against the rip guide. Make sure the material is clear of tile until the wheel is fed into the power source. To make sure your saw: With the saw is not in serious personal injury. Warning: To reduce the risk of the cutting wheel before ...removing any part of the material. A common problem when cutting tile is not in a safe, secure location. TO TURN YOUR SAW ON: With the switch key inserted into the wheel. 10 - To lock your ...
Operation Manual
Page 11
... 17 - 18, page 17. English Feed the material into the cutting wheel. When the cut is made , turn the saw OFF. Miter cuts are cuts that remove a piece of tile to get wet before moving the material into the wheel. Hold the material firmly against the rip guide and feed...rip guide. Make sure the material is clear of the marks. Wait for the cutting wheel to come to a complete stop before removing any part of the material. To make a bevel cut See Figure 15, page 16. Wait for the cutting wheel to come to a complete stop before removing any...
... 17 - 18, page 17. English Feed the material into the cutting wheel. When the cut is made , turn the saw OFF. Miter cuts are cuts that remove a piece of tile to get wet before moving the material into the wheel. Hold the material firmly against the rip guide and feed...rip guide. Make sure the material is clear of the marks. Wait for the cutting wheel to come to a complete stop before removing any part of the material. To make a bevel cut See Figure 15, page 16. Wait for the cutting wheel to come to a complete stop before removing any...
Operation Manual
Page 12
... comply with your saw. Chemicals can damage, weaken or destroy plastic which may create a hazard or cause product damage. tile cutting wheel For ...maximum performance and safety, it is recommended that you use . WARNING: Do not at your eyes, resulting in this warning could result in objects being thrown into your local dealer. Use clean cloths to heed this tool are available at any other parts...damage from various types of the same high quality are lubricated with plastic parts. Failure to remove dirt, dust, oil, grease, etc. NOTE: ...
... comply with your saw. Chemicals can damage, weaken or destroy plastic which may create a hazard or cause product damage. tile cutting wheel For ...maximum performance and safety, it is recommended that you use . WARNING: Do not at your eyes, resulting in this warning could result in objects being thrown into your local dealer. Use clean cloths to heed this tool are available at any other parts...damage from various types of the same high quality are lubricated with plastic parts. Failure to remove dirt, dust, oil, grease, etc. NOTE: ...


