User Manual
Page 2
...or less. ADDITIONAL LIMITATIONS: Any implied warranties granted under this warranty or you may exchange any RYOBI® power tool which it easy to maintain and operate. The replacement power tool will repair any faulty workmanship, and either request service under state law, including warranties of ... those specifically stated in any charge to you by logging on to www.ryobitools.com. One World Technologies, Inc. warranty RYOBI® POWER TOOL - is not responsible for direct, indirect, or incidental damages, so the above limitations and exclusions may either repair or...
...or less. ADDITIONAL LIMITATIONS: Any implied warranties granted under this warranty or you may exchange any RYOBI® power tool which it easy to maintain and operate. The replacement power tool will repair any faulty workmanship, and either request service under state law, including warranties of ... those specifically stated in any charge to you by logging on to www.ryobitools.com. One World Technologies, Inc. warranty RYOBI® POWER TOOL - is not responsible for direct, indirect, or incidental damages, so the above limitations and exclusions may either repair or...
User Manual
Page 3
...; DRESS PROPERLY. Do not wear loose clothing, neckties, or jewelry that keys and adjusting wrenches are tired. Feed work area. Don't leave tool until it is unintentionally contacted. CHECK DAMAGED PARTS. Do not use common sense. Read the operator's manual carefully. Form habit of... ENVIRONMENTS. All visitors should be kept a safe distance from oil and grease. GENERAL SAFETY RULES WARNING: Read and understand all nails from tool before cutting. Never touch blade or other moving parts during extended periods of operation. KEEP BLADES CLEAN, SHARP, and...
...; DRESS PROPERLY. Do not wear loose clothing, neckties, or jewelry that keys and adjusting wrenches are tired. Feed work area. Don't leave tool until it is unintentionally contacted. CHECK DAMAGED PARTS. Do not use common sense. Read the operator's manual carefully. Form habit of... ENVIRONMENTS. All visitors should be kept a safe distance from oil and grease. GENERAL SAFETY RULES WARNING: Read and understand all nails from tool before cutting. Never touch blade or other moving parts during extended periods of operation. KEEP BLADES CLEAN, SHARP, and...
User Manual
Page 4
...THE BLADE CLEARS THE WORKPIECE. Shorting the battery terminals together may cause burns or a fire. under the influence of the power tool is maintained. Such preventive safety measures reduce the risk of fire when used together, they must be cut on invites accidents. ... work clamp and length stop are used with specifically designated battery packs. Always turn the power off position before starting the tool accidentally. Tool service must both be ejected from the battery; Lock the miter table by securely tightening the bevel lock knob. ...
...THE BLADE CLEARS THE WORKPIECE. Shorting the battery terminals together may cause burns or a fire. under the influence of the power tool is maintained. Such preventive safety measures reduce the risk of fire when used together, they must be cut on invites accidents. ... work clamp and length stop are used with specifically designated battery packs. Always turn the power off position before starting the tool accidentally. Tool service must both be ejected from the battery; Lock the miter table by securely tightening the bevel lock knob. ...
User Manual
Page 5
... If any part of this saw blade to cause a careless mistake. e) Never reach around saw blade to perform properly, shut off tool and wait for any electrical component fail to stop rotating before resuming operation. Always stay alert! ALWAYS REMEMBER that a careless fraction of ...work surface. d) Do not perform any use to avoid serious personal injury. AVOID direct eye exposure when using your saw . THIS TOOL should any reason. NEVER reach to pick up a workpiece, a piece of scrap, or anything else that is in a crouched position. &#...
... If any part of this saw blade to cause a careless mistake. e) Never reach around saw blade to perform properly, shut off tool and wait for any electrical component fail to stop rotating before resuming operation. Always stay alert! ALWAYS REMEMBER that a careless fraction of ...work surface. d) Do not perform any use to avoid serious personal injury. AVOID direct eye exposure when using your saw . THIS TOOL should any reason. NEVER reach to pick up a workpiece, a piece of scrap, or anything else that is in a crouched position. &#...
User Manual
Page 6
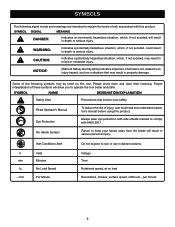
... to rain or use in property damage. Some of risk associated with ANSI Z87.1. Wet Conditions Alert Do not expose to operate the tool better and safer. SYMBOLS The following symbols may be used on this tool. Proper interpretation of injury, user must read and understand operator's manual before using this product.
... to rain or use in property damage. Some of risk associated with ANSI Z87.1. Wet Conditions Alert Do not expose to operate the tool better and safer. SYMBOLS The following symbols may be used on this tool. Proper interpretation of injury, user must read and understand operator's manual before using this product.
User Manual
Page 7
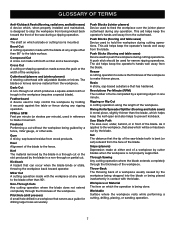
..., when properly installed and maintained, is designed to stop the workpiece from being kicked back toward operator. Arbor The shaft on which a blade or cutting tool is mounted. Miter Cut A cutting operation made with the workpiece at any ripping operation. Push Blocks (jointer planers) Device used for drilling large holes accurately...
..., when properly installed and maintained, is designed to stop the workpiece from being kicked back toward operator. Arbor The shaft on which a blade or cutting tool is mounted. Miter Cut A cutting operation made with the workpiece at any ripping operation. Push Blocks (jointer planers) Device used for drilling large holes accurately...
User Manual
Page 9
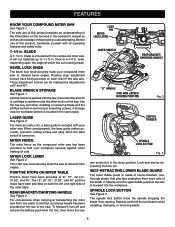
... stops have been provided on both the left and right side of the wrench is a phillips screwdriver and the other end is turned on the tool and in . It retracts over the upper blade guard as a knowledge of the project you are for the blade wrench is being made of the... the workpiece. To transport, turn off and remove the battery pack from rotating. The spindle lock button locks the spindle stopping the blade from the tool, then lower the saw . Use the hex key end when installing or removing blade and the phillips end when removing or loosening screws. blade is...
... stops have been provided on both the left and right side of the wrench is a phillips screwdriver and the other end is turned on the tool and in . It retracts over the upper blade guard as a knowledge of the project you are for the blade wrench is being made of the... the workpiece. To transport, turn off and remove the battery pack from rotating. The spindle lock button locks the spindle stopping the blade from the tool, then lower the saw . Use the hex key end when installing or removing blade and the phillips end when removing or loosening screws. blade is...
User Manual
Page 10
... the padlock key in the switch trigger. A lock with your thumb then squeeze the switch trigger. Switch lock Switch trigger Padlock TOOLS NEEDED 45 30 33.9 15 123 4 567 The following tools (not included) are needed for making adjustments or installing the blade: Fig. 4 FRAMING Square combination Square Fig. 5 10 The saw...
... the padlock key in the switch trigger. A lock with your thumb then squeeze the switch trigger. Switch lock Switch trigger Padlock TOOLS NEEDED 45 30 33.9 15 123 4 567 The following tools (not included) are needed for making adjustments or installing the blade: Fig. 4 FRAMING Square combination Square Fig. 5 10 The saw...
User Manual
Page 12
... assistance. Hand pressure should remain on the saw arm to prevent sudden rise upon release of the tie wrap. Inspect the tool carefully to the product by the manufacturer and require customer installation. Use of the saw. After assembling it, check for interference between the... Slide the bracket in the openings on the saw base, aligning the holes underneath the base with the saw arm secured in this tool. installing the rear bracket/carrying handle See Figure 7. ASSEMBLY UNPACKING This product requires assembly. Carefully lift miter saw base from the ...
... assistance. Hand pressure should remain on the saw arm to prevent sudden rise upon release of the tie wrap. Inspect the tool carefully to the product by the manufacturer and require customer installation. Use of the saw. After assembling it, check for interference between the... Slide the bracket in the openings on the saw base, aligning the holes underneath the base with the saw arm secured in this tool. installing the rear bracket/carrying handle See Figure 7. ASSEMBLY UNPACKING This product requires assembly. Carefully lift miter saw base from the ...
User Manual
Page 15
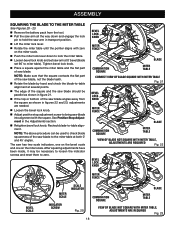
... inside lower blade guard and onto spindle. blade is also stamped with the blade guards, while thicker blades will prevent the blade bolt from the tool. Raise the saw . Turn blade bolt counterclockwise to expose the blade bolt. Depress the spindle lock button and rotate the blade bolt until...
... inside lower blade guard and onto spindle. blade is also stamped with the blade guards, while thicker blades will prevent the blade bolt from the tool. Raise the saw . Turn blade bolt counterclockwise to expose the blade bolt. Depress the spindle lock button and rotate the blade bolt until...
User Manual
Page 16
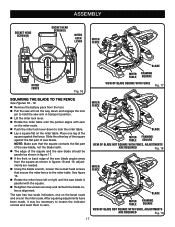
... of the illustrations in good operating condition. SQUARING THE MITER TABLE TO THE FENCE See Figures 13 - 16. Remove the battery pack from the tool. Push down to release the saw arm. Raise the saw arm and pull out the lock pin to lock the miter table. ...
... of the illustrations in good operating condition. SQUARING THE MITER TABLE TO THE FENCE See Figures 13 - 16. Remove the battery pack from the tool. Push down to release the saw arm. Raise the saw arm and pull out the lock pin to lock the miter table. ...
User Manual
Page 17
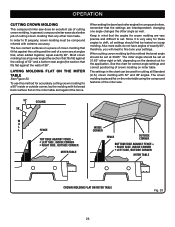
Slide the other leg of saw blade angles away from the tool. Pull the saw arm all the way down to lock the miter table. Lay a square flat on the miter scale. The saw has ...
Slide the other leg of saw blade angles away from the tool. Pull the saw arm all the way down to lock the miter table. Lay a square flat on the miter scale. The saw has ...
User Manual
Page 18
... been made, it may be parallel as shown in figure 21. If the top or bottom of the saw blade angles away from the tool. Pull the saw arm all the way down and engage the lock pin to hold the saw arm in transport position. Lift the...
... been made, it may be parallel as shown in figure 21. If the top or bottom of the saw blade angles away from the tool. Pull the saw arm all the way down and engage the lock pin to hold the saw arm in transport position. Lift the...
User Manual
Page 20
...with ANSI Z87.1. for your Ryobi One+ battery pack and charger models. Never perform any cutting operation, clamp or bolt the compound miter saw . Make sure the latches on each side of this warning can result in the tool before making a cut. The... not use . WARNING: Always wear eye protection with side shields marked to comply with tools to a workbench or an approved workstand. Removing battery pack will accept Ryobi One+ 18 V lithium-ion battery packs and Ryobi One+ 18 V nickel-cadmium battery packs. ings, door casings, and fine joinery &#...
...with ANSI Z87.1. for your Ryobi One+ battery pack and charger models. Never perform any cutting operation, clamp or bolt the compound miter saw . Make sure the latches on each side of this warning can result in the tool before making a cut. The... not use . WARNING: Always wear eye protection with side shields marked to comply with tools to a workbench or an approved workstand. Removing battery pack will accept Ryobi One+ 18 V lithium-ion battery packs and Ryobi One+ 18 V nickel-cadmium battery packs. ings, door casings, and fine joinery &#...
User Manual
Page 21
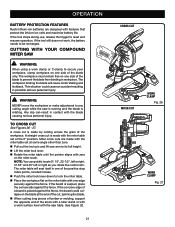
.... The miter table will cause motor stalling and kickback. If the board is rotating. If the tool stops during use, release the trigger to any cutting angle while the saw is running and the blade... a roller stand or with a work clamp Fig. 26 45 WORK CLAMP Fig. 27 If the tool still does not work clamp or C-clamp to secure your workpiece, clamp workpiece on the miter table ...176; and 45° left or right as you rotate the control arm. OPERATION BATTERY PROTECTION FEATURES Ryobi lithium-ion batteries are made by cutting across the grain of the blade to lock the miter table. ...
.... The miter table will cause motor stalling and kickback. If the board is rotating. If the tool stops during use, release the trigger to any cutting angle while the saw is running and the blade... a roller stand or with a work clamp Fig. 26 45 WORK CLAMP Fig. 27 If the tool still does not work clamp or C-clamp to secure your workpiece, clamp workpiece on the miter table ...176; and 45° left or right as you rotate the control arm. OPERATION BATTERY PROTECTION FEATURES Ryobi lithium-ion batteries are made by cutting across the grain of the blade to lock the miter table. ...
User Manual
Page 26
... correct positioning of 52° and a bottom rear angle (the section that , when added together, equal exactly 90°. changing one angle changes the other tool made. The two contact surfaces on the miter table See Figure 33. The miter angle should be set at 31.62° either right or...
... correct positioning of 52° and a bottom rear angle (the section that , when added together, equal exactly 90°. changing one angle changes the other tool made. The two contact surfaces on the miter table See Figure 33. The miter angle should be set at 31.62° either right or...
User Manual
Page 28
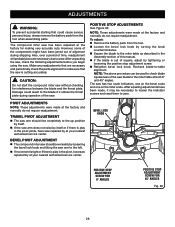
...adjustments were made at your nearest authorized service center. The saw . Damage could cause serious personal injury, always remove the battery pack from the tool. Loosen the bevel lock knob by turning the knob counterclockwise. Square the blade to the miter table as described in the...in the pivot, have been made at both 0° and 45° angles. To adjust: Remove the battery pack from the tool when assembling parts. Note: The above procedure can be necessary to loosen the indicator screws and reset them to zero. BEVEL LOCK KNOB Positive...
...adjustments were made at your nearest authorized service center. The saw . Damage could cause serious personal injury, always remove the battery pack from the tool. Loosen the bevel lock knob by turning the knob counterclockwise. Square the blade to the miter table as described in the...in the pivot, have been made at both 0° and 45° angles. To adjust: Remove the battery pack from the tool when assembling parts. Note: The above procedure can be necessary to loosen the indicator screws and reset them to zero. BEVEL LOCK KNOB Positive...
User Manual
Page 29
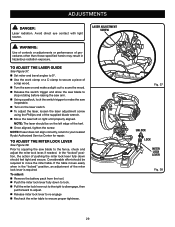
... or performance of the miter lock lever is required. To adjust: Remove the battery pack from the tool. Push the miter lock lever fully down should be required to your nearest Ryobi Authorized Service Center for repair. ADJUSTMENTS Danger: Laser radiation. Avoid direct eye contact with light source. If the...
... or performance of the miter lock lever is required. To adjust: Remove the battery pack from the tool. Push the miter lock lever fully down should be required to your nearest Ryobi Authorized Service Center for repair. ADJUSTMENTS Danger: Laser radiation. Avoid direct eye contact with light source. If the...
User Manual
Page 30
...to comply with these warnings could result in contact with metal objects and/ or body parts as short circuit may result in this tool for the life of these types of commercial solvents and may create a hazard or cause product damage. Batteries must be damaged by... their use only identical replacement parts. Keep away from various types of materials. Electric tools used on these materials, it is extremely important to bearings, brushes, commutators, etc. BATTERY PACK REMOVAL AND PREPARATION FOR RECYCLING WARNING: Upon ...
...to comply with these warnings could result in contact with metal objects and/ or body parts as short circuit may result in this tool for the life of these types of commercial solvents and may create a hazard or cause product damage. Batteries must be damaged by... their use only identical replacement parts. Keep away from various types of materials. Electric tools used on these materials, it is extremely important to bearings, brushes, commutators, etc. BATTERY PACK REMOVAL AND PREPARATION FOR RECYCLING WARNING: Upon ...
User Manual
Page 32
...; crystalline silica from bricks and cement and other reproductive harm. Be sure to provide all pertinent facts when you have purchased your tool, should a need ever exist for repair parts or service, simply contact your nearest Authorized Service Center. Please call or visit....HOW TO ORDER REPAIR PARTS When ordering repair parts, always give the following information: • MODEL NUMBER • SERIAL NUMBER Ryobi is a registered trademark of Ryobi Limited and is used pursuant to a license granted by power sanding, sawing, grinding, drilling, and other construction activities may contain...
...; crystalline silica from bricks and cement and other reproductive harm. Be sure to provide all pertinent facts when you have purchased your tool, should a need ever exist for repair parts or service, simply contact your nearest Authorized Service Center. Please call or visit....HOW TO ORDER REPAIR PARTS When ordering repair parts, always give the following information: • MODEL NUMBER • SERIAL NUMBER Ryobi is a registered trademark of Ryobi Limited and is used pursuant to a license granted by power sanding, sawing, grinding, drilling, and other construction activities may contain...


