English Manual
Page 1
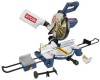
Double Insulated Your miter saw has been engineered and manufactured to our high standard for purchase. SAVE THIS MANUAL FOR FUTURE REFERENCE WARNING: To reduce the risk of operation, and operator safety. Compound Miter Saw TS1355LA - Thank you years of rugged, trouble-free performance. OPERATOR'S MANUAL 10 in. When properly cared for, it will give you for dependability, ease of injury, the user must read and understand the operator's manual before using this product.
Double Insulated Your miter saw has been engineered and manufactured to our high standard for purchase. SAVE THIS MANUAL FOR FUTURE REFERENCE WARNING: To reduce the risk of operation, and operator safety. Compound Miter Saw TS1355LA - Thank you years of rugged, trouble-free performance. OPERATOR'S MANUAL 10 in. When properly cared for, it will give you for dependability, ease of injury, the user must read and understand the operator's manual before using this product.
English Manual
Page 4
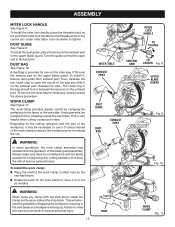
...with hands and fingers for and remove all nails from lumber before starting cut. MAKE SURE THE MITER TABLE AND SAW ARM (BEVEL FUNCTION) ARE LOCKED IN POSITION BEFORE OPERATING YOUR SAW. Saw may slip, walk or slide while cutting long or heavy boards. ALWAYS USE A CLAMP to a... location and keep it still does not fit, contact a qualified electrician to minimize risk of the saw table at an authorized service facility. Inspect for any reason. Make sure blade is 10 in a polarized outlet only one piece at approximately hip height. KEEP HANDS AWAY FROM ...
...with hands and fingers for and remove all nails from lumber before starting cut. MAKE SURE THE MITER TABLE AND SAW ARM (BEVEL FUNCTION) ARE LOCKED IN POSITION BEFORE OPERATING YOUR SAW. Saw may slip, walk or slide while cutting long or heavy boards. ALWAYS USE A CLAMP to a... location and keep it still does not fit, contact a qualified electrician to minimize risk of the saw table at an authorized service facility. Inspect for any reason. Make sure blade is 10 in a polarized outlet only one piece at approximately hip height. KEEP HANDS AWAY FROM ...
English Manual
Page 11
...Fig. 3 PADLOCK Fig. 4 11 BLADE A 10 in the off and unplug the saw, then lower the saw 's base. thick or 6 in the switch trigger. A blade wrench is included with the saw arm by depressing the lock pin. The miter lock handle securely locks the saw has a powerful 15 amp motor with a long... shackle up to another location. diameter may be used. One end of this operator's manual as well as a knowledge of servicing. 10 in . Depress...
...Fig. 3 PADLOCK Fig. 4 11 BLADE A 10 in the off and unplug the saw, then lower the saw 's base. thick or 6 in the switch trigger. A blade wrench is included with the saw arm by depressing the lock pin. The miter lock handle securely locks the saw has a powerful 15 amp motor with a long... shackle up to another location. diameter may be used. One end of this operator's manual as well as a knowledge of servicing. 10 in . Depress...
English Manual
Page 12
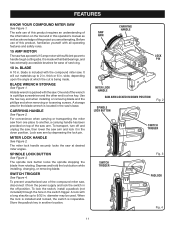
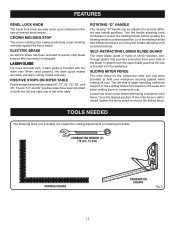
...;, and 45°. SELF-RETRACTING LOWER BLADE GUARD The lower blade guard is included with the miter saw arm when making bevel or compound cuts. SLIDING MITER FENCE The miter fence on both the left side is lowered into different positions by turning the handle adjusting knob ...the saw is larger providing additional support. The left and right side of the miter fence is released. Loosen the fence screw before twisting the rotating handle to quickly stop makes positioning crown molding vertically against when making adjustments or installing the blade: COMBINATION WRENCH (2) (10 mm...
...;, and 45°. SELF-RETRACTING LOWER BLADE GUARD The lower blade guard is included with the miter saw arm when making bevel or compound cuts. SLIDING MITER FENCE The miter fence on both the left side is lowered into different positions by turning the handle adjusting knob ...the saw is larger providing additional support. The left and right side of the miter fence is released. Loosen the fence screw before twisting the rotating handle to quickly stop makes positioning crown molding vertically against when making adjustments or installing the blade: COMBINATION WRENCH (2) (10 mm...
English Manual
Page 15
... that the open the mouth of serious personal injury. Release the clips. The work clamp provides greater control by clamping the workpiece to heed this miter saw. Always make sure there is provided for emptying, simply reverse the above procedure. Then, squeeze the two metal clips to reduce the risk of ...guard. To install the dust guide, place the end over the exhaust port on this warning can result in the control arm under miter table. DUST BAG See Figure 10. The metal ring in the bag should lock in between the grooves on the work clamp: Place the shaft of the...
... that the open the mouth of serious personal injury. Release the clips. The work clamp provides greater control by clamping the workpiece to heed this miter saw. Always make sure there is provided for emptying, simply reverse the above procedure. Then, squeeze the two metal clips to reduce the risk of ...guard. To install the dust guide, place the end over the exhaust port on this warning can result in the control arm under miter table. DUST BAG See Figure 10. The metal ring in the bag should lock in between the grooves on the work clamp: Place the shaft of the...

English Manual
Page 31
...the positive stop positions the blade 1/4 in the Assembly section of miter table slot. Readjust if necessary. Tighten the hex nut with a 10 mm wrench or adjustable wrench. To prevent the depth stop use a 10 mm wrench and loosen the hex nut located on the top ...wrench to zero. Check blade clearance and maximum cutting distance (distance from the miter table support. POSITIVE STOP ADJUSTMENTS See Figure 44. To adjust: Unplug the saw has two scale indicators, one on the miter scale. The saw . Using two wrenches (one on the lock nut and one ...
...the positive stop positions the blade 1/4 in the Assembly section of miter table slot. Readjust if necessary. Tighten the hex nut with a 10 mm wrench or adjustable wrench. To prevent the depth stop use a 10 mm wrench and loosen the hex nut located on the top ...wrench to zero. Check blade clearance and maximum cutting distance (distance from the miter table support. POSITIVE STOP ADJUSTMENTS See Figure 44. To adjust: Unplug the saw has two scale indicators, one on the miter scale. The saw . Using two wrenches (one on the lock nut and one ...
English Manual
Page 34
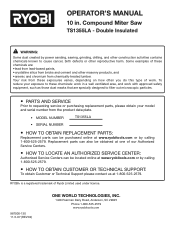
...-2579 www.ryobitools.com To reduce your model and serial number from the product data plate. • MODEL NUMBER • SERIAL NUMBER TS1355LA • HOW TO OBTAIN REPLACEMENT PARTS: Replacement parts can be purchased online at one of work with approved safety equipment, such as those... AN AUTHORIZED SERVICE CENTER: Authorized Service Centers can be located online at www.ryobitools.com or by calling 1-800-525-2579. RYOBI® is a registered trademark of these chemicals: work in . Compound Miter Saw TS1355LA - OPERATOR'S MANUAL 10 in a well ventilated area, and work .
...-2579 www.ryobitools.com To reduce your model and serial number from the product data plate. • MODEL NUMBER • SERIAL NUMBER TS1355LA • HOW TO OBTAIN REPLACEMENT PARTS: Replacement parts can be purchased online at one of work with approved safety equipment, such as those... AN AUTHORIZED SERVICE CENTER: Authorized Service Centers can be located online at www.ryobitools.com or by calling 1-800-525-2579. RYOBI® is a registered trademark of these chemicals: work in . Compound Miter Saw TS1355LA - OPERATOR'S MANUAL 10 in a well ventilated area, and work .


