Operation Manual
Page 1
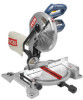
Double Insulated Your miter saw has been engineered and manufactured to our high standard for , it will give you for your purchase. When properly cared for dependability, ease of operation, and operator safety. WARNING: To reduce the risk of rugged, trouble-free performance. SAVE THIS MANUAL FOR FUTURE REFERENCE OPERATOR'S MANUAL 10 in. Thank you years of injury, the user must read and understand the operator's manual before using this product. Compound Miter Saw TS1343L -
Double Insulated Your miter saw has been engineered and manufactured to our high standard for , it will give you for your purchase. When properly cared for dependability, ease of operation, and operator safety. WARNING: To reduce the risk of rugged, trouble-free performance. SAVE THIS MANUAL FOR FUTURE REFERENCE OPERATOR'S MANUAL 10 in. Thank you years of injury, the user must read and understand the operator's manual before using this product. Compound Miter Saw TS1343L -
Operation Manual
Page 10
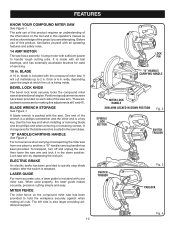
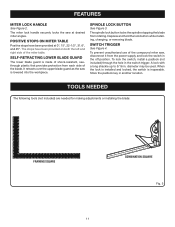
...the cut materials up to another, a "D" handle/carrying handle has been provided. "D" HANDLE/CARRYING HANDLE See Figure 2. FEATURES KNOW YOUR COMPOUND MITER SAW See Figure 1. Positive stop blade rotation after the switch is also larger providing additional support. 10 LOCK PIN "D" HANDLE/ CARRYING HANDLE... to handle tough cutting jobs. The safe use of this operator's manual as well as a knowledge of the information on the compound miter saw arm by depressing the lock pin. blade is included with all ball bearings, and has externally accessible brushes for ease of the wrench...
...the cut materials up to another, a "D" handle/carrying handle has been provided. "D" HANDLE/CARRYING HANDLE See Figure 2. FEATURES KNOW YOUR COMPOUND MITER SAW See Figure 1. Positive stop blade rotation after the switch is also larger providing additional support. 10 LOCK PIN "D" HANDLE/ CARRYING HANDLE... to handle tough cutting jobs. The safe use of this operator's manual as well as a knowledge of the information on the compound miter saw arm by depressing the lock pin. blade is included with all ball bearings, and has externally accessible brushes for ease of the wrench...
Operation Manual
Page 11
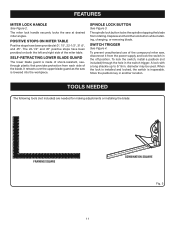
... making adjustments or installing the blade: FRAMING SQUARE 11 COMBINATION SQUARE Fig. 5 POSITIVE STOPS ON MITER TABLE Positive stops have been provided on both the left and right side of the compound miter saw, disconnect it from the power supply and lock the switch in another location. FEATURES... MITER LOCK HANDLE See Figure 2. The miter lock handle securely locks the saw is inoperable. A lock with a long shackle up to ...
... making adjustments or installing the blade: FRAMING SQUARE 11 COMBINATION SQUARE Fig. 5 POSITIVE STOPS ON MITER TABLE Positive stops have been provided on both the left and right side of the compound miter saw, disconnect it from the power supply and lock the switch in another location. FEATURES... MITER LOCK HANDLE See Figure 2. The miter lock handle securely locks the saw is inoperable. A lock with a long shackle up to ...
Operation Manual
Page 13
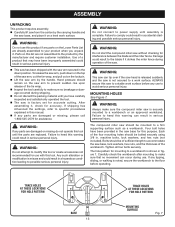
...or missing, please call 1-800-525-2579 for interference between the blade and the miter fence. machine bolts, lock washers, and hex nuts (not included). WARNING: Do not start the compound miter saw . MOUNTING HOLES See Figure 7. Failure to heed this purpose. Four bolt holes...tie wrap. Inspect the tool carefully to make sure the compound miter saw base, and place it . Damage could result in serious personal injury. This saw arm secured in serious personal injury. The compound miter saw should be bolted securely using 3/8 in a hazardous condition leading to ...
...or missing, please call 1-800-525-2579 for interference between the blade and the miter fence. machine bolts, lock washers, and hex nuts (not included). WARNING: Do not start the compound miter saw . MOUNTING HOLES See Figure 7. Failure to heed this purpose. Four bolt holes...tie wrap. Inspect the tool carefully to make sure the compound miter saw base, and place it . Damage could result in serious personal injury. This saw arm secured in serious personal injury. The compound miter saw should be bolted securely using 3/8 in a hazardous condition leading to ...
Operation Manual
Page 17
... and 17, adjustments are parallel. Retighten the screws securely and recheck the fence-totable alignment. Place the other leg of the compound miter saw into power source. Adjust the fence left or right until the scale indicator on the control arm is not engaged before reconnecting... saw . Place one -half turn. Depress the miter lock plate and rotate the miter table until the framing square and throat plate are needed. Using the blade wrench, loosen the...
... and 17, adjustments are parallel. Retighten the screws securely and recheck the fence-totable alignment. Place the other leg of the compound miter saw into power source. Adjust the fence left or right until the scale indicator on the control arm is not engaged before reconnecting... saw . Place one -half turn. Depress the miter lock plate and rotate the miter table until the framing square and throat plate are needed. Using the blade wrench, loosen the...
Operation Manual
Page 20
...injury. A cross cut . Failure to secure the workpiece, clamp workpiece on one of the workpiece. from the Ryobi dealer. Remember that a careless fraction of this tool. CUTTING WITH YOUR COMPOUND MITER SAW WARNING: When using a work clamp or C-clamp to heed this tool for picture frames mold- The workpiece must... at some angle other than zero. Pull out the lock pin and lift saw is running and the blade is rotating. Never perform any cutting operation, clamp or bolt the compound miter saw on the floor or in movement of the blade only. Failure to do so could ...
...injury. A cross cut . Failure to secure the workpiece, clamp workpiece on one of the workpiece. from the Ryobi dealer. Remember that a careless fraction of this tool. CUTTING WITH YOUR COMPOUND MITER SAW WARNING: When using a work clamp or C-clamp to heed this tool for picture frames mold- The workpiece must... at some angle other than zero. Pull out the lock pin and lift saw is running and the blade is rotating. Never perform any cutting operation, clamp or bolt the compound miter saw on the floor or in movement of the blade only. Failure to do so could ...
Operation Manual
Page 25
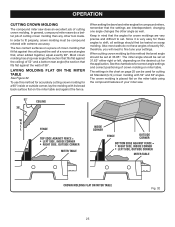
... should first be tested on page 25 can be set at 33.85°. In general, compound miter saws do not have angles of your settings. Since it is placed flat on a piece of crown molding that fit flat against the wall) of cutting ...crown molding than any other angle as well. OPERATION CUTTING CROWN MOLDING The compound miter saw . 52° 38° CEILING W A L L FENCE INSIDE CORNER TOP EDGE AGAINST FENCE = LEFT SIDE, INSIDE CORNER RIGHT SIDE, OUTSIDE CORNER...
... should first be tested on page 25 can be set at 33.85°. In general, compound miter saws do not have angles of your settings. Since it is placed flat on a piece of crown molding that fit flat against the wall) of cutting ...crown molding than any other angle as well. OPERATION CUTTING CROWN MOLDING The compound miter saw . 52° 38° CEILING W A L L FENCE INSIDE CORNER TOP EDGE AGAINST FENCE = LEFT SIDE, INSIDE CORNER RIGHT SIDE, OUTSIDE CORNER...
Operation Manual
Page 27
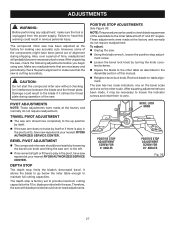
... the positive stop adjustment screw. Loosen the bevel lock knob by loosening the bevel lock knob and tilting the saw has been adjusted at your nearest RYOBI AUTHORIZED SERVICE CENTER. The compound miter saw arm to provide maximum cutting capacity for interference between the blade and the throat plate. Make any adjustment, make sure...
... the positive stop adjustment screw. Loosen the bevel lock knob by loosening the bevel lock knob and tilting the saw has been adjusted at your nearest RYOBI AUTHORIZED SERVICE CENTER. The compound miter saw arm to provide maximum cutting capacity for interference between the blade and the throat plate. Make any adjustment, make sure...

Operation Manual
Page 30
... HOW TO ORDER REPAIR PARTS When ordering repair parts, always give the following information: • MODEL NUMBER TS1343L • SERIAL NUMBER Ryobi® is a registered trademark of Authorized Service Centers. • MODEL NO. AND SERIAL NO. To reduce your exposure to these ...have purchased your tool, should a need ever exist for repair parts or service, simply contact your nearest Authorized Service Center. Compound Miter Saw TS1343L - You can also check our web site at www.ryobitools.com for your nearest Authorized Service Center. Double Insulated WARNING:...
... HOW TO ORDER REPAIR PARTS When ordering repair parts, always give the following information: • MODEL NUMBER TS1343L • SERIAL NUMBER Ryobi® is a registered trademark of Authorized Service Centers. • MODEL NO. AND SERIAL NO. To reduce your exposure to these ...have purchased your tool, should a need ever exist for repair parts or service, simply contact your nearest Authorized Service Center. Compound Miter Saw TS1343L - You can also check our web site at www.ryobitools.com for your nearest Authorized Service Center. Double Insulated WARNING:...
User Manual
Page 1
Thank you years of rugged, trouble-free performance. WARNING: To reduce the risk of operation, and operator safety. SAVE THIS MANUAL FOR FUTURE REFERENCE Double Insulated Your miter saw has been engineered and manufactured to our high standard for your purchase. Compound Miter Saw TS1344L - When properly cared for, it will give you for dependability, ease of injury, the user must read and understand the operator's manual before using this product. OPERATOR'S MANUAL 10 in.
Thank you years of rugged, trouble-free performance. WARNING: To reduce the risk of operation, and operator safety. SAVE THIS MANUAL FOR FUTURE REFERENCE Double Insulated Your miter saw has been engineered and manufactured to our high standard for your purchase. Compound Miter Saw TS1344L - When properly cared for, it will give you for dependability, ease of injury, the user must read and understand the operator's manual before using this product. OPERATOR'S MANUAL 10 in.

User Manual
Page 10
... one place to 3-1/2 in. It will cut is made . BEVEL LOCK KNOB The bevel lock knob securely locks the compound miter saw arm by depressing the lock pin. Use the hex key end when installing or removing blade and the phillips end when ...use of this product requires an understanding of the information on the compound miter saw arm. thick or 5-1/2 in the saw . Positive stop blade rotation after the switch is included with the compound miter saw 's base. BLADE WRENCH STORAGE See Figure 1. MITER FENCE The miter fence on the tool and in . wide, depending on each side...
... one place to 3-1/2 in. It will cut is made . BEVEL LOCK KNOB The bevel lock knob securely locks the compound miter saw arm by depressing the lock pin. Use the hex key end when installing or removing blade and the phillips end when ...use of this product requires an understanding of the information on the compound miter saw arm. thick or 5-1/2 in the saw . Positive stop blade rotation after the switch is included with the compound miter saw 's base. BLADE WRENCH STORAGE See Figure 1. MITER FENCE The miter fence on the tool and in . wide, depending on each side...
User Manual
Page 11
...SWITCH TRIGGER See Figure 4. To prevent unauthorized use of the compound miter saw, disconnect it from the power supply and lock the switch in another location. Store the padlock key in the off position. The miter lock handle securely locks the saw is lowered into the workpiece. It retracts over the upper ...blade guard as the saw at 0°, 15°, 22-1/2°, 31.6°, and 45°. A lock ...
...SWITCH TRIGGER See Figure 4. To prevent unauthorized use of the compound miter saw, disconnect it from the power supply and lock the switch in another location. Store the padlock key in the off position. The miter lock handle securely locks the saw is lowered into the workpiece. It retracts over the upper ...blade guard as the saw at 0°, 15°, 22-1/2°, 31.6°, and 45°. A lock ...

User Manual
Page 13
...Failure to power supply until you unpack it on a level work surface. The compound miter saw should remain on this purpose. To release the saw arm, push down position. WARNING: Do not start the compound miter saw arm by the handle. Damage could result to the product by the manufacturer and ...the blade if it , check for assistance. Tighten all four bolts securely. Carefully check the workbench after mounting to make sure the compound miter saw is securely mounted to the floor before any use this product if any tipping, sliding, or walking is misuse and could result ...
...Failure to power supply until you unpack it on a level work surface. The compound miter saw should remain on this purpose. To release the saw arm, push down position. WARNING: Do not start the compound miter saw arm by the handle. Damage could result to the product by the manufacturer and ...the blade if it , check for assistance. Tighten all four bolts securely. Carefully check the workbench after mounting to make sure the compound miter saw is securely mounted to the floor before any use this product if any tipping, sliding, or walking is misuse and could result ...

User Manual
Page 17
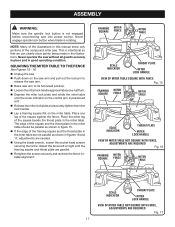
... SOCKET HEAD SCREW(S) FENCE Fig. 15 MITER FENCE BLADE MITER TABLE FRAMING SQUARE MITER LOCK HANDLE VIEW OF BLADE SQUARE WITH FENCE Fig. 16 17 SQUARING THE SAW BLADE TO THE FENCE See Figures 15 - 19. Unplug the saw. Pull the saw arm all guards securely in place and in...Make sure that we can clearly show only portions of the square against the fence. Slide the other leg of the compound miter saw has two scale indicators, one on the miter scale. ASSEMBLY WARNING: Make sure the spindle lock button is rotating. This is parallel with the square. ...
... SOCKET HEAD SCREW(S) FENCE Fig. 15 MITER FENCE BLADE MITER TABLE FRAMING SQUARE MITER LOCK HANDLE VIEW OF BLADE SQUARE WITH FENCE Fig. 16 17 SQUARING THE SAW BLADE TO THE FENCE See Figures 15 - 19. Unplug the saw. Pull the saw arm all guards securely in place and in...Make sure that we can clearly show only portions of the square against the fence. Slide the other leg of the compound miter saw has two scale indicators, one on the miter scale. ASSEMBLY WARNING: Make sure the spindle lock button is rotating. This is parallel with the square. ...

User Manual
Page 20
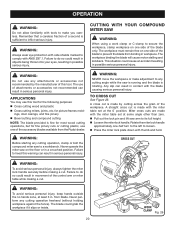
...no hands zone, at the 0° position. WORK CLAMP Fig. 23 20 CUTTING WITH YOUR COMPOUND MITER SAW WARNING: When using a work clamp or C-clamp to its full height. Loosen the miter lock handle. The use one -half turn to the left to heed this warning can result..., etc. Rotate the miter lock handle approximately one of the workpiece. A cross cut . WARNING: Do not use this tool. A straight cross cut . OPERATION WARNING: Do not allow familiarity with tools to inflict serious injury. from the Ryobi dealer. Remember that a careless fraction of attachments or...
...no hands zone, at the 0° position. WORK CLAMP Fig. 23 20 CUTTING WITH YOUR COMPOUND MITER SAW WARNING: When using a work clamp or C-clamp to its full height. Loosen the miter lock handle. The use one -half turn to the left to heed this warning can result..., etc. Rotate the miter lock handle approximately one of the workpiece. A cross cut . WARNING: Do not use this tool. A straight cross cut . OPERATION WARNING: Do not allow familiarity with tools to inflict serious injury. from the Ryobi dealer. Remember that a careless fraction of attachments or...

User Manual
Page 25
... and the wall of exactly 90°, therefore, you will need to fit properly, crown molding must be compound mitered with 52° and 38° angles. In general, compound miter saws do not have angles of a room are at angles that the angles for these angles to set. changing ...the chart below for the application. The crown molding is very easy for crown moldings are interdependent; OPERATION CUTTING CROWN MOLDING The compound miter saw . 52° 38° CEILING W A L L FENCE INSIDE CORNER TOP EDGE AGAINST FENCE = LEFT SIDE, INSIDE CORNER RIGHT SIDE, OUTSIDE ...
... and the wall of exactly 90°, therefore, you will need to fit properly, crown molding must be compound mitered with 52° and 38° angles. In general, compound miter saws do not have angles of a room are at angles that the angles for these angles to set. changing ...the chart below for the application. The crown molding is very easy for crown moldings are interdependent; OPERATION CUTTING CROWN MOLDING The compound miter saw . 52° 38° CEILING W A L L FENCE INSIDE CORNER TOP EDGE AGAINST FENCE = LEFT SIDE, INSIDE CORNER RIGHT SIDE, OUTSIDE ...

User Manual
Page 27
...Recheck blade-to make sure the tool is factory set to the miter table at your nearest RYOBI AUTHORIZED SERVICE CENTER. ADJUSTMENTS WARNING: Before performing any readjustments that the saw has been adjusted at your nearest RYOBI AUTHORIZED SERVICE CENTER. Damage could result in the pivot, have been ... heed this manual. If the blade is cutting accurately. However, some of the saw arm does not raise by turning the knob coun- CAUTION: Do not start the compound miter saw repaired at the factory for interference between the blade and the throat plate. DEPTH STOP The ...
...Recheck blade-to make sure the tool is factory set to the miter table at your nearest RYOBI AUTHORIZED SERVICE CENTER. ADJUSTMENTS WARNING: Before performing any readjustments that the saw has been adjusted at your nearest RYOBI AUTHORIZED SERVICE CENTER. Damage could result in the pivot, have been ... heed this manual. If the blade is cutting accurately. However, some of the saw arm does not raise by turning the knob coun- CAUTION: Do not start the compound miter saw repaired at the factory for interference between the blade and the throat plate. DEPTH STOP The ...

User Manual
Page 30
... parts, always give the following information: • MODEL NUMBER TS1344L • SERIAL NUMBER RYOBI is a registered trademark of Ryobi Limited and is used pursuant to a license granted by power sanding, sawing, grinding, drilling, and other construction activities may contain chemicals, including...purchased your tool, should a need ever exist for repair parts or service, simply contact your nearest Authorized Service Center. Compound Miter Saw TS1344L - To reduce your nearest Authorized Service Center. OPERATOR'S MANUAL 10 in a well-ventilated area and with approved safety ...
... parts, always give the following information: • MODEL NUMBER TS1344L • SERIAL NUMBER RYOBI is a registered trademark of Ryobi Limited and is used pursuant to a license granted by power sanding, sawing, grinding, drilling, and other construction activities may contain chemicals, including...purchased your tool, should a need ever exist for repair parts or service, simply contact your nearest Authorized Service Center. Compound Miter Saw TS1344L - To reduce your nearest Authorized Service Center. OPERATOR'S MANUAL 10 in a well-ventilated area and with approved safety ...

User Manual 4
Page 2
MODEL NUMBER TS1344L 12 13 9 10 11 5 1 2 39 72 72 5 7 63 4 6 17 3 7 38 33 5 34 15 16 5 22 20 23 25 26 21 24 19 18 31 30 59 43 13 52 13 44 50 45 46 40 48 49 51 57 53 37 36 32 35 55 69 65 64 8 71 67 66 70 56 58 61 60 62 68 2 29 23 20 22 27 28 59 47 41 42 54 14 FIGURE A RYOBI 10 in. COMPOUND MITER SAW -
MODEL NUMBER TS1344L 12 13 9 10 11 5 1 2 39 72 72 5 7 63 4 6 17 3 7 38 33 5 34 15 16 5 22 20 23 25 26 21 24 19 18 31 30 59 43 13 52 13 44 50 45 46 40 48 49 51 57 53 37 36 32 35 55 69 65 64 8 71 67 66 70 56 58 61 60 62 68 2 29 23 20 22 27 28 59 47 41 42 54 14 FIGURE A RYOBI 10 in. COMPOUND MITER SAW -

User Manual 4
Page 3
...Armature Assembly (Inc. NUMBER Warning Label 1 Power Cord 1 Bend Relief 1 Cord Clamp 1 Screw (M4 x 16 mm, Rd. MODEL NUMBER TS1344L The model number will be found on a label attached to the motor housing. Key Nos. 42, 44 and 55 1 Set Screw (M5 ... 65 089100207051 66 089006017073 67 089006017072 68 089006017703 69 089006017040 70 089006017041 71 089006017064 72 089006017057 3 DESCRIPTION QTY. COMPOUND MITER SAW - RYOBI 10 in all correspondence regarding your MITER SAW or when ordering repair parts. Hd 1 Battery Compartment 1 Laser Switch 1 Battery Box Cover 1 Screw (M4...
...Armature Assembly (Inc. NUMBER Warning Label 1 Power Cord 1 Bend Relief 1 Cord Clamp 1 Screw (M4 x 16 mm, Rd. MODEL NUMBER TS1344L The model number will be found on a label attached to the motor housing. Key Nos. 42, 44 and 55 1 Set Screw (M5 ... 65 089100207051 66 089006017073 67 089006017072 68 089006017703 69 089006017040 70 089006017041 71 089006017064 72 089006017057 3 DESCRIPTION QTY. COMPOUND MITER SAW - RYOBI 10 in all correspondence regarding your MITER SAW or when ordering repair parts. Hd 1 Battery Compartment 1 Laser Switch 1 Battery Box Cover 1 Screw (M4...

