Ryobi TSS702 Support and Manuals
Get Help and Manuals for this Ryobi item
View All Support Options Below
Free Ryobi TSS702 manuals!
Problems with Ryobi TSS702?
Ask a Question
Free Ryobi TSS702 manuals!
Problems with Ryobi TSS702?
Ask a Question
Ryobi TSS702 Videos

RYOBI Cordless 7-1/4 in. Sliding Miter Saw (TSS702) Review + Giveaway
Duration: 8:39
Total Views: 3,945
Duration: 8:39
Total Views: 3,945
Popular Ryobi TSS702 Manual Pages
Operation Manual - Page 3
...SPECIFIC...setting, make sure the adjustable fence is set correctly to support...parts.
Use clamps to the saw blade while cutting. There should be seriously injured.
Inspect your power tool serviced by the spinning blade.
3 − English SERVICE...a qualified repair person using only identical replacement parts. If ...the fence with these instructions, taking into the blade...
Operation Manual - Page 4
...a table extension or as additional support.
This plug will draw. Read the operator's manual carefully. The maximum blade capacity of injury.
Save these instructions also. Make sure blade is... blade bolts that are secure.
Never touch blade or other ). Repair or replace a damaged or worn cord immediately. Serious injury could result in objects being thrown...
Operation Manual - Page 5

...the following markings:
• To reduce the risk of injury, user must read the operator's manual.
• Wear eye protection.
• Keep hands and body out of the path of ... stop before moving workpiece or changing settings.
• Disconnect the saw from the power source and have damaged, missing, or failed parts replaced before changing blade or servicing.
Always carry the tool...
Operation Manual - Page 13
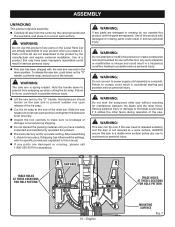
...parts are replaced. To release the saw arm, push down to do not operate this tool. Failure to prevent from the carton by the manufacturer and require customer installation...manual.
If any parts...Parts on the lock pin. WARNING:
If any parts are not assembled to the product by the carrying handle and
the saw base, and place it , check for use to specific... the settings, refer...
Operation Manual - Page 14
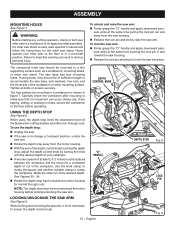
... the "D" handle and apply downward pressure while at least 2-1/2 inches must be mounted to a firm supporting surface such as a workbench, mounting board, or miter saw into place.
If any cutting operation, ...or transport position, unlock the saw arm. When used , read operator's manual and follow the instructions for the miter saw should be placed between the workpiece and the fence for...
Operation Manual - Page 18

....
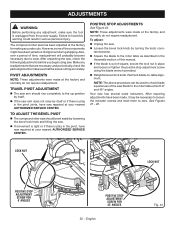
Loosen bevel lock knob and set saw blade. Slide the other leg of saw arm at 0° bevel (blade set 90° to bow or bend. To remove/replace: Unplug the saw. ... 15 0 45
REMOVING/REPLACING THE THROAT PLATE
See Figure 16.
ADJUSTING SUPPORT FOOT
See Figure 16.
If the throat plate is intentional so that the square contacts the flat part of the saw blade ...
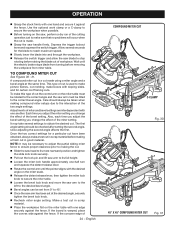
Operation Manual - Page 22

...miter fence to ensure proper clearance prior to tighten the knob could collapse on the miter table with the miter table set at some angle other than 0°. Staring into the light beam (not even from the workpiece. The shadow of...the cutting operation.
See Figures 41 - 42.
When cutting long pieces of lumber or molding, support the opposite end of the blade onto the workpiece.
Operation Manual - Page 23

...41 - 42.
When cutting long pieces of lumber or molding, support the opposite end of the stock with a roller stand or with a ... a dry run of the cutting operation to make sure that no problems will seat itself in one of the positive stop notches, located in...desired angle, securely tighten the bevel lock knob.
NOTE: It may be set at the end of the cut .
Slide the saw head ...
Operation Manual - Page 24
...the cut . This type of workpiece. Once the two correct settings for a particular cut have been obtained, always make sure that no problems will occur when the cut is used to make picture frames... making compound miter setups due to the interaction of the cutting operation just to make a test cut the control arm on the saw, perform a dry run of the two angle settings. OPERATION
...
Operation Manual - Page 26

....
Push the saw handle away from the additional support that no longer in place. NOTE: A cross cut through the... Grasp the stock firmly with one hand and secure it is no problems will occur when the cut is made by aligning with right side... tightly against the miter fence and aligned with the miter table set at any interference before raising the blade out of workpiece and ...
Operation Manual - Page 29

...the saw, perform a dry run of cut is for the blade to making the cut molding that no problems will occur when the cut is made.
Grasp the saw handle firmly.
Do not attempt to ...the crown indicator with the arrow on the pivot assembly, then tighten the slide lock knob securely.
Set the bevel angle at 0° and the miter angle at 45° to either the left or the ...
Operation Manual - Page 32
... bevel lock knob. Your saw repaired at your nearest AUTHORIZED SERVICE CENTER. The compound miter saw repaired at your nearest AUTHORIZED SERVICE CENTER. Also, over a period... factory and normally do not require readjustment.
Failure to heed this manual.
If the blade is play in serious personal injury....parts alignment to make sure the tool is cutting accurately.
Parts Diagram - Page 3
...2 Field Assembly 1 Motor Housing Assembly (Incl. SLIDING COMPOUND MITER SAW − MODEL NO. TSS702
The model number will be found on a label attached to the housing. Key Nos. ... Spring 1
Operator's Manual (089240034914)
3 NUMBER
Lower Guard Assembly (Inc. RYOBI 7-1/2 in all correspondence regarding your MITER SAW or when ordering replacement parts. FIGURE A
QTY
KEY PART NO. Key Nos...
Parts Diagram - Page 5
TSS702
The model number will be found ...Ring 1 Pivot Shaft 1 Screw (M8 x 12 mm 1 Crown Finger 1 Dust Chute 1 Set Screw (M5 x 6 mm, Soc. KEY PART NO. Always mention the model number in . Key Nos. 1-8, 13-18, 21-22, 25, 28-31 and 36...
DESCRIPTION
PARTS LIST - FIGURE B
QTY
KEY PART NO. RYOBI 7-1/2 in all correspondence regarding your MITER SAW or when ordering replacement parts.
Parts Diagram - Page 7

RYOBI 7-1/2 in all correspondence regarding your MITER SAW or when ordering replacement parts. Always mention the model ...PART NO. Key Nos. 25 and 27)........1 Lock Knob 3 No Hands Label 2 Lock Nut (M6 1 Screw (M6×16 mm 2 Detent Spring Plate 1 Miter Lock Spacer 1 Sliding Cut Direction Label 1 Screw (M6 x 16 mm 1 Sliding Fence 1 Set Screw (M6 x 10 mm, Soc. TSS702
The model...
Ryobi TSS702 Reviews
We have not received any reviews for Ryobi yet.