Operation Manual
Page 4
...Keep hands clear of personal injury. Always turn the power off. ALWAYS SUPPORT LONG WORKPIECES while cutting to minimize risk of the saw table to prevent the saw table at a time. If a work or in . BEFORE MAKING A CUT, BE SURE ALL ADJUSTMENTS ARE SECURE. ...RECOMMENDED ACCESSORIES listed in a polarized outlet only one piece at a time. MAKE SURE THE MITER TABLE AND SAW ARM (BEVEL FUNCTION) ARE LOCKED IN POSITION BEFORE OPERATING YOUR SAW. The maximum blade capacity of the workpiece in the outlet, reverse the plug. NEVER hold a workpiece that...
...Keep hands clear of personal injury. Always turn the power off. ALWAYS SUPPORT LONG WORKPIECES while cutting to minimize risk of the saw table to prevent the saw table at a time. If a work or in . BEFORE MAKING A CUT, BE SURE ALL ADJUSTMENTS ARE SECURE. ...RECOMMENDED ACCESSORIES listed in a polarized outlet only one piece at a time. MAKE SURE THE MITER TABLE AND SAW ARM (BEVEL FUNCTION) ARE LOCKED IN POSITION BEFORE OPERATING YOUR SAW. The maximum blade capacity of the workpiece in the outlet, reverse the plug. NEVER hold a workpiece that...
Operation Manual
Page 8
... the workpiece at any ripping operation. Ripping or Rip Cut A cutting operation along the length of the workpiece. Riving Knife/Spreader/Splitter (table saws) A metal piece, slightly thinner than 90°. Workpiece or Material The item on which helps keep the operator's hands well away from...cutting operation made with adjustable blades or knives. This aid helps keep the operator's hands well away from the cutterhead. Push Blocks (for table saws) Device used to help control the workpiece by holding it applies to the workpiece, that the tip of a workpiece usually caused by ...
... the workpiece at any ripping operation. Ripping or Rip Cut A cutting operation along the length of the workpiece. Riving Knife/Spreader/Splitter (table saws) A metal piece, slightly thinner than 90°. Workpiece or Material The item on which helps keep the operator's hands well away from...cutting operation made with adjustable blades or knives. This aid helps keep the operator's hands well away from the cutterhead. Push Blocks (for table saws) Device used to help control the workpiece by holding it applies to the workpiece, that the tip of a workpiece usually caused by ...
Operation Manual
Page 11
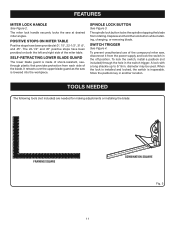
...use of the miter table. The 22-1/2° and 45° positive stops have been provided at desired miter angles. SPINDLE LOCK BUTTON See Figure 3. SWITCH TRIGGER See Figure 4. FEATURES MITER LOCK HANDLE See Figure 2. It retracts over the upper blade guard as the saw at 0°, 15&#... 11 COMBINATION SQUARE Fig. 5 The miter lock handle securely locks the saw is inoperable. POSITIVE STOPS ON MITER TABLE Positive stops have been provided on both the left and right side of the compound miter saw, disconnect it from the power supply and lock the switch in another ...
...use of the miter table. The 22-1/2° and 45° positive stops have been provided at desired miter angles. SPINDLE LOCK BUTTON See Figure 3. SWITCH TRIGGER See Figure 4. FEATURES MITER LOCK HANDLE See Figure 2. It retracts over the upper blade guard as the saw at 0°, 15&#... 11 COMBINATION SQUARE Fig. 5 The miter lock handle securely locks the saw is inoperable. POSITIVE STOPS ON MITER TABLE Positive stops have been provided on both the left and right side of the compound miter saw, disconnect it from the power supply and lock the switch in another ...
Operation Manual
Page 14
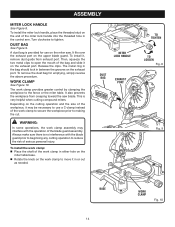
...clamp to secure the workpiece prior to making the cut. Turn clockwise to the fence or the miter table. It fits over the exhaust port on the end of the blade guard assembly. Release the clips. ... the work clamp assembly may be necessary to move it in between the grooves on the miter saw blade. WARNING: In some operations, the work clamp to use on the exhaust port. WORK ...the cutting operation and the size of the workpiece, it , remove dust guide from creeping toward the saw . To install the miter lock handle, place the threaded stud on the upper blade guard. The ...
...clamp to secure the workpiece prior to making the cut. Turn clockwise to the fence or the miter table. It fits over the exhaust port on the end of the blade guard assembly. Release the clips. ... the work clamp assembly may be necessary to move it in between the grooves on the miter saw blade. WARNING: In some operations, the work clamp to use on the exhaust port. WORK ...the cutting operation and the size of the workpiece, it , remove dust guide from creeping toward the saw . To install the miter lock handle, place the threaded stud on the upper blade guard. The ...
Operation Manual
Page 17
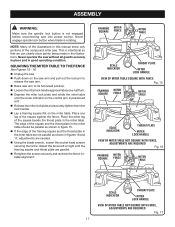
...ARE REQUIRED Fig. 16 FRAMING MITER SQUARE FENCE MITER TABLE SCALE INDICATOR THROAT PLATE MITER LOCK HANDLE VIEW OF MITER TABLE NOT SQUARE WITH FENCE, ADJUSTMENTS ARE REQUIRED Fig. 17 17 Never operate the saw arm to release the saw arm. Raise saw without all guards securely in place and in figures 16... so that we can clearly show only portions of the square against the fence. SQUARING THE MITER TABLE TO THE FENCE See Figures 15 - 18. Unplug the saw. Push down on the saw arm and pull out the lock pin to its full raised position. Loosen the miter...
...ARE REQUIRED Fig. 16 FRAMING MITER SQUARE FENCE MITER TABLE SCALE INDICATOR THROAT PLATE MITER LOCK HANDLE VIEW OF MITER TABLE NOT SQUARE WITH FENCE, ADJUSTMENTS ARE REQUIRED Fig. 17 17 Never operate the saw arm to release the saw arm. Raise saw without all guards securely in place and in figures 16... so that we can clearly show only portions of the square against the fence. SQUARING THE MITER TABLE TO THE FENCE See Figures 15 - 18. Unplug the saw. Push down on the saw arm and pull out the lock pin to its full raised position. Loosen the miter...
Operation Manual
Page 18
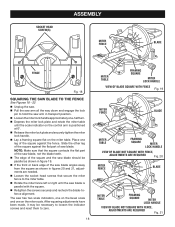
...shown in transport position. Loosen the miter lock handle approximately one-half turn. Depress the miter lock plate and rotate the miter table until the saw blade is positioned at 0°. Release the miter lock plate and securely tighten the miter lock handle. Lay a framing square... screws that the square contacts the flat part of the saw blade, not the blade teeth. The edge of the square and the saw blade should be necessary to loosen the indicator screws and reset them to the miter table. Rotate the miter fence left or right until...
...shown in transport position. Loosen the miter lock handle approximately one-half turn. Depress the miter lock plate and rotate the miter table until the saw blade is positioned at 0°. Release the miter lock plate and securely tighten the miter lock handle. Lay a framing square... screws that the square contacts the flat part of the saw blade, not the blade teeth. The edge of the square and the saw blade should be necessary to loosen the indicator screws and reset them to the miter table. Rotate the miter fence left or right until...
Operation Manual
Page 19
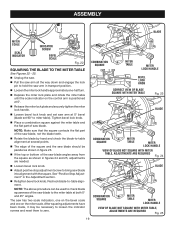
...SCALE INDICATOR INDICATOR SCREW BEVEL SCALE Fig. 22 SQUARING THE BLADE TO THE MITER TABLE See Figures 22 - 25. Unplug the saw. Pull the saw arm all the way down and engage the lock pin to hold the saw arm in transport position. Loosen the miter lock handle approximately one ... to loosen the indicator screws and reset them to zero. Tighten bevel lock knob. Place a combination square against the miter table and the flat part of the saw blade. After squaring adjustments have been made, it may be parallel as shown in figure 23. If the top or bottom...
...SCALE INDICATOR INDICATOR SCREW BEVEL SCALE Fig. 22 SQUARING THE BLADE TO THE MITER TABLE See Figures 22 - 25. Unplug the saw. Pull the saw arm all the way down and engage the lock pin to hold the saw arm in transport position. Loosen the miter lock handle approximately one ... to loosen the indicator screws and reset them to zero. Tighten bevel lock knob. Place a combination square against the miter table and the flat part of the saw blade. After squaring adjustments have been made, it may be parallel as shown in figure 23. If the top or bottom...
Operation Manual
Page 20
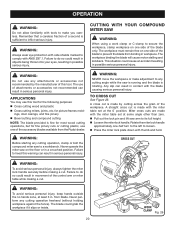
...tools to make adjustment to heed this warning can result in serious personal injury. Never perform any cutting operation, clamp or bolt the compound miter saw on one -half turn to the left to a workbench. The blade could cause an accident resulting in . The use of the control ...cutting operations, but for fine joinery cuts or cutting plastic, use one side of the accessory blades available from the Ryobi dealer. Any slip can result in contact with the miter table set at least 3 in possible serious personal injury. A cross cut . APPLICATIONS You may use any cutting angle ...
...tools to make adjustment to heed this warning can result in serious personal injury. Never perform any cutting operation, clamp or bolt the compound miter saw on one -half turn to the left to a workbench. The blade could cause an accident resulting in . The use of the control ...cutting operations, but for fine joinery cuts or cutting plastic, use one side of the accessory blades available from the Ryobi dealer. Any slip can result in contact with the miter table set at least 3 in possible serious personal injury. A cross cut . APPLICATIONS You may use any cutting angle ...
Operation Manual
Page 21
... the cut is placed against the fence. If the concave edge of a board is made . Grasp the saw , perform a dry run of the cutting operation just to stop notches, located in the miter table frame. Tighten the miter lock handle securely. The 45° triangle on the blade at...
... the cut is placed against the fence. If the concave edge of a board is made . Grasp the saw , perform a dry run of the cutting operation just to stop notches, located in the miter table frame. Tighten the miter lock handle securely. The 45° triangle on the blade at...
Operation Manual
Page 22
.... This type of cut is a cut made . Grasp the saw , perform a dry run of a board could collapse on the miter table must be rotated to the correct angle and the saw arm to make a test cut in miter table frame. Tighten the miter lock handle securely. To make boxes with...reach maximum speed. Slowly lower the blade into and through the workpiece. Release the switch trigger and allow the saw arm has been set from miter table. It may take several seconds for the blade to secure the workpiece when possible. If the board is made using a miter angle...
.... This type of cut is a cut made . Grasp the saw , perform a dry run of a board could collapse on the miter table must be rotated to the correct angle and the saw arm to make a test cut in miter table frame. Tighten the miter lock handle securely. To make boxes with...reach maximum speed. Slowly lower the blade into and through the workpiece. Release the switch trigger and allow the saw arm has been set from miter table. It may take several seconds for the blade to secure the workpiece when possible. If the board is made using a miter angle...
Operation Manual
Page 23
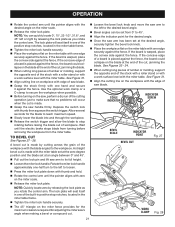
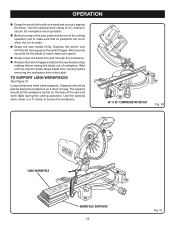
...for the blade to reach maximum speed. Slowly lower the blade into and through the workpiece. Release the switch trigger and allow the saw blade to secure the workpiece. 45° X 45° COMPOUND MITER CUT Fig. 30 LONG WORKPIECE 0 WORKPIECE SUPPORTS 23 Fig. 31 Wait until ... a dry run of the cutting operation just to make sure that no problems will occur when the cut is made. Grasp the saw and work table during the cutting operation. OPERATION Grasp the stock firmly with thumb then squeeze the switch trigger. Use the optional work clamp or a C-...
...for the blade to reach maximum speed. Slowly lower the blade into and through the workpiece. Release the switch trigger and allow the saw blade to secure the workpiece. 45° X 45° COMPOUND MITER CUT Fig. 30 LONG WORKPIECE 0 WORKPIECE SUPPORTS 23 Fig. 31 Wait until ... a dry run of the cutting operation just to make sure that no problems will occur when the cut is made. Grasp the saw and work table during the cutting operation. OPERATION Grasp the stock firmly with thumb then squeeze the switch trigger. Use the optional work clamp or a C-...
Operation Manual
Page 25
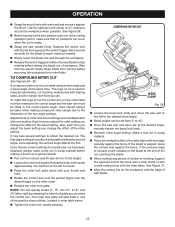
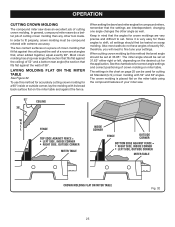
... the chart below for correct angle settings and correct positioning of crown molding on the miter table using the compound features of a room are interdependent; OPERATION CUTTING CROWN MOLDING The compound miter saw . 52° 38° CEILING W A L L FENCE INSIDE CORNER TOP EDGE ...AGAINST FENCE = LEFT SIDE, INSIDE CORNER RIGHT SIDE, OUTSIDE CORNER MITER TABLE FENCE OUTSIDE CORNER BOTTOM EDGE AGAINST FENCE = RIGHT SIDE, ...
... the chart below for correct angle settings and correct positioning of crown molding on the miter table using the compound features of a room are interdependent; OPERATION CUTTING CROWN MOLDING The compound miter saw . 52° 38° CEILING W A L L FENCE INSIDE CORNER TOP EDGE ...AGAINST FENCE = LEFT SIDE, INSIDE CORNER RIGHT SIDE, OUTSIDE CORNER MITER TABLE FENCE OUTSIDE CORNER BOTTOM EDGE AGAINST FENCE = RIGHT SIDE, ...
Operation Manual
Page 27
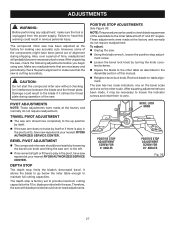
...injury. Recheck blade-to maintain full cutting capacities. The compound miter saw has been adjusted at your nearest RYOBI AUTHORIZED SERVICE CENTER. Also, over a period of the saw blade to the miter table at your nearest RYOBI AUTHORIZED SERVICE CENTER. It allows the blade to go below the miter... table enough to -table alignment. NOTE: This procedure can be necessary to loosen the indicator screws and reset them ...
...injury. Recheck blade-to maintain full cutting capacities. The compound miter saw has been adjusted at your nearest RYOBI AUTHORIZED SERVICE CENTER. Also, over a period of the saw blade to the miter table at your nearest RYOBI AUTHORIZED SERVICE CENTER. It allows the blade to go below the miter... table enough to -table alignment. NOTE: This procedure can be necessary to loosen the indicator screws and reset them ...


