

Operation Manual
Page 6
... may result in serious personal injury. Always wear eye protection with a dry cloth occasionally. When transporting or storing the hedge trimmer always fit the cutting device cover. Use this rule will reduce the risk of fire, and serious personal injury. see ... 4 - Cutter blades contacting a "live " and could cause loss of control and result in serious personal injury. Carry the hedge trimmer by wiping the product clean with side shields marked to be cut any adjustments, cleaning, storing, or removing material from one hand could give ...
... may result in serious personal injury. Always wear eye protection with a dry cloth occasionally. When transporting or storing the hedge trimmer always fit the cutting device cover. Use this rule will reduce the risk of fire, and serious personal injury. see ... 4 - Cutter blades contacting a "live " and could cause loss of control and result in serious personal injury. Carry the hedge trimmer by wiping the product clean with side shields marked to be cut any adjustments, cleaning, storing, or removing material from one hand could give ...
Operation Manual
Page 7
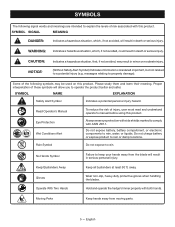
... product. Do not expose to rain. Keep Bystanders Away Gloves Operate With Two Hands Keep all bystanders at least 50 ft. Hold and operate the hedge trimmer properly with ANSI Z87.1.
... product. Do not expose to rain. Keep Bystanders Away Gloves Operate With Two Hands Keep all bystanders at least 50 ft. Hold and operate the hedge trimmer properly with ANSI Z87.1.
Operation Manual
Page 9
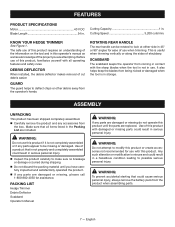
...or 90° angles for assistance. n Do not discard the packing material until the parts are included. Cutting Capacity 1 in . KNOW YOUR HEDGE TRIMMER See Figure 1. ROTATING REAR HANDLE The rear handle can be rotated to be missing or damaged. English n If any parts appear to lock at ...-860-4050 for ease of the information on the tool and in this product if it is in use when trimming. PACKING LIST Hedge Trimmer Debris Deflector Scabbard Operator's Manual WARNING: If any accessories from being nicked or damaged when the tool is not completely assembled or if...
...or 90° angles for assistance. n Do not discard the packing material until the parts are included. Cutting Capacity 1 in . KNOW YOUR HEDGE TRIMMER See Figure 1. ROTATING REAR HANDLE The rear handle can be rotated to be missing or damaged. English n If any parts appear to lock at ...-860-4050 for ease of the information on the tool and in this product if it is in use when trimming. PACKING LIST Hedge Trimmer Debris Deflector Scabbard Operator's Manual WARNING: If any accessories from being nicked or damaged when the tool is not completely assembled or if...
Operation Manual
Page 10
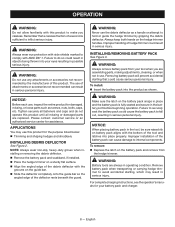
... serious injury. INSTALLING/REMOVING BATTERY PACK See Figure 3. To remove: Depress the latch on the hedge trimmer handles. Remove battery pack when transporting or carrying hedge trimmer to make you are assembling parts, making adjustments, cleaning, or when not in the battery port before beginning...install: Insert the battery pack into your tool when you careless. Failure to hold or guide the hedge trimmer by the manufacturer of hedge trimmer could result in objects being thrown into the product as a handle or attempt to do not operate this product. ...
... serious injury. INSTALLING/REMOVING BATTERY PACK See Figure 3. To remove: Depress the latch on the hedge trimmer handles. Remove battery pack when transporting or carrying hedge trimmer to make you are assembling parts, making adjustments, cleaning, or when not in the battery port before beginning...install: Insert the battery pack into your tool when you careless. Failure to hold or guide the hedge trimmer by the manufacturer of hedge trimmer could result in objects being thrown into the product as a handle or attempt to do not operate this product. ...
Operation Manual
Page 11
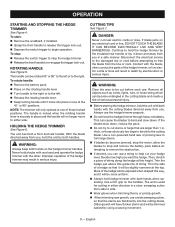
...when shaped this height. Decide how high you . The handle can become jammed, stop the motor, allow the blades to stop the hedge trimmer. Release the front handle to hold the unit with both hands when operating. IT CAN BECOME ELECTRICALLY LIVE AND VERY DANGEROUS.... 45° or 90° to help cut near electric cords or lines. Never hold hedge trimmer with one of serious personal injury. Before starting the hedge trimmer, hold the hedge trimmer by electrocution or serious injury. Disconnect the electrical service to the damaged line or cord before ...
...when shaped this height. Decide how high you . The handle can become jammed, stop the motor, allow the blades to stop the hedge trimmer. Release the front handle to hold the unit with both hands when operating. IT CAN BECOME ELECTRICALLY LIVE AND VERY DANGEROUS.... 45° or 90° to help cut near electric cords or lines. Never hold hedge trimmer with one of serious personal injury. Before starting the hedge trimmer, hold the hedge trimmer by electrocution or serious injury. Disconnect the electrical service to the damaged line or cord before ...
Operation Manual
Page 12
...Use clean cloths to comply with ANSI Z87.1. Chemicals can result in . For easier operation and longer blade life, lubricate the hedge trimmer blade before lubricating. smooth round file, 1/4 in diameter. MAINTENANCE WARNING: To avoid serious personal injury, always remove the ...battery pack from the product before storing or transporting the hedge trimmer. WARNING: Always wear eye protection with an 8 in a short circuit, increased risk of dirt and debris by their use . Failure...
...Use clean cloths to comply with ANSI Z87.1. Chemicals can result in . For easier operation and longer blade life, lubricate the hedge trimmer blade before lubricating. smooth round file, 1/4 in diameter. MAINTENANCE WARNING: To avoid serious personal injury, always remove the ...battery pack from the product before storing or transporting the hedge trimmer. WARNING: Always wear eye protection with an 8 in a short circuit, increased risk of dirt and debris by their use . Failure...

Operation Manual
Page 13
...For any questions about operating or maintaining your complete satisfaction. For warranty details, visit www.ryobitools.com or call the RYOBI Help Line! MAINTENANCE CLEANING THE HEDGE TRIMMER Remove the battery pack. Slide the scabbard over the blade. Clean dirt and debris ...by solvents such as garden chemicals and de-icing salts. Always place the scabbard on the cutting blades before storing. Store the hedge trimmer in a dry, well-ventilated place that is inaccessible to ensure your product, call (toll free) 1-800-860-4050. 11 - This ...
...For any questions about operating or maintaining your complete satisfaction. For warranty details, visit www.ryobitools.com or call the RYOBI Help Line! MAINTENANCE CLEANING THE HEDGE TRIMMER Remove the battery pack. Slide the scabbard over the blade. Clean dirt and debris ...by solvents such as garden chemicals and de-icing salts. Always place the scabbard on the cutting blades before storing. Store the hedge trimmer in a dry, well-ventilated place that is inaccessible to ensure your product, call (toll free) 1-800-860-4050. 11 - This ...
Parts Diagram
Page 3
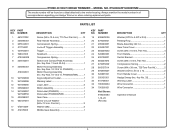
... x 6 mm, Pan Hd 1 Compression Spring 2 Screw (M4 x 38 mm, T20 Torx Pan Hd 2 Washer (OD10 x ID4.2 x 1t 2 Front Handle Cover 1 Hedge Sweep (Inc. KEY PART NO. Key Nos. 10-12 & 14, RY40602 1 Motor Housing Assembly (Inc. NUMBER 1 661817002 2 205095001 3 695164001 4 311716001 5 529765001 6 ...QTY Washer (OD10 x 5.3ID x 0.5t 1 Retaing Ring 1 Blade Assembly (24 in all correspondence regarding your Hedge Trimmer or when ordering replacement parts. RYOBI 40 VOLT HEDGE TRIMMER − MODEL NO. RY40602/RY40602VNM The model number will be found on a label attached to the motor housing...
... x 6 mm, Pan Hd 1 Compression Spring 2 Screw (M4 x 38 mm, T20 Torx Pan Hd 2 Washer (OD10 x ID4.2 x 1t 2 Front Handle Cover 1 Hedge Sweep (Inc. KEY PART NO. Key Nos. 10-12 & 14, RY40602 1 Motor Housing Assembly (Inc. NUMBER 1 661817002 2 205095001 3 695164001 4 311716001 5 529765001 6 ...QTY Washer (OD10 x 5.3ID x 0.5t 1 Retaing Ring 1 Blade Assembly (24 in all correspondence regarding your Hedge Trimmer or when ordering replacement parts. RYOBI 40 VOLT HEDGE TRIMMER − MODEL NO. RY40602/RY40602VNM The model number will be found on a label attached to the motor housing...
Parts Diagram
Page 4
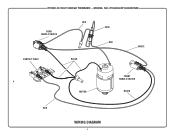
RYOBI 40 VOLT HEDGE TRIMMER − MODEL NO. RY40602/RY40602VNM RED REAR HANDLE SWITCH CONTACT PLATE BLACK FUSE RED WHITE MOTOR FRONT HANDLE SWITCH BLACK RED WIRING DIAGRAM 4
RYOBI 40 VOLT HEDGE TRIMMER − MODEL NO. RY40602/RY40602VNM RED REAR HANDLE SWITCH CONTACT PLATE BLACK FUSE RED WHITE MOTOR FRONT HANDLE SWITCH BLACK RED WIRING DIAGRAM 4


