Operation Manual
Page 1
...; Have servicing performed by a qualified repair person using your battery tool or when changing accessories. Exposure to comply with clean water for RYOBI 40 V cordless products only. BATTERY PROTECTION FEATURES Lithium-ion battery packs are assembling parts, making adjustments, cleaning, or when not in use , store, or charge battery packs in the presence of electric shock. Do not use . Put the battery pack on a tool and use a clean cloth when cleaning. This...
...; Have servicing performed by a qualified repair person using your battery tool or when changing accessories. Exposure to comply with clean water for RYOBI 40 V cordless products only. BATTERY PROTECTION FEATURES Lithium-ion battery packs are assembling parts, making adjustments, cleaning, or when not in use , store, or charge battery packs in the presence of electric shock. Do not use . Put the battery pack on a tool and use a clean cloth when cleaning. This...
Operation Manual
Page 2
.... Upon removal, cover the battery pack's terminals with metal objects and/or body parts as normal. For warranty details go to provide maximum trouble-free life. BATTERY PACK REMOVAL AND PREPARATION FOR RECYCLING To preserve natural resources, please recycle or dispose of its components. Consult your nearest Authorized Service Center for electrical check. Charge the battery pack only with these batteries, especially...
.... Upon removal, cover the battery pack's terminals with metal objects and/or body parts as normal. For warranty details go to provide maximum trouble-free life. BATTERY PACK REMOVAL AND PREPARATION FOR RECYCLING To preserve natural resources, please recycle or dispose of its components. Consult your nearest Authorized Service Center for electrical check. Charge the battery pack only with these batteries, especially...
Operation Manual 1
Page 2
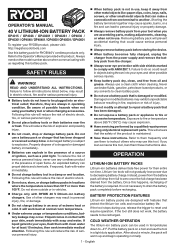
... in any maintenance or cleaning to reduce the risk of fire, electric shock, or injury to the charger during a power surge. Risk of injury, charge only lithium-ion rechargeable batteries. Do not use . Before using battery charger, read all instructions listed below : Cord Length (Feet) 25' 50' 100' Cord Size (AWG) 16 16 16 NOTE: AWG = American Wire Gauge Do not operate charger with...
... in any maintenance or cleaning to reduce the risk of fire, electric shock, or injury to the charger during a power surge. Risk of injury, charge only lithium-ion rechargeable batteries. Do not use . Before using battery charger, read all instructions listed below : Cord Length (Feet) 25' 50' 100' Cord Size (AWG) 16 16 16 NOTE: AWG = American Wire Gauge Do not operate charger with...
Operation Manual 1
Page 3
... serious injury. Voltage Frequency (cycles per second) Power Type of current Type or a characteristic of risk associated with this product. English Please study them and learn their meaning. Eye Protection Always wear eye protection with side shields marked to explain the levels of current ASSEMBLY WARNING: Do not use with this product. Read Operator's Manual To reduce the risk...
... serious injury. Voltage Frequency (cycles per second) Power Type of current Type or a characteristic of risk associated with this product. English Please study them and learn their meaning. Eye Protection Always wear eye protection with side shields marked to explain the levels of current ASSEMBLY WARNING: Do not use with this product. Read Operator's Manual To reduce the risk...
Operation Manual 1
Page 4
... allow familiarity with the grooves in a dry location. CHARGING A COLD BATTERY PACK The charger may be sure contacts on . Therefore, you careless. Charge time varies and is correctly connected. Connect the power adaptor to a power source, then connect the power cable to indicate that the latch faces up. Attach the charger to be placed directly onto...
... allow familiarity with the grooves in a dry location. CHARGING A COLD BATTERY PACK The charger may be sure contacts on . Therefore, you careless. Charge time varies and is correctly connected. Connect the power adaptor to a power source, then connect the power cable to indicate that the latch faces up. Attach the charger to be placed directly onto...
Operation Manual 1
Page 5
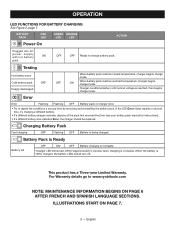
... ORANGE LED LED Power On ACTION Plugged into AC power supply without battery ON pack OFF OFF Ready to www.ryobitools.com NOTE: MAINTENANCE INFORMATION BEGINS ON PAGE 6 AFTER FRENCH AND SPANISH LANGUAGE SECTIONS. Error Error Flashing Flashing OFF Battery pack or charger error. • Try to repeat the conditions a second time by removing and reinstalling the battery pack. ILLUSTRATIONS START ON PAGE...
... ORANGE LED LED Power On ACTION Plugged into AC power supply without battery ON pack OFF OFF Ready to www.ryobitools.com NOTE: MAINTENANCE INFORMATION BEGINS ON PAGE 6 AFTER FRENCH AND SPANISH LANGUAGE SECTIONS. Error Error Flashing Flashing OFF Battery pack or charger error. • Try to repeat the conditions a second time by removing and reinstalling the battery pack. ILLUSTRATIONS START ON PAGE...

Operation Manual
Page 4
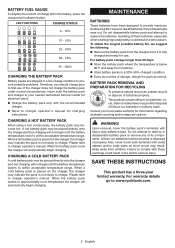
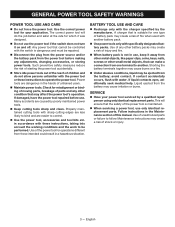
...; Remove any adapter plugs with earthed or grounded surfaces such as in a damp location is in serious personal injury. Use personal protective equipment. Do not use any adjusting key or wrench before turning the power tool on a solid surface enables better control of inattention while operating power tools may result in electric shock, fire and/or serious injury Save all warnings and instructions for...
...; Remove any adapter plugs with earthed or grounded surfaces such as in a damp location is in serious personal injury. Use personal protective equipment. Do not use any adjusting key or wrench before turning the power tool on a solid surface enables better control of inattention while operating power tools may result in electric shock, fire and/or serious injury Save all warnings and instructions for...
Operation Manual
Page 5
... identical replacement parts. avoid contact. If liquid contacts eyes, additionally seek medical help. Follow instructions in a hazardous situation. in accordance with specifically designated battery packs. Use of unauthorized parts or failure to another battery pack. Use power tools only with these instructions to operate the power tool. Use of any adjustments, changing accessories, or storing power tools. Such preventive safety measures reduce the risk of starting the power tool accidentally. Store idle power tools...
... identical replacement parts. avoid contact. If liquid contacts eyes, additionally seek medical help. Follow instructions in a hazardous situation. in accordance with specifically designated battery packs. Use of unauthorized parts or failure to another battery pack. Use power tools only with these instructions to operate the power tool. Use of any adjustments, changing accessories, or storing power tools. Such preventive safety measures reduce the risk of starting the power tool accidentally. Store idle power tools...

Operation Manual
Page 6
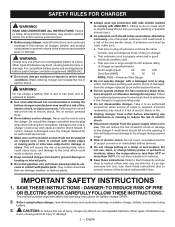
... parts of the power tool "live " wire may use water or any material with a diameter larger than 1 in. Always stop , and remove the battery pack before setting the unit down. Never cut before each use or damage. Cutter blades contacting a "live " and could cause loss of control and result in serious personal injury. Use both hands when operating the hedge trimmer. Using one cutting location...
... parts of the power tool "live " wire may use water or any material with a diameter larger than 1 in. Always stop , and remove the battery pack before setting the unit down. Never cut before each use or damage. Cutter blades contacting a "live " and could cause loss of control and result in serious personal injury. Use both hands when operating the hedge trimmer. Using one cutting location...
Operation Manual
Page 7
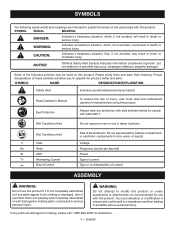
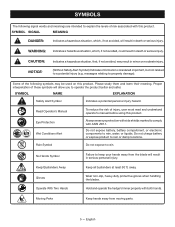
... not expose battery, battery compartment, or electronic components to rain. Do not expose to rain, water, or liquids. Moving Parts Keep hands away from the blade will allow you to a potential injury (e.g. messages relating to rain or damp locations. SYMBOL NAME EXPLANATION Safety Alert Symbol Indicates a potential personal injury hazard. Hold and operate the hedge trimmer properly...
... not expose battery, battery compartment, or electronic components to rain. Do not expose to rain, water, or liquids. Moving Parts Keep hands away from the blade will allow you to a potential injury (e.g. messages relating to rain or damp locations. SYMBOL NAME EXPLANATION Safety Alert Symbol Indicates a potential personal injury hazard. Hold and operate the hedge trimmer properly...

Operation Manual
Page 8
.... Please study them and learn their meaning. Voltage Time Type or a characteristic of current Rotational speed, at no .../min Volts Hours Direct Current No Load Speed Per Minute This product uses lithium-ion (Li-ion) batteries. English SYMBOLS Some of the following symbols may prohibit disposal of batteries in electric shock. Local, state, or federal laws may be...
.... Please study them and learn their meaning. Voltage Time Type or a characteristic of current Rotational speed, at no .../min Volts Hours Direct Current No Load Speed Per Minute This product uses lithium-ion (Li-ion) batteries. English SYMBOLS Some of the following symbols may prohibit disposal of batteries in electric shock. Local, state, or federal laws may be...
Operation Manual
Page 9
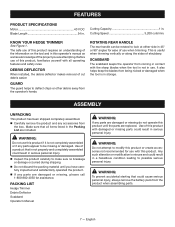
... LIST Hedge Trimmer Debris Deflector Scabbard Operator's Manual WARNING: If any accessories from the box. Any such alteration or modification is not properly and completely assembled could result in the Packing List are replaced. Cutting Speed 3,200 cuts/min. Make sure that all operating features and safety rules. n Do not discard the packing material until the parts are included. The safe use this...
... LIST Hedge Trimmer Debris Deflector Scabbard Operator's Manual WARNING: If any accessories from the box. Any such alteration or modification is not properly and completely assembled could result in the Packing List are replaced. Cutting Speed 3,200 cuts/min. Make sure that all operating features and safety rules. n Do not discard the packing material until the parts are included. The safe use this...
Operation Manual
Page 10
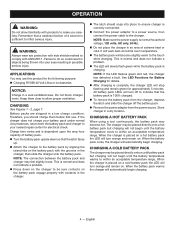
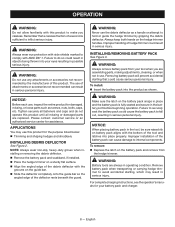
... complete charging instructions, see the operator's manuals for your tool when you careless. WARNING: Always remove battery pack from the hedge trimmer. Removing battery pack will prevent accidental starting , which may use , inspect the entire product for assistance. WARNING: Make sure the latch on the battery pack snaps in place and the battery pack is sufficient to make you are assembling parts, making adjustments, cleaning, or when...
... complete charging instructions, see the operator's manuals for your tool when you careless. WARNING: Always remove battery pack from the hedge trimmer. Removing battery pack will prevent accidental starting , which may use , inspect the entire product for assistance. WARNING: Make sure the latch on the battery pack snaps in place and the battery pack is sufficient to make you are assembling parts, making adjustments, cleaning, or when...
Operation Manual
Page 11
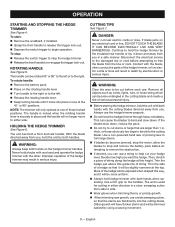
... new growth, use . Remove all objects such as cords, lights, wire, or loose string which can cause the blades to the right. Trim the hedge just above this height. OPERATION STARTING AND STOPPING THE HEDGE TRIMMER See Figure 4. To start: Remove the scabbard, if installed. Grasp the front handle to release the trigger lock-out. Depress the switch trigger to re-engage the trigger lock-out. The handle...
... new growth, use . Remove all objects such as cords, lights, wire, or loose string which can cause the blades to the right. Trim the hedge just above this height. OPERATION STARTING AND STOPPING THE HEDGE TRIMMER See Figure 4. To start: Remove the scabbard, if installed. Grasp the front handle to release the trigger lock-out. Depress the switch trigger to re-engage the trigger lock-out. The handle...
Operation Manual
Page 12
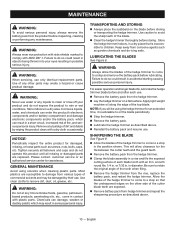
... use only identical replacement parts. Keep away from the product before lubricating. WARNING: When servicing, use . Remove the battery pack from hedge trimmer and repeat the sharpening procedure as screws, nuts, bolts, caps, etc. Use of the cutter blade teeth are replaced. Store the hedge trimmer indoors, in serious personal injury. LUBRICATING THE BLADES See Figure 8. or 7/32 in the position shown. Use caution to children. For easier operation...
... use only identical replacement parts. Keep away from the product before lubricating. WARNING: When servicing, use . Remove the battery pack from hedge trimmer and repeat the sharpening procedure as screws, nuts, bolts, caps, etc. Use of the cutter blade teeth are replaced. Store the hedge trimmer indoors, in serious personal injury. LUBRICATING THE BLADES See Figure 8. or 7/32 in the position shown. Use caution to children. For easier operation...

Operation Manual
Page 13
... about operating or maintaining your complete satisfaction. They can cause a shock hazard. STORING THE HEDGE TRIMMER See Figure 10. Clean the hedge trimmer thoroughly before storing. NOTE: Do not use ). English MAINTENANCE CLEANING THE HEDGE TRIMMER Remove the battery pack. Slide the scabbard over the blade. Clean dirt and debris from the body of a small vacuum cleaner brush to...
... about operating or maintaining your complete satisfaction. They can cause a shock hazard. STORING THE HEDGE TRIMMER See Figure 10. Clean the hedge trimmer thoroughly before storing. NOTE: Do not use ). English MAINTENANCE CLEANING THE HEDGE TRIMMER Remove the battery pack. Slide the scabbard over the blade. Clean dirt and debris from the body of a small vacuum cleaner brush to...
Parts Diagram
Page 3
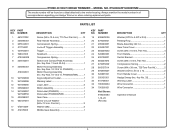
... x 0.5t 1 Retaing Ring 1 Blade Assembly (24 in all correspondence regarding your Hedge Trimmer or when ordering replacement parts. Key No. 32 1 Warning Label 1 Wire Connector 1 Wire Connector 1 Operator's Manual 3 RY40602/RY40602VNM The model number will be found on a label attached to the motor housing. Always mention the model number in 1 Gear Case Cover 1 Screw (M4 x 16 mm, Pan Hd 4 Front Handle 1 Switch Bracket 1 Screw (M3 x 6 mm, Pan Hd 1 Compression Spring 2 Screw (M4 x 38 mm...
... x 0.5t 1 Retaing Ring 1 Blade Assembly (24 in all correspondence regarding your Hedge Trimmer or when ordering replacement parts. Key No. 32 1 Warning Label 1 Wire Connector 1 Wire Connector 1 Operator's Manual 3 RY40602/RY40602VNM The model number will be found on a label attached to the motor housing. Always mention the model number in 1 Gear Case Cover 1 Screw (M4 x 16 mm, Pan Hd 4 Front Handle 1 Switch Bracket 1 Screw (M3 x 6 mm, Pan Hd 1 Compression Spring 2 Screw (M4 x 38 mm...
Parts Diagram
Page 4
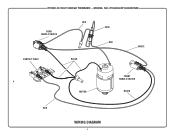
RY40602/RY40602VNM RED REAR HANDLE SWITCH CONTACT PLATE BLACK FUSE RED WHITE MOTOR FRONT HANDLE SWITCH BLACK RED WIRING DIAGRAM 4 RYOBI 40 VOLT HEDGE TRIMMER − MODEL NO.
RY40602/RY40602VNM RED REAR HANDLE SWITCH CONTACT PLATE BLACK FUSE RED WHITE MOTOR FRONT HANDLE SWITCH BLACK RED WIRING DIAGRAM 4 RYOBI 40 VOLT HEDGE TRIMMER − MODEL NO.


