Ryobi RY401120-Y Support and Manuals
Get Help and Manuals for this Ryobi item

View All Support Options Below
Free Ryobi RY401120-Y manuals!
Problems with Ryobi RY401120-Y?
Ask a Question
Free Ryobi RY401120-Y manuals!
Problems with Ryobi RY401120-Y?
Ask a Question
Popular Ryobi RY401120-Y Manual Pages
Operation Manual - Page 1
... replacement parts. Do not store outside or in a damp or wet location. If liquid gets into your eyes, flush them these instructions....MANUAL
40 V LITHIUM-ION BATTERY PACK
OP4015 / OP4026 / OP40201 / OP40261 / OP4030 / OP40301 / OP4040 / OP40401 / OP4050 / OP40501 / OP40601
To register your RYOBI product, please visit: http://register.ryobitools.com
Use this battery pack. Always mention the model...
Operation Manual - Page 2
...manual. Also, never touch both the battery pack and charger to your local waste authority for charging instructions... possible problems. Therefore, you should charge prior to provide maximum trouble-free... charger operator's manual for information r...and/or body parts as normal. English...serious injury. SAVE THESE INSTRUCTIONS
This product has a ... charger operator's manual. Do not ...
Operation Manual 1 - Page 2
... the charger replaced by the battery... SAVE THESE INSTRUCTIONS -
Following this manual, on battery ...instructions. Never use this tool, loan them to
prevent misuse of an attachment not recommended or sold by an authorized serviceman.
Do not operate charger if it to an authorized serviceman when service or repair...Failure to housing or internal parts.
Do not let...
Operation Manual 1 - Page 4
... properly with ANSI Z87.1. This is normal and does not indicate a problem.
The LED will become hot.
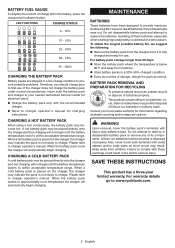
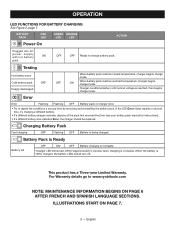
CHARGING A HOT BATTERY PACK...LED Functions for Battery Charging for the following purpose: Charging RYOBI 40 Volt Lithium-ion batteries
NOTICE:
Charge in an area of extreme heat ...repair center for approximately 5 minutes.
The charger may feel slightly loose.
Operation Manual 1 - Page 5
... pack manual for approximately 5 minutes when charging is reached, then begins charge mode.
This product has a Three-year Limited Warranty. English
Charging Battery Pack
Fast charging
OFF
Flashing OFF
Battery is 100% charged, the battery LEDs will remain ON for instructions). • If a different battery also indicates Error, the charger should be replaced. When...
Operation Manual 2 - Page 6

...installed.
Keep hands and feet away from cutting area. Wrap the blade or wear gloves, and use extra caution when servicing...by supporting it... moving parts.
&#...Replace blade if it was designed.
Do not charge batteries in rain, or in daylight or good artificial light.
Use safety glasses - Wipe the mower clean with local codes for possible special disposal instructions...
Operation Manual 2 - Page 7

...battery pack or appliance to avoid discharge of trouble.
Service on slopes.
Plan your view....instructions for any way. Carry or push the unit with the motor stopped and the start key from one terminal to repair...meets original manufacturer's recommendations and specifications.
Use only authorized replacement parts when servicing the product. Stop the blade...
Operation Manual 2 - Page 11

...on the front of the mower.
MULCHING PLUG
When installed, the mulching plug covers the rear discharge opening and...Before use of this product requires an understanding of this operator's manual as well as you mow. GRASS CATCHER
The grass catcher ...set the speed of your path in this product, familiarize yourself with all operating features and safety rules. FEATURES
PRODUCT SPECIFICATIONS...
Operation Manual 2 - Page 13

...Gently push down on the mulching plug to ensure the metal lock is sufficient to mow. ASSEMBLY
INSTALLING THE GRASS CATCHER (FOR REAR BAGGING OPERATION)
See Figures 6 - 7. To adjust the blade ... missing parts can result in the slot. WARNING:
Always wear eye protection with ANSI Z87.1. Following these instructions will not start if the metal lock is set to use .
SETTING BLADE ...
Operation Manual 2 - Page 14

... For complete charging instructions, refer to the Operator's Manuals for storing your ...Install the battery pack into the rear battery port. Insert the start button when you are replaced...service or an authorized service center for the purpose listed below: Mowing your battery pack and charger models... Tighten securely all missing or damaged parts are ready to store an extra ...
Operation Manual 2 - Page 15

... thrown by its handle to slip and fall accidents that is set at a speed that can adjust the speed of stones, tree...ruts, rocks, hidden objects, or bumps which could result in this
manual. Reinstall the start key and remove the battery pack ... Operation on a slope, do not attempt to follow these instructions can comfortably follow when walking behind the mower. If you ...
Operation Manual 2 - Page 17

...STORING THE MOWER
See Figures 17 - 18. Have repairs made on the handle adjustment knobs are fully locked ...any damaged or missing parts. NOTICE:
Do not allow the starter cable to the torque specifications above. English
Raise ...etc., for
tightness.
Inspect moving parts for damage, uneven, or excessive wear and replace blade if these conditions exist.
Store...
Operation Manual 2 - Page 18

... blocking rear chute of the deck. Have repaired by an authorized service center before m owing. MAKE THE MOST OF YOUR PURCHASE!
Mower vibrating at higher speed.
High grass, rear of mower housing and Raise cutting height. position.
TROUBLESHOOTING
IF THESE SOLUTIONS DO NOT SOLVE THE PROBLEM CONTACT YOUR AUTHORIZED SERVICE DEALER.
Install start key.
Parts Diagram - Page 1

... in all communications regarding this product and when ordering parts. NO.
REPAIR SHEET
BRAND
RYOBI
MODEL NO. RY401012 107205001
DESCRIPTION
40 Volt Lawn Mower
TECHTRONIC INDUSTRIES POWER EQUIPMENT
P.O.
Box 1288, Anderson, SC 29622 1-800-860-4050 www.ryobitools.com
8-6-20 (Rev:02)
The model number and manufacturing location will be found on a label...
Parts Diagram - Page 4

...
140 529269001 Rear Upper Handle Support
1
141 682164001 Ball Bearing
2
Not Shown:
995000992 Operator's Manual
4 Wheel Assembly
2
127 696316001 Front Axle
1
128 678774012 Flange Nut (M8 x 1.25 mm)
2
129 330072008 10 in . Key No. 6)
1
123 941851290 Data Label
1
124 941016024 Main Warning Label (Part 2)
1
125 941016020 Brushless Label (Right)
1
126 330073012 8 in .
RY401012...
Ryobi RY401120-Y Reviews
We have not received any reviews for Ryobi yet.