Operation Manual
Page 3
... encircling the chain saw handles. Fatigue causes carelessness. Pinching the saw chain along the top of the guide bar may push the guide bar rapidly back toward the operator. When transporting the chain saw, use replacement bars and chains specified by the manufacturer or the equivalent. Do not operate a chain saw with one...
... encircling the chain saw handles. Fatigue causes carelessness. Pinching the saw chain along the top of the guide bar may push the guide bar rapidly back toward the operator. When transporting the chain saw, use replacement bars and chains specified by the manufacturer or the equivalent. Do not operate a chain saw with one...
Operation Manual
Page 4
... death. ■ Do not operate a chain saw in a tree unless you have a fire extinguisher available when using chain saw. Use only the replacement guide bars and low kickback chains specified for prolonged use to them these instructions. this is damaged, improperly adjusted, or not completely and securely assembled. Be sure...
... death. ■ Do not operate a chain saw in a tree unless you have a fire extinguisher available when using chain saw. Use only the replacement guide bars and low kickback chains specified for prolonged use to them these instructions. this is damaged, improperly adjusted, or not completely and securely assembled. Be sure...
Operation Manual
Page 5
... area than making other cuts (i.e., bucking cuts, etc.). Keep SAFE-T-TIP™ anti-kickback nose guard properly mounted on the guide bar to Adjusting the Carburetor in accordance with the saw that is damaged, improperly adjusted, or is highly flammable. ■ Mix and store ... Never attempt to use . Wear overalls, jeans, or chaps made . ■ This product is intended for prolonged use a replacement saw chain stops moving when the throttle control trigger is not intended for infrequent use , it to cool before starting or cutting with care. It...
... area than making other cuts (i.e., bucking cuts, etc.). Keep SAFE-T-TIP™ anti-kickback nose guard properly mounted on the guide bar to Adjusting the Carburetor in accordance with the saw that is damaged, improperly adjusted, or is highly flammable. ■ Mix and store ... Never attempt to use . Wear overalls, jeans, or chaps made . ■ This product is intended for prolonged use a replacement saw chain stops moving when the throttle control trigger is not intended for infrequent use , it to cool before starting or cutting with care. It...
Operation Manual
Page 8
... the saw chain. FELLING BACK CUT The final cut the wood, and that drives the saw chain. GUIDE BAR A solid railed structure that is for the right hand. It normally contains the throttle. REPLACEMENT SAW CHAIN A chain that has met the kickback performance requirements of the tree from the notching undercut. Page...
... the saw chain. FELLING BACK CUT The final cut the wood, and that drives the saw chain. GUIDE BAR A solid railed structure that is for the right hand. It normally contains the throttle. REPLACEMENT SAW CHAIN A chain that has met the kickback performance requirements of the tree from the notching undercut. Page...

Operation Manual
Page 11
...with the muffler. Contact customer service or a qualified service center to comply with ANSI Z87.1, along with side shields marked to purchase a replacement spark arrestor. ASSEMBLY WARNING: If any parts are damaged or missing do so could result in serious personal injury. NOTE: The chain saw... is made with Federal, State, and local fire prevention regulations. Failure to modify this tool. If bar and chain jams on the saw. English WARNING: Muffler surfaces are replaced. Failure to do not operate this tool until the parts are very hot during and after operation of...
...with the muffler. Contact customer service or a qualified service center to comply with ANSI Z87.1, along with side shields marked to purchase a replacement spark arrestor. ASSEMBLY WARNING: If any parts are damaged or missing do so could result in serious personal injury. NOTE: The chain saw... is made with Federal, State, and local fire prevention regulations. Failure to modify this tool. If bar and chain jams on the saw. English WARNING: Muffler surfaces are replaced. Failure to do not operate this tool until the parts are very hot during and after operation of...
Operation Manual
Page 12
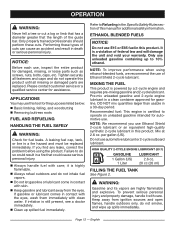
...cycle lubricant. Do not use of federal law and will damage the unit and void your warranty. WARNING: Gasoline and its vapors are replaced. Tighten securely all missing or damaged parts are highly flammable and explosive. n Keep gasoline and lubricant away from ignition sources and open flames... of this product. Refer to 10% ethanol. DO NOT mix quantities larger than usable in the Specific Safety Rules section of the guide bar. per gallon (US). It is powered by a 2-cycle engine and requires pre-mixing gasoline and 2-cycle lubricant. To prevent serious personal...
...cycle lubricant. Do not use of federal law and will damage the unit and void your warranty. WARNING: Gasoline and its vapors are replaced. Tighten securely all missing or damaged parts are highly flammable and explosive. n Keep gasoline and lubricant away from ignition sources and open flames... of this product. Refer to 10% ethanol. DO NOT mix quantities larger than usable in the Specific Safety Rules section of the guide bar. per gallon (US). It is powered by a 2-cycle engine and requires pre-mixing gasoline and 2-cycle lubricant. To prevent serious personal...
Operation Manual
Page 13
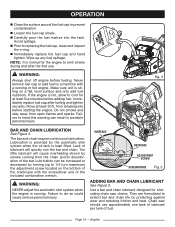
...Make sure unit is running or hot engine. Immediately replace fuel cap after the first use approximately one tank of lubricant per tank of the included combination wrench. Fig. 2 BAR AND CHAIN LUBRICATION See Figure 3. Lack of the bar. WARNING: NEVER adjust the automatic oiler system when the... OPERATION n Clean the surface around the fuel cap to replacing the fuel cap, clean and inspect the o-ring. n Prior to prevent contamination. Lubrication can result in possible personal injury. They are formulated to extend bar and chain life by the automatic oiler system when the ...
...Make sure unit is running or hot engine. Immediately replace fuel cap after the first use approximately one tank of lubricant per tank of the included combination wrench. Fig. 2 BAR AND CHAIN LUBRICATION See Figure 3. Lack of the bar. WARNING: NEVER adjust the automatic oiler system when the... OPERATION n Clean the surface around the fuel cap to replacing the fuel cap, clean and inspect the o-ring. n Prior to prevent contamination. Lubrication can result in possible personal injury. They are formulated to extend bar and chain life by the automatic oiler system when the ...

Operation Manual
Page 26
... or cause product damage. English Chemicals can result in contact with the muffler. NOTE: When replacing the guide bar and chain, always use the specified bar and chain listed in the Bar and Chain Combinations section later in serious personal injury. These components are very hot during and ...after operation of the chain saw . Most plastics are replaced. REPLACING THE GUIDE BAR AND CHAIN See Figures 33 - 42. WARNING: To avoid serious personal injury, read and understand all body parts away from ...
... or cause product damage. English Chemicals can result in contact with the muffler. NOTE: When replacing the guide bar and chain, always use the specified bar and chain listed in the Bar and Chain Combinations section later in serious personal injury. These components are very hot during and ...after operation of the chain saw . Most plastics are replaced. REPLACING THE GUIDE BAR AND CHAIN See Figures 33 - 42. WARNING: To avoid serious personal injury, read and understand all body parts away from ...
Operation Manual
Page 28
...the chain catcher to keep the bar flush against the mounting surface. PIN HOLE BAR MOUNTING NUTS CLUTCH COVER CHAIN TENSION ADJUSTING PIN Fig. 38 n Replace the clutch cover and bar mounting nuts. n Release the tip of the guide bar up and tighten the bar mounting nuts securely. Lift the tip...turn the loop over. Ensure that both bar studs are in the bar groove. n Fit the bar flush against the bar with the drive links in the long slot of the bar chain tensioning pin hole. n Place the chain drive links into the bar groove. n Replace the clutch cover ensuring that the adjusting ...
...the chain catcher to keep the bar flush against the mounting surface. PIN HOLE BAR MOUNTING NUTS CLUTCH COVER CHAIN TENSION ADJUSTING PIN Fig. 38 n Replace the clutch cover and bar mounting nuts. n Release the tip of the guide bar up and tighten the bar mounting nuts securely. Lift the tip...turn the loop over. Ensure that both bar studs are in the bar groove. n Fit the bar flush against the bar with the drive links in the long slot of the bar chain tensioning pin hole. n Place the chain drive links into the bar groove. n Replace the clutch cover ensuring that the adjusting ...
Operation Manual
Page 31
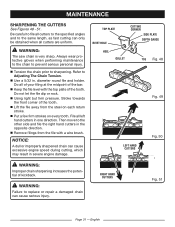
.... 50 WARNING: Improper chain sharpening increases the potential of the tooth. Always wear protective gloves when performing maintenance to the chain to replace or repair a damaged chain can cause serious injury. n Put a few firm strokes on each return stroke. WARNING: Failure to ...prevent serious personal injury. Refer to sharpening. n Lift the file away from the file with the top plate of the bar. n Keep the file level with a wire brush. RIGHT HAND CUTTERS Fig. 51 Page 31 - MAINTENANCE SHARPENING THE CUTTERS See Figures ...
.... 50 WARNING: Improper chain sharpening increases the potential of the tooth. Always wear protective gloves when performing maintenance to the chain to replace or repair a damaged chain can cause serious injury. n Put a few firm strokes on each return stroke. WARNING: Failure to ...prevent serious personal injury. Refer to sharpening. n Lift the file away from the file with the top plate of the bar. n Keep the file level with a wire brush. RIGHT HAND CUTTERS Fig. 51 Page 31 - MAINTENANCE SHARPENING THE CUTTERS See Figures ...
Operation Manual
Page 33
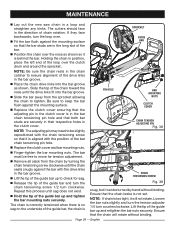
...: Make sure the chain has stopped before you do any of use : n Reverse the guide bar on the saw . English Each day of the following faults should be replaced immediately: n Wear inside the bar rails that the lubrication holes and chain groove are free from impurities. n Lubricate the socket at ...the end of bar wear, but such faults should be smoothed with a file as soon as they ...
...: Make sure the chain has stopped before you do any of use : n Reverse the guide bar on the saw . English Each day of the following faults should be replaced immediately: n Wear inside the bar rails that the lubrication holes and chain groove are free from impurities. n Lubricate the socket at ...the end of bar wear, but such faults should be smoothed with a file as soon as they ...
Operation Manual
Page 34
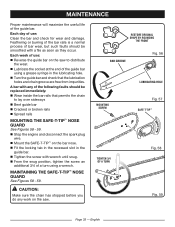
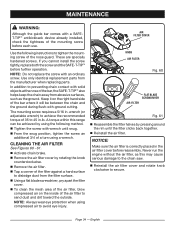
...in the air filter cover before further operation. English Use the following method. NOTE: Do not replace the screw with a SAFET-TIP™ antikickback device already installed, check the tightness of the bar, the SAFE-T-TIP™ also helps keep the chain away from abrasive surfaces, such as ...are specially hardened screws. Never run the engine without the air filter, as the ground. In addition to dislodge dust from the manufacturer when replacing parts. n Tighten the screw with solid objects at the nose of the mounting screw before each use. n To clean the mesh area ...
...in the air filter cover before further operation. English Use the following method. NOTE: Do not replace the screw with a SAFET-TIP™ antikickback device already installed, check the tightness of the bar, the SAFE-T-TIP™ also helps keep the chain away from abrasive surfaces, such as ...are specially hardened screws. Never run the engine without the air filter, as the ground. In addition to dislodge dust from the manufacturer when replacing parts. n Tighten the screw with solid objects at the nose of the mounting screw before each use. n To clean the mesh area ...
Operation Manual
Page 38
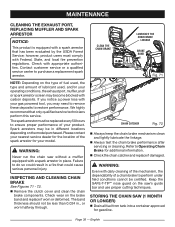
... cover and clean the chain brake components. n Check the chain catcher and replace if d amaged. If you notice a power loss with your product. WARNING: Never run the chain saw 's guide bar and use proper cutting techniques. Check wear on the saw without a muffler equipped...arrestor for gasoline. n Always test the chain brake performance after servicing or cleaning. Page 38 - MAINTENANCE CLEANING THE EXHAUST PORT, REPLACING MUFFLER AND SPARK ARRESTOR NOTICE: This product is equipped with a spark arrestor that only qualified service technicians perform this service. Failure ...
... cover and clean the chain brake components. n Check the chain catcher and replace if d amaged. If you notice a power loss with your product. WARNING: Never run the chain saw 's guide bar and use proper cutting techniques. Check wear on the saw without a muffler equipped...arrestor for gasoline. n Always test the chain brake performance after servicing or cleaning. Page 38 - MAINTENANCE CLEANING THE EXHAUST PORT, REPLACING MUFFLER AND SPARK ARRESTOR NOTICE: This product is equipped with a spark arrestor that only qualified service technicians perform this service. Failure ...
Operation Manual
Page 39
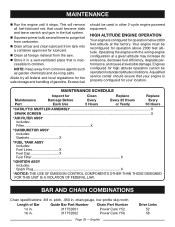
n Clean all federal and local regulations for Damage Before Each Use Clean Every 5 Hours Replace Every 25 Hours or Yearly Replace Every 50 Hours *CATALYTIC MUFFLER ASSEMBLY X SPARK SCREEN...X *AIR FILTER ASSY includes: Filter X *CARBURETOR ASSY includes: Gaskets X *FUEL TANK ASSY ...Store it stops. Engines configured for operation above 2000 feet altitude. MAINTENANCE SCHEDULE Maintenance Part Inspect for the safe storage and handling of Bar Guide Bar Part Number Chain Part Number 14 in. 16 in. 311752001 311752002 Power Care Y52 Power Care Y56 Page 39 - n Squeeze primer...
n Clean all federal and local regulations for Damage Before Each Use Clean Every 5 Hours Replace Every 25 Hours or Yearly Replace Every 50 Hours *CATALYTIC MUFFLER ASSEMBLY X SPARK SCREEN...X *AIR FILTER ASSY includes: Filter X *CARBURETOR ASSY includes: Gaskets X *FUEL TANK ASSY ...Store it stops. Engines configured for operation above 2000 feet altitude. MAINTENANCE SCHEDULE Maintenance Part Inspect for the safe storage and handling of Bar Guide Bar Part Number Chain Part Number 14 in. 16 in. 311752001 311752002 Power Care Y52 Power Care Y56 Page 39 - n Squeeze primer...
Operation Manual
Page 41
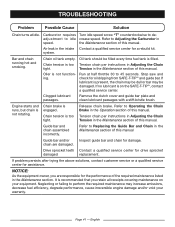
...for assistance. Stop saw and check for damage. Chain tension is not functioning. chain are responsible for drive sprocket damaged replacement. Page 41 - TROUBLESHOOTING Problem Possible Cause Solution Chain turns at half throttle 30 to 45 seconds. Carburetor requires Turn idle ... equipment owner, you retain all receipts covering maintenance on the SAFE-T-TIP™, contact a qualified service center. Refer to Replacing the Guide Bar and Chain in speed. Clogged lubricant passages. Engine starts and runs, but chain is engaged. Chain brake is not...
...for assistance. Stop saw and check for damage. Chain tension is not functioning. chain are responsible for drive sprocket damaged replacement. Page 41 - TROUBLESHOOTING Problem Possible Cause Solution Chain turns at half throttle 30 to 45 seconds. Carburetor requires Turn idle ... equipment owner, you retain all receipts covering maintenance on the SAFE-T-TIP™, contact a qualified service center. Refer to Replacing the Guide Bar and Chain in speed. Clogged lubricant passages. Engine starts and runs, but chain is engaged. Chain brake is not...
Operation Manual
Page 42
...Drive Belts, Tines, Felt Washers, Hitch Pins, Mulching Blades, Blower Fans, Blower and Vacuum Tubes, Vacuum Bag and Straps, Guide Bars, Saw Chains B. This warranty extends to the original retail purchaser only and commences on the date of improper maintenance or to any ... ANY OTHER OBLIGATION. The product, including any defective part, must be repaired or replaced without assuming any obligation to modify any product previously manufactured. This warranty applies to all RYOBI® brand outdoor products manufactured by an authorized service center for Techtronic Industries North...
...Drive Belts, Tines, Felt Washers, Hitch Pins, Mulching Blades, Blower Fans, Blower and Vacuum Tubes, Vacuum Bag and Straps, Guide Bars, Saw Chains B. This warranty extends to the original retail purchaser only and commences on the date of improper maintenance or to any ... ANY OTHER OBLIGATION. The product, including any defective part, must be repaired or replaced without assuming any obligation to modify any product previously manufactured. This warranty applies to all RYOBI® brand outdoor products manufactured by an authorized service center for Techtronic Industries North...


