User Manual
Page 6
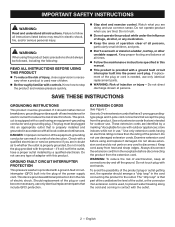
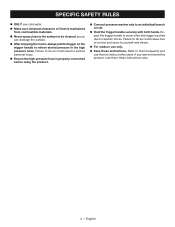
... plug or cord become necessary, use only identical replacement parts. WARNING: Risk of the outlet, or the connector if an extension cord is equipped with a qualified electrician or service personnel if you are tired. If replacement of the plug or cord is needed, use only identical replacement parts that accept the plug from the extension cord. IMPORTANT SAFETY INSTRUCTIONS WARNING: Read and understand all instructions listed below the level...
... plug or cord become necessary, use only identical replacement parts. WARNING: Risk of the outlet, or the connector if an extension cord is equipped with a qualified electrician or service personnel if you are tired. If replacement of the plug or cord is needed, use only identical replacement parts that accept the plug from the extension cord. IMPORTANT SAFETY INSTRUCTIONS WARNING: Read and understand all instructions listed below the level...
User Manual
Page 7
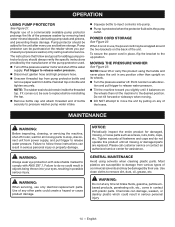
... handles dry, clean, and free from heat, oil, sharp edges, or moving parts. Learn the machine's applications and limitations as well as rocks, broken glass, nails, wire, or string which can get caught and draw you into moving parts. The smaller the gauge number, the heavier the cord. A loose bolt or nut may affect its intended function. English Have switch replaced by an authorized service center...
... handles dry, clean, and free from heat, oil, sharp edges, or moving parts. Learn the machine's applications and limitations as well as rocks, broken glass, nails, wire, or string which can get caught and draw you into moving parts. The smaller the gauge number, the heavier the cord. A loose bolt or nut may affect its intended function. English Have switch replaced by an authorized service center...
User Manual
Page 8
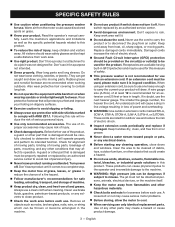
... you can damage the surface. After stopping the motor, always pull the trigger on the trigger handle to relieve stored pressure in serious personal injury. Ensure the high pressure hose is pulled due to reaction forces. SPECIFIC SAFETY RULES ONLY use cold water. Make sure minimum clearance of control and injury to yourself and others. For outdoor...
... you can damage the surface. After stopping the motor, always pull the trigger on the trigger handle to relieve stored pressure in serious personal injury. Ensure the high pressure hose is pulled due to reaction forces. SPECIFIC SAFETY RULES ONLY use cold water. Make sure minimum clearance of control and injury to yourself and others. For outdoor...
User Manual
Page 9
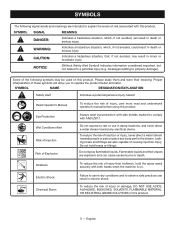
...intended to rain or use in electric shock. SYMBOL NAME DESIGNATION/EXPLANATION Safety Alert Indicates a potential personal injury hazard. Do not expose to explain the levels of injury from ....1. SYMBOLS The following symbols may result in damp locations, and never direct a water stream toward any body part in this product. Please study them and learn ... in the stream. Electric Shock Chemical Burns Failure to observe safe practices can cause severe burns or death. To reduce the risk of injury, user must read and understand operator's manual before using this product. 5 ...
...intended to rain or use in electric shock. SYMBOL NAME DESIGNATION/EXPLANATION Safety Alert Indicates a potential personal injury hazard. Do not expose to explain the levels of injury from ....1. SYMBOLS The following symbols may result in damp locations, and never direct a water stream toward any body part in this product. Please study them and learn ... in the stream. Electric Shock Chemical Burns Failure to observe safe practices can cause severe burns or death. To reduce the risk of injury, user must read and understand operator's manual before using this product. 5 ...
User Manual
Page 11
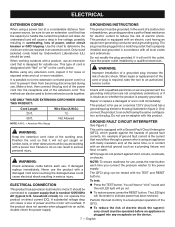
... a power tool. Position the cord so that it for loose or exposed wires and cut or worn insulation. WARNING: Check extension cords before an appliance is required, take the tool to tie two extension cords together. Never use . To test: ELECTRICAL CONNECTION This product has a precision-built electric motor. Perform this product on the cord's jacket. Only round jacketed cords listed by a qualified electrician. This type of the power cord into...
... a power tool. Position the cord so that it for loose or exposed wires and cut or worn insulation. WARNING: Check extension cords before an appliance is required, take the tool to tie two extension cords together. Never use . To test: ELECTRICAL CONNECTION This product has a precision-built electric motor. Perform this product on the cord's jacket. Only round jacketed cords listed by a qualified electrician. This type of the power cord into...
User Manual
Page 12
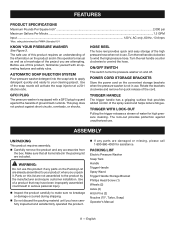
.../OFF SWITCH This switch turns the pressure washer on this operator's manual as well as a knowledge of the soap nozzle will activate the soap injector at a 20:1 dilution ratio. n Carefully remove the product and any parts are not assembled to your cleaning project. PACKING LIST Electric Pressure Washer Soap Tank Handle Trigger Handle Spray Wand Trigger Handle Storage Bracket Phillips Head Screw (1) Wheels (2) Axles (2) Hitch Pins (2) Nozzles (15º, Turbo, Soap) Operator's Manual 8 - The safe use of...
.../OFF SWITCH This switch turns the pressure washer on this operator's manual as well as a knowledge of the soap nozzle will activate the soap injector at a 20:1 dilution ratio. n Carefully remove the product and any parts are not assembled to your cleaning project. PACKING LIST Electric Pressure Washer Soap Tank Handle Trigger Handle Spray Wand Trigger Handle Storage Bracket Phillips Head Screw (1) Wheels (2) Axles (2) Hitch Pins (2) Nozzles (15º, Turbo, Soap) Operator's Manual 8 - The safe use of...
User Manual
Page 13
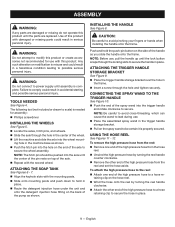
... the high pressure hose to secure the wheel assembly. USING THE HOSE REEL See Figures 11 - 12. n Push the end of the spray wand into the axle until the parts are replaced. taining clip on top of the high pressure hose to a hose retaining clip to the reel: n Attach one end of the axle to a hose re- NOTE: Before use . ATTACHING THE TRIGGER HANDLE...
... the high pressure hose to secure the wheel assembly. USING THE HOSE REEL See Figures 11 - 12. n Push the end of the spray wand into the axle until the parts are replaced. taining clip on top of the high pressure hose to a hose retaining clip to the reel: n Attach one end of the axle to a hose re- NOTE: Before use . ATTACHING THE TRIGGER HANDLE...
User Manual
Page 14
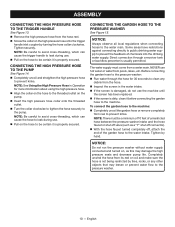
... high pressure hose onto the trigger handle inlet coupler by turning the hose collar clockwise. Before connecting the garden hose to clean any other objects that may damage the high pressure seals and decrease pump life. n Inspect the screen in Operation for 30 seconds to the pressure washer: n Run water through a receiver tank or backflow preventer is damaged, do not use . n If the screen is dirty, clean...
... high pressure hose onto the trigger handle inlet coupler by turning the hose collar clockwise. Before connecting the garden hose to clean any other objects that may damage the high pressure seals and decrease pump life. n Inspect the screen in Operation for 30 seconds to the pressure washer: n Run water through a receiver tank or backflow preventer is damaged, do not use . n If the screen is dirty, clean...
User Manual
Page 15
... intake screen is turned on page 2. The use of the pump and motor during use any attachments or accessories not recommended by tires, rocks, or any electrical device. Please call customer service or contact an authorized service center for repair. STARTING AND STOPPING THE PRESSURE WASHER See Figure 16. Failure to relieve air pressure; Remember that a careless fraction of electrocution, keep all hoses. hold the trigger...
... intake screen is turned on page 2. The use of the pump and motor during use any attachments or accessories not recommended by tires, rocks, or any electrical device. Please call customer service or contact an authorized service center for repair. STARTING AND STOPPING THE PRESSURE WASHER See Figure 16. Failure to relieve air pressure; Remember that a careless fraction of electrocution, keep all hoses. hold the trigger...
User Manual
Page 16
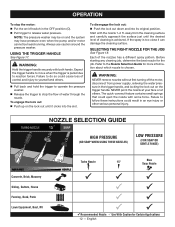
... surface just until it can damage the cleaning surface. Start with both hands. WARNING: NEVER remove nozzles without first turning off switch in the OFF position (O). Pull trigger to choose. NOZZLE SELECTION GUIDE HIGH PRESSURE (NO SOAP WHEN USING THESE NOZZLES) LOW PRESSURE (FOR SOAP OR GENTLE RINSE) Concrete, Brick, Masonry Siding, Gutters, House Fencing, Deck, Patio Lawn Equipment, Boat, RV Turbo Nozzle 15...
... surface just until it can damage the cleaning surface. Start with both hands. WARNING: NEVER remove nozzles without first turning off switch in the OFF position (O). Pull trigger to choose. NOZZLE SELECTION GUIDE HIGH PRESSURE (NO SOAP WHEN USING THESE NOZZLES) LOW PRESSURE (FOR SOAP OR GENTLE RINSE) Concrete, Brick, Masonry Siding, Gutters, House Fencing, Deck, Patio Lawn Equipment, Boat, RV Turbo Nozzle 15...
User Manual
Page 17
... motor: n Fill the soap tank with "downstream" pressure washer detergents. n Shut off the water supply. Pull trigger to be rinsed and work down, overlapping the strokes. 13 - The high pressure hose features an outer covering that the nozzle is designed for the detergent to be kinked. To prevent damage to use with clean water. n Engage the lock out on the trigger handle by high pressure...
... motor: n Fill the soap tank with "downstream" pressure washer detergents. n Shut off the water supply. Pull trigger to be rinsed and work down, overlapping the strokes. 13 - The high pressure hose features an outer covering that the nozzle is designed for the detergent to be kinked. To prevent damage to use with clean water. n Engage the lock out on the trigger handle by high pressure...
User Manual
Page 18
... these instructions can be purchased at any other than upright on the back of the pressure washer by their use only identical replacement parts. n Unscrew threaded top from pump protector bottle and remove paper seal from various types of commercial solvents and may be sure to move the unit by calling customer service. tion and pull trigger to remove dirt, dust, oil, grease, etc...
... these instructions can be purchased at any other than upright on the back of the pressure washer by their use only identical replacement parts. n Unscrew threaded top from pump protector bottle and remove paper seal from various types of commercial solvents and may be sure to move the unit by calling customer service. tion and pull trigger to remove dirt, dust, oil, grease, etc...

User Manual
Page 19
... 32°F, the use of pump protector will void your face or at your warranty. n Turn off the pressure washer, disconnect from power supply, relieving the water pressure in the trigger handle, and locking the lock out on /off the water supply. WARNING: NEVER remove nozzles without first turning off the motor, disconnecting from power supply, and shut off switch is required. n To free any remaining water...
... 32°F, the use of pump protector will void your face or at your warranty. n Turn off the pressure washer, disconnect from power supply, relieving the water pressure in the trigger handle, and locking the lock out on /off the water supply. WARNING: NEVER remove nozzles without first turning off the motor, disconnecting from power supply, and shut off switch is required. n To free any remaining water...
User Manual
Page 20
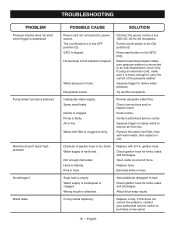
... the power cord to purchase a new wand. 16 - Reset house/shop breaker. Squeeze trigger to remove air from line. Try another receptacle. Pump is restricted. Water supply is faulty. Not enough inlet water. Soap tank is inadequate or clogged. Water supply is empty. Check garden hose for kinks, leaks, and blockages. Make sure pressure washer is in . Replace hose. O-ring needs replacing. If using an extension cord...
... the power cord to purchase a new wand. 16 - Reset house/shop breaker. Squeeze trigger to remove air from line. Try another receptacle. Pump is restricted. Water supply is faulty. Not enough inlet water. Soap tank is inadequate or clogged. Water supply is empty. Check garden hose for kinks, leaks, and blockages. Make sure pressure washer is in . Replace hose. O-ring needs replacing. If using an extension cord...
User Manual
Page 21
... service center for warranty work must be required to substantiate any RYOBI™ brand pressure washer without charge for any other purpose, such as to change or improve the design of returning it back to the owner after repair or replacement will be performed by a RYOBI™ Authorized Service Center. The product, including any defective part, must be paid by the use...
... service center for warranty work must be required to substantiate any RYOBI™ brand pressure washer without charge for any other purpose, such as to change or improve the design of returning it back to the owner after repair or replacement will be performed by a RYOBI™ Authorized Service Center. The product, including any defective part, must be paid by the use...
User Manual 2
Page 1
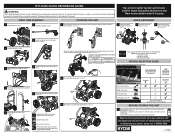
... your new tool online. If using an extension cord, arrange a drip loop to the trigger handle (see pages 2 and 7). To reduce the risk of the tool plug getting wet (see page 9). Press the reset button on fully. All page references refer to the power supply. FIRST TIME ASSEMBLY STARTING THE UNIT USING DETERGENT 1 Install the wheels (see page 9). 6 Install the spray wand (see page 9). 1 Connect the pressure washer...
... your new tool online. If using an extension cord, arrange a drip loop to the trigger handle (see pages 2 and 7). To reduce the risk of the tool plug getting wet (see page 9). Press the reset button on fully. All page references refer to the power supply. FIRST TIME ASSEMBLY STARTING THE UNIT USING DETERGENT 1 Install the wheels (see page 9). 6 Install the spray wand (see page 9). 1 Connect the pressure washer...
User Manual 5
Page 3
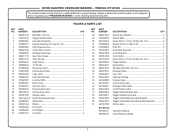
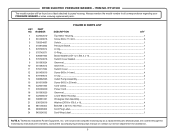
... a plate attached to pump housing. S.T 2 Trigger Handle 1 Spray Wand 1 Shoulder Bolt (M6 x 16 mm 2 Detergent Tank 1 Hose Clip 1 Warning Hangtag 1 Inquires Label 1 Cord Unlock Label 1 Detergent Tank Label 1 On/Off Switch Label 1 Trigger Handle Rating Label 1 Trigger Handle Logo Label 1 Trigger Handle Warning Label (English 1 Trigger Handle Warning Label (French/Spanish 1 Pump Label 1 Operator's Manual Quick Reference Guide 3 RYOBI ELECTRIC PRESSURE WASHER − ITEM NO. Key No. 28 1 High Pressure Hose 1 Screw (M6 x 40 mm 8 Detergent Tank Cap 1 Quick Start Label...
... a plate attached to pump housing. S.T 2 Trigger Handle 1 Spray Wand 1 Shoulder Bolt (M6 x 16 mm 2 Detergent Tank 1 Hose Clip 1 Warning Hangtag 1 Inquires Label 1 Cord Unlock Label 1 Detergent Tank Label 1 On/Off Switch Label 1 Trigger Handle Rating Label 1 Trigger Handle Logo Label 1 Trigger Handle Warning Label (English 1 Trigger Handle Warning Label (French/Spanish 1 Pump Label 1 Operator's Manual Quick Reference Guide 3 RYOBI ELECTRIC PRESSURE WASHER − ITEM NO. Key No. 28 1 High Pressure Hose 1 Screw (M6 x 40 mm 8 Detergent Tank Cap 1 Quick Start Label...
User Manual 5
Page 5
......1 Grommet...2 Switch Cover...1 Screw (M3 x 14 mm)...4 U Clip...2 Outlet Pump Assembly...1 Screw (M3.5 x 20 mm)...2 Cord Clamp...1 Power Cord...1 Grommet...1 Lower Motor Housing...1 90 degree Inlet Assembly...1 Washer (OD18 x ID6.3 x 1t)...4 Bolt (M8 x 20 mm, Hex Hd.)...4 Cord Plug Label...1 Cord Wrap Label...1 NOTE A: Techtronic Industries Power Equipment, Inc. Always mention the model number in all correspondence regarding your PRESSURE WASHER or when ordering replacement parts. Motor/pumps are covered though the motor/pump manufacturer's warranty. RYOBI ELECTRIC PRESSURE WASHER...
......1 Grommet...2 Switch Cover...1 Screw (M3 x 14 mm)...4 U Clip...2 Outlet Pump Assembly...1 Screw (M3.5 x 20 mm)...2 Cord Clamp...1 Power Cord...1 Grommet...1 Lower Motor Housing...1 90 degree Inlet Assembly...1 Washer (OD18 x ID6.3 x 1t)...4 Bolt (M8 x 20 mm, Hex Hd.)...4 Cord Plug Label...1 Cord Wrap Label...1 NOTE A: Techtronic Industries Power Equipment, Inc. Always mention the model number in all correspondence regarding your PRESSURE WASHER or when ordering replacement parts. Motor/pumps are covered though the motor/pump manufacturer's warranty. RYOBI ELECTRIC PRESSURE WASHER...
User Manual 6
Page 3
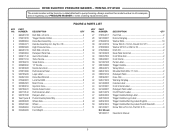
... Hangtag 1 Inquires Label 1 Cord Unlock Label 1 Detergent Tank Label 1 On/Off Switch Label 1 Trigger Handle Rating Label 1 Trigger Handle Logo Label 1 Trigger Handle Warning Label (English 1 Trigger Handle Warning Label (French/Spanish 1 Screw (M4 x 25.4 mm, Flat Hd. Always mention the model number in all correspondence regarding your PRESSURE WASHER or when ordering replacement parts. Key No. 28 1 High Pressure Hose 1 Bolt (M6 x 40 mm 8 Detergent Tank Cap 1 Quick Start Label 1 Turbo Nozzle...
... Hangtag 1 Inquires Label 1 Cord Unlock Label 1 Detergent Tank Label 1 On/Off Switch Label 1 Trigger Handle Rating Label 1 Trigger Handle Logo Label 1 Trigger Handle Warning Label (English 1 Trigger Handle Warning Label (French/Spanish 1 Screw (M4 x 25.4 mm, Flat Hd. Always mention the model number in all correspondence regarding your PRESSURE WASHER or when ordering replacement parts. Key No. 28 1 High Pressure Hose 1 Bolt (M6 x 40 mm 8 Detergent Tank Cap 1 Quick Start Label 1 Turbo Nozzle...

User Manual 6
Page 5
... housing. Motor/pumps are covered though the motor/pump manufacturer's warranty. Locking)...4 Cord Plug Label...1 Cord Wrap Label...1 Screw (ST 3.5)...4 Wire Box Cover...1 Wire Box Gasket (Upper)...1 NOTE A: Techtronic Industries Power Equipment, Inc. Always mention the model number in all correspondence regarding your PRESSURE WASHER or when ordering replacement parts. Consult the accompanying motor/pumps manual or contact our service department for assistance. 5 RY141900 The model number will not provide complete motor/pump as a replacement part. RYOBI ELECTRIC PRESSURE...
... housing. Motor/pumps are covered though the motor/pump manufacturer's warranty. Locking)...4 Cord Plug Label...1 Cord Wrap Label...1 Screw (ST 3.5)...4 Wire Box Cover...1 Wire Box Gasket (Upper)...1 NOTE A: Techtronic Industries Power Equipment, Inc. Always mention the model number in all correspondence regarding your PRESSURE WASHER or when ordering replacement parts. Consult the accompanying motor/pumps manual or contact our service department for assistance. 5 RY141900 The model number will not provide complete motor/pump as a replacement part. RYOBI ELECTRIC PRESSURE...


