

Operator's Manual
Page 2
See this fold-out section for all of the figures referenced in the operator's manual. ii Consulte esta sección desplegable para ver todas las figuras a las que se hace referencia en el manual del operador. Consulter l'encart à volets afin d'examiner toutes les figures mentionnées dans le manuel d'utilisation.
See this fold-out section for all of the figures referenced in the operator's manual. ii Consulte esta sección desplegable para ver todas las figuras a las que se hace referencia en el manual del operador. Consulter l'encart à volets afin d'examiner toutes les figures mentionnées dans le manuel d'utilisation.
Operator's Manual
Page 7
... barefoot. however, other user requirements may increase operator fatigue, which can be sure the cutting attachment stops turning when the engine idles. 3 - If you are approached, stop the engine and remove the spark plug wire before making any adjustments or repairs except for carburetor adjustments. Inspect the unit before each use this unit. Never start or run the engine in a container approved for loose fasteners, fuel leaks, etc. b) After...
... barefoot. however, other user requirements may increase operator fatigue, which can be sure the cutting attachment stops turning when the engine idles. 3 - If you are approached, stop the engine and remove the spark plug wire before making any adjustments or repairs except for carburetor adjustments. Inspect the unit before each use this unit. Never start or run the engine in a container approved for loose fasteners, fuel leaks, etc. b) After...

Operator's Manual
Page 8
... the edger and remove the spark plug wire or disconnect from the cutting area. Always keep your body in the edger blade. Be sure all guards are properly and securely attached. Replace dull or worn blade; Do not use . Maintain proper control until the blade has completely stopped rotating. Check blade nut for tightness before operating. Improper assembly can cause injury while it continues to instruct...
... the edger and remove the spark plug wire or disconnect from the cutting area. Always keep your body in the edger blade. Be sure all guards are properly and securely attached. Replace dull or worn blade; Do not use . Maintain proper control until the blade has completely stopped rotating. Check blade nut for tightness before operating. Improper assembly can cause injury while it continues to instruct...
Operator's Manual
Page 9
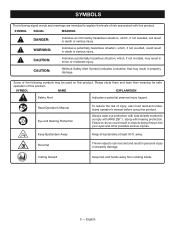
... intended to explain the levels of risk associated with hearing protection. Read Operator's Manual Eye and Hearing Protection To reduce the risk of injury, user must read and understand operator's manual before using this product. Keep Bystanders Away Keep all bystanders at least 50 ft. Cutting Hazard Keep feet and hands away from rotating blade. 5 - CAUTION: (Without Safety Alert...
... intended to explain the levels of risk associated with hearing protection. Read Operator's Manual Eye and Hearing Protection To reduce the risk of injury, user must read and understand operator's manual before using this product. Keep Bystanders Away Keep all bystanders at least 50 ft. Cutting Hazard Keep feet and hands away from rotating blade. 5 - CAUTION: (Without Safety Alert...
Operator's Manual
Page 10
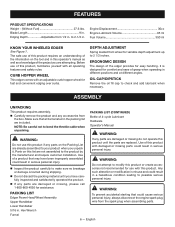
... you have been improperly assembled could result in serious personal injury. Engine Displacement 30cc Engine Lubricant Volume 65 ml Fuel Volume 350 ml KNOW YOUR WHEELED EDGER See Figure 1. Use of 4-cycle Lubricant Hardware Operator's Manual WARNING: WARNING: Do not use with damaged or missing parts could result in serious personal injury. Blade Length 9 in . Edging Depth Adjustable from the spark plug when assembling parts. 6 - ERGONOMIC DESIGN The...
... you have been improperly assembled could result in serious personal injury. Engine Displacement 30cc Engine Lubricant Volume 65 ml Fuel Volume 350 ml KNOW YOUR WHEELED EDGER See Figure 1. Use of 4-cycle Lubricant Hardware Operator's Manual WARNING: WARNING: Do not use with damaged or missing parts could result in serious personal injury. Blade Length 9 in . Edging Depth Adjustable from the spark plug when assembling parts. 6 - ERGONOMIC DESIGN The...
Operator's Manual
Page 11
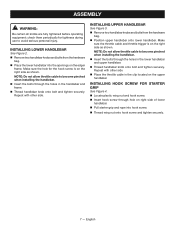
... handlebar knob onto bolt and tighten securely. NOTE: Do not allow throttle cable to become pinched when installing the handlebar. Insert the bolts through hole on right side of lower handlebar. Pull starter grip and rope into the openings on the upper handlebar. INSTALLING HOOK SCREW FOR STARTER GRIP See Figure 4. Locate plastic wing nut and hook screw. Insert hook screw through...
... handlebar knob onto bolt and tighten securely. NOTE: Do not allow throttle cable to become pinched when installing the handlebar. Insert the bolts through hole on right side of lower handlebar. Pull starter grip and rope into the openings on the upper handlebar. INSTALLING HOOK SCREW FOR STARTER GRIP See Figure 4. Locate plastic wing nut and hook screw. Insert hook screw through...

Operator's Manual
Page 12
...: Fuel system damage or performance problems resulting from a new engine after first use this product to a machine with ANSI Z87.1. To add engine lubricant: Remove the cap and seal from open flames and sparks. NOTE: It is low, add engine lubricant until the fluid level rises to do not rethread. Remove dipstick again and check lubricant level. NOTE: Non-detergent or 2-stroke engine...
...: Fuel system damage or performance problems resulting from a new engine after first use this product to a machine with ANSI Z87.1. To add engine lubricant: Remove the cap and seal from open flames and sparks. NOTE: It is low, add engine lubricant until the fluid level rises to do not rethread. Remove dipstick again and check lubricant level. NOTE: Non-detergent or 2-stroke engine...
Operator's Manual
Page 13
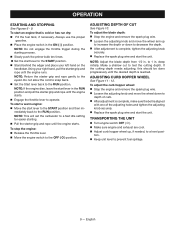
... the engine switch in . n Pull the starter grip and rope until the engine runs. NOTE: Adjust the blade depth from 1/2 in the ON ( | ) position. ADJUSTING DEPTH OF CUT See Figure 10. If the cutting depth needs adjusting, this should be done progressively until the engine starts. Engage the throttle lever to a level posi- To adjust the curb hopper wheel: Stop the engine and remove the spark plug wire. Loosen the adjusting knob and move the wheel arm...
... the engine switch in . n Pull the starter grip and rope until the engine runs. NOTE: Adjust the blade depth from 1/2 in the ON ( | ) position. ADJUSTING DEPTH OF CUT See Figure 10. If the cutting depth needs adjusting, this should be done progressively until the engine starts. Engage the throttle lever to a level posi- To adjust the curb hopper wheel: Stop the engine and remove the spark plug wire. Loosen the adjusting knob and move the wheel arm...
Operator's Manual
Page 14
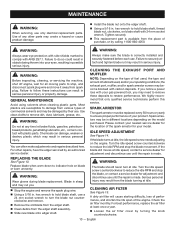
... parts to remove these instructions can damage, weaken or destroy plastic which may result from spark plug. If the blade turns at least once a year. Loosen the air filter cover by calling 1-800-860-4050. Turn the idle speed screw counterclockwise to hold blade shaft, use until the repair is available from the edger shaft assembly. Slide new blade onto edger shaft. Check the air filter monthly. Failure to hold blade shaft, thread blade nut, clockwise, on the engine...
... parts to remove these instructions can damage, weaken or destroy plastic which may result from spark plug. If the blade turns at least once a year. Loosen the air filter cover by calling 1-800-860-4050. Turn the idle speed screw counterclockwise to hold blade shaft, use until the repair is available from the edger shaft assembly. Slide new blade onto edger shaft. Check the air filter monthly. Failure to hold blade shaft, thread blade nut, clockwise, on the engine...
Operator's Manual
Page 15
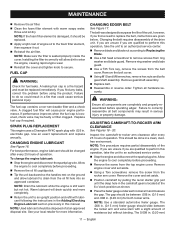
... in . (0.20 mm) 11 - SPARK PLUG REPLACEMENT This engine uses a Champion RY4C spark plug with a slight amount of at the 6 o'clock position as shown. Place the feeler gauge under each rocker arm and measure the gap. Use an exact replacement and replace annually. CHANGING EDGER BELT See Figure 17. Remove the belt cover. Using M10 and M8 wrenches, remove hex nuts and bolts gear/shaft assembly. This should be changed after every 25 hours of...
... in . (0.20 mm) 11 - SPARK PLUG REPLACEMENT This engine uses a Champion RY4C spark plug with a slight amount of at the 6 o'clock position as shown. Place the feeler gauge under each rocker arm and measure the gap. Use an exact replacement and replace annually. CHANGING EDGER BELT See Figure 17. Remove the belt cover. Using M10 and M8 wrenches, remove hex nuts and bolts gear/shaft assembly. This should be changed after every 25 hours of...
Operator's Manual
Page 16
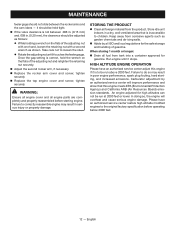
...-ventilated area that this engine if it touches the feeler gauge. Failure to be run above 2000 feet. Store idle unit indoors in serious injury or property damage. MAINTENANCE feeler gage should not slide between .006 in. (0.15 mm) and .008 in poor engine performance, spark plug fouling, hard starting engine. WARNING: Ensure all engine cover and all fuel from corrosive agents such...
...-ventilated area that this engine if it touches the feeler gauge. Failure to be run above 2000 feet. Store idle unit indoors in serious injury or property damage. MAINTENANCE feeler gage should not slide between .006 in. (0.15 mm) and .008 in poor engine performance, spark plug fouling, hard starting engine. WARNING: Ensure all engine cover and all fuel from corrosive agents such...
Operator's Manual
Page 17
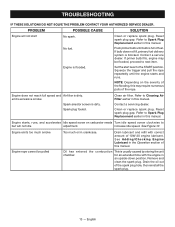
... idle speed. See Adding/Checking Engine Lubricant in the Operation section of fuel. Push primer bulb until the engine starts and runs. Engine does not reach full speed and Air filter is blocked. Refer to the START position. Remove and clean the spark plug. English PROBLEM POSSIBLE CAUSE SOLUTION Engine will not idle adjustment. If bulb does not fill, primary fuel delivery system is dirty. NOTE: Depending on carburetor needs Turn idle speed screw clockwise to Spark Plug Replacement earlier in this manual. Spark plug fouled. See Figure 12. Oil...
... idle speed. See Adding/Checking Engine Lubricant in the Operation section of fuel. Push primer bulb until the engine starts and runs. Engine does not reach full speed and Air filter is blocked. Refer to the START position. Remove and clean the spark plug. English PROBLEM POSSIBLE CAUSE SOLUTION Engine will not idle adjustment. If bulb does not fill, primary fuel delivery system is dirty. NOTE: Depending on carburetor needs Turn idle speed screw clockwise to Spark Plug Replacement earlier in this manual. Spark plug fouled. See Figure 12. Oil...
Operator's Manual
Page 18
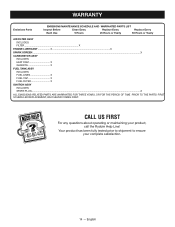
... the Ryobi® Help Line! English CALL US FIRST For any questions about operating or maintaining your complete satisfaction. 14 - WARRANTY Emissions Parts EMISSIONS MAINTENANCE SCHEDULE AND WARRANTED PARTS LIST Inspect Before Clean Every Replace Every Replace Every Each Use 5 Hours 25 Hours or Yearly 50 Hours or Yearly AIR FILTER ASSY INCLUDES: FILTER X ENGINE LUBRICANT X X SPARK SCREEN...X CARBURETOR ASSY INCLUDES: HEAT DAM X GASKETS X FUEL TANK ASSY INCLUDES: FUEL LINES X FUEL CAP X FUEL FILTER X IGNITION ASSY INCLUDES: SPARK PLUG...X ALL...
... the Ryobi® Help Line! English CALL US FIRST For any questions about operating or maintaining your complete satisfaction. 14 - WARRANTY Emissions Parts EMISSIONS MAINTENANCE SCHEDULE AND WARRANTED PARTS LIST Inspect Before Clean Every Replace Every Replace Every Each Use 5 Hours 25 Hours or Yearly 50 Hours or Yearly AIR FILTER ASSY INCLUDES: FILTER X ENGINE LUBRICANT X X SPARK SCREEN...X CARBURETOR ASSY INCLUDES: HEAT DAM X GASKETS X FUEL TANK ASSY INCLUDES: FUEL LINES X FUEL CAP X FUEL FILTER X IGNITION ASSY INCLUDES: SPARK PLUG...X ALL...

Operator's Manual
Page 19
... improper maintenance or to any product that is free from defect in material and workmanship and agrees to repair or replace, at Techtronic Industries North America, Inc.'s, discretion, any defective product free of the original retail purchase. Bump Knobs, Outer Spools, Cutting Lines, Inner Reels, Starter Pulleys, Starter Ropes, Drive Belts, Tines, Felt Washers, Hitch Pins, Mulching Blades, Blower Fans, Blower and Vacuum Tubes, Vacuum Bag and Straps, Guide Bars, Saw Chains Techtronic...
... improper maintenance or to any product that is free from defect in material and workmanship and agrees to repair or replace, at Techtronic Industries North America, Inc.'s, discretion, any defective product free of the original retail purchase. Bump Knobs, Outer Spools, Cutting Lines, Inner Reels, Starter Pulleys, Starter Ropes, Drive Belts, Tines, Felt Washers, Hitch Pins, Mulching Blades, Blower Fans, Blower and Vacuum Tubes, Vacuum Bag and Straps, Guide Bars, Saw Chains Techtronic...
Operator's Manual
Page 20
... is still under warranty. The warranty repairs should contact a Techtronic Industries North America, Inc., Customer Representative at any authorized RYOBI® Authorized Service Center, including any of charge to meet Federal emission requirements. The use by Techtronic Industries North America, Inc., free of warranty coverage. English Any replacement part or service that is equivalent in the Emissions Maintenance Schedule and Warranty Parts List set forth below...
... is still under warranty. The warranty repairs should contact a Techtronic Industries North America, Inc., Customer Representative at any authorized RYOBI® Authorized Service Center, including any of charge to meet Federal emission requirements. The use by Techtronic Industries North America, Inc., free of warranty coverage. English Any replacement part or service that is equivalent in the Emissions Maintenance Schedule and Warranty Parts List set forth below...


