
Operator's Manual
Page 3
.... Either of medication, drugs, or alcohol. Use safety footwear. A chain saw is intended for two-handed use replacement bars and chains specified by the manufacturer or the equivalent. Do not operate a chain saw . • Cut at high engine speeds. Wear snug-fitting clothing, ...61550; Know your shift. Do not rely exclusively upon the safety devices built into the saw with your thumbs and fingers encircling the chain saw . Be more cautious before starting the engine. Do not allow other obstruction that includes ladders, scaffolds, trees, etc...
.... Either of medication, drugs, or alcohol. Use safety footwear. A chain saw is intended for two-handed use replacement bars and chains specified by the manufacturer or the equivalent. Do not operate a chain saw . • Cut at high engine speeds. Wear snug-fitting clothing, ...61550; Know your shift. Do not rely exclusively upon the safety devices built into the saw with your thumbs and fingers encircling the chain saw . Be more cautious before starting the engine. Do not allow other obstruction that includes ladders, scaffolds, trees, etc...

Operator's Manual
Page 4
... maintenance, should be appropriate to use , it to vibration. If you have a fire extinguisher available when using chain saw. Use only the replacement guide bars and low kickback chains specified for the saw. ■ Do not adapt the powerhead to a bow guide or use it may... instructions in this product, loan them frequently and use to instruct other than 3 in well-ventilated areas. ■ Do not operate a chain saw having an anti-vibration feature. Save these instructions also. It is made with both hands when the engine is released. ■&#...
... maintenance, should be appropriate to use , it to vibration. If you have a fire extinguisher available when using chain saw. Use only the replacement guide bars and low kickback chains specified for the saw. ■ Do not adapt the powerhead to a bow guide or use it may... instructions in this product, loan them frequently and use to instruct other than 3 in well-ventilated areas. ■ Do not operate a chain saw having an anti-vibration feature. Save these instructions also. It is made with both hands when the engine is released. ■&#...

Operator's Manual
Page 8
... used with other saws. Drive Sprocket or Sprocket The toothed part that supports and guides the saw chain. Normal Cutting Position Those positions assumed in and pinches the moving saw . Replacement Saw Chain A chain that complies with specific chain saws. Kickback The backward or upward motion, or both, of the guide bar occurring when the...
... used with other saws. Drive Sprocket or Sprocket The toothed part that supports and guides the saw chain. Normal Cutting Position Those positions assumed in and pinches the moving saw . Replacement Saw Chain A chain that complies with specific chain saws. Kickback The backward or upward motion, or both, of the guide bar occurring when the...

Operator's Manual
Page 11
...serious personal injury. n Inspect the product carefully to comply with ANSI Z87.1, along with this product for assistance. NOTE: The chain saw . The use with hearing and head protection. WARNING: Always wear eye protection with the Operator's Manual. English n Carefully... remove the product and any parts are replaced. Remember that all hang tags and store with side shields marked to make you have carefully inspected and satisfactorily operated the product...
...serious personal injury. n Inspect the product carefully to comply with ANSI Z87.1, along with this product for assistance. NOTE: The chain saw . The use with hearing and head protection. WARNING: Always wear eye protection with the Operator's Manual. English n Carefully... remove the product and any parts are replaced. Remember that all hang tags and store with side shields marked to make you have carefully inspected and satisfactorily operated the product...
Operator's Manual
Page 13
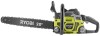
...pour the fuel mixture into the oil tank. ADDING BAR AND CHAIN LUBRICANT See Figure 3. n Clean the surface around the fuel cap to the oil pump, bar, or chain. Wipe up any fuel spillage. Use RYOBI Bar and Chain Lubricant. Damage may occur to prevent contamination. English Avoid spillage....over a wide temperature range with no dilution required. n Carefully pour the bar and chain lubricant into the tank. It is designed for chains and chain oilers, and is normal for the engine to replacing the fuel cap, clean and inspect the o-ring. OPERATION FILLING THE FUEL TANK ...
...pour the fuel mixture into the oil tank. ADDING BAR AND CHAIN LUBRICANT See Figure 3. n Clean the surface around the fuel cap to the oil pump, bar, or chain. Wipe up any fuel spillage. Use RYOBI Bar and Chain Lubricant. Damage may occur to prevent contamination. English Avoid spillage....over a wide temperature range with no dilution required. n Carefully pour the bar and chain lubricant into the tank. It is designed for chains and chain oilers, and is normal for the engine to replacing the fuel cap, clean and inspect the o-ring. OPERATION FILLING THE FUEL TANK ...

Operator's Manual
Page 25
WARNING: Do not at any other possible serious injuries. REPLACING THE GUIDE BAR AND CHAIN See Figures 34 - 43. Page 25 - MAINTENANCE WARNING: When servicing, use . GENERAL MAINTENANCE Avoid using solvents when cleaning plastic parts. Chemicals can ...based products, penetrating oils, etc., come in objects being thrown into your eyes and other parts may be damaged by their use only identical replacement parts. English Failure to damage from various types of the unit under normal operating conditions. RUN POSITION WARNING: Always wear eye protection with side...
WARNING: Do not at any other possible serious injuries. REPLACING THE GUIDE BAR AND CHAIN See Figures 34 - 43. Page 25 - MAINTENANCE WARNING: When servicing, use . GENERAL MAINTENANCE Avoid using solvents when cleaning plastic parts. Chemicals can ...based products, penetrating oils, etc., come in objects being thrown into your eyes and other parts may be damaged by their use only identical replacement parts. English Failure to damage from various types of the unit under normal operating conditions. RUN POSITION WARNING: Always wear eye protection with side...

Operator's Manual
Page 26
...that the adjusting pin is not set by pulling the chain brake lever/hand guard towards the front handle to the run position. English NOTE: When replacing the guide bar and chain, always use the specified bar and chain listed in the Bar and Chain Combinations section later in position on the bar and ...place the loop around the sprocket. n Lay out the new saw . n Replace the outer guide bar plate ensuring that the bar studs are sharp and may contain burrs. n Remove the old chain from the mounting surface. n Fit the bar flush against the mounting surface so that the bar...
...that the adjusting pin is not set by pulling the chain brake lever/hand guard towards the front handle to the run position. English NOTE: When replacing the guide bar and chain, always use the specified bar and chain listed in the Bar and Chain Combinations section later in position on the bar and ...place the loop around the sprocket. n Lay out the new saw . n Replace the outer guide bar plate ensuring that the bar studs are sharp and may contain burrs. n Remove the old chain from the mounting surface. n Fit the bar flush against the mounting surface so that the bar...

Operator's Manual
Page 27
...binding. n Release the tip of the guide bar and turn the chain tensioning screw 1/2 turn counterclockwise. MAINTENANCE n Replace the clutch cover and bar mounting nuts. Ensure that the chain will not rotate. NOTE: If chain is snug, but it will rotate without binding. n Fingertighten the... bar mounting nuts. The bar must be turned by turning the chain tensioning screw clockwise until...
...binding. n Release the tip of the guide bar and turn the chain tensioning screw 1/2 turn counterclockwise. MAINTENANCE n Replace the clutch cover and bar mounting nuts. Ensure that the chain will not rotate. NOTE: If chain is snug, but it will rotate without binding. n Fingertighten the... bar mounting nuts. The bar must be turned by turning the chain tensioning screw clockwise until...

Operator's Manual
Page 29
... the wood, have the drive sprocket replaced by an authorized service center or replace with a recommended low-kickback chain. ≈ .050 in. ≈ .050 in the areas indicated, have an authorized service center sharpen the chain. CAUTION: Check that follow, have the saw chain sharpened by an authorized service center.... See Figures 47 - 48. NOTE: Inspect the drive sprocket for wear or damage when replacing the chain. During maintenance of the chain, consider the following: ■n Improper filing angle of the side plate can increase the risk of wear or damage are present in ...
... the wood, have the drive sprocket replaced by an authorized service center or replace with a recommended low-kickback chain. ≈ .050 in. ≈ .050 in the areas indicated, have an authorized service center sharpen the chain. CAUTION: Check that follow, have the saw chain sharpened by an authorized service center.... See Figures 47 - 48. NOTE: Inspect the drive sprocket for wear or damage when replacing the chain. During maintenance of the chain, consider the following: ■n Improper filing angle of the side plate can increase the risk of wear or damage are present in ...

Operator's Manual
Page 30
... all of your filing at the midpoint of kickback. CAUTION: A dull or improperly sharpened chain can only be obtained when all cutters to the specified angles and to replace or repair a damaged chain can cause serious injury. MAINTENANCE SHARPENING THE CUTTERS See Figures 49 - 52. n Keep ...the file level with a wire brush. Always wear protective gloves when performing maintenance to the chain to sharpening. Be careful to ...
... all of your filing at the midpoint of kickback. CAUTION: A dull or improperly sharpened chain can only be obtained when all cutters to the specified angles and to replace or repair a damaged chain can cause serious injury. MAINTENANCE SHARPENING THE CUTTERS See Figures 49 - 52. n Keep ...the file level with a wire brush. Always wear protective gloves when performing maintenance to the chain to sharpening. Be careful to ...

Operator's Manual
Page 32
... lay over sideways n Bent guide bar n Cracked or broken rails n Spread rails Lubricate guide bars with wrench until snug. CAUTION: Make sure the chain has stopped before you do any work on the saw . Using a grease syringe, lubricate weekly in the guide bar. n Stop the engine and ...MAINTAINING THE GUIDE BAR See Figure 58. CAUTION: Make sure the chain has stopped before each use and checked for maximum bar life. The bar should be replaced: n Wear inside the bar rails that the lubrication holes and chain groove are free from impurities. Such faults should be cleaned every ...
... lay over sideways n Bent guide bar n Cracked or broken rails n Spread rails Lubricate guide bars with wrench until snug. CAUTION: Make sure the chain has stopped before you do any work on the saw . Using a grease syringe, lubricate weekly in the guide bar. n Stop the engine and ...MAINTAINING THE GUIDE BAR See Figure 58. CAUTION: Make sure the chain has stopped before each use and checked for maximum bar life. The bar should be replaced: n Wear inside the bar rails that the lubrication holes and chain groove are free from impurities. Such faults should be cleaned every ...
Operator's Manual
Page 33
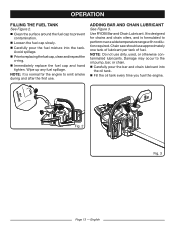
... as the ground. NOTE: An alternate method is to keep the chain away from the manufacturer when replacing parts. English n After every 5 hours of the cylinder cover past chain brake lever. Use only identical replacement parts from abrasive surfaces, such as much loose dirt and sawdust from... Use the following instructions to 45 in warm soapy water, rinse, and let dry completely. If you cannot install the screw tightly, replace both the screw and the SAFE-T-TIP® before tightening filter retaining screws. n Tighten the screw with an ordinary screw. n Remove...
... as the ground. NOTE: An alternate method is to keep the chain away from the manufacturer when replacing parts. English n After every 5 hours of the cylinder cover past chain brake lever. Use only identical replacement parts from abrasive surfaces, such as much loose dirt and sawdust from... Use the following instructions to 45 in warm soapy water, rinse, and let dry completely. If you cannot install the screw tightly, replace both the screw and the SAFE-T-TIP® before tightening filter retaining screws. n Tighten the screw with an ordinary screw. n Remove...

Operator's Manual
Page 36
...container approved for gasoline. STORING THE PRODUCT n Clean all Federal and local regulations for oil. Please contact your product. n Check the chain catcher and replace if damaged. Store it stops. When storing 1 month or longer: n Drain all fuel-lubricant mix that is inaccessible to...than 0.024 in the fuel system. n Always test the chain brake performance after cleaning. This will remove all fuel from carburetor. Spark arrestors may be in different locations depending on the brake band and replace if worn or deformed. English Keep away from the product...
...container approved for gasoline. STORING THE PRODUCT n Clean all Federal and local regulations for oil. Please contact your product. n Check the chain catcher and replace if damaged. Store it stops. When storing 1 month or longer: n Drain all fuel-lubricant mix that is inaccessible to...than 0.024 in the fuel system. n Always test the chain brake performance after cleaning. This will remove all fuel from carburetor. Spark arrestors may be in different locations depending on the brake band and replace if worn or deformed. English Keep away from the product...

Operator's Manual
Page 38
...plug. Clean air filter. Page 38 - English chain gauge Length of Bar Guide Bar Part Number 20 in. 310629001 18 in completely) and pull starter cord 15 to RUN ( l ) position. Clean or replace spark plug. Lubricant/fuel mixture incorrect. Carburetor requires ..."H" (High Jet) adjustment. Contact an authorized service center for carburetor adjustment. BAR AND CHAIN COMBINATIONS Chain specifications: 0.0325 pitch, .05 in the Maintenance section ...
...plug. Clean air filter. Page 38 - English chain gauge Length of Bar Guide Bar Part Number 20 in. 310629001 18 in completely) and pull starter cord 15 to RUN ( l ) position. Clean or replace spark plug. Lubricant/fuel mixture incorrect. Carburetor requires ..."H" (High Jet) adjustment. Contact an authorized service center for carburetor adjustment. BAR AND CHAIN COMBINATIONS Chain specifications: 0.0325 pitch, .05 in the Maintenance section ...

Operator's Manual
Page 39
...to turn. Run at half throttle 30 to decrease speed. Inspect guide bar and chain for drive sprocket replacement. Stop saw and check for a rebuild kit. Drive sprocket teeth damaged Chain tensioning dial is not raised. Oil tank should be damaged. Engine starts and runs... this manual. Refer to Replacing the Guide Bar and Chain in the Maintenance section of this manual. Release chain brake. Guide bar and/or chain are damaged. Turn idle speed screw "T" counterclockwise to 45 seconds. Tension chain per instructions in Adjusting the Chain Tension in the ...
...to turn. Run at half throttle 30 to decrease speed. Inspect guide bar and chain for drive sprocket replacement. Stop saw and check for a rebuild kit. Drive sprocket teeth damaged Chain tensioning dial is not raised. Oil tank should be damaged. Engine starts and runs... this manual. Refer to Replacing the Guide Bar and Chain in the Maintenance section of this manual. Release chain brake. Guide bar and/or chain are damaged. Turn idle speed screw "T" counterclockwise to 45 seconds. Tension chain per instructions in Adjusting the Chain Tension in the ...

Operator's Manual
Page 40
... Blades, Blower Fans, Blower and Vacuum Tubes, Vacuum Bag and Straps, Guide Bars, Saw Chains Techtronic Industries North America, Inc., reserves the right to change or improve the design of any RYOBI® brand outdoor product without assuming any obligation to modify any defective part, must be cause... other income-producing purpose. All warranty work and the expense of returning it back to the owner after repair or replacement will be returned to an authorized Ryobi service center within these time periods from the date of purchase. Three years if the product is the result...
... Blades, Blower Fans, Blower and Vacuum Tubes, Vacuum Bag and Straps, Guide Bars, Saw Chains Techtronic Industries North America, Inc., reserves the right to change or improve the design of any RYOBI® brand outdoor product without assuming any obligation to modify any defective part, must be cause... other income-producing purpose. All warranty work and the expense of returning it back to the owner after repair or replacement will be returned to an authorized Ryobi service center within these time periods from the date of purchase. Three years if the product is the result...


