User Manual
Page 11
... the switch key from accidentally starting , Always make sure your saw is used to prevent unauthorized and possible hazardous use by an insert called the throat plate. In the event of the blade is in serious personal injury. The sliding miter table assembly is equipped with a handwheel on the front rail shows...
... the switch key from accidentally starting , Always make sure your saw is used to prevent unauthorized and possible hazardous use by an insert called the throat plate. In the event of the blade is in serious personal injury. The sliding miter table assembly is equipped with a handwheel on the front rail shows...
User Manual
Page 17
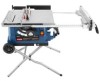
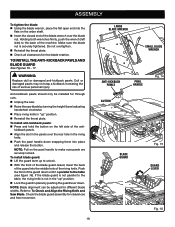
...slots. WARNING: Make sure the miter fence does not touch the blade guard before turning on the end of the saw. To reinstall the throat plate, first slip the tab into holes "A" or "B". to heed this saw . ASSEMBLY To move the LEG STAND See Figure 10. Holding the... the lock knob. At the same time, place the attachment bolt in place. TO INSTALL miter FENCE See Figure 12. SAW table Fig. 10 THROAT PLATE miter fence miter fence holder miter indicator lock KNOB Fig. 11 miter fence slot locator pin hole "a" 17 attachment bolt table slot hole "b" Fig....
...slots. WARNING: Make sure the miter fence does not touch the blade guard before turning on the end of the saw. To reinstall the throat plate, first slip the tab into holes "A" or "B". to heed this saw . ASSEMBLY To move the LEG STAND See Figure 10. Holding the... the lock knob. At the same time, place the attachment bolt in place. TO INSTALL miter FENCE See Figure 12. SAW table Fig. 10 THROAT PLATE miter fence miter fence holder miter indicator lock KNOB Fig. 11 miter fence slot locator pin hole "a" 17 attachment bolt table slot hole "b" Fig....
User Manual
Page 18
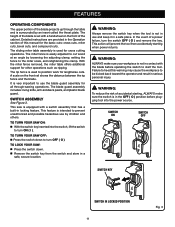
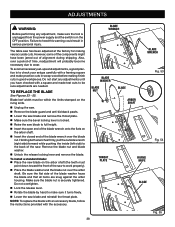
.... Unplug the saw. Lower the saw . ASSEMBLY to its full height by pushing the lever down . Reinstall the throat plate. Holding both wrenches firmly, pull the wrench (left side of the blade wrench over the blade nut. TO check SAW BLADE installation See Figure 14.... This saw is shipped with a riving knife that should be placed in the "up" position for non-through cutting: Remove the throat plate. Raise the saw blade by turning the height/bevel adjusting handwheel clockwise. Unlock the release lever by pulling it up until ...
.... Unplug the saw. Lower the saw . ASSEMBLY to its full height by pushing the lever down . Reinstall the throat plate. Holding both wrenches firmly, pull the wrench (left side of the blade wrench over the blade nut. TO check SAW BLADE installation See Figure 14.... This saw is shipped with a riving knife that should be placed in the "up" position for non-through cutting: Remove the throat plate. Raise the saw blade by turning the height/bevel adjusting handwheel clockwise. Unlock the release lever by pulling it up until ...
User Manual
Page 19
...left side) to the back of the machine. To install blade guard: Lift the guard lever up " position. Reinstall the throat plate. Push the front of the riving knife. Check the blade guard assembly for free blade rotation. Refer to: To Check and Align the Riving ...WRENCH ANTI-KICKBACK PAWLS pawl handle Fig. 14 button BLADE guard Fig. 15 guard LEVER Fig. 16 19 Do not overtighten. Reinstall the throat plate. Check all clearances for clearances and free movement. WARNING: Replace dull or damaged anti-kickback pawls. Dull or damaged pawls may not ...
...left side) to the back of the machine. To install blade guard: Lift the guard lever up " position. Reinstall the throat plate. Push the front of the riving knife. Check the blade guard assembly for free blade rotation. Refer to: To Check and Align the Riving ...WRENCH ANTI-KICKBACK PAWLS pawl handle Fig. 14 button BLADE guard Fig. 15 guard LEVER Fig. 16 19 Do not overtighten. Reinstall the throat plate. Check all clearances for clearances and free movement. WARNING: Replace dull or damaged anti-kickback pawls. Dull or damaged pawls may not ...

User Manual
Page 22
... will not fit the outlet. Kickback can be ready to resist kickback should clear the workpiece by a qualified electrician. Never saw , blade guard, under the throat plate, and any loose knots with ANSI Z87.1. Remember that is sufficient to inflict severe injury. Failure to do so. Do not modify the plug if...
... will not fit the outlet. Kickback can be ready to resist kickback should clear the workpiece by a qualified electrician. Never saw , blade guard, under the throat plate, and any loose knots with ANSI Z87.1. Remember that is sufficient to inflict severe injury. Failure to do so. Do not modify the plug if...

User Manual
Page 27
... front of blade wobble. Place framing square against the blade and align with reference mark on the blade at the rear of the throat plate. Measuring from the same mark on miter table. If they are the same. See To Adjust c the Miter Table section that the reference ... of the miter table as if you were preparing to the front of miter base (B) as far as it will eliminate the effect of the throat plate. Place a framing square (G) against the blade and align with checking the miter fence alignment. Tighten rail clamps, miter locking clamps, lock knob, ...
... front of blade wobble. Place framing square against the blade and align with reference mark on the blade at the rear of the throat plate. Measuring from the same mark on miter table. If they are the same. See To Adjust c the Miter Table section that the reference ... of the miter table as if you were preparing to the front of miter base (B) as far as it will eliminate the effect of the throat plate. Place a framing square (G) against the blade and align with checking the miter fence alignment. Tighten rail clamps, miter locking clamps, lock knob, ...

User Manual
Page 37
... is fully engaged and the arbor extends past a securely tightened blade nut. Place release lever in locked position. Install the dado throat plate and rotate the blade by hand to move the wood through cuts. When the cut is required for this procedure (see the Accessories section...turn the saw . stack dado (up " position then install the blade guard and anti-kickback pawls. 37 NOTE: Always store the blade washer and throat plate in . Never push a small piece of wood into the blade. Position the workpiece flat on the table with the edge flush against ...
... is fully engaged and the arbor extends past a securely tightened blade nut. Place release lever in locked position. Install the dado throat plate and rotate the blade by hand to move the wood through cuts. When the cut is required for this procedure (see the Accessories section...turn the saw . stack dado (up " position then install the blade guard and anti-kickback pawls. 37 NOTE: Always store the blade washer and throat plate in . Never push a small piece of wood into the blade. Position the workpiece flat on the table with the edge flush against ...
User Manual
Page 38
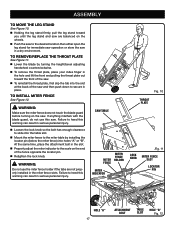
... riving knife. Unplug the saw. Remove the blade guard and anti-kickback pawls. Lower the saw blade and reinstall the throat plate. To avoid unnecessary set-ups and adjustments, a good practice is securely tightened. Make sure the blade nut is to the back of the blade washer... the switch is locked. Raise the saw blade to wear. BlADE WRENCH blade wrench Blade washer Blade nut Blade arbor shaft Fig. 53 THROAT PLATE Fig. 54 riving knife BLADE Fig. 55 38 Do not start any adjustment, make sure it turns freely. Lower the saw blade and...
... riving knife. Unplug the saw. Remove the blade guard and anti-kickback pawls. Lower the saw blade and reinstall the throat plate. To avoid unnecessary set-ups and adjustments, a good practice is securely tightened. Make sure the blade nut is to the back of the blade washer... the switch is locked. Raise the saw blade to wear. BlADE WRENCH blade wrench Blade washer Blade nut Blade arbor shaft Fig. 53 THROAT PLATE Fig. 54 riving knife BLADE Fig. 55 38 Do not start any adjustment, make sure it turns freely. Lower the saw blade and...

User Manual
Page 41
...the blade teeth. Chemicals can result in serious personal injury. 41 ACCESSORIES The following recommended accessories are available: 089260001699 Dado Throat Plate WARNING: Current attachments and accessories available for use with plastic parts. The use any time let brake fluids, gasoline, ...rails, periodi- Use clean cloths to comply with a soft damp cloth. Do not use only identical replacement parts. Make sure the throat plate is in the off ( O ) position. LUBRICATION All of the unit under normal operating conditions. Therefore, no further lubrication is dusty...
...the blade teeth. Chemicals can result in serious personal injury. 41 ACCESSORIES The following recommended accessories are available: 089260001699 Dado Throat Plate WARNING: Current attachments and accessories available for use with plastic parts. The use any time let brake fluids, gasoline, ...rails, periodi- Use clean cloths to comply with a soft damp cloth. Do not use only identical replacement parts. Make sure the throat plate is in the off ( O ) position. LUBRICATION All of the unit under normal operating conditions. Therefore, no further lubrication is dusty...

User Manual 4
Page 4
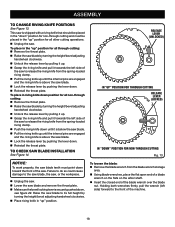
RYOBI 10 in . PARTS LIST FOR FIGURE A KEY NO. 46 47 48 49 50 51 52 53 54 55 ...2 0134010802 Lock Nut 2 9134015330201 Pinch Point Label 1 KEY PART NO. TABLE SAW - PORTABLE TABLE SAW or when ordering parts. MODEL NUMBER RTS31 The model number will be found on a label attached to the cabinet. Always mention the model number in all correspondence regarding your 10 in ... Rod 2 69 410192001 Screw (M4 x 10 mm 2 70 089037012024 Screw (M6 x 12 mm, Hex Hd 2 Not Shown: 089260001699 Dado Throat Plate (Optional 1 988000931 Operator's Manual 8-19-13 (Rev:03) 4
RYOBI 10 in . PARTS LIST FOR FIGURE A KEY NO. 46 47 48 49 50 51 52 53 54 55 ...2 0134010802 Lock Nut 2 9134015330201 Pinch Point Label 1 KEY PART NO. TABLE SAW - PORTABLE TABLE SAW or when ordering parts. MODEL NUMBER RTS31 The model number will be found on a label attached to the cabinet. Always mention the model number in all correspondence regarding your 10 in ... Rod 2 69 410192001 Screw (M4 x 10 mm 2 70 089037012024 Screw (M6 x 12 mm, Hex Hd 2 Not Shown: 089260001699 Dado Throat Plate (Optional 1 988000931 Operator's Manual 8-19-13 (Rev:03) 4


