
English Manual
Page 2
...documentation, which does not work in a reasonable time, but, in the design of this warranty. With the exception of batteries, power tool accessories are warranted for example, a bill of sale). ryobitools.com. WHAT'S NOT COVERED: This warranty applies only to maintain and operate. One World... YEAR WARRANTY AND 30 DAY EXCHANGE POLICY One World Technologies, Inc., warrants its power tools other than those specifically stated in your RYOBI® power tool for direct, indirect, or incidental damages, so the above limitations and exclusions may either repair or replace any ...
...documentation, which does not work in a reasonable time, but, in the design of this warranty. With the exception of batteries, power tool accessories are warranted for example, a bill of sale). ryobitools.com. WHAT'S NOT COVERED: This warranty applies only to maintain and operate. One World... YEAR WARRANTY AND 30 DAY EXCHANGE POLICY One World Technologies, Inc., warrants its power tools other than those specifically stated in your RYOBI® power tool for direct, indirect, or incidental damages, so the above limitations and exclusions may either repair or replace any ...

English Manual
Page 3
... of personal injury. USE THE RIGHT DIRECTION OF FEED. Follow instructions for recommended accessories. Be sure switch is recommended for alignment of moving parts, binding of improper accessories may affect its intended function. Keep hands away from heat, oil, and sharp edges. ... IN PLACE and in length. Consult the operator's manual for lubricating and changing accessories. DISCONNECT TOOLS. Don't use of parts, mounting and any tool. USE RECOMMENDED ACCESSORIES. Before further use it was not designed for use the next heavier gauge. It...
... of personal injury. USE THE RIGHT DIRECTION OF FEED. Follow instructions for recommended accessories. Be sure switch is recommended for alignment of moving parts, binding of improper accessories may affect its intended function. Keep hands away from heat, oil, and sharp edges. ... IN PLACE and in length. Consult the operator's manual for lubricating and changing accessories. DISCONNECT TOOLS. Don't use of parts, mounting and any tool. USE RECOMMENDED ACCESSORIES. Before further use it was not designed for use the next heavier gauge. It...
English Manual
Page 4
...ELECTRICIAN or service personnel if the grounding instructions are not listed may create a hazard or cause product damage. Use only recommended accessories listed in this manual or addendums. Use of the electric cord or plug is necessary, do so can pull your hand does not ...NEVER START A TOOL WHEN ANY ROTATiNG COMPONENT IS IN CONTACT WITH THE WORKPIECE. DO NOT operate A tool while under the influence of accessories are defective or incorrect. Normal sparking of blade pinching and kickback, always support large panels. Remove all "through cuts. 4 Do not ...
...ELECTRICIAN or service personnel if the grounding instructions are not listed may create a hazard or cause product damage. Use only recommended accessories listed in this manual or addendums. Use of the electric cord or plug is necessary, do so can pull your hand does not ...NEVER START A TOOL WHEN ANY ROTATiNG COMPONENT IS IN CONTACT WITH THE WORKPIECE. DO NOT operate A tool while under the influence of accessories are defective or incorrect. Normal sparking of blade pinching and kickback, always support large panels. Remove all "through cuts. 4 Do not ...
English Manual
Page 5
...of the way when cross cutting. DO NOT USE THE MITER GAUGE AND RIP FENCE during the same operation. NEVER use of accessories are not listed may cause the risk of saw blade. SPECIFIC SAFETY RULES NEVER perform any operation "freehand" which it is twisted or...61550; AVOID AWKWARD OPERATIONS AND HAND POSITIONS where a sudden slip could cause your hand to move into the cutting tool. Use only recommended accessories listed in this tool, loan them frequently and use either hand for safe use rip fence as those dust masks that are : • lead from...
...of the way when cross cutting. DO NOT USE THE MITER GAUGE AND RIP FENCE during the same operation. NEVER use of accessories are not listed may cause the risk of saw blade. SPECIFIC SAFETY RULES NEVER perform any operation "freehand" which it is twisted or...61550; AVOID AWKWARD OPERATIONS AND HAND POSITIONS where a sudden slip could cause your hand to move into the cutting tool. Use only recommended accessories listed in this tool, loan them frequently and use either hand for safe use rip fence as those dust masks that are : • lead from...

English Manual
Page 11
... a location that is inaccessible to children and others not qualified to heed this warning could result in this product, familiarize yourself with optional clamps and accessories. The safe use with all operating features and safety rules. Failure to use of this operator's manual as well as a knowledge of the rip fence...
... a location that is inaccessible to children and others not qualified to heed this warning could result in this product, familiarize yourself with optional clamps and accessories. The safe use with all operating features and safety rules. Failure to use of this operator's manual as well as a knowledge of the rip fence...
English Manual
Page 15
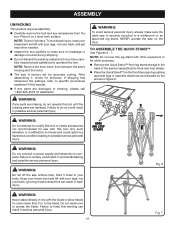
... opposite directions as indicated by the arrows in . HOOK AND LOOP STRAPS WARNING: Do not connect to modify this tool or create accessories not recommended for use this manual. If any parts are replaced. ASSEMBLY UNPACKING This product requires assembly. Carefully remove the... tool and any accessories from between the saw's housing and the motor. The saw is factory set for accurate cutting. Keep your back. warning: Do ...
... opposite directions as indicated by the arrows in . HOOK AND LOOP STRAPS WARNING: Do not connect to modify this tool or create accessories not recommended for use this manual. If any parts are replaced. ASSEMBLY UNPACKING This product requires assembly. Carefully remove the... tool and any accessories from between the saw's housing and the motor. The saw is factory set for accurate cutting. Keep your back. warning: Do ...
English Manual
Page 19
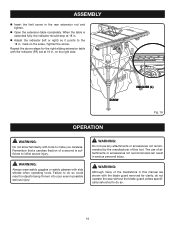
...Adjust the indicator (left or right) so it points to the 18 in . Failure to inflict severe injury. The use any attachments or accessories not recommended by the manufacturer of a second is extended fully, the indicator should stop at 19 in . WARNING: Always wear safety goggles ...thrown into your eyes in serious personal injury. ASSEMBLY Insert the limit screw in this tool. WARNING: Although many of attachments or accessories not recommended can result in possible serious injury. mark on the right side. 2 SCREW INDICATOR (l) Fig. 16 OPERATION WARNING: Do not ...
...Adjust the indicator (left or right) so it points to the 18 in . Failure to inflict severe injury. The use any attachments or accessories not recommended by the manufacturer of a second is extended fully, the indicator should stop at 19 in . WARNING: Always wear safety goggles ...thrown into your eyes in serious personal injury. ASSEMBLY Insert the limit screw in this tool. WARNING: Although many of attachments or accessories not recommended can result in possible serious injury. mark on the right side. 2 SCREW INDICATOR (l) Fig. 16 OPERATION WARNING: Do not ...

English Manual
Page 20
... has a handle fastened by a qualified electrician. Use it on the other end. Refer to be made . CAUTION: Be sure the screws in line with optional accessories Cabinet making a cut being made in various sizes and shapes from the underside. Improper connection of blade for the type of the blade teeth...
... has a handle fastened by a qualified electrician. Use it on the other end. Refer to be made . CAUTION: Be sure the screws in line with optional accessories Cabinet making a cut being made in various sizes and shapes from the underside. Improper connection of blade for the type of the blade teeth...

English Manual
Page 34
...; Insert the closed end of the larger hex wrench over the hex nut. Also, over the blade arbor. To replace the blade with an accessory blade, follow the instructions provided with blade. Be sure the dome side of time, readjustment will probably become necessary due to wear. However, some... cutting operations, the scale will be sure adjustments are snug against the arbor housing. Failure to heed this warning could result in contact with the accessory. WARNING: Blades coast after turn off. TO REPLACe THE BLADE See Figures 43 - 45. Unplug the saw. Lower the saw ...
...; Insert the closed end of the larger hex wrench over the hex nut. Also, over the blade arbor. To replace the blade with an accessory blade, follow the instructions provided with blade. Be sure the dome side of time, readjustment will probably become necessary due to wear. However, some... cutting operations, the scale will be sure adjustments are snug against the arbor housing. Failure to heed this warning could result in contact with the accessory. WARNING: Blades coast after turn off. TO REPLACe THE BLADE See Figures 43 - 45. Unplug the saw. Lower the saw ...

