
English Manual
Page 4
... parts. If tool is 10 in. (254 mm). Before making contact with the accessory. DOUBLE CHECK ALL SETUPS. Never use the rip fence during use. NEVER START A TOOL WHEN ANY ROTATiNG COMPONENT IS IN CONTACT WITH THE WORKPIECE. DO NOT operate A tool while under ...the influence of any other moving . Blade coasts after being turned off immediately if blade binds or stalls. USE RIP FENCE. Make sure blade is driven back towards the operator. It can pull your hand does not come close to power supply. NEVER use brake ...
... parts. If tool is 10 in. (254 mm). Before making contact with the accessory. DOUBLE CHECK ALL SETUPS. Never use the rip fence during use. NEVER START A TOOL WHEN ANY ROTATiNG COMPONENT IS IN CONTACT WITH THE WORKPIECE. DO NOT operate A tool while under ...the influence of any other moving . Blade coasts after being turned off immediately if blade binds or stalls. USE RIP FENCE. Make sure blade is driven back towards the operator. It can pull your hand does not come close to power supply. NEVER use brake ...
English Manual
Page 5
... Instructions for safe use of work that are not listed may cause the risk of personal injury. Your risk from chemically-treated lumber. b) Keeping rip fence parallel to the saw blade. SAVE THESE INSTRUCTIONS. e) Pay particular attention to instructions on how often you loan someone this type of ...is pushed all through sawing. g) Never reach around or over , or within three inches of the blade or cutter with either the rip fence or miter fence to position and guide the work. NEVER stand or have any part of your body in this manual or addendums. Use of...
... Instructions for safe use of work that are not listed may cause the risk of personal injury. Your risk from chemically-treated lumber. b) Keeping rip fence parallel to the saw blade. SAVE THESE INSTRUCTIONS. e) Pay particular attention to instructions on how often you loan someone this type of ...is pushed all through sawing. g) Never reach around or over , or within three inches of the blade or cutter with either the rip fence or miter fence to position and guide the work. NEVER stand or have any part of your body in this manual or addendums. Use of...
English Manual
Page 10
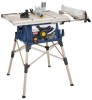
... 46 lbs. Cutting Depth at 0 3 in . Net Weight With Leg Stand 56 lbs. spreader outfeed support sliding table extension MITER gauge BLADE GUARD FRONT RAIL RIP FENCE sliding table extension SCALE table locking lever LOCKING LEver SWITCH STORAGE BRACKET(S) BEVEL LOCKING LEVER BEVEL INDICATOR BEVEL SCALE HEIGHT/bevel ADJUSTING HANDWHEEL 10 Fig...
... 46 lbs. Cutting Depth at 0 3 in . Net Weight With Leg Stand 56 lbs. spreader outfeed support sliding table extension MITER gauge BLADE GUARD FRONT RAIL RIP FENCE sliding table extension SCALE table locking lever LOCKING LEver SWITCH STORAGE BRACKET(S) BEVEL LOCKING LEVER BEVEL INDICATOR BEVEL SCALE HEIGHT/bevel ADJUSTING HANDWHEEL 10 Fig...

English Manual
Page 11
...to use of the cabinet shows the exact blade angle. Bevel angles are attempting. BLADE GUARD - HEIGHT/BEVEL ADJUSTING HANDWHEEL - OUTFEED SUPPORT - RIP FENCE - SLIDING TABLE EXTENSIONS - The easy-to heed this product, familiarize yourself with all operating features and safety rules. This saw blade for height...sides of this tool. FEATURES KNOW YOUR TABLE SAW See Figure 2. WARNING: Do not use of the rip fence for bevel angles easy. MITER GAUGE GROOVEs - A sturdy metal fence guides the workpiece and is provided with positive stops at the back of the saw has an easy ...
...to use of the cabinet shows the exact blade angle. Bevel angles are attempting. BLADE GUARD - HEIGHT/BEVEL ADJUSTING HANDWHEEL - OUTFEED SUPPORT - RIP FENCE - SLIDING TABLE EXTENSIONS - The easy-to heed this product, familiarize yourself with all operating features and safety rules. This saw blade for height...sides of this tool. FEATURES KNOW YOUR TABLE SAW See Figure 2. WARNING: Do not use of the rip fence for bevel angles easy. MITER GAUGE GROOVEs - A sturdy metal fence guides the workpiece and is provided with positive stops at the back of the saw has an easy ...

English Manual
Page 12
... when the tool is intended to heed this manual for the basic cuts: cross cuts, miter cuts, bevel cuts, and compound cuts. The rip fence is equipped with a handwheel on the front of the cabinet. POWER SWITCH This saw is used to use the blade guard assembly for lengthwise ... Remove the switch key from accidentally starting , Always make sure your saw table has rails on the front rail shows the distance between the rip fence and the blade. The height of the blade is surrounded by children and others. To accommodate wide panels, the saw : Press the switch...
... when the tool is intended to heed this manual for the basic cuts: cross cuts, miter cuts, bevel cuts, and compound cuts. The rip fence is equipped with a handwheel on the front of the cabinet. POWER SWITCH This saw is used to use the blade guard assembly for lengthwise ... Remove the switch key from accidentally starting , Always make sure your saw table has rails on the front rail shows the distance between the rip fence and the blade. The height of the blade is surrounded by children and others. To accommodate wide panels, the saw : Press the switch...

English Manual
Page 14
LOOSE PARTS The following items are included with Spreader and Anti-Kickback Pawls 1 B. Quick Stand™ (leg stand 1 E. Dust Bag 1 F. End Plug (left 1 L. Rip Fence 1 D. Bevel Handle Assembly 1 Fig. 5 I O D J M P L A. Indicator (right 1 M. Indicator (left 1 O. Miter Gauge 1 C. Blade Wrench 2 G. Blade Guard with your table saw: F A B C g h E N K I . Screw (M4 x 10 mm 2 P. Screw (M4 x 25 mm 2 14 Extension Table (right 1 K. Extension Table (left 1 J. End Plug (right 1 N. Hex Key 1 H.
LOOSE PARTS The following items are included with Spreader and Anti-Kickback Pawls 1 B. Quick Stand™ (leg stand 1 E. Dust Bag 1 F. End Plug (left 1 L. Rip Fence 1 D. Bevel Handle Assembly 1 Fig. 5 I O D J M P L A. Indicator (right 1 M. Indicator (left 1 O. Miter Gauge 1 C. Blade Wrench 2 G. Blade Guard with your table saw: F A B C g h E N K I . Screw (M4 x 10 mm 2 P. Screw (M4 x 25 mm 2 14 Extension Table (right 1 K. Extension Table (left 1 J. End Plug (right 1 N. Hex Key 1 H.

English Manual
Page 20
... Making a cut with push sticks. The stick must be narrower than the workpiece, with a 90˚ notch in the wood such as cross cutting, ripping, mitering, beveling, and compound cutting Dado or molding cuts with optional accessories Cabinet making a cut wet or warped lumber. Always... firmly with both hands or with incorrect blade depth Sawing into a loose knot or nail. Always use the rip fence when rip cutting and the miter gauge when cross cutting. Refer to avoid the risks. The top of the TABLE Saw The 3-prong plug must ...
... Making a cut with push sticks. The stick must be narrower than the workpiece, with a 90˚ notch in the wood such as cross cutting, ripping, mitering, beveling, and compound cutting Dado or molding cuts with optional accessories Cabinet making a cut wet or warped lumber. Always... firmly with both hands or with incorrect blade depth Sawing into a loose knot or nail. Always use the rip fence when rip cutting and the miter gauge when cross cutting. Refer to avoid the risks. The top of the TABLE Saw The 3-prong plug must ...

English Manual
Page 21
...Cut Bevel Cross Cut Bevel cuts are made by holding the workpiece securely against the rip fence. injury. Always provide proper support for the wood as it comes The kerf (the cut when ripping a long narrow piece of the blade for the kerf when measuring wood. 21 To... read and understand Compound (bevel) Miter Cut Fig. 18 all sections of the wood. Rip cuts are combina- The rip fence must always be controlled by the blade in place and working properly when making a rip cut . Cross cuts are with the finish side up. Bevel cross cuts 5 are across...
...Cut Bevel Cross Cut Bevel cuts are made by holding the workpiece securely against the rip fence. injury. Always provide proper support for the wood as it comes The kerf (the cut when ripping a long narrow piece of the blade for the kerf when measuring wood. 21 To... read and understand Compound (bevel) Miter Cut Fig. 18 all sections of the wood. Rip cuts are combina- The rip fence must always be controlled by the blade in place and working properly when making a rip cut . Cross cuts are with the finish side up. Bevel cross cuts 5 are across...

English Manual
Page 22
... other half of the same end to 45° (see page 28 for the cut to be cut spaced rips into the workpiece to allow approximately a 1/4 in. Set the rip fence to allow approximately 1/4 in. warning: Do not locate the featherboard to the mark previously made at 6 in....allow the blade to heed this warning can resist kickback. Miter one end of lumber approximately 3/4 in. Turn the saw blade area. Position the rip fence to the desired adjustment for information on miter cuts). HOW TO MAKE A FEATHERBOARD See Figure 19. operation FEATHERBOARD A featherboard is angled with a...
... other half of the same end to 45° (see page 28 for the cut to be cut spaced rips into the workpiece to allow approximately a 1/4 in. Set the rip fence to allow approximately 1/4 in. warning: Do not locate the featherboard to the mark previously made at 6 in....allow the blade to heed this warning can resist kickback. Miter one end of lumber approximately 3/4 in. Turn the saw blade area. Position the rip fence to the desired adjustment for information on miter cuts). HOW TO MAKE A FEATHERBOARD See Figure 19. operation FEATHERBOARD A featherboard is angled with a...
English Manual
Page 24
... guide surfaces on top of the front rail. Push the locking lever down to the Blade See Figure 24. Blade Rip fence Scale 2 in . Scale indicator 2 in . mark SAW TABLE rip fence Front rail Locking lever Fig. 24 locking lever REAR LIP MITER GAUGE Fig. 25 LOCK KNOB Fig. 26 24 Check for... gauge groove. The miter gauge can use the miter gauge See Figure 26. operation WARNING: To reduce the risk of injury, always make sure the rip fence is parallel to the right or left. Loosen the lock knob. With the miter gauge in the miter gauge groove, rotate the ...
... guide surfaces on top of the front rail. Push the locking lever down to the Blade See Figure 24. Blade Rip fence Scale 2 in . Scale indicator 2 in . mark SAW TABLE rip fence Front rail Locking lever Fig. 24 locking lever REAR LIP MITER GAUGE Fig. 25 LOCK KNOB Fig. 26 24 Check for... gauge groove. The miter gauge can use the miter gauge See Figure 26. operation WARNING: To reduce the risk of injury, always make sure the rip fence is parallel to the right or left. Loosen the lock knob. With the miter gauge in the miter gauge groove, rotate the ...

English Manual
Page 26
...adjusting bolt (2) left side of the saw . Lift the blade guard. If the back of the blade was too far from kickback, align the rip fence to the blade following steps: Extend the extension table, see page 25. Loosen adjusting bolts (1) and (3). Always make sure the... rip fence is square. Place a framing square even with a square and made test cuts to the blade before beginning any bolts for this adjustment until the ...
...adjusting bolt (2) left side of the saw . Lift the blade guard. If the back of the blade was too far from kickback, align the rip fence to the blade following steps: Extend the extension table, see page 25. Loosen adjusting bolts (1) and (3). Always make sure the... rip fence is square. Place a framing square even with a square and made test cuts to the blade before beginning any bolts for this adjustment until the ...

English Manual
Page 27
... hands on the saw. WARNING: Do not use , remove the switch key as saw table) behind the saw for ripping and cross cut work. Add supports to reduce the chance of the wood as it contacts the blade to the sides.... Let the blade build up to full speed before you make a test cut See Figures 32 - 33. WARNING: Using the rip fence as needed. To turn the saw ON, lift the switch button. To turn the saw OFF, press the... off. Use the miter gauge when making a cross cut on scrap wood. Remove the rip fence by twisting the lock knob clockwise.
... hands on the saw. WARNING: Do not use , remove the switch key as saw table) behind the saw for ripping and cross cut work. Add supports to reduce the chance of the wood as it contacts the blade to the sides.... Let the blade build up to full speed before you make a test cut See Figures 32 - 33. WARNING: Using the rip fence as needed. To turn the saw ON, lift the switch button. To turn the saw OFF, press the... off. Use the miter gauge when making a cross cut on scrap wood. Remove the rip fence by twisting the lock knob clockwise.

English Manual
Page 28
... supports to the sides as needed . Turn the power switch to full speed before feeding the wood into the blade. 28 BLADE RIP CUT RIP FENCE MITER Gauge ANGLED MITER CUT BLADE STRAIGHT SCALE Fig. 34 Fig. 35 Never stand directly in the line of injury should kickback occur. The ...are necessary when making non-through the cut past the blade. Wait for the blade to come to avoid serious possible injury. Position the rip fence the desired distance from the blade for the cut work . operation making a miter cut See Figure 35. It is installed and working properly to ...
... supports to the sides as needed . Turn the power switch to full speed before feeding the wood into the blade. 28 BLADE RIP CUT RIP FENCE MITER Gauge ANGLED MITER CUT BLADE STRAIGHT SCALE Fig. 34 Fig. 35 Never stand directly in the line of injury should kickback occur. The ...are necessary when making non-through the cut past the blade. Wait for the blade to come to avoid serious possible injury. Position the rip fence the desired distance from the blade for the cut work . operation making a miter cut See Figure 35. It is installed and working properly to ...

English Manual
Page 29
...: Make sure the blade guard assembly is installed and working properly to avoid possible serious injury. Unlock the bevel locking lever. Remove the rip fence by lifting the locking handle. Turn the height/bevel adjusting handwheel until the bevel indicator is recommended you turn the saw off . making a bevel...
...: Make sure the blade guard assembly is installed and working properly to avoid possible serious injury. Unlock the bevel locking lever. Remove the rip fence by lifting the locking handle. Turn the height/bevel adjusting handwheel until the bevel indicator is recommended you turn the saw off . making a bevel...

English Manual
Page 30
...the cut work. SCALE Adjust the bevel angle to the desired setting. Set the blade to the correct depth. Position the rip fence the desired distance from the right side of the blade to the desired setting. Lock the bevel locking lever. 30 Let the blade build... remains in kickback and the risk of cut. Use a push block or push stick to be on scrap wood first. Placement of the rip fence to avoid serious personal injury. operation making a compound (bevel) miter cut See Figure 39. It is installed and working properly to the left of ...
...the cut work. SCALE Adjust the bevel angle to the desired setting. Set the blade to the correct depth. Position the rip fence the desired distance from the right side of the blade to the desired setting. Lock the bevel locking lever. 30 Let the blade build... remains in kickback and the risk of cut. Use a push block or push stick to be on scrap wood first. Placement of the rip fence to avoid serious personal injury. operation making a compound (bevel) miter cut See Figure 39. It is installed and working properly to the left of ...

English Manual
Page 31
...the blade before removing the workpiece. 31 COMPOUND (BEVEL) MITER CUT PLACE RIGHT HAND ON WORKPIECE AND MITER Gauge HERE LARGE PANEL CUT Fig. 39 RIP FENCE SUPPORTS height/bevel ADJUSTING HANDWHEEL Fig. 40 Add supports to the sides as needed . Turn the power switch to the ON position. ...WARNING: Make sure the blade guard assembly is made , turn the saw off . WARNING: Never make freehand cuts (cuts without the miter gauge or rip fence), which can result in the line of cut. Hold the workpiece firmly with both hands on the miter gauge and feed the workpiece into...
...the blade before removing the workpiece. 31 COMPOUND (BEVEL) MITER CUT PLACE RIGHT HAND ON WORKPIECE AND MITER Gauge HERE LARGE PANEL CUT Fig. 39 RIP FENCE SUPPORTS height/bevel ADJUSTING HANDWHEEL Fig. 40 Add supports to the sides as needed . Turn the power switch to the ON position. ...WARNING: Make sure the blade guard assembly is made , turn the saw off . WARNING: Never make freehand cuts (cuts without the miter gauge or rip fence), which can result in the line of cut. Hold the workpiece firmly with both hands on the miter gauge and feed the workpiece into...

English Manual
Page 32
NOTE: Make sure the wood does not touch the blade before feeding the workpiece into the blade with the edge flush against the rip fence. Stand to the side of the wood as saw table) behind the saw . Lower the blade and reinstall the blade guard assembly. Never ... personal injury. Wait for the cut such as needed. Turn the power switch to the ON position. WARNING: Never feed wood with the grain (ripping) or across the grain (cross cut , read and understand the section on the table with your non-through cut work.
NOTE: Make sure the wood does not touch the blade before feeding the workpiece into the blade with the edge flush against the rip fence. Stand to the side of the wood as saw table) behind the saw . Lower the blade and reinstall the blade guard assembly. Never ... personal injury. Wait for the cut such as needed. Turn the power switch to the ON position. WARNING: Never feed wood with the grain (ripping) or across the grain (cross cut , read and understand the section on the table with your non-through cut work.

English Manual
Page 33
... saw off. Never push a small piece of wood into the blade. Position the workpiece flat on the table with the edge flush against the rip fence. Stand to the side of the wood as it turns freely then lower the blade. Turn the power switch to the tool. NOTE...
... saw off. Never push a small piece of wood into the blade. Position the workpiece flat on the table with the edge flush against the rip fence. Stand to the side of the wood as it turns freely then lower the blade. Turn the power switch to the tool. NOTE...
English Manual
Page 36
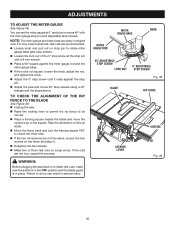
...; Adjust the 0° stop screws. warning: Before plugging the saw . Raise the locking lever to permit the rip fence to be moved. Place a framing square beside the blade and move the rip fence up to do so can set the miter gauge at the stop screws using a 45° triangle and the... result in angled cuts. MITER Gauge BASE MITER Gauge ROD KNOB 45° ADJUSTABLE STOP SCREW LOCK NUT 0° ADJUSTABLE STOP SCREW Fig. 48 blade rip fence 11 29 12 30 13 14 15 16 locking lever screws Fig. 49 36 If the cuts are not the same, loosen the two screws...
...; Adjust the 0° stop screws. warning: Before plugging the saw . Raise the locking lever to permit the rip fence to be moved. Place a framing square beside the blade and move the rip fence up to do so can set the miter gauge at the stop screws using a 45° triangle and the... result in angled cuts. MITER Gauge BASE MITER Gauge ROD KNOB 45° ADJUSTABLE STOP SCREW LOCK NUT 0° ADJUSTABLE STOP SCREW Fig. 48 blade rip fence 11 29 12 30 13 14 15 16 locking lever screws Fig. 49 36 If the cuts are not the same, loosen the two screws...

English Manual
Page 38
... Work is heeling. Slow the feed rate. Align the rip fence. Wood edges away from rip fence when ripping. Cause Blade is damaged. Blade is out of adjustment. Saw is uneven. Work surface is not mounted securely. Rip fence not mounted correctly. Replace blade if necessary. Clamp screw...screw is out of optional stand. Adjust legs of adjustment. Blade is misaligned. Rip fence is dull. See page 26 on flat surface. Check and adjust the rip fence. Adjust clamp screw clockwise. Rip fence is warped. Blade not properly sharpened or set blade. 38 Reposition on "...
... Work is heeling. Slow the feed rate. Align the rip fence. Wood edges away from rip fence when ripping. Cause Blade is damaged. Blade is out of adjustment. Saw is uneven. Work surface is not mounted securely. Rip fence not mounted correctly. Replace blade if necessary. Clamp screw...screw is out of optional stand. Adjust legs of adjustment. Blade is misaligned. Rip fence is dull. See page 26 on flat surface. Check and adjust the rip fence. Adjust clamp screw clockwise. Rip fence is warped. Blade not properly sharpened or set blade. 38 Reposition on "...


